-->

Friday, July 26, 2013

How to Change file attributes in C# Programming

File attributes are metadata associated with computer files that define system behaviour.  Same as files, folders, volumes and other file system objects may have these attributes. All the operating system have often four attributes i.e. archive, hidden, read-only and system. Windows has more attributes. Read more about File Attributes

User have to right click on desired file or folder and then open properties, to change the attributes of that file or folder. If one want to change attributes of multiple files then he/she has to either select all the files and then change or change attributes of each file or folder one by one.

In programming context we can do this task with a predefined class i.e. FileAttributes which provides all the attributes for files and directories. We can easily change the desired attribute of a file or directory using the above class FileAttributes that is exists in System.IO namespace.

Design a new form in windows form application that will look like the below form:


Change file attributes in C#

There are some controls which are used for specific task in this project, we will discuss them one by one:
  • TextBox: show the path of folder selected by user.
  • Browse Button: open a folderBrowserDialog which select a path of folders and files.
  • CheckBox: if checked program will check all the sub-folders for files.
Except these controls there are three more buttons which are used to play with attributes of files or folders as their text shows. For example "Remove all" will remove all the attributes of files and folder at selected path.

Write the following code in the click event of Only Hidden button:
private void btnSetHidden_Click(object sender, EventArgs e)
        {
            count = 0;
            setHidden(txtPath.Text);
            lblStatus.Text = "Number Of Scanned Files And Folders:" + count.ToString();
        }
In the above code there is an integer variable count that will count the scanned file and folders. Then it will call a function setHidden(string ) that will use the selected path and set the hidden property to true of all the files and folders at that selected path.


The code of this function is:
private void setHidden(string dir)
{
if (!Directory.Exists(dir))
{
lblStatus.Text = "Invalid path!";
return;
}
if (chkSub.Checked)
{
foreach (string d in System.IO.Directory.GetDirectories(dir))
{
count++;
lblStatus.Text = dir;
setHidden(d);
DirectoryInfo df = new DirectoryInfo(d);

df.Attributes = System.IO.FileAttributes.Hidden;
foreach (string fil in System.IO.Directory.GetFiles(d))
{
FileInfo f = new FileInfo(fil);
f.Attributes = System.IO.FileAttributes.Hidden;
Application.DoEvents();
count++;
}
}
}
}
In above code it will change the attribute of a directory and then all the files in that directory. Here, a new Method doEvents() is used which process all windows messages currently in the message queue. Calling this method causes the current thread to be suspended while all waiting window messages are processed. You can read more about DoEvents().

Go for example.

Monday, July 22, 2013

How to prevent duplicate child forms in windows forms C#

In my previous post we have create an MDI container form in which we have opened some individual forms called child forms. Each form contains a property MdiParent that is used to get or set the parent form of a particular form.
Form2 obj = new Form2();
obj.MdiParent = this;
obj.Show();

As we know, in MDI container application user opens multiple child forms at a time. Most often when user opens a child form, application opens a new instance of the form, doesn't matter the form is previously opened or not. This is programmer’s job to check if the same form is previously opened then bring that form to front otherwise create a new instance.

To check the instance is null or not we have to write following code in our code behind file of form that will be the child form.
private static Form3 instance;
public static Form3 GetInstance()
{
if (instance == null)
instance = new Form3 ();
return instance;
}

In above code we have defined a new object of type Form3. Each time when we call this method it will check this object whether it is null or not. If this is null it will create a new instance of the form otherwise it simply return that object.

Our next task is to set the value of that instance to null each time user closes that form. Each form has a FormClosing event which occur whenever user closes the form, before the form will closed. We will set the instance to null in this FormClosing event of the form.
Instance = null;

In the MDI parent form replace the above three line of code with the following code:
Form3 obj = Form3.GetInstance();
obj.MdiParent = this;

if (!obj.Visible)
obj.Show();
else
obj.BringToFront();

Through the above code we will use the newly defined method i.e. GetInstance() in place of its constructor. Now when user opens this child form it will check that if that form is visible then it will bring that in front otherwise display the form to user using show method.

Sunday, July 21, 2013

Filter data in datagridview according to combobox in c#

As we have previously studied that datagridview is used for display rows and columns of data in a grid format in windows form. Mostly data are previously defined which are to be shown in datagridview. Sometimes we have to change the data on basis of some conditions.

In previous post we have learnt to bind a datagridview with search option and in else case all the data from database will bind to datagridview in C# language. In this post we will learn to bind datagridview with the selected index changed event of combobox in C#.

The selection changed event of combobox occurs when the value of selected index property changes. We are going to change our data of datagridview according to that changed value.

Let’s create a student class, which will be used to bind our datagridview, having some properties like below:
public class Student
{
public string Name { get; set; }
public int Age { get; set; }
public string Address { get; set; }
public string Branch { get; set; }
}

Create a new list of student that will be the data source of datagridview and insert some records in that list having branch CS or IT as I have inserted in my example using C# language. Set this list as a data source of datagridview.
dataGridView1.DataSource = studentList;

Now when we run this project all the records will be shown in datagridview. We want to change the data of datagridview according to selection changed event. So write the below code in selection changed event of combobox
if (comboBox1.SelectedItem != null)
{
string branch = comboBox1.Text;
var students = studentList.Where(a => a.Branch.Equals(branch));
dataGridView1.DataSource = students.ToList();
}

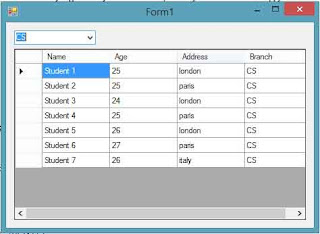
Run this project now and change the selection value of combobox to CS and we will show the data of datagridview have been changed as following image:

Filter data in datagridview according to combobox in c#

Change the selection value to IT and the data will be changed as following image:


Filter data in datagridview according to combobox in c#
Go for example

Sunday, July 7, 2013

Round off value in DataGridView Cell

In most of the situations programmer want to save value in decimal data type, but try to show that value in approximate format. For example we have a variable "income" that have some different value as below
income = 3.57 (stored in database exactly)
income = 3.6 (programmer want to show the user)

The decimal data type can store maximum of 38 digits. It stores exact representation of the number, there is no approximation of the stored value. Decimal data type can be used to store numbers with decimals when the values must store exactly as specified. We can read more about decimal values from http://msdn.microsoft.com/en-us/library/ms187912(v=sql.105).aspx

In above case programmer want to round off that value at run time binding. As we know about datagridview binding in which data will be shown as same as they are stored in our database. When we bind our list to datagridview it means we are binding each cell one by one. If we want to check which cell is binding to what value then we can do this in Cell Formatting event of datagridview.

Datagridview cell formatting event occurs when the contents of a cell need to be formatted for display. If the standard formatting is insufficient, we can customize the formatting by handling this event. This event occurs every time each cell is painted. Go through datagridview cell formatting event if you want to know more about cell formatting event.

Your cell formatting event should look like the below code if you want to round off all the decimal values bind to this datagridview.

private void dataGridView_CellFormatting(object sender, DataGridViewCellFormattingEventArgs e)
{
double decValue;
if (e.Value == null)
return;
if (double.TryParse(e.Value.ToString(), out decValue) == false)
return;
e.Value = Math.Round(decValue);
}

This code will work only with decimal values. It will do nothing if either “value is null” or “value is not type of decimal”. If the value is of type decimal it will round off that value using Math.Round() method. This method rounds a value to its nearest integral value.

Wednesday, July 3, 2013

Use XML file as database

Sometimes, when we are creating small application, we have to use SQL Server database if we don’t know about any alternative solution. SQL Server databases are very familiar with programmers, but if our application is small then we don’t let the user install and maintain any database engine.


We have an alternative solution i.e. XML (Extensible Markup Language) files that is a textual data format. It is widely used for the representation of arbitrary data structures, for example in web services. We can read more about Xml files through http://en.wikipedia.org/wiki/XML.


To work with XML files we use XmlSerializer class that serializes and deserializes objects into and from XML documents. It is in System.Xml.Serialization namespace and enables us to control how objects are encoded into XML. The most important methods in this class are Serialize and Deserialize.


In this article we will serialize a class Person consists of public properties, as shown below:

public class Person
{
     public string Name { get; set; }
     public string FName { get; set; }
     public int Age { get; set; }

}

Write data to XML file:

To write data in XML file we use Serialize method that serializes the specified object and writes the XML document to a file using the specified stream. It takes two parameters.

First parameter will be used to write the data to file, it may be either a FileStream or an XmlWriter. Second parameter is the data that is to be written.


List<Person> personList = new List<Person>();
XmlSerializer serializer = new XmlSerializer(typeof(List<Person>));
using (FileStream stream = new FileStream(Environment.CurrentDirectory + "\\file.xml", FileMode.Create, FileAccess.Write))
{
    serializer.Serialize(stream, personList);
}


In above code


  • Add some data to personList that are to be written to file.
    personList.Add(new Person() { Name = "Student1", FName = "Father1", Age = 25 });
    personList.Add(new Person() { Name = "Student2", FName = "Father2", Age = 24 });
    personList.Add(new Person() { Name = "Student3", FName = "Father3", Age = 26 });
    personList.Add(new Person() { Name = "Student4", FName = "Father4", Age = 23 });

  • Create an object of XmlSerializer class which will decide the type of data that is to be written (list of person here).
  • Create a stream having FileMode Create and FileAccess Write.
  • At the last serialize the list to stream and stream will write it to xml file.

Read data from XML file:


To read data from XML file we use Deserialize method that deserialize the xml document contained by stream. It takes only one parameter i.e. our stream.


List<Person> accessedData = new List<Person&gt
XmlSerializer serializer = new XmlSerializer(typeof(List<Person>));
using (FileStream stream = new FileStream(Environment.CurrentDirectory + "\\file.xml", FileMode.Open, FileAccess.Read))
{
    accessedData = serializer.Deserialize(stream) as List<Person>;
}
dataGridView1.DataSource = accessedData;

In above code
  • Declare a list of person that will hold deserialized data.
  • Create an object of XmlSerializer class which will decide the type of data that is to be read (list of persons here).
  • Create a stream having FileMode Open and FileAccess Read.
  • At the last deserialize the data and convert them to List<Person>.
After successfully deserialize the data in list, i am bind that list to datagridview. When i run the project, my datagridview look like following screenshot:


We can read more about Environment.CurrentDirectory

Saturday, June 29, 2013

Find a control in windows forms

When we drag-n-drop controls in our designer file then we can easily access those controls in our code file directly by its name. But when we dynamically add some controls either in constructor or in load event of form then we can't access them directly in our code.

Let's have an example

  • Add a textbox and a button using drag-n-drop operation on our form i.e. Form1.
  • Leave the name of controls i.e. textBox1 and button1 as they are.
  • Now in constructor add a new textbox dynamically having name "txtBox" with some properties like:

    TextBox txtBox = new TextBox();
    txtBox.Name = "txtBox";
    txtBox.Text = "dynamically added control";
    txtBox.Width = 250;
    txtBox.Location = new Point(10, 10);

    this.Controls.Add(txtBox);
In above code the Name property will be used to find this control. All the remaining properties are familiar to you as in our designer file. At the last we have added this textbox to the form, here the keyword this is pointing Form1.
This form will look like the following screenshot: 

find control in windows form


In click event of button when we will try to access above controls then we notice that "textBox1" will be accessed by its name and "txtBox" will not accessed here.

To access these dynamically added controls we have to use a pre-defined method Find(). This method searches the controls by their name and builds an array as in below code.

Control[] controls = this.Controls.Find("txtBox", false);
foreach (var item in controls)
{
     TextBox txtBox = item as TextBox;
     if (txtBox != null)
        MessageBox.Show("control accessed");
}

In above set of code "controls" will hold the array of all the controls having name "txtBox". One by one we will access items of array and check the type of item. If type of item is TextBox then we found our textbox having name "txtBox".

As we know about naming standards of programming that two controls of the same name cannot exists. Keep in mind the above line, and we are sure that, there will only one control named “txtBox” of type TextBox.

Now we will access the above textbox in one line of code i.e.

TextBox txtBox1 = this.Controls.Find("txtBox", false).First() as TextBox;
if (txtBox1 != null)
 MessageBox.Show("control accessed");

When we run our project and click on button then our form look like this.
find control


© Copyright 2013 Computer Programming | All Right Reserved