-->

Thursday, June 6, 2013

How to use NumericUpDown controls as a Time Control in c#

NumericUpDown control is used when user want some numeric values as input or to show some numeric values to user. It has some properties which are mostly used about this control are:

  • Incrementthis property indicates amount to increment or decrements on each button click.
  • Minimumindicates minimum value for this control.
  • Maximumindicates maximum value for this control.
  • Valueindicates current value of this control.

Most often NumericUpDown control in windows form displays a single numeric value that can be incremented and decremented by clicking up and down buttons on the control.

We can extend this control so that user can enter time using NumericUpDown.
To do this we use two NumericUpDown control in our form, one for inserting hour and one for minutes.

In our Form1.cs (Designer file) drag and drop two NumericUpDown controls and a button from ToolBox. Button will used to show the selected time through its click event.
Now for first NumericUpDown control set
  • Increment  = 1
  • Minimum = 1
  • Maximum = 24
  • Value = 1
And for second NumericUpDown control
  • Increment  = 1
  • Minimum = 1
  • Maximum = 24
  • Value = 1
In click event of button write following code:
numeric updown control
when we run our project and set some values in both numericUpDown control and click on button it will show a message box like:
numeric updown window
Finally we have used these controls as time control.
Download source code.

How to bind TreeView with database table in c# Windows Form

TreeView displays a hierarchical collection of labelled items to the user that optionally contains an image. Microsoft is also using treeview in left side of windows explorer from the time of windows 98 till now.


It is very simple to add a root node with some child nodes to treeview as:
TreeView with database
Now in this article I am going to bind this treeview through a database table having following properties:
TreeView with database
Create a database having single table i.e. TreeNode1 as I have described in my previous post “How to create database using Entity Framework”. To bind treeview to table there should be some records in our table Treenode1, so let add some entries to database like:

TreeView with database
Now to bind treeview with table TreeNode1 write following code in our Form1’s constructor
TreeView with database
Here in the first statement I got all the records which have Parent key = 0 i.e. they will be our root node. Now one by one we will check if any node in database have this node as its parent node, if any, then create that new node to its child node.
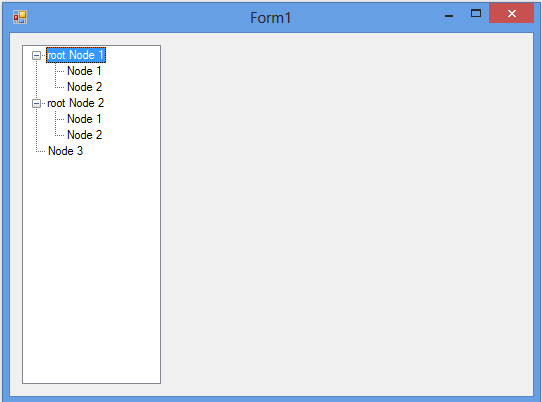
At the last add that root node to treeview and that is it. I have a screenshot also as an example.
TreeView with database
Download source code.

How to bind GridView with search results in c# Windows Forms

There are many cases in which user want to search some records in database that are satisfying a condition and bind them to gridview. So I am writing this post to bind a gridview with search option and in else case all the data from database will bind to gridview.

Now create a new windows form application in visual studio, make a database as I have described in my previous post How to create Database using Entity Framework and add a table i.e. Student having following properties:

bind GridView with search results
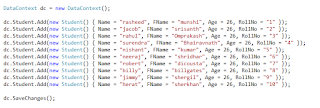
Insert some records in Student table as I have entered following list of items:
Add item to the list
In Form1 designer add two controls TextBox and DataGridView.
Now bind DataGridView to a list that have all the records saved in student table in database.
There is an event of textbox i.e. textchanged event that is raised when the value of text property is changed on control.
In this event of textbox write the following code:
binding data from data list
When you run this project it will show default binding of datagridview as
output screen of the binding data from data list

and when you type some text in textbox then:
searching result of  control
so this datagridview has been bind to search result of textbox.
Download Example.

Sunday, June 2, 2013

How to pass value from one form to another in C#

There are so many cases in which programmer have to pass some values from one form to another, like he/she has a list form and want to edit that record in another form, in that case he/she has to pass a unique key of that record so that record can be processed easily.

We all known about concepts of classes and its constructor. It is a basic approach in Object Oriented Programming to pass some parameters through constructor.

In Visual Studio, by default we have a single form i.e. Form1 in our project, lets add an another form i.e. Form2 and make its constructor same as below:

public Form2(string str = "Nothing has been passed")
{
     InitializeComponent();
     MessageBox.Show(str);
}

Now in Form1 create a button and in click event of that button create an object of Form2 with parameter and finally show that form using Show() method.

private void button1_Click(object sender, EventArgs e)
{
     Form2 obj = new Form2("Pass this parameter");
     obj.Show();
}
A message box will appear with showing the parameter you have passed through constructor. If you have not passed anything then also a message box will appear showing "Nothing has been passed", because i have set its default value.
There are many another methods to pass parameters like, using objects, using properties, using delegates etc. In all these methods I have found that this is so simple and easy method.

Download Example.

How to pass value using public property

How to open a new form and close an existing in c# Windows Forms

As we all know that we don’t want unauthorized users to let them access our programs, so the better approach is to use a login form and then run our main application. For that simple task we have to close our first thread in which login form is running and start a new thread in which our new form will open.

To start a new thread Microsoft provides a class i.e. System.Threading.Thread
In Visual Studio 2012 In which some function have written to play with threads like, Start(), Abort() etc.


First create a new form named login and set this our default form through program.cs, now in login form designer window create a new button having text “Start New thread”. Generate click event of this button and write following set of lines:

start new thread after closing main thread
Here appThread is a variable of type System.Threading.Thread class and LaunchAdminApplication is a function that have work to do now.

In above code, first we have called the constructor of Thread class that needs a parameter, which is name of function, having the work to do. At the last we call Start() function which causes the operating system to change the state of current instance.


run new application
Application.Run() is the same function our program.cs class have which is used to define which form is going to be shown.

So finally Form1 will be the new instance of this windows form application.

Download Example Here.

Saturday, June 1, 2013

Change textbox value according to Combo Box in c# programming: WinForms

In our previous post we have learnt perform binding Combo Box and Listbox, now it’s time to get access their values and use them to bind another controls in winforms. I am binding a combo box with an employee list and them access data in textbox in c# programming.


For example we have a c# class Employee having following properties:

public class Employee
{
        public int No { get; set; }
        public string Name { get; set; }
}

Create an object of type List of employee (in our Form1.cs file) that will be used to in binding of combo Box

List<Employee> empList = new List<Employee>();

To bind with combo Box this list should have some set of items, so we will add some employees with use of following code in our Form1's constructor:

empList.Add(new Employee() { No = 111, Name = "Venkatesh" });
empList.Add(new Employee() { No = 222, Name = "Muthu Kumaran" });
empList.Add(new Employee() { No = 333, Name = "Murli Prasad" });
empList.Add(new Employee() { No = 444, Name = "Ghosh Babu" });
empList.Add(new Employee() { No = 555, Name = "Jacob Martin" });

Now using following two lines of code we will bind our comboBox with this above list of item

comboBox1.DataSource = empList;
comboBox1.DisplayMember = "No";

When Form1 will run, combo Box will have above list of items and textbox will be empty. To display related value of employee name we have to write these two lines of code with combo Box binding:

Employee selectedEmployee = comboBox1.SelectedItem as Employee;
textBox1.Text = selectedEmployee.Name;

Now our article’s main aim is to binding a textbox with combo Box selected value, so there is an Event of combo Box i.e. comboBox_SelectionChanged event. So I will repeat the most recent two lines of code in this event as written below:

private void comboBox1_SelectedIndexChanged(object sender, EventArgs e)
{
     Employee selectedEmployee = comboBox1.SelectedItem as Employee;
     textBox1.Text = selectedEmployee.Name;
}

Check your windows form application, when you change the selected item of combo Box it will also change the related name of Employee in textbox’s text property.

Download Example

How to Perform Binding with DataGridView in WinForms

The DataGridView control provides a powerful and easiest way to display our data in tabular format with entity framework 5. We can use DataGridView as we want to, like we can use it to simply show our read-only data or we can use it with editable views of our data, in c# programming. Access data from the database and perform binding steps to show them in datagridview.

To do binding on DataGridView with our data is straight-forward and in many cases it is as simple as setting the DataSource property of DataGridView. As DataGridView supports standard binding model, so it will bind to some instances of c# classes like DataSet, DataTable, BindingList and BindingSource etc.

The first way to bind our datagridview to table of database is:

studentDataGridView.DataSource = "DataSet Name";
studentDataGridView.DataMember = "Table Name";


Let’s suppose we have a c# class Student having some properties like following:

public class Student
{
       public int Id { get; set; }
       public string Name { get; set; }
       public string RollNo { get; set; }
       public string Branch { get; set; }
}

Now we will bind datagridview to list of students as:

DataContext dc = new DataContext();
var studentList = dc.Student;
studentDataGridView.DataSource = studentList.ToList();

Here ToList() method is used to convert our DbSet<Student> type of data to List<Student> type of data, because DbSet<> type of data cant be directly bind with any control.
Now if we want to bind only Name and Branch column of Student class then:

DataContext dc = new DataContext();
var studentList = from d in dc.Student
select new
{
d.Name,
d.Branch
};
studentDataGridView.DataSource = studentList.ToList();

We can bind our desired columns to datagridview as we have done in above code. DataGridView doesn’t have any mean where is data come from, so we can use conditions in our queries also.

See Also: DataGridView binding with DataSet
© Copyright 2013 Computer Programming | All Right Reserved