-->

Monday, August 12, 2013

Grid Panel Overview in WPF

When a window is added to WPF project then grid is added by default having zero children. It is most often used panel in compare to dock panel, stack panel and other panels. Grid provides no of rows and columns which enables you to arrange the elements without wrapping, stacking. It is like table in programming where we can add no of rows and columns as required.
<Grid>
<Grid.RowDefinitions>
<RowDefinition/>
<RowDefinition/>
</Grid.RowDefinitions>
<Grid.ColumnDefinitions>
<ColumnDefinition/>
<ColumnDefinition/>
</Grid.ColumnDefinitions>
</Grid>
We have to specify the position of each child using either Grid.Row or Grid.Column property of each child in this grid. If we not then it will place all the children in first cell by default.


Grid cells can be either left empty or multiple elements can also be placed in a single cell. Other panels like stack panel or wrap panel can also be used in the grid. Resizing the rows or columns can also be done using Grid Splitter. All this can be also performed by using code behind file.

Grid provides many more in-built functions like sharing width of a column, resizing cells, adding controls to grid and many more.
Canvas panel

Sunday, August 11, 2013

DockPanel Overview in WPF

It is somewhat different with wrap panel. The name Dock panel is created by the word Dock. Dock element provides the user with a way of launching, switching between running applications. Dock panel provides easy docking of elements to an entire side of the panel, stretching it to fill the entire side. It also enables a single element to fill all the remaining space unused by the docked elements.

DockPanel with four children

There are four possible dock in a dock panel i.e. left, top, right and bottom. A children can itself control its dock with these four values. The dock property of any child is left by default. In the above image only four buttons are used, if we add a fifth button in this then the fourth one will shift to bottom and the fifth one will be placed in center like in following image.

DockPanel with five children

Dock panel supports number of children as per requirements. Elements are stacked in the appropriate direction when multiple elements are docked in the same direction. If we will place a sixth element then it will stacked with the First element. The xaml code for the above dock panel image is:
<DockPanel>
<Button Content="First" DockPanel.Dock="Left"></Button>
<Button Content="Second" DockPanel.Dock="Top"></Button>
<Button Content="Third" DockPanel.Dock="Right"></Button>
<Button Content="Four" DockPanel.Dock="Bottom"></Button>
</DockPanel>
Grid panel

WrapPanel Overview in WPF

Wrap panel is similar to stack panel, but while stack panel stacks its items, wrap panel wrap them to additional rows and columns according to provided space. It may be used when the list of items is to be shown. When we are not sure about the item count then wrap panel will wrap the items continuously like in windows explorer.

WrapPanel in WPF

Orientation property of wrap panel is Horizontal by default that is changeable. The above image is simple created by using the following code:
<WrapPanel>
<Button Content="First"></Button>
<Button Content="Second"></Button>
<Button Content="Third"></Button>
<Button Content="Four"></Button>
<Button Content="Five"></Button>
</WrapPanel>
<WrapPanel Orientation="Vertical">
<Button Content="First"></Button>
<Button Content="Second"></Button>
<Button Content="Third"></Button>
<Button Content="Four"></Button>
<Button Content="Five"></Button>
</WrapPanel>

Nested wrap panel can be used in the same way stack panel is used.
Dock panel

How to use Application State, Session State and View State in ASP.NET

Application State : Application state is used to store data corresponding to all the variables of an ASP.NET Web application. The data in application state is stored once and read several times. Application state uses the HttpApplicationstate class to store and share the data throughout the application. You can access the information stored in an applicationstate by using the HttpApplication class property. Data stored in application state is accessible to all the pages of the application and is the same for all users accessing the application. The HttpApplicationstate class provides a lock, method , which you can use to ensure that only one user is able to access and modify the data of an application at any instant of time.

Session State : Each client accessing a Web application maintains a distinct session with the Web server, and there is also specific information associated with each of these sessions. Session state is defined in the <sessionState> section of the web.config file. It also stores the data specific to a user session in session variables. Different session variables are created for each user session. In addition, session variables can be accessed from any page of the application. When a user accesses a page , a session ID for the user is created. The session ID is transferred between the server and the client over the HTTP protocol using cookies.

View State :  View state stores page specific information , when a page is posted back to the server. When a page is processed, the current state of the page and its controls is hashed (transforming a sequence of character into a fixed-length value ) into a string and saved as a hidden field on the page. Such  a state of the page is called view state.

Example of Application State , Session State and View State
Step-1 : Add Global.asax file in your project
Step-2 : Copy this code and paste in your global.asax file


<%@ Application Language="C#" %>
<%@ Import Namespace="WebSite2" %>
<%@ Import Namespace="System.Web.Optimization" %>
<%@ Import Namespace="System.Web.Routing" %>

<script runat="server">

    void Application_Start(object sender, EventArgs e)
    {
        Application["visits"] = 0;
   
    }
 
    void Application_End(object sender, EventArgs e)
    {
        //  Code that runs on application shutdown

    }

    void Application_Error(object sender, EventArgs e)
    {
        // Code that runs when an unhandled error occurs

    }
    void Session_Start(Object sender, EventArgs e)
    {
        Session["mytext"] = "I am a teacher";
     
    }

</script>

Step-3: Add a webform in your project
Step-4: Copy this code and paste to your webform
Source code
<%@ Page Language="C#" AutoEventWireup="true" CodeFile="saexample.aspx.cs" Inherits="saexample" %>
<!DOCTYPE html>
<html xmlns="http://www.w3.org/1999/xhtml">
<head runat="server">
    <title></title>
</head>
<body>
    <form id="form1" runat="server">
    <div>
 
        Enter your name :
        <asp:TextBox ID="TextBox1" runat="server" Height="26px" Width="155px"></asp:TextBox>
        <br />
        <asp:Button ID="Button1" runat="server" OnClick="Button1_Click" Text="Submit" />
        <br />
        <asp:Label ID="Label1" runat="server"></asp:Label>
        <br />
        <br />
        Application State :<br />
        Number of last visit :<br />
        <asp:Label ID="Label2" runat="server"></asp:Label>
        <br />
        <br />
        Session State<br />
        <asp:Label ID="Label3" runat="server"></asp:Label>
        <br />
 
    </div>
    </form>
</body>
</html>


Code Behind file
using System;
using System.Collections.Generic;
using System.Linq;
using System.Web;
using System.Web.UI;
using System.Web.UI.WebControls;

public partial class saexample : System.Web.UI.Page
{
    protected void Page_Load(object sender, EventArgs e)
    {
        Application["visits"] = (int)Application["visits"] + 1;
        Label2.Text = Application["visits"].ToString();
        Label3.Text = (string)Session["mytext"];

    }
    protected void Button1_Click(object sender, EventArgs e)
    {
        string txtvalue = TextBox1.Text;
        ViewState.Add("item", txtvalue);
        string item = (string)ViewState["item"];
        Label1.Text = item;
    }
}

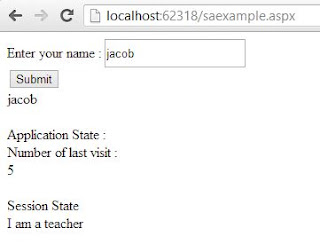
OutPut


How to use Application State, Session State and View State in ASP.NET

Friday, August 9, 2013

How to add control to the footer of Gridview in ASP.NET

Top related post


Add FooterTemplate in Gridview
Source code
<%@ Page Language="C#" AutoEventWireup="true" CodeFile="footercontrol.aspx.cs" Inherits="footercontrol" %>
<!DOCTYPE html>
<html xmlns="http://www.w3.org/1999/xhtml">
<head runat="server">
    <title></title>
</head>
<body>
    <form id="form1" runat="server">
    <div>
        <asp:GridView ID="GridView1" runat="server" AutoGenerateColumns ="false" ShowFooter="True">
            <Columns >
                <asp:TemplateField HeaderText ="header template">
                    <ItemTemplate>
<asp:Label ID="l1" runat ="server" Text ='<% # Eval("Name") %>' />
                    </ItemTemplate>
                    <FooterTemplate>
                        <asp:Button ID="Button1" runat="server" Text="Footer template" />
                    </FooterTemplate>
                </asp:TemplateField>

            </Columns>
        </asp:GridView>
    </div>
    </form>
</body>
</html>
CodeBehind File


using System;
using System.Collections.Generic;
using System.Configuration;
using System.Linq;
using System.Web;
using System.Web.UI;
using System.Web.UI.WebControls;
using System.Data.SqlClient;

public partial class footercontrol : System.Web.UI.Page
{
    protected void Page_Load(object sender, EventArgs e)
    {
        SqlConnection con = new System.Data.SqlClient.SqlConnection();
        con.ConnectionString = ConfigurationManager.ConnectionStrings["ConnectionString"].ToString();
        con.Open();
        System.Data.SqlClient.SqlCommand cmd = new System.Data.SqlClient.SqlCommand();
        cmd.CommandText = "Select * from commentbox";
        cmd.Connection = con;
        System.Data.SqlClient.SqlDataAdapter da = new System.Data.SqlClient.SqlDataAdapter(cmd);
        System.Data.DataSet ds = new System.Data.DataSet();
        da.Fill(ds);
        GridView1.DataSource = ds;
        GridView1.DataBind();
    }
}

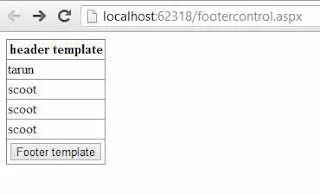
Output
How to add control to the footer of Gridview in ASP.NET


Thursday, August 8, 2013

How to use HTTP Handlers in ASP.NET

HTTP Handlers, as the name suggest, handle user requests for  Web application resources. They are the backbone of the request-response model of web applications. For each user request type, there is a specific event handler to handle the request and send back the corresponding response object.
Each user request to the IIS Web Server flows through the HTTP pipeline, which refers to a series of components (HTTP Modules and HTTP Handlers) to process the request. HTTP Modules act as filters to process the request as it passes through the HTTP pipeline. The request, after passing through the HTTP Modules, is assigned to an HTTP Handlers that determines the response of the server to the user request. The response then passes through the HTTP Modules once again and sends back to the server.

You can define HTTP Handlers in the <httpHandlers> section of a configuration file. The <add> element tag is used to add new handlers and the <remove> elements tag is used to remove existing handlers. To create an HTTP Handlers, you need to define a class that implements an IHttpHandler interface. The two methods of the IHttpHandler interface are:

ProcessRequest ( ) : Invoked when a user request is received. It processes the request using the HttpContext object, which is passed as a parameters.
IsReusable ( ) - Determines whether the HTTP Handler object, accessed using the Processrequest ( ) method , can be reused. The HTTP handler object can only be reused if the IsReusable ( ) method returns a true value. The object is discarded when the HTTP Handlers object returns a false value.

Example of HTTP Handlers in ASP.NET

First need to create a class file CustomHandler.cs


using System;
using System.Collections.Generic;
using System.Linq;
using System.Web;

/// <summary>
/// Summary description for CustomHandler
/// </summary>
namespace CustomHTTP
{
public class CustomHandler : IHttpHandler
{

    public bool IsReusable()
    {
        return true;
    }
    public void ProcessRequest(System.Web.HttpContext context)
    {
        HttpResponse response = context.Response;
        response.Write("<html><body><h2>Example of HTTP Handlers </body></html>");

    }
}
}
Add the code in the section of the web.config file


 <httpHandlers>
      <add verb ="*" path ="CustomHttp.test" type ="CustomHTTP.CustomHandler"/>
 
 
    </httpHandlers>

Wednesday, August 7, 2013

How to use web User Control in ASP.NET

Example of Web User Control

Step-1 : Add Web User Control file in solution explorer name  as " WebUserControl.ascx".
Step-2 :  Drop some controls from tool box to  Designing window of WebUserControl.ascx page .

How to use web User Control in ASP.NET

Step-3 : Add a Web form in Solution explorer name as " usercontroluses.aspx" 
Step-4 : Drop "WebUserControl.ascx " page from solution explorer  to Web form ( usercontroluses.aspx)
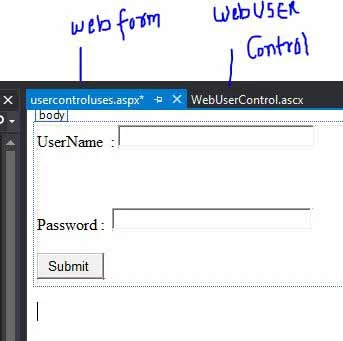
Step-5 :  Check your Web Form designing part .
How to use web User Control in ASP.NET


After dropping your web form contain a single Register directive and  one user defined tag.

<%@ Register src="WebUserControl.ascx" tagname="WebUserControl" tagprefix="uc1" %>

<uc1:WebUserControl ID="WebUserControl1" runat="server" />

Code file of WebUserControl.ascx

<%@ Control Language="C#" ClassName="WebUserControl" %>
<script runat="server">
</script>
<asp:Label ID="Label1" runat="server" Text="UserName"></asp:Label>
&nbsp;:
<asp:TextBox ID="TextBox1" runat="server" Width="189px"></asp:TextBox>
<p>    &nbsp;</p>
<p>    Password :&nbsp;
    <asp:TextBox ID="TextBox2" runat="server" Width="192px"></asp:TextBox>
</p>
<p>
    <asp:Button ID="Button1" runat="server" Text="Submit " />
</p>
Code file of  usercontroluses.aspx


<%@ Page Language="C#" %>
<%@ Register src="WebUserControl.ascx" tagname="WebUserControl" tagprefix="uc1" %>
<!DOCTYPE html>
<script runat="server">
</script>
<html xmlns="http://www.w3.org/1999/xhtml">
<head runat="server">
    <title></title>
</head>
<body>
    <form id="form1" runat="server">
    <div>
 
        <uc1:WebUserControl ID="WebUserControl1" runat="server" />
 
    </div>
    </form>
</body>
</html>

© Copyright 2013 Computer Programming | All Right Reserved