-->

Wednesday, August 28, 2013

How to Design Better UI: Border Control in WPF

Whenever we use a control in our WPF window, it feels a simple look in our design view. Border control is used to draw a border around other control. Borders generally play an important role to generate a better UI for the application. It have some properties as other controls have like:

  • BorderBrush: used to specify color for the border.
  • BorderThickness: thickness of the border. By default it is zero.
  • CornerRadius: denote the degree to which the corner of border are rounded.
And many more common properties as WPF controls have like width, height, alignment properties, background, margin, padding and etc. Consider the following code
<Button Width="200" Height="30" Content="Button Without Border" Grid.Row="0"></Button>
<Border Width="200" Height="30" BorderThickness="2" BorderBrush="Aqua" Grid.Row="1" >
<Button Content="Button With Border"></Button>
</Border>

The first button doesn’t have any border so it will be simple in our window. Look out the second button surrounded by a border control. This border control have some properties assigned in above code. As we can see that in the second button, we did not provide width and height because it has been provided in the border control.

Run the above code and check the two buttons written in the above code:

Design Better UI with Border Control in WPF

Designing a same button with the same border can be easily performed with the following code.
Border border = new Border();
border.Height = 30;
border.Width = 200;
border.BorderBrush = Brushes.Aqua;
border.BorderThickness = new Thickness(2);
border.Child = new Button() { Content = "Button With Border" };
this.Content = border;

This code is also as same as written in the above xaml code. Run this code and a single but same button will be placed in WPF window.

How to use Button Control in ASP.NET

The Button Control

The Button control is used for performing action or generating events. There are two types of buttons are available in DOTNET library , First one is push button and another one is command Button. By Default you use push button if you want to make command button then assign some value to the command name property of the button. Button Control available in System.Web.UI.WebControl Class.
If you want to perform some action on button control then you must use Click event of the button. You can run your JavaScript code in DOTNET easily so If you want to perform client-side events on Button control then you must use OnClientClick property of the Button.
OnClientClick :   The Client-side script that is executed on a client-side OnClick

Example of Client side event and server side event

<%@ Page Language="C#" %>
<!DOCTYPE html>
<script>
    function Welcome() {
        alert("Welcome, Example of client side");
    }
</script>
<script runat="server">

    protected void Button1_Click(object sender, EventArgs e)
    {
        Response.Write("Example of Server Side");

    }
</script>
<html xmlns="http://www.w3.org/1999/xhtml">
<head runat="server">
    <title></title>
</head>
<body>
    <form id="form1" runat="server">
    <div>
        <asp:Button ID="Button1" runat="server" Text="Submit" OnClick="Button1_Click" OnClientClick="Welcome()"  />
    </div>
    </form>
</body>
</html>

Output
How to use Button Control in ASP.NET-Example of client side event
Your OutPut Shows that when you run your application first client side event will be executed after that run your server side event . According to Output diagram your client side code executed first  
<script>
    function Welcome() {
        alert("Welcome, Example of client side");
    }
</script>
After that when you press "OK" button then your Server side code executed.
 protected void Button1_Click(object sender, EventArgs e)
    {
        Response.Write("Example of Server Side");

    }

How to use Button Control in ASP.NET-server side event


How to use Scrolling in WPF: ScrollViewer Control

Most often times in the programming we don’t know about the size of the content to be displayed. The content may be fit in to the allotted area or may be larger than. That’s why in WPF there is a control i.e. ScrollViewer which can enable scrolling of those content whenever the content goes out to the display area.

ScrollViewer makes use of Scroll Bar controls and hooks them up to your content automatically. Just wrap your element in a Scroll Viewer to make it scrollable. I have used a textblock with large content (unfit to allotted area) in a stack panel as in following code in C# language:
<StackPanel>
<TextBlock Text="dotprograming is the latest group in the education field which gives accurate information about programming language"></TextBlock>
</StackPanel>
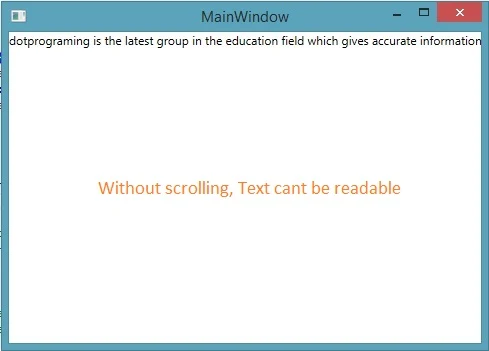
Run the WPF window and look out the result.


Text shown without ScrollViewer control in WPF

In the above image the content have been hidden and we can’t check the content without maximizing the window. But what about if the content is a paragraph. Now try the below code:
 <ScrollViewer HorizontalScrollBarVisibility="Auto">
<StackPanel>
<TextBlock Text="dotprograming is the latest group in the education field which gives accurate information about programming language"></TextBlock>
</StackPanel>
</ScrollViewer>

Run the project and check the result. A horizontal scrollbar has been enabled by the ScrollViewer control as in following image:

TextBlock enabled Scrolling with ScrollViewer control in WPF

The same process can be used when we want to enable vertical scrolling. Scrollbar visibility has four options to select by the user which are:
  • Visible—Scrollbar is always visible, whether it is needed or not.
  • Auto—visible if the content is big enough, hidden otherwise.
  • Hidden—always invisible but scrolling can be done using the arrow keys.
  • Disabled—always invisible and doesn’t exist.

How to open and close connections with ADO.NET

ADO.NET enables applications to connect to data sources and manipulate the data.  In ADO.NET object model, the data is retrieved through a data provider. An application can access data either through a dataset or a data reader.

You have to create a connection and then provide connection string, to move data between data source and an application. SqlConnection class is used to open a connection and also have some more methods:
  • ConnectionString: It is a property provides information like database name and data source.
  • Open (): used to open a connection. It Needs connection string to open a connection.
  • Close (): used to close an existing connection.
For example, the following code will create an object of SqlConnection class and then create a connection a connection string to the database in c# language.
SqlConnection connection = new SqlConnection();
connection.ConnectionString = “Data Source=(LocalDB)\v11.0;Initial Catalog=StockDb; Integrated Security=True”;

Here in the above code i have used the connection string of database name "StockDb". After you have defined the connection string, you need to open the connection by using open() method as written below
connection.Open();

Do all your work related to database and at the last you have to close the connection using close() method as written below
connection.Close();

How to use RadioButton Control in ASP.NET

The RadioButton Control

Similar to the CheckBox control , a RadioButton control creates a single radio button . The RadioButton control exists within the System.Web.UI.WebControls namespace . The RadioButton controls can be grouped, where only one RadioButton control can be selected at a time. In web forms, You have to set the RadioButton's GroupName property to the same value to associate them into a group.

Use of the RadioButton

  • Where you want to select only single item in given multiple items.
  • In BioData Forms you have to select gender
How to use RadioButton Control in ASP.NET

Public Properties of the RadioButton Class

GroupName : Obtains the name of the group to which radio button belongs.

Example of RadioButton Control in ASP.NET


<%@ Page Language="C#" %>

<!DOCTYPE html>

<script runat="server">

    protected void RadioButton1_CheckedChanged(object sender, EventArgs e)
    {
        result.Text = "You have Selected <br/>" + RadioButton1.Text;
        RadioButton2.Checked = false;

    }

    protected void RadioButton2_CheckedChanged(object sender, EventArgs e)
    {
        result.Text = "You have Selected <br/>" + RadioButton2.Text;
        RadioButton1.Checked = false;

    }
</script>

<html xmlns="http://www.w3.org/1999/xhtml">
<head runat="server">
    <title></title>
</head>
<body>
    <form id="form1" runat="server">
    <div>
        <h3>RadioButton Example

    </h3>
        <h3>Select The car you want to Buy</h3>
        <p>
            <asp:RadioButton ID="RadioButton1" runat="server" AutoPostBack="True" OnCheckedChanged="RadioButton1_CheckedChanged" Text="Maruti Zen" />
        </p>
        <p>
            <asp:RadioButton ID="RadioButton2" runat="server" AutoPostBack="True" Text="Honda City" OnCheckedChanged="RadioButton2_CheckedChanged" />
        </p>
        <p>
            <asp:Label ID="result" runat="server"></asp:Label>
        </p>

    </div>
    </form>
</body>
</html>

OutPut
How to use RadioButton Control in ASP.NET

Tuesday, August 27, 2013

How to use CheckBoxList Control in ASP.NET

The CheckBoxList Control

you can use a CheckBoxList control to display a number of check boxes at once as a column of check boxes. The CheckBoxList control exists within the System.Web.UI.WebControls namespace. This control is often useful when you want to bind the data from a datasource to checkboxes . The CheckBoxList control creates multiselection checkbox groups at runtime by binding these controls to a data source.


Use of CheckBoxList Control

  • Where you find multiple options.
  •  In Shoping Site where you find sub category under category 
How to use CheckBoxList Control in ASP.NET

Example of CheckBoxList Control in ASP.NET 

<%@ Page Language="C#" %>

<!DOCTYPE html>

<script runat="server">
protected void CheckBoxList1_SelectedIndexChanged(object sender, EventArgs e)
    {
        string s = "Your selected books are<br/>";
        foreach (ListItem s1 in CheckBoxList1.Items)
        {
            if (s1.Selected)
            {
                s = s + s1.Text + "<br/>";


            }
        }
        result.Text = s;

    }

    protected void Page_Load(object sender, EventArgs e)
    {
     
    }
</script>

<html xmlns="http://www.w3.org/1999/xhtml">
<head runat="server">
    <title></title>
</head>
<body>
    <form id="form1" runat="server">
        <div >
Select Your Favorite books:<br />
            <asp:CheckBoxList ID="CheckBoxList1" runat="server" AutoPostBack="True">
                <asp:ListItem>ASP.NET </asp:ListItem>
                <asp:ListItem>WINDOWS FORMS</asp:ListItem>
                <asp:ListItem>WPF</asp:ListItem>
                <asp:ListItem>WCF</asp:ListItem>
                <asp:ListItem>JAVA SCRIPT</asp:ListItem>
            </asp:CheckBoxList>


        </div>
        <asp:Label ID="result" runat="server"></asp:Label>
    </form>
</body>
</html>


Output
How to use CheckBoxList Control in ASP.NET

This example shows that you can choose multiple item in given list. Here foreach loop is running from starting index to ending imdex. When you select ASP.NET book item in the given list then your item will appear on the Label control under the CheckBoxList. If you again select Windows Forms Book in given list , PostBack will occurs and your result will appear on Label Control with previous result.   

Monday, August 26, 2013

Print Image using PrintDialog Box

To print images in windows forms Graphics class and its various methods are used. Graphics class provides methods for sending objects to a device such as printer. Add a printDocument,  printDialog and a button to the windows form application.

In the code behind file create an object of Bitmap class which will be used to create an image. Write a function to capture the screen to be printed just like written in the below code:
private void CaptureScreen()
{
Graphics graphics = this.CreateGraphics();
graphics.DrawRectangle(Pens.Black, 50, 50, 300, 100);
image = new Bitmap(300, 300, graphics);
Graphics g = Graphics.FromImage(image);
g.CopyFromScreen(this.Location.X, this.Location.Y, 0, 0, this.Size);
}
In the above code a rectangle will be drawn at the given location. CopyFromScreen() function used to performs a bit-block transfer of the color data, corresponding to a rectangle of pixels, from the screen to the drawing surface.

In the click event of code write the following code:
CaptureScreen();
printDocument1.PrintPage += printDocument_PrintPage;
printDialog1.Document = printDocument1;
DialogResult res = printDialog1.ShowDialog();
if (res == DialogResult.OK)
printDocument1.Print();
The above code is somewhat same to the code used in printing text except the calling of CaptureScreen() method.

Print page event of print document should be look like:
void printDocument_PrintPage(object sender, PrintPageEventArgs e)
{
e.Graphics.DrawImage(image, 50, 100);
}

Run the project and click on print button. On the print Dialog box click on ok with selected printer and it will print whatever is on your screen at the given points. When I print this then it had printed as the following image:

Print image using PrintDialog Box
See also: Printing Text
© Copyright 2013 Computer Programming | All Right Reserved