-->

Saturday, September 7, 2013

Bind ListView Control with Grid Resource: WPF

Grid resource provides a way to reuse the objects and values by other controllers, as we studied in previous posts. In this article we will bind the listview with Grid resource defined in XAML code:
<Grid.Resources>          
<x:ArrayExtension Type="{ x:Type sys:String}" x:Key="placesSource">
<sys:String>London</sys:String>
<sys:String>Italy</sys:String>
<sys:String>California</sys:String>
<sys:String>France</sys:String>
</x:ArrayExtension>
</Grid.Resources>

This resource is the same in our recent article about listbox binding with grid resource. Write the following code in XAML to bind the above resource:
<ListView Name="listView" ItemsSource="{StaticResource placesSource}">
</ListView>

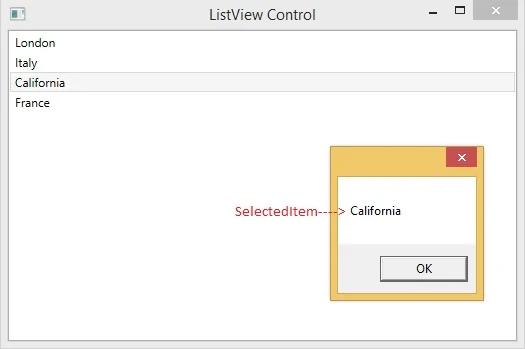
When we run this project then it will bind the above data with listview as shown in following image:


To get selected item from this listview, write following code in the selectionChanged event of the listview:
private void listView_SelectionChanged(object sender, SelectionChangedEventArgs e)
{
string selectedValue = listView.SelectedItem.ToString();
MessageBox.Show(selectedValue);
}

Run the code and change the selection, a message box will display with the selected value.

Introduction of ListView Control: WPF

I have discussed about Listbox control introduction, its binding with grid resource and a list of string, in my previous posts. Now the next is ListView control, which is inherited by the listbox class. It means it have all the features of listbox and included some new features also.

ListView control provides some layouts to display the data bound to it. A simple listview, with some width and height, can be coded by following XAML code:

<ListView Name="listView" Height="300" Width="200" />

A listview can contain any type of items, it may be string, a class or it may be from database. We can show some items as same as in listbox control like:
<ListView Name="listView" Height="300" Width="200" >
<ListView.Items>
<ListViewItem>First Item</ListViewItem>
<ListViewItem>Second Item</ListViewItem>
<ListViewItem>Third Item</ListViewItem>
<ListViewItem>Fourth Item</ListViewItem>
</ListView.Items>
</ListView>

The above XAML code will add a listview with four items as shown in following image. In the image no items have been selected. We can select the item with IsSelected property to true, the more containing this property to true, the more will get selected.

ListView control introduction in WPF C#

When we talk about the properties, it have much more like listbox and some extra i.e. View, which is used to define the infrastructure for the data. We can show the data in tabular format using gridview control in the view mode of listview control. In the next article we will bind this listview control.

How to create a Subdirectory in C#

To maintain or store files on our systems, we may need to create subdirectory within a directory. Now,let's see how to create a sub directory within an existing directory. Perform the following steps to create a subdirectory within an existing directory.

Complete code of How to create sub directory 


using System;
using System.Collections.Generic;
using System.ComponentModel;
using System.Data;
using System.Drawing;
using System.Linq;
using System.Text;
using System.Threading.Tasks;
using System.Windows.Forms;
using System.IO;

namespace WindowsFormsApplication2
{
    public partial class Form5 : Form
    {
        public Form5()
        {
            InitializeComponent();
        }

        private void button1_Click(object sender, EventArgs e)
        {
            string dirpath = textBox1.Text;
            DirectoryInfo dirinfo = new DirectoryInfo(dirpath);
            string newsub = textBox2.Text;
            dirinfo.CreateSubdirectory(newsub);
            label3.Text = "your subdirectory " + newsub + " is created  at " + dirpath;


        }
    }
}

Output
How to create a Subdirectory in C#

How to create a Subdirectory in C#


Friday, September 6, 2013

How to create a Directory in C#

Using The Directory class

The Directory class exposes static methods to create ,move and enumerate directories and subdirectories. This class is located under the System.IO namespace and is not inherited by any other class. Using the Directory class, we can accomplish a number of operations, such as moving a directory from one location to another and remaining a directory. We do not need to create objects of the Directory class because this class provides static methods. A drawback of the Directory class is that it takes longer time to execute, since every time we call a method, The Directory class performs a security check.

Take a Example of Create a new Directory

using System;
using System.Collections.Generic;
using System.ComponentModel;
using System.Data;
using System.Drawing;
using System.Linq;
using System.Text;
using System.Threading.Tasks;
using System.Windows.Forms;
using System.IO;

namespace WindowsFormsApplication2
{
    public partial class Form4 : Form
    {
        public Form4()
        {
            InitializeComponent();
        }

        private void button1_Click(object sender, EventArgs e)
        {
            string path = @"c:\" + textBox1.Text;
            if (!Directory.Exists(path))
            {
                Directory.CreateDirectory(path);
                label2 .Text =@"You directory has baan created in c:\";

            }
            else
            {
                if (Directory.Exists(path))
                {
                 
                    label2.Text = @"You directory already exist in c:\";

                }

            }
        }
    }
}


Output


How to create a Directory in C#How to create a Directory in C#

How to create a Directory in C#


How to Bind ComboBox with List: WPF

The same procedure will be follow up as in listbox binding. In the XAML define a combobox with some common properties you want as height, width and etc. Don’t forget the name property, because it will be used to assign itemsSource for this control.

<ComboBox Name="comboBox" Width="200"/>

Create a list of type string and add some items with Add() method of list. I have added the same items as in grid resources.
List<string> strList = new List<string>();
strList.Add("London");
strList.Add("Italy");
strList.Add("California");
strList.Add("France");
comboBox.ItemsSource = strList;

Just run the code and the same window will be shown with a combobox containing above four items.

Combobox binding with List control WPF c#

Combobox also have a property selectedIndex which is used to get or set the selected index of the control. To select an item by default we can use this property as:

comboBox.SelectedIndex = 2;

Write the above line of code just below the c# code, and California will be selected.

How to Bind ListBox with List: WPF

According to the previous post we don’t need to define the items first. Means the source having the items to be bind with listbox. In the XAML define a listbox with some common properties you want as height, width and etc. Don’t forget the name property, because it will be used to assign itemsSource for this control.

<ListBox Name="listBox" Width="200"/>

Create a list of type string and add some items with Add() method of list. I have added the same items as in grid resources.
List<string> strList = new List<string>();
strList.Add("London");
strList.Add("Italy");
strList.Add("California");
strList.Add("France");
listBox.ItemsSource = strList;

Just run the code and the same window will be shown with a listbox containing above four items.

Binding of Listbox with C# List: WPF

Listbox have a property selectedIndex which is used to get or set the selected index of the control. To select an item by default we can use this property as:

listBox.SelectedIndex = 2;

Write the above line of code just below the c# code, and California will be selected.

How to Bind ListBox with XAML Grid Resource: WPF

In the previous article, we have learnt about the listbox and some of the properties of listbox. Resources provide a way to reuse the objects and values by other controllers in the code. As we created a grid resource in the combobox binding, that resource can be used here easily.

Just review the grid resource written as below, where type indicates the type of values defined in it, and the key name will be used to bind other control through it.
<Grid.Resources>          
<x:ArrayExtension Type="{ x:Type sys:String}" x:Key="cmbPlacesSource">
<sys:String>London</sys:String>
<sys:String>Italy</sys:String>
<sys:String>California</sys:String>
<sys:String>France</sys:String>
</x:ArrayExtension>
</Grid.Resources>

Now add a listbox and use its itemsSource property. This property is used to get or set a collection used to generate the content of itemscontrol.
<ListBox Name=”listBox” Width="200"
ItemsSource="{StaticResource cmbPlacesSource}">
</ListBox>

This will show the above items in this listbox as shown in following diagram.

Listbox binding with grid resource: wpf

As the items increases or height decreases, this control will use scroller to view the extra items. Let me set height of above listbox to 30 and lookout the output.

Listbox binding with grid resource plus scrolling: WPF

We can get the selected item’s value from the selection changed event of this control. Write the following code in selection Changed event of listbox
private void listBox_SelectionChanged(object sender, SelectionChangedEventArgs e)
{
string selectedValue = listBox.SelectedItem.ToString();
MessageBox.Show(selectedValue);
}

It will show a message, containing the selected item, each time when the selection changed of the listbox control.
Select an Item in listbox binding WPF

© Copyright 2013 Computer Programming | All Right Reserved