-->

Sunday, April 27, 2014

How to Create Rule and User Defined Data Type in SQL

A rule enforces domain integrity for columns or user-defined data types. The rules is applied to the column of the user-defined data type before an INSERT or UPDATE statement is issued. In other words, a rule specifies a restriction on the values of a column or a user-defined data type. Rules are used to implement business-related restrictions or limitations. A rule can be created by using the CREATE RULE statement.

The syntax of the CREATE RULE statement is:
CREATE RULE rule_name AS conditional_expression
Where,

  • Rule_name specifies the name of the new rule that must conform to rules for identifiers.
  • Conditional_expression specifies the condition(s) that defines the rule. It can be any expression that is valid in a WHERE clause and can include elements, such as arithmetic operators, relational operators, IN, LIKE, and BETWEEN.

The variable specified in the conditional expression must be prefixed with the @ symbol. The expression refers to the value that is being specified with the INSERT or UPDATE statement.

In the preceding example of the EmployeeLeave table, you applied a rule to accept only three values: ‘CL’, ‘SL’, and ‘PL’. You can perform the same task by creating a rule. You can use the following statement to create the rule:
CREATE RULE rulType
AS @LeaveType IN (‘CL’, ‘SL’, ‘PL’)

After you create the rule, you need to activate the rule by using a stored procedure, sp_bindrule.

The syntax of sp_bindrule is:
Sp_bindrule <’rule’>, <’object_name’>, [<’futureonly_flag’>]
Where,

  • Rule specifies the name of the rule that you want to bind.
  • Object_name specifies the object on which you want to bind the rule.
  • Futureonly_flag applies only when you want to bind the rule to a user-defined data type.

Using a user defined data type

User-defined data types are custom data types defined by the users with a custom name. User-defined data types allow modifying the composite data type used in the database. The user-defined data types are based on the system data types and can be used to predefine several attributes of a column, such as its data type, length, and whether it supports NULL values.

You can create user-defined data types by using the CREATE TYPE statement. The syntax of the CREATE TYPE statement is:
CREATE TYPE [schema_name. ] type_name {FROM base_type [ ( precision [, scale ] ) ] [ NULL | NOT NULL ] } [;]
Where,

  • Schema_name specifies the name of the schema to which the alias data type or the user-defined data type belongs.
  • Type_name specifies the name of the alias data type or the user-defined data type.
  • Base_type specifies the SQL Server supplied data type on which the alias data type is based.
  • Precision specifies the decimal or numeric point. Decimal and numeric are non-negative integers that indicate the maximum total number of decimal digits that can be stored, both to the left and to the right of the decimal point.
  • Scale specifies the decimal or numeric scale.
  • NULL | NOT NULL specifies whether the data type can hold a null value. If not specified, NULL is the default value.

The following SQL query creates a user-defined data type for descriptive columns:
CREATE TYPE DSCRP
FROM varchar (100) NOT NULL;

In the preceding example, a user-defined data type DSCRP is created to store the varchar data type and the size limit is specified as 100. Further, it also specifies NOT NULL. Therefore, you can use this data for the columns that hold description, address, and reason.

For example, you can use the DSCRP data type to store the data of the LeaveReason column of the EmployeeLeave table, as shown in the following statement:

CREATE TABLE HumanResources.EmployeeLeave
(
EmployeeID int CONSTRAINT fkEmployeeID FOREIGN KEY REFERENCES
HumanResources.Employee (EmployeeID),
LeaveStartDate datetime CONSTRAINT cpkLeaveStartDate PRIMARY KEY (EmployeeID, LeaveStartDate),
LeaveEndDate datetime NOT NULL,
LeaveReason DSCRP,
LeaveType char(2) CONSTRAINT chkLeave CHECK (LeaveType IN (‘CL’, ‘SL’, ‘PL’)) CONSTRAINT chkDefLeave DEFAULT ‘PL’)

Solve Decision-Making Expression using Logical Operators in JAVA

Relational operators often are used with logical operators (also known as conditional operators sometimes) to construct more complex decision-making expression. The Java programming language supports six conditional operators-five binary and one unary-as shown in the following image.


The logical OR operator (||)

The logical OR operator (||) combines two expressions which make its operands. The logical OR (||) operator evaluates to Boolean true if either of its operands evaluate to true.

This principle is used while testing evaluating expressions. Following are some examples of logical OR operation:

  • (4= =4) || (5 = =8)    results into true because first expression is true.
  • 1 = = 0 || 0 > 1         results into false because neither expression is true (both are false).
  • 5 > 8 || 5 < 2            results into false because both expression are false.
  • 1 < 0 || 8 > 0            results into true because second expression is true.

The operator || (logical OR) has lower precedence than the relational operators, thus, we don’t need to use parenthesis in these expressions.

The logical AND operator (&&)

The logical AND operator, written as &&, also combines two expressions into one. The resulting expression has the value true only if both of the original expression (its operands) are true. Following are some examples of AND operator (&&).

  • (6 == 3) && (4 == 4)           results into false because first expression is false.
  • (4 == 4) && (8 == 8)           results into true because both expressions are true.
  • 6 < 9 && 4 > 2                     results into true because both expressions are true.
  • 6 > 9 && 5 < 2                     results into true because both expressions are false.

Because logical AND operator (&&) has lower precedence than the relational operators, we don’t need to use parentheses in these expressions.

The logical NOT operator (!)

The logical NOT operator, written as "!", works on single expression or operand i.e. it is a unary operator. The logical NOT operator (!) negates or reverses the truth value of the expression following it i.e. if the expression is true, then expression is false, and vice versa.

Following are some examples of logical NOT operation:

  • ! (5 ! = 0) results into false because 5 is non zero (i.e., true)
  • ! (5 >2) results into false because the expression 5>2 is true.
  • !(5>9)  results into true because the expression 5>9 is false.

The logical negation operator "!" has a higher precedence then any of the relational or arithmetic operators. Therefore, to negate an expression, you should enclose the expression in parentheses:

!( x > 5 ) will reverse the result of the expression x > 5
    Whereas! x > 5 is equivalent to ( ! x ) > 5

i.e., it will first reverse the truth value of x and then test whether the reverse of x’s truth value is greater than 5 or not.

Relational Operators in JAVA

Compare Values using Relational Operators in JAVA

In the term relational operator, relational refers to the relationships that values (or operands) can have with one another. Thus, the relational operators determine the relation among different operands.

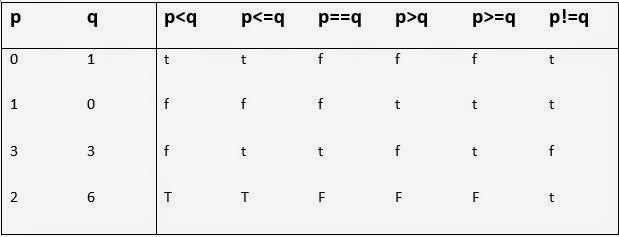
Java provides six relational operator for comparing numbers and characters. But they don’t work with strings. If the comparison is true, the relational expression results into the Boolean value true and to Boolean value false, if the comparison is false. The six relational operators are:

  • < (less than)
  • <= (less than or equal to)
  • == (equal to)
  • > (greater than)
  • >= (greater than or equal to) and
  • != (not equal to)

Summarizes the action of these relational operators.

Compare Values using Relational Operators in JAVA

t represents true and f represents false.
The relational operators have a lower precedence than the arithmetic operators. That means the expression
a + 5 > c – 2  ...expression 1
Corresponds to
( a + 5 ) > ( c – 2 ) ...expression 2
And not the following
a + ( 5 > c ) -2  …expression 3

Though relational operators are easy to work with, yet while working with them, sometimes you get unexpected results and behavior from your program. To avoid so, we would like you to know certain tips regarding relational operators.
Do not confuse the = and the = = operators.
A very common mistake is to use the assignment operators (=) in place of the relational operator (==). Do not confuse the testing the operator (==) with the assignment operator (=). For instance, the expression
Value = 3
Tests whether value is equal to 3? The expression has the Boolean value true if the comparison is true and Boolean false if it is false.

But the expression
Value = 3
Assigns 3 to value. The whole expression, in the case, has the value 3 because that’s the value of the left-hand side.
Avoid equality comparisons on floating-point numbers.
Floating-point arithmetic is not as exact and accurate as the integer arithmetic is. For instance, 3 X 5 is exactly 15, but 3.25 X 5.25 is nearly equal to 17.06 (if we are working with number with 2 decimal places). The exact number resulting from 3.25 X 5.25 is 17.0625.

Therefore, after any calculation involving floating-point numbers, there may be a small residue error. Because of this error, you should avoid the equality and inequality comparisons on floating-point number.
The relational operators group Left-to-right i. e., a <b<c means (a <b) < c and not a < ( b < c ).

Postfix version of operators 

How to use LINQ Conversion operators in ASP.NET

Introduction

Conversion operators convert a collection to an array. A Conversion operator changes the type of input objects. The different Conversion operators are ToSequence, ToArray, ToList, ToDictionary, ToLookup, OfType, and Cast.
The ToSequence clause simply returns the source argument by changing it to IEnumerable<T>. The ToArray clause enumerates the source sequence and returns an array containing the elements of the sequence. The ToList clause enumerates the source sequence and returns a List<T> containing the elements of the sequence. The ToDictionary clause lists the source sequence and evaluates the keySelector and elementSelector functions for each element to produce the element key and value of the source sequence. The ToLookup clause implements one-to-many dictionary that maps the key to the sequence of values. The OfType clause allocates and returns an enumerable object that captures the source argument. The Cast clause also allocates and returns an enumerable object that captures the source argument.
The syntax of the ToList clause is:


For C#
public static List<T> ToList<T>( this IEnumerable<T> source);

Lets take an simple example

<form id="form1" runat="server">
    <div>
 
        <asp:ListBox ID="ListBox1" runat="server" Height="143px" Width="143px">
        </asp:ListBox>
        <br />
        <asp:Button ID="Button1" runat="server" onclick="Button1_Click"
            Text="String type" />
        <asp:Button ID="Button2" runat="server" onclick="Button2_Click"
            Text="Integer Type" />
 
    </div>
    </form>
Code Behind
protected void Button1_Click(object sender, EventArgs e)
    {
        ListBox1.Items.Clear();
        var strtype = list.OfType<string>();
        ListBox1.Items.Add("String type value");
        foreach (var item in strtype)
        {
            ListBox1.Items.Add(item);
        }
    }
    protected void Button2_Click(object sender, EventArgs e)
    {

        ListBox1.Items.Clear();
        var strtype = list.OfType<int>();
        ListBox1.Items.Add("integer type value");
        foreach (var item in strtype)
        {
            ListBox1.Items.Add(item.ToString ());
        }

    }
Code Generate the following output
How to use LINQ Conversion operators in ASP.NET

How to use LINQ Conversion operators in ASP.NET

Saturday, April 26, 2014

How to use LINQ Set Operators in ASP.NET

Introduction

The Set operators in LINQ refer to the query operations that produce a result set. The result is based on the presence or absence of the equivalent elements that are present within the same or separate collection. The Distinct, Union, Intersect, and Except clauses are classified as the Set operators. The Distinct clause removes duplicate values from a collection.
The syntax of the Distinct clause is:
For C#
public static IEnumerable<T> Distinct<T>( this IEnumerabIe<T> source);

The Union clause returns the union of two sets. The result elements are the unique elements that are common in the two sets.
The syntax of the Union clause is:
For C#
public static IEnumerabIe<T> Union<T>( this IEnumerabIe<T> source1, IEnumerabIe<T> source2);

The Intersect clause returns the set intersection. The elements appear in each of the two collections.
The syntax of the Intersect clause is:
For C#
public static IEnumerabIe<T> Intersect<T>( this IEnumerabIe<T> source1, IEnumerabIe<T> source2);
The Except clause returns the set difference. The result of the Except clause returns the elements of one collection that do not appear in the second collection.
The syntax of the Except clause is:
For C#
public static 1Enumerable<T> Except<T>( this 1Enumerable<T> sourcel, IEnumerab1e<T> source2);

lets take an simple example

Source Code
<form id="form1" runat="server">
    <div>
    
    </div>
    <asp:ListBox ID="ListBox1" runat="server" Height="137px" Width="221px">
    </asp:ListBox>
    <br />
    <asp:Button ID="Button1" runat="server" onclick="Button1_Click" 
        Text="common word" />
    </form>
Code behind
protected void Button1_Click(object sender, EventArgs e)
    {
        string[] fruits = { "apple", "mango", "banana" };
        string[] wds = { "my world", "mango", "operation" };
        var common = fruits.Intersect(wds);
        ListBox1.Items.Add("common in both array");
        foreach (var item in common)
        {
            ListBox1.Items.Add(item);
        }
    }
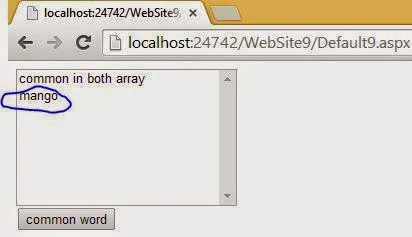
Code Generate the following output
How to use LINQ Set Operators in ASP.NET

How to add hour, minute and seconds in existing time ASP.NET Example

Introduction

If you want to add hour, minute and seconds in existing time then you should take TimeSpan structure with overload function. Now, you can easily add TimeSpan structure with existing date time object using Add method. Lets take an simple example for demonstration.
Step-1 : Add new web form into the project
Step-2 : Add one button and label control on it.
Step-3 : Handle Button click event.

<form id="form1"
    runat="server">
    <asp:Button ID="Button1"
    runat="server"
    BackColor="#33CCFF"
    onclick="Button1_Click"
    Text="Click" />
    <div>  
    <asp:Label ID="Label1"
    runat="server"
    BackColor="Yellow"></asp:Label>  
    </div>
    </form>
Code Behind
 protected void Button1_Click(object sender, EventArgs e)
        {          
            DateTime now = DateTime.Now;    
            TimeSpan TR = new TimeSpan(3, 41, 11);
            DateTime afterAddedSpanTime = now.Add(TR);
            Label1.Text = "current time : " + now.ToLongTimeString();
            Label1.Text += "<br /><br />";
            Label1.Text += "after added a spantime with current time <br />";
            Label1.Text += "time span: 3 hours|41 minutes|11 seconds <br />";
            Label1.Text += afterAddedSpanTime.ToLongTimeString();

        }
Code Generate the following output
How to add hour, minute and seconds in existing time ASP.NET Example

How to show AM and PM with time in ASP.NET

Introduction

You can show System time as well as universal time through DateTime class. Now, this time you want to show only am and pm text after the current time. You can use "tt" in the ToString ( ) method. Lets create an simple algorithm.
Step-1 : Take a web form into the project
Step-2 : Add two control (button and label control) onto the form window.
Step-3 : Raise button click event
Step-4 : Take single instance of DateTime class also pass "tt" parameter in ToString ( ) method.
Step-5 : Now Run your application from green triangle button or Ctrl+f5

Complete Source Code

<form id="form1" runat="server">
    <div>
   
        <asp:Button ID="Button1"
         runat="server"
         onclick="Button1_Click"
         Text="Click"
         BackColor="#99CCFF" />  
    </div>
        <asp:Label ID="Label1"
        runat="server"
        Text="Label"
        BackColor="Yellow"></asp:Label>
    </form>
Code Behind
 protected void Button1_Click(object sender, EventArgs e)
        {
          DateTime now = DateTime.Now;          
            Label1.Text = "current time PM AM: " + now.ToLongTimeString();
            Label1.Text += "<br /><br />";          
            Label1.Text += "current time [PM AM]: " + now.ToString("tt");

        }
Code generate the following output
How to show AM and PM with time in ASP.NET
© Copyright 2013 Computer Programming | All Right Reserved