-->

Sunday, May 11, 2014

C# - Program Structure

Introduction

Now, we will learn basic structure of the c# program as well as building blocks. In this article, we will cover only basic structure of c#. In this article we will learn sample code plus provide additional background information.

C# Hello World! Example
Simple c# program should take some minimum functionality


  • Imported namespace ( How to use libraries)
  • Namespace declaration (How to create new Namespace in c#)
  • A class (How to design a class in c#)
  • Class methods (Default class consist of single main() method, you can take other methods)
  • Class Properties(it shows the behavior of the class as well as object)
  • A Main method (its the entry point of the c# program)
  • Statements & Expressions (You can put your ideas using statements and expression)
  • Comments (Design user friendly using comments)


Lets take a simple that would print Hello World!, I have visual studio 2013 , you can take 2005 and above version.

using System;
using System.Collections.Generic;
using System.Linq;
using System.Text;
using System.Threading.Tasks;

namespace csharpprogram
{
    class Program
    {
        static void Main(string[] args)
        {
            Console.WriteLine("Hello World");
            Console.ReadKey(false);
        }
    }
}

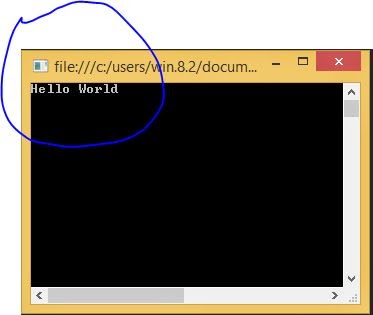
If you want to compile and execute this code, press green triangle button, which is mentioned in VS IDE and see your result
C# - Program Structure- Hello world output

Ok, Now understand what is in this program:

  • The first five line of the program using System; and etc - the using keyword is most important keyword in c# library, you can take it in different purpose like The using block is used, where you want to deallocate resources forcefully. Also used where you want to add library references in the code. A program generally has multiple using statements.
  • The next line has the namespace declaration. A namespace is a collection of classes, enum , delegates , structure and etc, also its not a replacement of assemblies. Here csharpprogram namespace consists of single Program class.
  • The next line has a class declaration, the class Program contains data members and member functions, also known as encapsulation, which is discuss later. The data members shows the properties of the object and member functions shows behavior of the object. Like, we take a person as a object then we can take person name, person id, person address, etc as a data member and person_walk consider in member function. 
  • The next line defines the Main method, which is the entry point for all C# programs.  The main method consists of various statement. In our c# program, we can take multiple main methods.
  • The next line defines the WriteLine( ) method, which return the string output onto the screen. It is included in Console class , which is in System Namespace.
  • Using the Console.ReadKey( ) method, which is overloaded by boolean values. You can take true as well as false as a argument in it. False parameter shows presses key onto the screen. Using This method compiler wait for a key press and it prevents the screen from running and closing quickly when the program is launched from Visual Studio .NET. 
Note: Some Basic concepts about c#
  1. C# is a case sensitive language.
  2. Statement and expression end with semicolon(;)
  3. Always C# program start from main method.
How to Compile & Execute a C# Program: lets check this video.
Saturday, May 10, 2014

How to find month name in asp.net c#

Using the CultureInfo, you can get calendar information such as date, current month, current date etc. In this program we will get month name. Using the parameterized GetMonthName ( ) method , you can  retrieve month information.
<form id="form1" runat="server">
    <div>  
        <asp:Button ID="Button1"
         runat="server"
         BackColor="#33CCFF"
         onclick="Button1_Click"
         Text="Click"
          Width="69px" />  
    </div>
        <asp:Label ID="Label1"
         runat="server"
          BackColor="Yellow"
          Text="Label"></asp:Label>
    </form>
Code Behind
 protected void Button1_Click(object sender, EventArgs e)
        {          
            DateTime today = DateTime.Today;
            String Todaymonth = CultureInfo.CurrentCulture.DateTimeFormat.GetMonthName(today.Month);
            String month = CultureInfo.CurrentCulture.DateTimeFormat.GetMonthName(2);
            Label1.Text = "Today : " + today.ToLongDateString();
            Label1.Text += "<br /><br />today month Name= ";
            Label1.Text += Todaymonth;
            Label1.Text += "<br /><br /> [2] number month= ";
            Label1.Text += month;

        }
Code Generate the following output
How to find month name in asp.net c#

Sunday, May 4, 2014

How to Insert Rows in Related Tables and Copy Data: SQL

Data pertaining to an entity can be stored in more than one table. Therefore, while adding information for a new entity, you need to insert new rows in all the related tables. In such a case, you need to first insert a row in the table that contains the primary key. Next, you can insert a row in the related table containing the foreign key.

For example, in the AdventureWorks database, the employee details are stored in the Person.Contact, HumanResources.Employee, HumanResources.EmployeeDepartmentHistory, and HumanResources.EmployeePayHistory tables.

To save the details for a new employee, you need to insert data in all these tables. The following statement insert data of a new employee into the database:

Inserting records in the Person.Contact table.

INSERT INTO Person.Contact VALUES (0, ‘Mr.’, ‘Steven’, NULL,’Fleming’,
NULL, ‘stevenfleming@adventure-works.com’, 1, ‘951-667-2401’,’B4802B37F8F077A6C1F2C3F50F6CD6C5379E9C79’, ‘3SA+edf=’, NULL, DEFAULT, DEFAULT)

INSERT INTO HumanResources.Employee VALUES (‘45879632’, 19978,’adventure-works/steven’, 185, ‘Tool Designer’, ‘ 1967-06-03 00:00:00.000’,
‘M’, ‘M’, ‘2006-08-01 00:00:00.000’, 1, 0, 0, 1, DEFAULT, DEFAULT)

INSERT INTO HumanResources.EmployeeDepartmentHistory VALUES (291, 2, 1, ‘2006-08-01 00:00:00.000’, NULL, DEFAULT)

INSERT INTO HumanResources.EmployeePayHistory VALUES (291,’2006-08-01 00:00:00.000’, 23.0769, 2, DEFAULT)

Copying Data from an Existing Table into a New Table

While inserting data in table, you might need to copy rows from an existing table to another table. You can do this by using the SELECT statement.

For example, in the AdventureWorks database, data for the employees with a remuneration rate of 35 or above is to be copied into a new table called Preferredemployee from the EmployeePayHistory table.
The following statements copy the values from the EmployeePayHistory table into the PreferredEmployee table:

SELECT * INTO PreferredEmployee
FROM HumanResources.EmployeePayHistory
WHERE Rate >= 35

The preceding statement will create a table named PreferredEmployee. The table will have the same structure as HumanResources.EmployeePayHistory.

How to Insert Rows and Partial Data in Database Table: SQL

While inserting rows into a table, Database developer need to consider the following guidelines:

  • The number of data values must be the same as the number of attributes in the table or column list.
  • The order of inserting the information must be the same as the order in which attributes are listed for insertion.
  • The values clause need not contain the column with the IDENTITY property.
  • The data types of the information must match the data types of the columns of the table.

Consider an example of the Address table that is used to store addresses of the employees. The following table describes the structure of the Address table.

AddressID int NOT NULL
AddressLine1 nvarchar(60) NOT NULL
AddressLine2 nvarchar(60) NULL
StateProvinceID int NOT NULL
PostalCode nvarchar(15) NOT NULL

To insert a row into the Address table with all the column values, you can use any one of the following statements:
INSERT into Address
VALUES (104, ’24, Herbon Aptsi, ‘Arthor Lane’, 56, ‘607009’)
Or
INSERT into Address (AddressID, AddressLIne1, AddressLine2, StateProvinceID, PostalCode)
VALUES (104, ’24, Herbon Apts’, ‘Arthor Lane’, 56, ‘607009’)
Or
INSERT into Address (AddressID, AddressLine1, AddressLine2, PostalCode, StateProvinceID)
VALUES (104, ’24, Herbon Apts’, ‘Arthor Lane’, ‘60070’, 56)
Or
INSERT into Address
VALUES (104, ’24, Herbon Apts’, NULL, 56 ‘607009’)

Inserting Partial Data

Depending on the constraints applied to the columns of the tables, you can insert partial data into the database tables. This means that while performing an insert operation, you can insert data for selective columns in a table. It is not necessary that you have to insert values for all columns in the table. The SQL Server allows you to insert partial data for a column that allows NULL or has a default constraint assigned to it. The INSERT clause lists the columns for which data is to be inserted, except those columns that allow NULL or have a default constraint. The VALUES clause provides values for the specified columns.

In the previous example of Address table, the AddressLine2 column allows you to enter a NULL value in a row. Therefore, you can use the following statements to insert partial data into the table:

INSERT into Address
VALUES (104, ’24, Herbon Apts’, NULL, 56, ‘607009’)
Or
INSERT into Address (AddressID, AddressLine1, PostalCode, StateProvinceID)
VALUES (104, ’24, Herbon Apts’, ‘607009’, 56)

Manipulate data in tables

How to Manipulate Data in Tables using DML Statements: SQL Syntax

After creating a database and the tables, the next step is to store data in the database. As a database developer, you will be required to modify or delete data. You can perform these data manipulations by using the Data Manipulation Language (DML) statement of Transact-SQL.

If the data stored in the database needs to be used by different kinds of client applications, such as mobile devices or Web applications, data should be stored in a format that can be interpreted by any application. For this, SQL Server allows you to store data in the Extensible Mark-up Language (XML) format that can be read by any application.

As a database developer, you need to regularly insert, modify, or delete data, these operations ensure data is up-to-date. For example, in a database that maintains employee details, you need to insert new records in the Employee table, whenever a new employee joins the organization. Similarly, if the details of an employee change, you need to update the existing records. For example, if the salary of any employee increases, you need to update the existing records to reflect this change.

Storing data in a Table

The smallest unit of data that you can add in a table is a row. You can add a row by using the INSERT DML statement. The syntax of the INSERT statement is:
INSERT [INTO]{table_name} [(column_list)]
VALUES {DEFAULT | values_list | select_statement}

Where

  • Table_name specifies the name of the table into which the data is to be inserted. The INTO keyword is optional.
  • Column_list specifies an optional parameter. You can use it when partial data is to be inserted in a table or when the columns to be inserted are defined in a different order.
  • DEFAULT specifies the clause that you can use to insert the default value specified for the column. If a default value is not specified for a column and the column property is specified as NULL, NULL is inserted in the column. If the column does not have any default constraint attached to it and does not allow NULL as the column value, the SQL Server returns an error message and the insert operation is rejected.
  • Value_list specifies the list of values for the table columns that have to be inserted as a row in the table. If a column is to be provided a default value, you can use the DEFAULT keyword instead of a column value. The column value can also be an expression.
  • Select_statement specifies a nested SELECT statement that you can use to insert rows into the table.

How to Implement Sorting and Searching Functionality in Asp.Net MVC

Asp.Net MVC offers a very simple way to implementing sorting and searching functionality of the listed data. This complete process will be discussed in this article.

Create a class Student having two columns i.e. Name and age (Here this Student class is from our Data Context), this class will be used to list the data on our View page. If programmer is collecting data from database as in this article then he/she only needs to write query to collect data, otherwise programmer have to create a list of students to be shown on view.
public class Student
    {
        public string Name { get; set; }
        public string Age { get; set; }
    }

In our controller, create a new action that is passing a list of students to view as written below. This will get all the records of student saved in our database, convert them to list and then pass them to particular view.
public ActionResult SortSearch()
{
var students = dc.Student.ToList();
return View(students);
}

Replace this above code with the code written below, which will includes the sorting and searching functionality on the listed data.

public ActionResult SortSearch(string sortOrder, string searchText)
        {
            ViewBag.NameSortParm = String.IsNullOrEmpty(sortOrder) ? "name_desc" : "";
            ViewBag.AgeSortParm = sortOrder == "age" ? "age_desc" : "age";
            DataContext dc = new DataContext();

            var students = dc.Student.ToList();
            if (!String.IsNullOrEmpty(searchText))
                students = students.Where(a => a.Name.ToLower().Contains(searchText.ToLower())).ToList();
            switch (sortOrder)
            {
                case "name_desc": students = students.OrderByDescending(a => a.Name).ToList();
                    break;
                case "age": students = students.OrderBy(a => a.Age).ToList();
                    break;
                case "age_desc": students = students.OrderByDescending(a => a.Age).ToList();
                    break;
                default: students = students.OrderBy(a => a.Name).ToList();
                    break;
            }

            return View(students);
        }

In our view page start a loop that will show individual record as a row as shown. Include a textbox to input search text and replace the header code (<th></th>) with the code written here, means replace your view code with the code written here.

@using (Html.BeginForm())
{
    <div>
        Find by Name: @Html.TextBox("searchText")
        <input type="submit" value="Search" id="searchBtn"/>
    </div>
}
<table>
    <thead>
        <tr>
            <th>@Html.ActionLink("Name", "SortSearch", new { sortOrder = ViewBag.NameSortParm })</th>
            <th>@Html.ActionLink("Age", "SortSearch", new { sortOrder = ViewBag.AgeSortParm })</th>
        </tr>
    </thead>
    @foreach (var item in Model)
    {
        <tr>
            <td>@item.Name</td>
            <td>@item.Age</td>
        </tr>
    }
</table>

As you can see in the view code, the name of textbox and the parameter for search string in the action is same i.e. searchText, which will automatically get the value of text entered in the input textbox. The same may be noticed with table header’s viewbag parameter i.e. sortOrder.

Run this view and click on the Header’s, through which you want to sort this list. With a single click this list will sort (first ascending then descending order) as shown in the image.

How to Implement Sorting and Searching Functionality in Asp.Net MVC

Now write something in the search textbox (“h”) and click on Submit button, this will list only the data containing the entered text as shown:

How to Implement Sorting and Searching Functionality in Asp.Net MVC

Operator Precedence and Associativity to Evaluate Expression: JAVA

Operator precedence determines the order in which expressions are evaluated. This, in some cases, can determine the overall value of the expression. For example, take the following expression:
 Y  =  6  + 4/2

Depending on whether the 6+4 expression or the 4/2 expression is evaluated first, the value of y can end up being 5 or 8. Operator precedence determines the order in which expression are evaluated, so you can predict the outcome of an expression. In general, increment and decrement expression are evaluated before arithmetic expression; arithmetic expression are evaluated before comparisons, and comparisons are evaluated before logical expression. Assignment expression are evaluated are evaluated last.

Operator Precedence and Associativity to Evaluate Expression: JAVA


Above Table shows the specific precedence of the various operators in Java. Operators further up in the table are evaluated first; operator on the same line have the same precedence and are evaluated left to right based on how they appear in the expression itself. For example, given that same expression
Y = 6 + 4/2

You now known, according to this table, that division is evaluated before addition, so the value of y will be 8.

You always can change the order in which expressions are evaluated by using parentheses around the expressions you want to evaluate first. You can nest parentheses to make sure that expressions evaluate in the order you want them to (the innermost parenthetical expressions is evaluated first.

Consider the following expression:
y = (6 + 4)/2

This results in a value of5, because the 6+4 expression is evaluated first, and then the result of that expression (10) is divided by 2.

Parentheses also can be useful in cases where the precedence of an expressions isn’t immediately clear. In other words, they can make your code easier to read. Adding parentheses doesn’t hurt, so if they help you figure out how expressions are evaluated, go ahead and use them.

Operator Associativity

There is a linked term – Operator Associativity. Associativity rules determine the grouping of operands and operators in an expression with more than one operator of the same precedence. When the operations in an expression all have the same precedence rating, the associativity rules determine the order of the operators.

For most operators, the evaluation is done left to right, e.g.
X  = a + b – c

Here, addition and subtraction have the same precedence rating and so a and b are added and then from this sum c is subtracted. Again, parentheses can be used to overrule the default associativity, e. g.
X = a + (b-c);

However, the assignment and unary operators, are associated right to left, e.g.,
X += y -= -4; equivalent to X  += (y  -= (-(4) ) );

Assignment and Remaining operators 
© Copyright 2013 Computer Programming | All Right Reserved