-->

Thursday, July 17, 2014

How to Bind Radio Button Control inside the Grid View control in ASP.NET

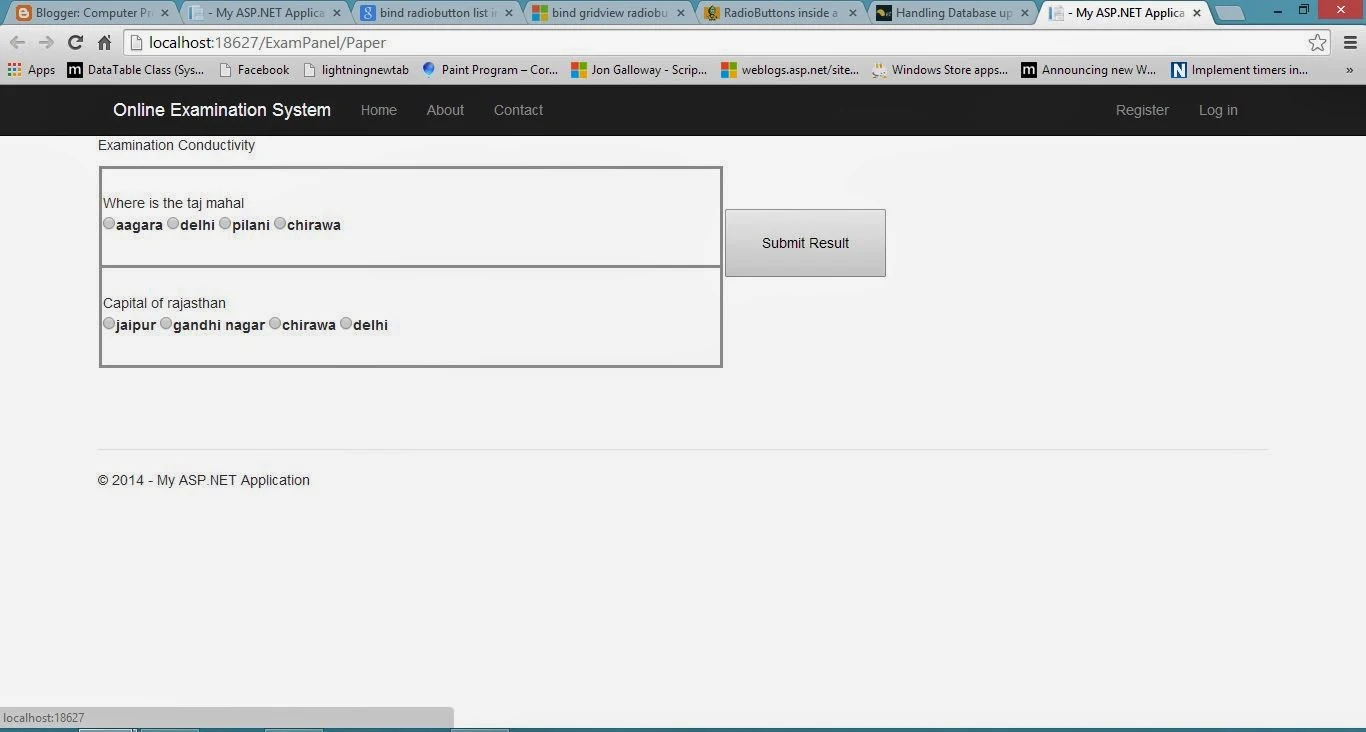
Binding process of control is same , You can bind all of controls from this method. In previous article we have  already discussed about Bind GridView in asp.net. In this example we have four radio buttons and one label control. Bind the text  of  radio button use <%# Eval(" Attribute of table") %> .
How to Bind Radio Button Control inside the Grid View control in ASP.NET

<asp:GridView ID="GridView2" runat="server" Height="202px" Width="624px" AutoGenerateColumns ="False" ShowHeader="False" AllowPaging="True">
      <Columns>
<asp:TemplateField>
    <ItemTemplate>
        <asp:Label ID="Label1" runat="server" Text='<%# Eval("Question") %>'></asp:Label><br />
     
            <asp:RadioButton ID="R1" runat="server" Text ='<%# Eval ("Answer-1") %>' GroupName ="g1" />
         <asp:RadioButton ID="R2" runat="server" Text ='<%# Eval ("Answer-2") %>' GroupName ="g1" />
         <asp:RadioButton ID="R3" runat="server" Text ='<%# Eval ("Answer-3") %>' GroupName ="g1"/>
         <asp:RadioButton ID="R4" runat="server" Text ='<%# Eval ("Answer-4") %>' GroupName ="g1"/>
    </ItemTemplate>
    <ItemStyle BorderColor="#999999" BorderStyle="Solid" BorderWidth="3px" />
</asp:TemplateField></Columns> </asp:GridView>

Codebehind code

 private void Bindabledata()
    {
        SqlConnection con = new SqlConnection();
        con.ConnectionString = ConfigurationManager.ConnectionStrings["ConnectionString"].ToString();
        con.Open();
        SqlCommand cmd = new SqlCommand();
        cmd.CommandText = "select * from [Question_Table]";
        cmd.Connection = con;
        DataSet ds = new DataSet();
        SqlDataAdapter da = new SqlDataAdapter(cmd);
        da.Fill(ds);
        GridView2.DataSource = ds;
        GridView2.DataBind();

    }

Code generate the following output

Sunday, July 13, 2014

Clock in windows phone 8

In this article,  i will use  DispatcherTimer class for creating timer control. Using interval property of this class, i will set the increment counter. After set the interval you can call tick event of this class. On tick event you can take current date and time. .
To create a new app in windows phone 8, the steps are listed below:
Create a new project by going through File | New Project | Windows Phone Application - Visual C#. Give a desired project name( World Clock is my app name).
create a new app in windows phone 8

From Solution Explorer, open MainPage.xaml file. (If Solution Explorer window is currently not opened then open it via View>>Other Windows>>Solution Explorer).
Inside Control Panel code fragment, add following code to create world clock app.

Source code (MainPage.xaml)

 <TextBlock HorizontalAlignment="Left" Margin="10,10,0,0" TextWrapping="Wrap" Text="" VerticalAlignment="Top" Width="436" Height="63" x:Name="label1" FontSize="30" Grid.ColumnSpan="2"/>

Code behind 

   DispatcherTimer t1 = new DispatcherTimer();
    t1.Interval = TimeSpan.FromSeconds(1);
            t1.Tick += OnTick;
            t1.Start();

  void OnTick(Object sender, EventArgs args)
        {
            label1.Text = DateTime.Now.ToString();
        }

Code Generate the following output

Clock in windows phone 8

Wednesday, July 9, 2014

How to Get text of radio button using JQuery

If you want to get Text from radio button then first to determine whether the radio button is checked or not , if it is checked then return true. Using the name property, you will get element of  html control. ':Checked' property check the status of html control. Suppose your radio button return true (it means checked) then you will get the value of radio button control using the val( ) method.

Now lets take an simple example

<%@ Page Language="c#" %>

<!DOCTYPE html>
<html xmlns="http://www.w3.org/1999/xhtml">
<head runat="server">   
    <title>Get Text Of Radio Button</title>


    <script src="Scripts/jquery-1.10.2.js"></script>
    <script>
        $(function () {
            $('#Button1').click(function () {
                var rdtxt = $('input[name=rd]:Checked').val();
                alert(rdtxt);
            })
        }); 
</script>

</head>
<body>
    <form id="form1" runat="server">
        <input id="Radio1" type="radio"  value="Gender" name ="rd"/>Gender<br />
        <input id="Button1" type="button" value="button" />
    </form>
</body>
</html>


Code Generate the following output

How to Get text of radio button using JQuery

Monday, July 7, 2014

How to check RadioButton or CheckBox is checked or not using JQuery

Welcome to JQuery, using ID property of HTML element you can get attribute of element in JQuery. If you want to get any element in JQuery, Should create a function in <Script> </Script> block, now your code look like.

<script type="text/javaScript">
$(function( ) { } );
</Script>

Now, if you want to handle function on button_click event then you must retrieve button_id using '#' after that you will handle any event on it like click. Today we will learn , how to check status of control like checked or not, first to get id of that control. Also check it using this function

is(':checked')


Note :  Must add     <script src="Scripts/jquery-1.10.2.js"></script> in your head section of page . I have visual studio 2013 so i use 1.10.2. You can also use 1.8.2.js file 

Now your complete code is 


<%@ Page Language="VB" AutoEventWireup="false" CodeFile="Default2.aspx.vb" Inherits="Default2" %>

<!DOCTYPE html>

<html xmlns="http://www.w3.org/1999/xhtml">
<head runat="server">
    <title>Jquery radiobutton and checkbox status check</title>
    <script src="Scripts/jquery-1.10.2.js"></script>
    <script>
        $(function () {
            $('#bt').click(function () {

                var rdchk = $('#Radio1').is(':Checked');
                var ckchk = $('#Checkbox1').is(':Checked');
                alert("radio button status "+rdchk+" check box status "+ckchk);


            })


        });


    </script>
    <style type="text/css">
        #Radio1 {
            height: 32px;
            width: 174px;
            color :black;
        }
        #Checkbox1 {
            height: 69px;
            width: 83px;
        }
    </style>
</head>
<body>
    <form id="form1" runat="server">
    <div>
    
        <input id="Radio1" type="radio" value="Gender" /></div>
        <input id="Checkbox1" type="checkbox" /><br />
    <button id="bt">Check Staus</button>
    </form>
   
        
</body>
</html>

Code generate the following code

How to check RadioButton or CheckBox is checked or not using JQuery

Friday, July 4, 2014

How to send bulk email in asp.net

If you want to send email in bulk then you should go for my algorithm. I have already learn about SMTP services (how to to send e-mail). Today we will learn , how to send email in bulk. There are various steps to send email in bulk, these are
1. Bind proper information of customer in gridview (learn how to bind gridview in asp.net)


2. Make user friendly application, in which you can insert data in gridview at runtime.(How to insert data into database)
3. Take two textboxes on design window for email-subject and email-message.
4. Also add single button control for sending message.
5. Raise click_event for button control.
6. Run foreach loop for all rows of gridview like

foreach (GridViewRow  gdata in GridView1 .Rows)
        {
}
7. Extract e-mail field from gridview, now, your code look like.

 string email = gdata.Cells[3].Text.Trim();

8. After retrieving single address from gridview, now you can send message.

9. Run your application.


Complete code


using System;
using System.Collections.Generic;
using System.Linq;
using System.Web;
using System.Web.UI;
using System.Web.UI.WebControls;
using System.Data.SqlClient;
using System.Data;
using System.Configuration;
using System.Net.Mail;

public partial class daclass : System.Web.UI.Page
{
    protected void Page_Load(object sender, EventArgs e)
    {
        SqlConnection con = new SqlConnection();
        con.ConnectionString =ConfigurationManager.ConnectionStrings ["ConnectionString"].ToString();
        con.Open();
        SqlCommand cmd=new SqlCommand ();
        cmd.CommandText ="select * from [user]";
        cmd.Connection =con;
        SqlDataAdapter da=new SqlDataAdapter (cmd);
        DataSet ds=new DataSet();
        da.Fill (ds);
        GridView1.DataSource = ds;
        GridView1.DataBind();          
       
    }
    protected void Button1_Click(object sender, EventArgs e)
    {
        foreach (GridViewRow  gdata in GridView1 .Rows)
        {
            string email = gdata.Cells[3].Text.Trim();
            MailMessage msg = new MailMessage();
            msg.From = new MailAddress("your gmail id here");
            msg.To.Add(email);
            msg.Subject = TextBox1.Text;
            msg.Body = TextBox2.Text;
            msg.IsBodyHtml = true;
            SmtpClient smt = new SmtpClient("smtp.gmail.com", 587);
            smt.EnableSsl = true;
            smt.Credentials = new System.Net.NetworkCredential("your gmail id here", "your gmail password");
            smt.Send(msg);
            Response.Write("message send");
            
        }
    }
}

Code Generate the following output
How to send bulk email in asp.net

How to send bulk email in asp.net

Tuesday, July 1, 2014

If statement in c#

Its also known as conditional statement, in c# there are two types of conditional statements. First one is if statement and second one is switch statement. In this article we will learn about if statement, basically if statement depends on condition. If your statement condition is true then if statement is executed otherwise not. Lets take an simple example
Suppose you have a variable  a of type int with having some value (take from user input). Like

int a= int.Parse(Console.ReadLine());
Now, if you want to compare this value from other value like 10. Now your statement look like
if(a==10)
{
   Console.writeLine("Your Number is 10");

}
So lets analyze this code, Now start from if statement , if statement needs a Boolean expression. In this code , evaluate the expression, which is inside in if bracket. Also return true as well as false Boolean value. If code return true then execute if block. Similarly we create multiple if block like

if(a==10)
{
   Console.writeLine("Your Number is 10");

}
if(a==20)
{
   Console.writeLine("Your Number is 20");

}
if(a==30)
{
   Console.writeLine("Your Number is 30");

}

If user enter any number, if entered number match with among given numbers then compiler display a  related message.

Disadvantage of multiple if statement is 

if first condition is match with entered value, processed should be closed but in case of multiple if statement, all condition would be checked. You can say its take more time.

So overcome this problem, you must use else-if statement. In case of else-if some false statement will be skipped. Like

if(a==10)
{
   Console.writeLine("Your Number is 10");

}
else if(a==20)
{
   Console.writeLine("Your Number is 20");

}

If your first condition is true then compiler will not check else-if condition, if first condition returns false then compiler will go to the else statement.

Sunday, June 29, 2014

How to create Indexes on Views: SQL Server

Similar to the tables, you can create indexes on views. By default, the views created on a table are no indexed. However, you can index the views when the volume of data in the underlying tables is large and not frequently updated. Indexing a view helps in improving the query performance.

Another benefit of creating an indexed view is that the optimizer starts using the view index in queries that do not directly name the view in the FROM clause. If the query contains references to columns that are also present in the indexed view, and the query optimizer estimates that using the indexed view offer the lowest cost access mechanism, the query optimizer selects the indexed view.

When indexing a view, you need to first create a unique clustered index on a view. After you have defined a unique clustered index on a view, you can create additional non-clustered indexes. When a view is indexed, the rows of the view are stored in the database in the same format as a table.

Guidelines for Creating an Indexed View


  • You should consider the following guidelines while creating an indexed view:
  • A unique clustered index must be the first index to be created on a view.
  • The view must not reference any other views, it can reference only base tables.
  • All base tables referenced by the view must be in the same database and have the same owner as the view.
  • The view must be created with the SCHEMABINDING option. Schema binding binds the view to the schema of the underlying base tables.

Creating an Indexed View by Using the CREATE INDEX Statement

You can create indexes on views by using the CREATE INDEX statement. For example, you can use the following statements for creating a unique clustered index on the vwEmployeeDepDate view:

CREATE UNIQUE CLUSTERED INDEX idx_vwEmployeeDepData
ON HumanResources.vwEmployeeDepData (EmployeeID, DepartmentID)
The vwEmployeeDepData view was not bound to the schema at the time of creation. Therefore, before executing the preceding statement, you need to bind the vwEmployeDepData view to the schema using the following statement:

ALTER VIEW HumanResources.vwEmployeeDepData WITH SCHEMABINDING
AS
SELECT e.EmployeeID, MaritalStatus, DepartmentID
FROM HumanResources.Employee e JOIN
HumanResources.EmployeeDepartmentHistory d
ON e.EmployeeID = d.EmployeeID

The preceding statement alters the existing view, vwEmployeeDepData, and binds it with the schema of the underlying tables. You can then create a unique clustered index on the view.
© Copyright 2013 Computer Programming | All Right Reserved