-->

Friday, December 26, 2014

TextMode property of TextBox in ASP.NET

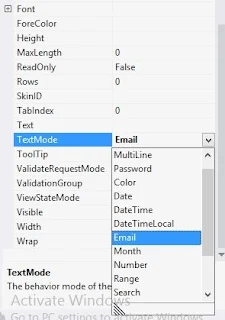
In visual studio 2010 you can assign only three values to the TextMode property , Those values are SingleLine , MultiLine and Password. But in visual studio 2012 you can set lots of value to the TextMode property Those values are SingleLine , MultiLine, Password, Email,Date , DateTime,URl etc All values are given below diagram.
Now all values we are using one by one :
MultiLine : In MultiLine TextBox you can take multiple rows but in single line TextBox you can take only single row. MultiLine TextBox is used where you need multiple rows like address of person. 

Lets take an example of MultiLine TextBox . Drag one TextBox control to the design window and set MultiLine to TextMode property.

<%@ Page Language="C#" %>

<!DOCTYPE html>

<script runat="server">

</script>

<html xmlns="http://www.w3.org/1999/xhtml">
<head runat="server">
    <title></title>
</head>
<body>
    <form id="form1" runat="server">
    <div>
 
    </div>
        <asp:TextBox ID="TextBox1" runat="server" TextMode="MultiLine" Width="213px"></asp:TextBox>
        <br />
        <asp:Button ID="Button1" runat="server" Text="Button" />
    </form>
</body>
</html>

Output
Multiline TextBox
SingleLine TextBox : In SingleLine TextBox You can take only single row means your TextBox does not support enter key. Lets take an example of SingleLine TextBox.
<%@ Page Language="C#" %>

<!DOCTYPE html>

<script runat="server">

</script>

<html xmlns="http://www.w3.org/1999/xhtml">
<head runat="server">
    <title></title>
</head>
<body>
    <form id="form1" runat="server">
    <div>
 
    </div>
        <asp:TextBox ID="TextBox1" runat="server" Width="213px"></asp:TextBox>
        <br />
        <asp:Button ID="Button1" runat="server" Text="Button" />
    </form>
</body>
</html>


SingleLine TextBox

Password TextBox : In password TextBox your input character will change in circular filled disc or circle.
normally password TextBox is used where you need security. Lets take an example 
<%@ Page Language="C#" %>

<!DOCTYPE html>

<script runat="server">

</script>

<html xmlns="http://www.w3.org/1999/xhtml">
<head runat="server">
    <title></title>
</head>
<body>
    <form id="form1" runat="server">
    <div>
 
    </div>
        <asp:TextBox ID="TextBox1" runat="server" TextMode="Password" Width="213px"></asp:TextBox>
        <br />
        <asp:Button ID="Button1" runat="server" Text="Button" />
    </form>
</body>
</html>

Output
password textbox
Email TextBox : You can set TextMode property is email in visual studio 2012.  HTML5 gives a new functionality to the web page such as email validation . you don't required expression validator for email validation . lets take an example of email validation feature in HTML5 .
<%@ Page Language="C#" %>

<!DOCTYPE html>

<script runat="server">

</script>

<html xmlns="http://www.w3.org/1999/xhtml">
<head runat="server">
    <title></title>
</head>
<body>
    <form id="form1" runat="server">
    <div>
 
    </div>
        <asp:TextBox ID="TextBox1" runat="server" TextMode="Email" Width="213px"></asp:TextBox>
        <br />
        <asp:Button ID="Button1" runat="server" Text="Button" />
    </form>
</body>
</html>

Output
TextMode property is Email
Url : TextMode property is set to url then you will assign url to the TextBox. Its also a validator ,
line of code
<asp:TextBox ID="TextBox1" runat="server" TextMode="Url" Width="213px"></asp:TextBox>

Output
TextMode property is url


Monday, December 22, 2014

SiteMap Path example in ASP.NET

Using the SiteMap Path class you can navigate a website. It displays a set of Text or images Hyperlinks. Inheritance hierarchy of SiteMapPath class are:
System.Object
    System.Web.UI.Control
      System.Web.UI.WebControls.WebControl
         System.Web.UI.WebControls.CompositeControl
            System.Web.UI.WebControls.SiteMapPath

Lets take an simple example of SiteMap Path 

To create Web.Sitemap, right click the website name. A context menu appears. Select the Add New Item option from the context menu. The Add New Item dialog box appear. Select Site Map from the option available. This will create a new web.sitemap file in the website.

 The Web.sitemap file consists of navigational details for an application. You can set the title, URL, and other information for each page by using the Web.sitemap file. code, copy and paste into your sitemap file.

Article : How to use Menu Control in ASP.NET

Video : A simple video contain how to use menu and sitemap file

  <?xml version="1.0" encoding="utf-8" ?>
<siteMap xmlns="http://schemas.microsoft.com/AspNet/SiteMap-File-1.0" >
    <siteMapNode url="~/Default.aspx" title="Home Page"  description="">
        <siteMapNode url="~/About.aspx" title="About"  description="" />
        <siteMapNode url="~/contact.aspx" title="contact us"  description="" />
    </siteMapNode>
</siteMap>


After that Add a master page and three web form(Default.aspx, About.aspx, contact.aspx)  into the website folder. Here we take ASP.NET website , which is contain default asp.net template. After Completed your sitemap file you can add sitemap path control to the master page.

Note : Add SiteMap Path control into the master page after navigation control

Master page source code , where your sitemap path control exists

<%@ Master Language="C#" AutoEventWireup="true" CodeFile="Site.master.cs" Inherits="SiteMaster" %>

<!DOCTYPE html PUBLIC "-//W3C//DTD XHTML 1.0 Strict//EN" "http://www.w3.org/TR/xhtml1/DTD/xhtml1-strict.dtd">
<html xmlns="http://www.w3.org/1999/xhtml" xml:lang="en">
<head runat="server">
    <title></title>
    <link href="~/Styles/Site.css" rel="stylesheet" type="text/css" />
    <asp:ContentPlaceHolder ID="HeadContent" runat="server">
    </asp:ContentPlaceHolder>
</head>
<body>
    <form runat="server">
    <div class="page">
        <div class="header">
            <div class="title">
                <h1>
                    My ASP.NET Application
                </h1>
            </div>
            <div class="loginDisplay">
                <asp:LoginView ID="HeadLoginView" runat="server" EnableViewState="false">
                    <AnonymousTemplate>
                        [ <a href="~/Account/Login.aspx" ID="HeadLoginStatus" runat="server">Log In</a> ]
                    </AnonymousTemplate>
                    <LoggedInTemplate>
                        Welcome <span class="bold"><asp:LoginName ID="HeadLoginName" runat="server" /></span>!
                        [ <asp:LoginStatus ID="HeadLoginStatus" runat="server" LogoutAction="Redirect" LogoutText="Log Out" LogoutPageUrl="~/"/> ]
                    </LoggedInTemplate>
                </asp:LoginView>
            </div>
            <div class="clear hideSkiplink">
                <asp:Menu ID="NavigationMenu" runat="server" CssClass="menu" EnableViewState="false" IncludeStyleBlock="false" Orientation="Horizontal">
                    <Items>
                        <asp:MenuItem NavigateUrl="~/Default.aspx" Text="Home"/>
                        <asp:MenuItem NavigateUrl="~/About.aspx" Text="About"/>
                    </Items>
                </asp:Menu>
            </div>
        </div>
        <div class="main">
            <asp:SiteMapPath ID="SiteMapPath2" runat="server">
            </asp:SiteMapPath>
            <br />
            <asp:ContentPlaceHolder ID="MainContent" runat="server"/>
        </div>
        <div class="clear">
        </div>
    </div>
    <div class="footer">
        
    </div>
    </form>
</body>
</html>

Code Generate the following output

SiteMap Path in ASP.NET

Sunday, December 21, 2014

Program to find sum of even and odd numbers (using one for loop) in C

Instead of using two for loops as in the previous program, only one for loop can be used. Let us see how this can be achieved.

sum= 0;
/* To add all numbers */
for(i=1; i<=n; i++)
{
sum = sum+i;
}

It is easy to say that we are computing the sum of all the numbers from 1 to n. To add only even numbers or to add numbers, the code can be changed as shown below:

esum=0;                          /* To store sum of even numbers */
osum = 0;                        /* To store sum of odd numbers */

/* To generate the integer from 1 to n */

for(i=1; i<=n; i++)
{
if(i % 2 == 0)                     /* If even */
esum = esum + i;               /* Add to even sum */
else
osum = osum + i;

}

Thus, after the control comes out of the for-loop, the variable esum contains the sum of even numbers and the variable osum contains the sum of odd numbers. The result can be printed using the following statements:

printf("Sum of even numbers = %d\n",esum);
printf("Sum of odd numbers = %d\n", osum);

The complete program is shown below:

Example : Program to add even numbers and odd numbers.
Program
#include<stdio.h>
main( )
{
int n, i, esum, osum;
printf("Enter the value of n:\n");
scanf("%d",&n);
/* Generate and print number from 1 to n */
printf("Integer from 1 to %d are \n",n);
for(i=1; i<=n;i++)
printf("%d",i);
printf("\n");
esum=0;
osum=0;

/* find sum of even and odd numbers */
for ( i=1; i<=n; i++)
{
if((i %2) == 0)
esum +=i;     /* Add even numbers */
else
osum += i;    /* Add odd numbers */

}
printf(" Sum of even numbers = %d\n",esum);
printf("Sum of odd numbers = %d\n",osum);
}

TRACING

Execution starts from here

Non-executable statement
Input
Enter the value of n:
6
Output 1
Integer from 1 to 6
1 2 3 4 5 6

Computations
e_sum = 0
o_sum = 0

i=1 2 3 4 5 6
e_sum = 0+2+4+6
                         = 12
o_sum= 0+1+3+5
                         = 9
Output 2

Sum of even numbers =12
Sum of odd numbers = 9

Saturday, December 20, 2014

How to insert data into multiple table in ASP.NET

I have two table, such as complaint table and status table. Now, i want to add data in both table through same SqlCommand class instance. Now, first to prepare the Connection using SqlConnection class, after that design the query for first table after inserting the data, we can add data into other table.


You can check the complete.

Source Code

<table style="width:100%;">
    <tr>
        <td class="style3">
            Complaint against To</td>
    </tr>
    <tr>
        <td class="style1">
            Name :&nbsp;&nbsp;&nbsp;&nbsp;&nbsp;&nbsp;&nbsp;&nbsp;&nbsp;&nbsp;&nbsp;&nbsp;&nbsp;&nbsp;&nbsp;&nbsp;&nbsp;&nbsp;&nbsp;&nbsp;&nbsp;&nbsp;&nbsp;&nbsp;&nbsp;&nbsp;&nbsp;&nbsp;&nbsp;&nbsp;&nbsp;&nbsp;&nbsp;&nbsp;&nbsp;&nbsp;&nbsp;&nbsp;&nbsp;&nbsp;
            <asp:TextBox ID="pname" runat="server" Height="24px" Width="245px" 
                ValidationGroup="cr"></asp:TextBox>
            <asp:RequiredFieldValidator ID="RequiredFieldValidator7" runat="server" 
                ControlToValidate="pname" ErrorMessage="Consumer Name Required" ForeColor="Red" 
                ValidationGroup="cr">*</asp:RequiredFieldValidator>
        </td>
    </tr>
    <tr>
        <td class="style1">
            Business&nbsp;&nbsp;&nbsp;&nbsp;&nbsp;&nbsp;&nbsp;&nbsp;&nbsp;&nbsp;&nbsp;&nbsp;&nbsp;&nbsp;&nbsp;&nbsp;&nbsp;&nbsp;&nbsp;&nbsp;&nbsp;&nbsp;&nbsp;&nbsp;&nbsp;&nbsp;&nbsp;&nbsp;&nbsp;&nbsp;&nbsp;&nbsp;&nbsp;&nbsp;&nbsp;&nbsp;&nbsp;&nbsp;
            <asp:TextBox ID="pbusiness" runat="server" Height="24px" Width="245px" 
                ValidationGroup="cr"></asp:TextBox>
            <asp:RequiredFieldValidator ID="RequiredFieldValidator8" runat="server" 
                ControlToValidate="pbusiness" ErrorMessage="Consumer Name Required" ForeColor="Red" 
                ValidationGroup="cr">*</asp:RequiredFieldValidator>
        </td>
    </tr>
    <tr>
        <td class="style1">
            Address&nbsp;&nbsp;&nbsp;&nbsp;&nbsp;&nbsp;&nbsp;&nbsp;&nbsp;&nbsp;&nbsp;&nbsp;&nbsp;&nbsp;&nbsp;&nbsp;&nbsp;&nbsp;&nbsp;&nbsp;&nbsp;&nbsp;&nbsp;&nbsp;&nbsp;&nbsp;&nbsp;&nbsp;&nbsp;&nbsp;&nbsp;&nbsp;&nbsp;&nbsp;&nbsp;&nbsp;&nbsp;&nbsp;
            <asp:TextBox ID="padd" runat="server" Height="61px" Width="248px" 
                TextMode="MultiLine" ValidationGroup="cr"></asp:TextBox>
            <asp:RequiredFieldValidator ID="RequiredFieldValidator9" runat="server" 
                ControlToValidate="padd" ErrorMessage="Consumer Name Required" ForeColor="Red" 
                ValidationGroup="cr">*</asp:RequiredFieldValidator>
        </td>
    </tr>
    <tr>
        <td class="style1">
            Phone Number&nbsp;&nbsp;&nbsp;&nbsp;&nbsp;&nbsp;&nbsp;&nbsp;&nbsp;&nbsp;&nbsp;&nbsp;&nbsp;&nbsp;&nbsp;&nbsp;&nbsp;&nbsp;&nbsp;&nbsp;&nbsp;&nbsp;&nbsp;&nbsp;&nbsp;&nbsp;&nbsp;&nbsp;
            <asp:TextBox ID="pnumber" runat="server" Height="24px" Width="245px" 
                ValidationGroup="cr"></asp:TextBox>
            <asp:RequiredFieldValidator ID="RequiredFieldValidator10" runat="server" 
                ControlToValidate="pnumber" ErrorMessage="Consumer Name Required" ForeColor="Red" 
                ValidationGroup="cr">*</asp:RequiredFieldValidator>
        </td>
    </tr>
    <tr>
        <td class="style1">
            Faulty Proff&nbsp;&nbsp;&nbsp;&nbsp;&nbsp;&nbsp;&nbsp;&nbsp;&nbsp;&nbsp;&nbsp;&nbsp;&nbsp;&nbsp;&nbsp;&nbsp;&nbsp;&nbsp;&nbsp;&nbsp;&nbsp;&nbsp;&nbsp;&nbsp;&nbsp;&nbsp;&nbsp;&nbsp;&nbsp;&nbsp;&nbsp;&nbsp;&nbsp;&nbsp;
            <asp:TextBox ID="pfproff" runat="server" Height="24px" Width="245px" 
                ValidationGroup="cr"></asp:TextBox>
            <asp:RequiredFieldValidator ID="RequiredFieldValidator11" runat="server" 
                ControlToValidate="pfproff" ErrorMessage="Consumer Name Required" ForeColor="Red" 
                ValidationGroup="cr">*</asp:RequiredFieldValidator>
        </td>
    </tr>
    <tr>
        <td class="style1">
            Faulty Proff Image&nbsp;&nbsp;&nbsp;&nbsp;&nbsp;&nbsp;&nbsp;&nbsp;&nbsp;&nbsp;&nbsp;&nbsp;&nbsp;&nbsp;&nbsp;&nbsp;&nbsp;&nbsp;&nbsp;&nbsp;&nbsp;&nbsp;&nbsp;
            <asp:FileUpload ID="pproffimage" runat="server" />
        </td>
    </tr>
    <tr>
        <td class="style1">
            Review Against&nbsp;&nbsp;&nbsp;&nbsp;&nbsp;&nbsp;&nbsp;&nbsp;&nbsp;&nbsp;&nbsp;&nbsp;&nbsp;&nbsp;&nbsp;&nbsp;&nbsp;&nbsp;&nbsp;&nbsp;&nbsp;&nbsp;&nbsp;&nbsp;&nbsp;&nbsp;&nbsp;&nbsp;
            <asp:TextBox ID="preview" runat="server" Height="55px" Width="248px" 
                TextMode="MultiLine" ValidationGroup="cr"></asp:TextBox>
            <asp:RequiredFieldValidator ID="RequiredFieldValidator12" runat="server" 
                ControlToValidate="preview" ErrorMessage="Consumer Name Required" ForeColor="Red" 
                ValidationGroup="cr">*</asp:RequiredFieldValidator>
        </td>
    </tr>
    <tr>
        <td class="style1">
            Fir Number (if any)&nbsp;&nbsp;&nbsp;&nbsp;&nbsp;&nbsp;&nbsp;&nbsp;&nbsp;&nbsp;&nbsp;&nbsp;&nbsp;&nbsp;&nbsp;&nbsp;&nbsp;&nbsp;&nbsp;&nbsp;&nbsp;&nbsp;
            <asp:TextBox ID="pfir" runat="server" Height="24px" Width="245px" 
                ValidationGroup="cr"></asp:TextBox>
            <asp:RequiredFieldValidator ID="RequiredFieldValidator13" runat="server" 
                ControlToValidate="pfir" ErrorMessage="Consumer Name Required" ForeColor="Red" 
                ValidationGroup="cr">*</asp:RequiredFieldValidator>
        </td>
    </tr>
</table>
<p>
    <asp:Button ID="Button1" runat="server" onclick="Button1_Click" Text="Submit" />
</p>
<p>
    <asp:Label ID="Label1" runat="server"></asp:Label>
</p>

<asp:ValidationSummary ID="ValidationSummary1" runat="server" ForeColor="Red" 
    ValidationGroup="cr" />

Design View Of Source code

Complaint form

Complete Business Logic Code

using System;
using System.Collections.Generic;
using System.Linq;
using System.Web;
using System.Web.UI;
using System.Web.UI.WebControls;
using System.Data.SqlClient;
using System.Configuration;

public partial class UserControl_complaint : System.Web.UI.UserControl
{
    string savefile = string.Empty;
    protected void Page_Load(object sender, EventArgs e)
    {

    }
    protected void Button1_Click(object sender, EventArgs e)
    {
        string un=System.Guid.NewGuid ().ToString ();

        if (pproffimage.HasFile)
        {
            pproffimage.SaveAs(Server.MapPath("~/images/" + pproffimage.FileName));
            savefile = "~/images/" + pproffimage.FileName;

        }
        SqlConnection con = new SqlConnection();
        con.ConnectionString = ConfigurationManager.ConnectionStrings["ConnectionString"].ToString();
        con.Open();
        SqlCommand cmd = new SqlCommand();
        cmd.CommandText = "insert into complaint(Party_Name,Business,Address,Faulty_proff,Image,Review,Fir_Numer,Consumer_Id,date,uniquet) values(@cuoname,@cuofname,@cuodob,@cuoadd,@cuoimage,@cuophone,@cuoemail,@cuoph,@cuodate,@cuoun)";
        cmd.Connection = con;
        cmd.Parameters.AddWithValue("@cuoname",pname.Text);
        cmd.Parameters.AddWithValue("@cuofname",pbusiness.Text);
        cmd.Parameters.AddWithValue("@cuodob", padd.Text);
        cmd.Parameters.AddWithValue("@cuoadd",pfproff .Text);
        cmd.Parameters.AddWithValue("@cuoimage", savefile);
        cmd.Parameters.AddWithValue("@cuophone",preview.Text);
        cmd.Parameters.AddWithValue("@cuoemail", pfir .Text);
        cmd.Parameters.AddWithValue("@cuoph",Session["cons_id"].ToString());
        cmd.Parameters.AddWithValue("@cuodate", DateTime.Now.ToString ());
         cmd.Parameters.AddWithValue("@cuoun", un);
        int a = cmd.ExecuteNonQuery();
        if (a > 0)
        {
            Label1.Text = "Data Inserted Sucessfully";
            Label1.ForeColor = System.Drawing.Color.Green;
        }
        cmd.Parameters.Clear();

        cmd.CommandText = "insert into status(status,Complaint_Id,consumer_id) values(@stname,@comid,@cunsid)";
        cmd.Parameters.AddWithValue("@stname", "pending");
        cmd.Parameters.AddWithValue("@comid",un);
        cmd.Parameters.AddWithValue("@cunsid", Session["cons_id"].ToString());
        cmd.ExecuteNonQuery();

    }
}

Friday, December 19, 2014

How to run Applet in Netbean IDE

We are very familiar with java programming, when we come to applet programming then we need some resources like browsers, AppletViewer etc to run the applet code. When i run the applet code in command prompt using following command:
appletviewer filename.html
 Applet viewer was not appear in windows 8.1. Then lastly i was decide that i shall install Netbean IDE for applet code.

import java.awt.*;
 import java.applet.*;

public class design extends Applet
 {
 public void paint(Graphics g)
{
g.drawString("Hello World",50,100);
}
}

Now, copy this code and following some instructions which is given in the youtube video

Monday, December 15, 2014

Prevention from SQL Injection attack in ASP.NET

In myPrevious article, we have already learn about SQL injection attack. We saw that if we use Text Box for retrieving data from the database then other queries also perform with the same database. So, Microsoft provide, Parameterized query for DML and DQL statements. Like
Replace this statement with the parameterized query

Direct Interface with TextBox (SQL Injection Attack Possible)

cmd.CommandText = "Select * from [TableName] where name='"+TextBox1.Text+"'";

Resolve this problem by the parameterized query

cmd.CommandText = "Select * from [TableName] where name=@name1";
cmd.Parameter.AddWithValue("@name1",TextBox1.Text);

Now that video give more clearance :   

Saturday, December 13, 2014

Program to add the numbers which are divisible by 5 in C

Let us write a program to print all the numbers between N1 and N2 which are divisible by 5. Then, compute the sum of those numbers. The numbers between N1 and N2 can be added using the following statement:

sum =0;
for(i=n1; i<=n2; i++)       /* i start from n1 and goes up to n2 */
{
sum =sum+i;                    /* Can be written as sum +=i */
}

But, it is required to add those which are divisible by 5 only. This can be achieved by taking only those values of i which are divisible by 5 and the program can be modified as follows:

sum =0;
for(i=n1; i<=n2; i++)
{
if(i%5 == 0)
{
sum +=i;
}
}

The complete algorithm are shown below:

Algorithm : DIVBY5.

[This algorithm prints the numbers divisible by 5 between n1 and n2]
Step 1: [Enter lower & upper limits]
Read : n1, n2

Step 2: [Initialize]
sum =0

Step 3: [Generate and add the number if divisible by 5]
for i=n1 to n2 in step 1
if(i%5 ==0)
sum = sum+i
[End of if]
[End of for]

Step 4: [Output the result]
Write : sum

Step 5: [Finished]
Exit.

The complete program to find the sum of all those numbers divisible by 5 is shown below:
Example : Program to add the numbers which are divisible by 5.
PROGRAM

#include<stdio.h>
main( )
{
int n1, n2, i, sum;
printf("Enter range N1 and N2 (N1 < N2): \n");
scanf("%d%d",&n1,&n2);
sum=0;
for(i=n1;i<=n2;i++)
{
if((i%5)==0)
{
printf("%d",i);
sum +=i;
}
}
printf("Total sum =%d\n",sum);
}

TRACING

Execution starts from here
Non-executable statement
Input
Enter the N1 and N2 (N1<N2):
4 20
Computations
sum=0
i= 5 10 15 20
Output
5 10 15 20
sum = 0+5+10+15+20

Total sum = 50

© Copyright 2013 Computer Programming | All Right Reserved