-->

Thursday, August 13, 2015

Ajax Password Strength and password indicator example in asp.net

Introduction

In this article i will learn about password strength control of ajax. Example of password indicator of ajax in asp.net. This example cover all such things which is related to password strength.

Description

i already explained about Always visible control example in ajax. Example of calendar extender using ajax. Example of Numeric UpDown Extender example using ajax. Example of Resizable control in asp.net. Slider Extender example in AJAX.


Source code :

<%@ Page Language="VB" AutoEventWireup="false" CodeFile="Default2.aspx.vb" Inherits="Default2" %>

<%@ Register assembly="AjaxControlToolkit" namespace="AjaxControlToolkit" tagprefix="cc1" %>

<!DOCTYPE html>

<html xmlns="http://www.w3.org/1999/xhtml">
<head runat="server">
    <title></title>
    <style>
        .very{
background-color:gray;
color:white;
        }
.weak{
    background-color:Red;
color:white;

}
.average{
    background-color:blue;
color:white;
}
.good{
    background-color:orange;
    color:green;
}
.excellent
{
    background-color:green;
    color:black;
}
        .barline
        {
            border-style:solid;
            border-width:2px;
            width:190px;
            padding:2px;

        }
  </style>
</head>
<body>
    <form id="form1" runat="server">
        <asp:ScriptManager ID="ScriptManager1" runat="server"></asp:ScriptManager>
    <div>
        Password:
        <asp:TextBox TextMode="Password" ID="TextBox1" runat="server" Height="23px" Width="227px"></asp:TextBox>
&nbsp;</div>
        <p>
            <asp:Label ID="Label1" runat="server" Text="Label"></asp:Label>
            <cc1:PasswordStrength PreferredPasswordLength="8" TargetControlID="TextBox1" ID="pwdstrength" runat="server" StrengthIndicatorType="Text" HelpStatusLabelID="Label1" MinimumNumericCharacters="1" MinimumSymbolCharacters="1" TextStrengthDescriptions="very;weak;average;good;excellent" />
        </p>
        <p>
            &nbsp;</p>
        <p>
            PassWord Indicator :
        <asp:TextBox TextMode="Password" ID="TextBox2" runat="server" Height="23px" Width="227px"></asp:TextBox>
            <cc1:PasswordStrength TextStrengthDescriptionStyles="very;weak;average;good;excellent" BarBorderCssClass="barline" PreferredPasswordLength="8" TargetControlID="TextBox2" ID="TextBox2_PasswordStrength" runat="server" StrengthIndicatorType="BarIndicator" HelpStatusLabelID="Label2" MinimumNumericCharacters="1" MinimumSymbolCharacters="1" TextStrengthDescriptions="very;weak;average;good;excellent" />
       
        </p>
        <p>
            <asp:Label ID="Label2" runat="server" Text="Label"></asp:Label>
        </p>
       
    </form>
</body>
</html>
In this example TextStrengthDescriptionStyles cover all css classes which is covered in the example. StrengthIndicatorType define the appearance of the validator.

Code generate the following outout

Ajax Password Strength and password indicator example in asp.net


Tuesday, August 11, 2015

How to add StaticResource and DynamicResource style in WPF

Introduction

In this article i will explain about style in wpf, How to use staticResources in wpf. Through the windows.Resources tag i will explain how to use style in xaml. Also use the DynamicResources in app.xaml file. Example of DynamicResourcs style in app.xaml file. 

Description

If you want to do some changes in formatting of your page or control then add some attribute like Background Foreground etc in xaml tag.But if you want to do same changes with 1000 of controls then what to do. There are two options first one is changes in all tags and second one is changes in one place but effect appear in all controls. Now, this example i will use both methods for you.


This video cover:
 How to add TextBlock in wpf window, How to add inline style in wpf . How to add foreground and background of TextBlock in wpf. Example of TextBlock control in wpf. How to change color of TextBlock in wpf. How to change foreground and background color of button control. How to use window.Resources in wpf. Example of window.Resources. How to create style in window.Resources. Example of style tag in xaml. Example of setter property of style tag. How to apply style on controls in wpf.

DynamicResources in WPF


This video cover:
How to use Application.Resources in wpf, example of Application.Resources. How to add style in app.xaml file. Example of TargetType property of style tag in wpf. How to use setter property of style in application.Resources tag. How to use application.Resources code on wpf controls.  

Sunday, August 9, 2015

How to bind Dropdownlist from all countries name in asp.net c#

In this article i will show you how to bind the dropdownlist to countries name. You can say load dropdownlist from countries names like United State, United Kingdom etc in asp.net c#. By the System.Globalization namespace you can bind dropdownlist to countries name in asp.net c#.
In previous article i explained some topics on dropdownlist:


Source code of this article:

<%@ Page Language="C#" AutoEventWireup="true" CodeFile="BindCountries.aspx.cs" Inherits="BindCountries" %>

<!DOCTYPE html>

<html xmlns="http://www.w3.org/1999/xhtml">
<head runat="server">
    <title></title>
</head>
<body>
    <form id="form1" runat="server">
    <div>
        <asp:DropDownList ID="DropDownList1" runat="server" Height="28px" Width="118px"></asp:DropDownList>
    </div>
    </form>
</body>
</html>

Code Behind:

using System;
using System.Collections.Generic;
using System.Globalization;
using System.Linq;
using System.Web;
using System.Web.UI;
using System.Web.UI.WebControls;

public partial class BindCountries : System.Web.UI.Page
{
    protected void Page_Load(object sender, EventArgs e)
    {
        if(!Page.IsPostBack)
        {
            List<string> countries = new List<string>();
            CultureInfo[] culture = CultureInfo.GetCultures(CultureTypes.SpecificCultures);
            foreach (CultureInfo item in culture)
            {
                RegionInfo region = new RegionInfo(item.LCID);
                if(!(countries.Contains(region.EnglishName)))
                {
                    countries.Add(region.EnglishName);
                }
            }
            countries.Sort();
            DropDownList1.DataSource = countries;
            DropDownList1.DataBind();
        }
    }
}

Above mentioned code define the following:
I have a list with string type, bind this English name of all countries name using System.Globalization namespace. First to bind array with the all cultures, now from all cultures you can get specific region.

Code generate the following output

How to bind Dropdownlist from all countries name in asp.net c#

Thursday, July 30, 2015

How to bind a TextBox to an instance of a custom class object in WPF

If you want to bind the text box with the instance of customer class object also call one way binding in wpf. first to add a cs class in the project. In which you should take one or more public properties , i will take two public properties and one static method. That static method will return class object.  Now, your code look like:


1. Add a Class in the project also paste the below mentioned code. But remember that your class name is match with csharp file name; namespace name match with code.
  
using System;
using System.Collections.Generic;
using System.Linq;
using System.Text;
using System.Threading.Tasks;

namespace SplashSCreen
{
   public class Student
    {
        public string Name { get; set; }
        public string Email { get; set; }
        public static Student GetRecord()
        {
            var student = new Student();
            {
                student.Name = "Jacob";
                student.Email = "narenkumar851@gmail.com";
            };
            return student;
        }
    }
}

2. Add a new window in the project.
3. Paste this code inside the grid of window class.

 <Grid>
        <TextBox x:Name="textBox" HorizontalAlignment="Left" Height="23" Margin="49,45,0,0" TextWrapping="Wrap" Text="{Binding Path=Name}" VerticalAlignment="Top" Width="120"/>

        <TextBlock x:Name="textBlock" HorizontalAlignment="Left" Margin="49,21,0,0" TextWrapping="Wrap" Text="Name:" VerticalAlignment="Top"/>

        <TextBlock x:Name="textBlock_Copy" HorizontalAlignment="Left" Margin="52,73,0,0" TextWrapping="Wrap" Text="Email:" VerticalAlignment="Top"/>

        <TextBox x:Name="textBox_Copy" HorizontalAlignment="Left" Height="23" Margin="49,107,0,0" TextWrapping="Wrap" Text="{Binding Path=Email}" VerticalAlignment="Top" Width="120"/>


    </Grid>

4. Add the business logic code in csharp file 

namespace SplashSCreen
{
    /// <summary>
    /// Interaction logic for bindtext.xaml
    /// </summary>
    public partial class bindtext : Window
    {
        public bindtext()
        {
            InitializeComponent();

            DataContext = Student.GetRecord();
         

        }

     
    }
}

Now , code generate the following output

How to bind a TextBox to an instance of a custom class object in WPF

Wednesday, July 29, 2015

Splash Screen in WPF example

The means of splash screen is a screen through which we can show the booting process of a thread. When you start your computer then first to load booting process after then load operating system. I will do the same thing in wpf. This screen appear before loading the start page. So lets to start it:


1. First to add a new window in the project.
2. Add these properties inside window tag.

 Title="SplashScreen"
 Height="300"
Width="300"
ResizeMode="NoResize"
WindowStyle="None"
WindowStartupLocation="CenterScreen"
Background="Green"
BorderThickness="8"
BorderBrush="Black"

3. Now, you complete code is:

<Window x:Class="SplashSCreen.SplashScreen"
        xmlns="http://schemas.microsoft.com/winfx/2006/xaml/presentation"
        xmlns:x="http://schemas.microsoft.com/winfx/2006/xaml"
        xmlns:d="http://schemas.microsoft.com/expression/blend/2008"
        xmlns:mc="http://schemas.openxmlformats.org/markup-compatibility/2006"
        xmlns:local="clr-namespace:SplashSCreen"
        mc:Ignorable="d"
        Title="SplashScreen" Height="300" Width="300" ResizeMode="NoResize" WindowStyle="None" WindowStartupLocation="CenterScreen" Background="Green" BorderThickness="8" BorderBrush="Black">
 
4. Add a label control in the page with content, like

<Grid>
        <Label x:Name="label" Content="Data Uploading......." HorizontalAlignment="Left" Margin="37,128,0,0" VerticalAlignment="Top" Width="187"/>

    </Grid>

5. Now, add this code in the app.xaml.cs file 

App.xaml.cs file

using System;
using System.Collections.Generic;
using System.Configuration;
using System.Data;
using System.Diagnostics;
using System.Linq;
using System.Threading;
using System.Threading.Tasks;
using System.Windows;

namespace SplashSCreen
{
    /// <summary>
    /// Interaction logic for App.xaml
    /// </summary>
    public partial class App : Application
    {
        private const int min_spl_time = 4000;
        protected override void OnStartup(StartupEventArgs e)
        {
            SplashScreen splash = new SplashScreen();
            splash.Show();
            Stopwatch timer = new Stopwatch();
            timer.Start();
            base.OnStartup(e);
            MainWindow main = new MainWindow();
            timer.Stop();
            int remaining_time = min_spl_time - (int)timer.ElapsedMilliseconds;
            if (remaining_time > 0)
                Thread.Sleep(remaining_time);
            splash.Close();
        }
    }
}
Here SplashScreen is the name of window or you can say class name. 

Delete DataGrid row from DataGrid using entity framework(EDMX file) in WPF

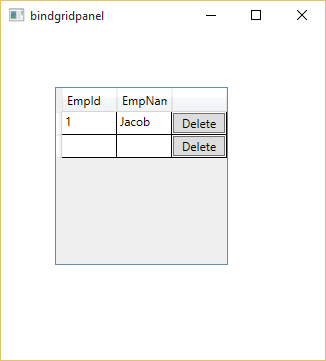
Before deleting the data from the dataGrid, first to load the DataGrid using Edmx file. This is done in previous article. In this article we have new column that is DataGridTemplateColumn , in which we have cell template. When we click on button then row is deleted from DataGrid. Before deleting data from DataGrid , access emp_id from selected row .


<Window x:Class="SplashSCreen.bindgridpanel"
        xmlns="http://schemas.microsoft.com/winfx/2006/xaml/presentation"
        xmlns:x="http://schemas.microsoft.com/winfx/2006/xaml"
        xmlns:d="http://schemas.microsoft.com/expression/blend/2008"
        xmlns:mc="http://schemas.openxmlformats.org/markup-compatibility/2006"
        xmlns:local="clr-namespace:SplashSCreen"
        mc:Ignorable="d"
        Title="bindgridpanel" Height="300" Width="300">
    <Grid>
        <DataGrid CanUserDeleteRows="True" AutoGenerateColumns="False" ColumnWidth="*" x:Name="dataGrid" HorizontalAlignment="Left" Margin="54,56,0,0" VerticalAlignment="Top" Height="178" Width="173">
            <DataGrid.Columns>
                <DataGridTextColumn Binding="{Binding Emp_Id}" Header="Emp_Id" />

                <DataGridTextColumn Binding="{Binding Emp_Name}" Header="Emp_Name" />
                <DataGridTemplateColumn>
                    <DataGridTemplateColumn.CellTemplate>
                        <DataTemplate>
                            <Button  Content="Delete" x:Name="dlt_button" Click="dlt_button_Click"></Button>
                         
                         
                        </DataTemplate>
                    </DataGridTemplateColumn.CellTemplate>
                </DataGridTemplateColumn>
            </DataGrid.Columns>
     
     
        </DataGrid>

    </Grid>
</Window>


Codebehind model

using System.Linq;
using System.Windows;

namespace SplashSCreen
{
    /// <summary>
    /// Interaction logic for bindgridpanel.xaml
    /// </summary>
    public partial class bindgridpanel : Window
    {
        TutorialEntities TE = new TutorialEntities();
        public bindgridpanel()
        {
            InitializeComponent();
            loadgrid();
        }

        private void loadgrid()
        {
           
            var data = from d in TE.emps select d;
            dataGrid.ItemsSource = data.ToList();
        }

        private void dlt_button_Click(object sender, RoutedEventArgs e)
        {
            int empid = (dataGrid.SelectedItem as emp).Emp_Id;
            emp employee = (from r in TE.emps where r.Emp_Id == empid select r).SingleOrDefault();
            TE.emps.Remove(employee);
            TE.SaveChanges();
            dataGrid.ItemsSource = TE.emps.ToList();
     

        }
    }
}


Code Generate the following output

Delete DataGrid row from DataGrid using entity framework(EDMX file) in WPF


© Copyright 2013 Computer Programming | All Right Reserved