-->

Sunday, October 4, 2015

JQuery: ScrollTop Button in Bottom right corner

Introduction
In this article i will show you how to design Scroll Top button in bottom right corner also when we click on it then we reach at top position of web browser. I will give an example of ScrollTop button which is used to scroll the page at top position.


Description 
First to design the button at bottom right corner using this line of code.

<div align="right">
        <a href="javascript:;" id="scrolltop1">&#x25B2;</a>
    </div>
After that apply formatting on button using css class.

<style>
        #scrolltop1{
            cursor:pointer;
            background-color:#00abcd;
            display:inline-block;
            height:50px;
            width:50px;
            color:#fff;
            font-size:14px;
            text-align:center;
            text-decoration:none;
            line-height:50px;


        }
    </style>

Now, scroll the page using script file, which is mentioned below.
 <script src="http://ajax.googleapis.com/ajax/libs/jquery/1.8.3/jquery.min.js"></script>
    <script>
        $(function () {
            $('#scrolltop1').bind("click", function () {
                $('html,body').animate({ scrollTop: 0 }, 1000);
                return false;
            })

        })
    </script>
In this script function when we click on hyperlink button, which is mentioned in bottom right corner then run animate function. In animate function we have one property that is scrollTop which is used to scroll the page.

Complete Source code


<!DOCTYPE html>
<html xmlns="http://www.w3.org/1999/xhtml">
<head>
    <title>ScrollTop Button in Bottom Right Corner</title>
    <style>
        #scrolltop1{
            cursor:pointer;
            background-color:#00abcd;
            display:inline-block;
            height:50px;
            width:50px;
            color:#fff;
            font-size:14px;
            text-align:center;
            text-decoration:none;
            line-height:50px;


        }


    </style>
    <script src="http://ajax.googleapis.com/ajax/libs/jquery/1.8.3/jquery.min.js"></script>
    <script>
        $(function () {
            $('#scrolltop1').bind("click", function () {
                $('html,body').animate({ scrollTop: 0 }, 1000);
                return false;


            })


        })


    </script>
 
</head>
<body>
   Welcome to dotprogramming.blogspot.com<br/>
    Welcome to dotprogramming.blogspot.com<br />
    Welcome to dotprogramming.blogspot.com<br />
    Welcome to dotprogramming.blogspot.com<br />
    Welcome to dotprogramming.blogspot.com<br />
    Welcome to dotprogramming.blogspot.com<br />
    Welcome to dotprogramming.blogspot.com<br />
    Welcome to dotprogramming.blogspot.com<br />
    Welcome to dotprogramming.blogspot.com<br />
    Welcome to dotprogramming.blogspot.com<br />
    Welcome to dotprogramming.blogspot.com<br />
    Welcome to dotprogramming.blogspot.com<br />
    Welcome to dotprogramming.blogspot.com<br />
    Welcome to dotprogramming.blogspot.com<br />
    Welcome to dotprogramming.blogspot.com<br />
    Welcome to dotprogramming.blogspot.com<br />
    Welcome to dotprogramming.blogspot.com<br />
    Welcome to dotprogramming.blogspot.com<br />
    Welcome to dotprogramming.blogspot.com<br />
    Welcome to dotprogramming.blogspot.com<br />
    Welcome to dotprogramming.blogspot.com<br />
    Welcome to dotprogramming.blogspot.com<br />
    Welcome to dotprogramming.blogspot.com<br />
    Welcome to dotprogramming.blogspot.com<br />
    Welcome to dotprogramming.blogspot.com<br />
    v
    Welcome to dotprogramming.blogspot.com<br />
    Welcome to dotprogramming.blogspot.com<br />
    Welcome to dotprogramming.blogspot.com<br />
    Welcome to dotprogramming.blogspot.com<br />
    Welcome to dotprogramming.blogspot.com<br />
    Welcome to dotprogramming.blogspot.com<br />
    Welcome to dotprogramming.blogspot.com<br />
    Welcome to dotprogramming.blogspot.com<br />
    Welcome to dotprogramming.blogspot.com<br />
    Welcome to dotprogramming.blogspot.com<br />
    Welcome to dotprogramming.blogspot.com<br />
    Welcome to dotprogramming.blogspot.com<br />
    Welcome to dotprogramming.blogspot.com<br />
    Welcome to dotprogramming.blogspot.com<br />
    Welcome to dotprogramming.blogspot.com<br />
    <div align="right">
        <a href="javascript:;" id="scrolltop1">&#x25B2;</a>
    </div>
</body>
</html>

JQuery: Define crop section area of image

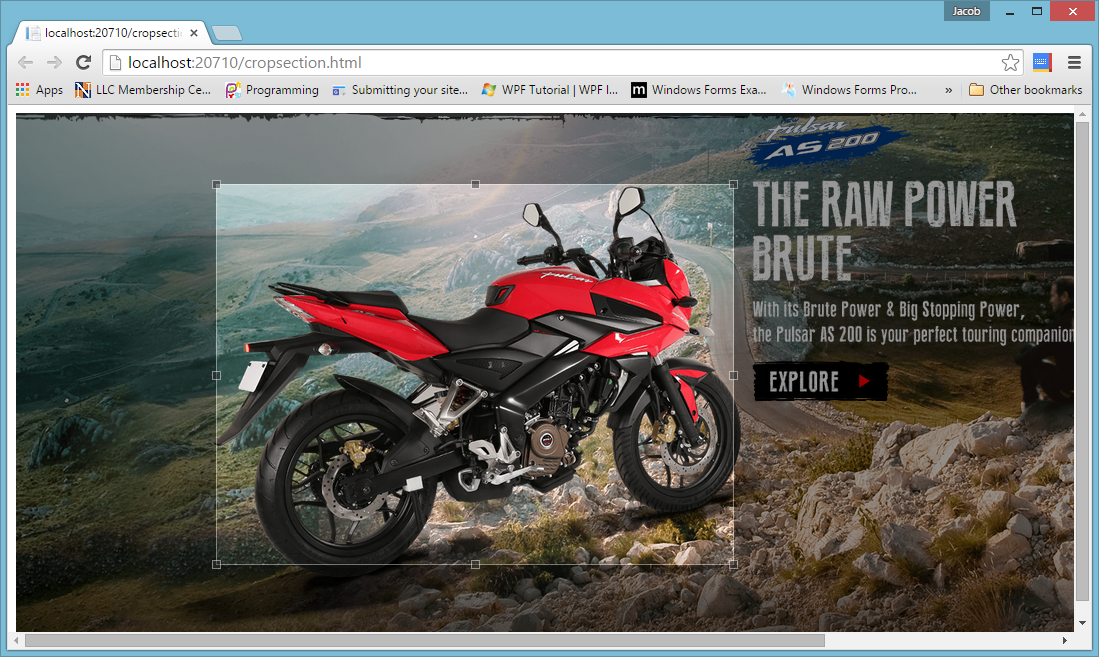
If you want to crop image then use JQuery Crop plugin. Download JQuery Crop Plugin from Here. Here you get two file, first is jquery.JCrop.js and second one is jquery.Jcrop.css file. Both of these files are used to set the crop section area on image. Lets check the example of Jquery crop section area of image.

<!DOCTYPE html>
<html xmlns="http://www.w3.org/1999/xhtml">
<head>
    <title></title>
    <script src="http://code.jquery.com/jquery-1.8.2.js"></script>
    <script src="jquery.Jcrop.js"></script>
    <link href="jquery.Jcrop.css" rel="stylesheet" />
    <script>
        $(function () {
            $("#cropimage").Jcrop({
                onSelect: croparea


            });

        })
        function croparea(c) {
            $("#coordinate_x").val(c.x);
            $("#coordinate_y").val(c.y);
            $("#coordinate_w").val(c.w);
            $("#coordinate_h").val(c.h);

        };

    </script>
</head>
<body>
    <div>
        <img src="image/12.PNG" id="cropimage"/>
        <input type="hidden" id="coordinate_x" />
        <input type="hidden" id="coordinate_y" />
        <input type="hidden" id="coordinate_w" />
        <input type="hidden" id="coordinate_h" />

    </div>

</body>
</html>

Code generate the following output

JQuery: Define crop section area of image

Saturday, October 3, 2015

How to get information about drive and their properties using windows form

Using The DriveInfo Class

The DriveInfo class provides access to information related to a drive, such as space availabe on a drive, total storage space of the drive and drive name. The DriveInfo class can also be used to query the format of a drive, such as NTFS or FAT and type of the drive, such as fixed, CD-ROM, or removable. This class throws an exception if a drive is currently not ready. For example, if we want to get information of a CD-ROM that does not contain a CD in it, The DriveInfo class will throw an exception. We can avoid such exceptions by using the IsReady property of the DriveInfo class. If the DriveInfo property returns true, we can access a drive without an exception.
In previous example we have been accessed Logical drives of the system. See previous image

How to access drive of the system

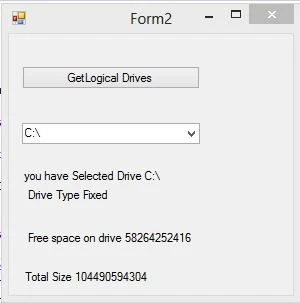
Now in this example we will access Logic drive information such as drive type , drive size and free space of the drive. So first we take four label control to the design window after that handle comboBox1_SelectedIndexChanged event in the program.

Complete code


using System;
using System.Collections.Generic;
using System.ComponentModel;
using System.Data;
using System.Drawing;
using System.IO;
using System.Linq;
using System.Text;
using System.Threading.Tasks;
using System.Windows.Forms;

namespace WindowsFormsApplication2
{
    public partial class Form2 : Form
    {
        public Form2()
        {
            InitializeComponent();
        }

        private void button1_Click(object sender, EventArgs e)
        {
            string[] str = Directory.GetLogicalDrives();
            foreach (string item in str)
            {
                comboBox1.Items.Add(item);

            }

        }

        private void comboBox1_SelectedIndexChanged(object sender, EventArgs e)
        {
            try
            {
                string drive = comboBox1.SelectedItem.ToString();
                label1.Text = "you have Selected Drive " + drive;
                DriveInfo info = new DriveInfo(drive);
                label2.Text = "Drive Type " + info.DriveType.ToString();
                label3.Text = "Free space on drive " + info.AvailableFreeSpace.ToString();
                label4.Text = "Total Size " + info.TotalSize.ToString();


            }
            catch (Exception exp)
            {

                label1.Text = exp.Message;

            }
        }
    }
}


Output
How to Access drive information in c#

Thursday, October 1, 2015

Use pen paint tool online using html5 canvas with JQuery

Introduction
In this article i will show you how to draw using pencil, i mean to say your mouse cursor behaves like pencil on specific area of web browser. You can draw something on web browser using mouse cursor. Also you can use this for digital signature. Through this article i will explain how to design paint online for drawing something.


Description
In this article i will use Html5 canvas with JQuery. i will use canvas for drawing area and sketch.js file is used for drawing on it. I explained Button working as file upload control using JQuery, Open and close new window using Jquery , event inside event example in JQuery etc.

Source code:

<!DOCTYPE html>
<html xmlns="http://www.w3.org/1999/xhtml">
<head>
    <title></title>
    <script src="http://ajax.googleapis.com/ajax/libs/jquery/1.8.3/jquery.min.js"></script>
    <script src="http://intridea.github.io/sketch.js/lib/sketch.min.js"></script>
    <script>
        $(function () {
            $('#sketch').sketch();

            $(".digital a").eq(0).attr("style", "color:#ddd");
            $(".digital a").click(function () {
                $(".tools a").removeAttr("style");
                $(this).attr("style", "color:#000");
            });


            $("#savebtn").bind("click", function () {
                var base64 = $('#sketch')[0].toDataURL();
                $("#imgc").attr("src", base64);
                $("#imgc").show();
    });
        });
     </script>


</head>
<body>
    <div class="digital">
        <a href="#sketch" data-tool="marker">marker</a>
        <a href="#sketch" data-tool="remover">remover</a>
            </div>

    <br/>
    <canvas id="sketch" width="600" height="300"></canvas>
    <br/>
    <input type="button" id="savebtn" value="image save"/>
    <img id="imgc" alt="" style="display:none"/>


</body>
</html>

Code Generate the following output

WPF: Show Each row details in DataGrid when we click on rows

Introduction
In this article i will explain how to bind the DataGrid with list, which is already bind with public class. Also explain, when we click on any row of DataGrid then it display detailed information of selected row. This things is possible through RowDetailsTemplate of DataGrid Template. In this DataGrid we have two TextColumn and one TextBlock.

Source Code

<Grid Name="grid1" Margin="0,10,0,0">
        <DataGrid Name="dg" AutoGenerateColumns="False">
            <DataGrid.Columns>
                <DataGridTextColumn Header="ID" Binding="{Binding Id}"/>
                <DataGridTextColumn Header="Name" Binding="{Binding Name}"/>


            </DataGrid.Columns>
            <DataGrid.RowDetailsTemplate>
                <DataTemplate>
                    <TextBlock Text="{Binding Details}"/>
                </DataTemplate>
            </DataGrid.RowDetailsTemplate>          
        </DataGrid>    

    </Grid>

Code Behind 

using System;
using System.Collections.Generic;
using System.Linq;
using System.Text;
using System.Threading.Tasks;
using System.Windows;
using System.Windows.Controls;
using System.Windows.Data;
using System.Windows.Documents;
using System.Windows.Input;
using System.Windows.Media;
using System.Windows.Media.Imaging;
using System.Windows.Shapes;

namespace WpfApplication1
{
    /// <summary>
    /// Interaction logic for addcolumn.xaml
    /// </summary>
    public partial class addcolumn : Window
    {
        public addcolumn()
        {
            InitializeComponent();
            List<student> students = new List<student>();
            students.Add(new student() { Id = 1, Name = "Jacob" });
            students.Add(new student() { Id = 2, Name = "Bill" });
            students.Add(new student() { Id = 3, Name = "Ammey" });
            students.Add(new student() { Id = 4, Name = "John" });
            students.Add(new student() { Id = 5, Name = "kitty" });
            dg.ItemsSource = students;
       
        }
     public class student
     {
         public int Id { get; set; }
         public string Name { get; set; }
         public string Details
         {
             get
             {
                 return String.Format("{0}=>this is row id and {1}=> this is row name", Id, Name);
             }
         }
     }
           
    }
}

Code generate the following output

WPF: Show Each row details in DataGrid when we click on rows

Wednesday, September 30, 2015

fire event inside another event using JQuery

Introduction
In this article i will show you how to fire event inside event using JQuery. I will give an example of it. In this article, first we create a table using JQuery then append the table with the dynamically created table. First, we get the column of the table for inside event then generate function on table row. Lets check the example.

Source code
<%@ Page Language="C#" AutoEventWireup="true" CodeFile="browserdetails.aspx.cs" Inherits="browserdetails" %>

<!DOCTYPE html>

<html xmlns="http://www.w3.org/1999/xhtml">
<head>
<script src="http://code.jquery.com/jquery-1.10.2.js"></script>
    <title></title>
    <script>
 

        $(function () {
            $("#btncreate").click(function () {
                var newtable = '<table id="mytable"><tr><td>Column1</td><td>Column2</td></tr><tr><td>Row11</td><td>Row12</td></tr></table>';
                $("#tbcontainer").append(newtable);

                var tblid = $("#tbcontainer table").attr("id");
           
                $("#" + tblid).on("click", "tr:last", function () {
                    var val1 = $(this).find("td").eq(0).text();
                    var val2 = $(this).find("td").eq(1).text();
                    alert(val1 + "  " + val2);
                })
            })
        })
</script>

</head>
<body>
    <form id="form1" runat="server">
    <div>
    <label id="tbcontainer" />
   
        <input id="btncreate" type="button" value="button" />
    </div>
    </form>
</body>
</html>

Code Generate the following output
fire event inside another event using JQuery

Open and close new window using JQuery

Introduction
In this article i will show you how to open new window when we click on button using JQuery. I will give an example of it. Also do some thing like when we click on other button then opened new window will closed also mentioned in the example.

Description
I have explained Get browser details using JQuery, Button work as fileupload control in JQuery.
Source code
<!DOCTYPE html>
<html>
<head>
    <title> OPen and close window using JQuery </title>
</head>
<body>

    <form name="form1">
        <input type="button" value="Open New Window" id="btnOpen" />
        <p> <input type="button" value="Close New Window" id="btnClose" />

    </form>
    <script src="https://code.jquery.com/jquery-2.1.4.js"></script>
    <script type="text/javascript">
     
        var Window1;
        $(function () {
            $(form1.btnOpen).click(function () {
                Window1 =  window.open('', 'YourWindow', 'height=500,width=500');
            });
            $(form1.btnClose).click(function () {
                Window1.close();
            });
        });


    </script>
</body>
</html>
Code Generate the following output
Open and close new window using JQuery

© Copyright 2013 Computer Programming | All Right Reserved