-->

Wednesday, October 14, 2015

Facebook see more button using JQuery

Introduction
In this article i will show you how to show 100 characters only from lots of words and remaining words or you can say characters are hide from see more words, just like facebook.com.  In facebook.com website, when we post some article which is lengthy in words then facebook.com functionality hide words just after specified length behind the see more links. Now, today i will give an example of it.


<!DOCTYPE html>
<html xmlns="http://www.w3.org/1999/xhtml">
<head>
    <title>Facebook See More and See Less</title>
    <script src="Scripts/jquery-1.10.2.js"></script>
    <script type="text/javascript">
    $(document).ready(function () {
        var sChar = 100;
        var ellipsestxt = "...";
        var moretext = "more";
        var lesstext = "less";
        $('.more').each(function () {
            var content = $(this).html();

            if (content.length > sChar) {

                var c = content.substr(0, sChar);
                var h = content.substr(sChar - 1, content.length - sChar);

                var html = c + '<span class="moreellipses">' + ellipsestxt + '&nbsp;</span><span class="morecontent"><span>' + h + '</span>&nbsp;&nbsp;<a href="" class="facebookmorelink">' + moretext + '</a></span>';

                $(this).html(html);
            }

        });

        $(".facebookmorelink").click(function () {
            if ($(this).hasClass("less")) {
                $(this).removeClass("less");
                $(this).html(moretext);
            } else {
                $(this).addClass("less");
                $(this).html(lesstext);
            }
            $(this).parent().prev().toggle();
            $(this).prev().toggle();
            return false;
        });
    });
    </script>
    <style>
        a {
            color: #0221ac;
        }

            a:visited {
                color: #02abcd;
            }

            a.facebookmorelink {
                text-decoration: none;
                outline: none;
            }

        .morecontent span {
            display: none;
        }

        .facebookseemore {
            width: 400px;
            background-color: #f0f0f0;
            margin: 10px;
        }
    </style>
 
</head>
<body>
    <div class="facebookseemore more">
<h1>Health Tips</h1>

        Fat on face or double chin suits on a person till a limited age only.
         As age of a person increases fat free face is considered more beautiful.
         Some girls do not like their fatty cheeks because it makes them look fat.
         Fat on face can increase because of many reasons like lack of water, presence
         of fat in diet and other fatty products. And for hiding it you may do make up
         but it is not the thing which gets hided easily. Today
        we are going to tell you about some such tips which can reduce fat from your face at a great extent.


    </div>
 
</body>
</html>
Code Generate the following output
Facebook see more button using JQuery


DataSet.ReadXml( ) method example in ASP.NET C#

Introduction
In this article i will give an example of DataSet.ReadXml( ) method. Through this we can read xml file in ASP.NET C#. In this method we will pass xml file URL.
Description
I have explained more about xml like How to create xml sitemap in ASP.NET C#.

Introduction about XML

XML stands for xtensible markup language. It have many features such as:
  • Xml is used for carry data .
  • Xml structure is based on tree structure.
  • Xml is not a presentation language 
  • XML use user defined tags for making structre.
  • Xml language is a case-sensitive language. 
  • XML is a Text File 

Now at a time if you want to make a structural database in xml file then you follow some steps . these steps are:
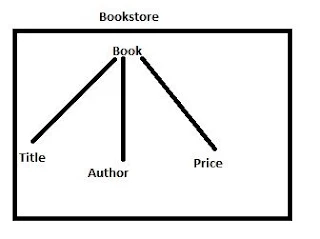
Step-1: First defined root node like <bookstore> 
Step-2: Declare child node <bookstore> <book>
Now you can consider book tag is your table name which you create in SQL and bookstore represent the database name.
Step-3 : Declare your column name inside the <book> tag such as Title of the book, author and price of the book .
now your file look like that.
Book store tree
Step-4 repeat your step 2-3 again
Now your complete code is

<?xml version="1.0" encoding="utf-8" ?>
<bookstore>
  <book>
    <title>
      ASP.NET
    </title>
    <author>
      SCOTT
    </author>
    <price>
      20$
    </price>
  </book>
<book>
    <title>
      PHP
    </title>
    <author>
      JECOB
    </author>
    <price>
      20$
    </price>
  </book>


</bookstore>

Dataset

Dataset is a collection of data-Table. So easily you can bind any control with Dataset . Dataset is a class file which stored in System.Data namespace. Here in this example using Dataset we can read xml file from the source. 
lets take an example , How to bind GridView using XML file in ASP.NET


<%@ Page Language="C#" AutoEventWireup="true" CodeFile="Default12.aspx.cs" Inherits="Default12" %>

<!DOCTYPE html>

<html xmlns="http://www.w3.org/1999/xhtml">
<head runat="server">
    <title></title>
</head>
<body>
    <form id="form1" runat="server">
    <div>
        <asp:GridView ID="GridView1" runat="server">
        </asp:GridView>
    </div>
    </form>
</body>
</html>

Codebehind

using System;
using System.Collections.Generic;
using System.Linq;
using System.Web;
using System.Web.UI;
using System.Web.UI.WebControls;
using System.Data;

public partial class Default12 : System.Web.UI.Page
{
    protected void Page_Load(object sender, EventArgs e)
    {
        DataSet ds = new DataSet();
        ds.ReadXml(Server.MapPath("XMLFile.xml"));
        GridView1.DataSource = ds;
        GridView1.DataBind();
    }
}
Output
How to bind GridView using XML file in ASP.NET

Tuesday, October 13, 2015

Use GridView.Sorting Event in ASP.NET C#

Introduction

In this article we will learn how to sort gridview data using Gridview columns.I mean to say when we click on gridview columns then data will be in ordered like ascending or descending. If you want to sort available data by using code then you should see this article.

About Sorting 

Sorting means rearranging data either ascending or descending data. you want to perform sorting of the data then you should apply technique to sort of the data . Various techniques are available in logic programming such as Bubble sort, insertion sort , quick sort , selection sort etc.
Basically GridView represents Data in 2D array. Graphical representation of 2D array is


How to sort Gridview Data in ASP.NET
Lets take an example , Firstly bind GridvView with database using the SqlDataSource. After binding the GridView you should select Enable Sorting Checkbox using ShowSmart Tag.

Enable Sorting Checkbox

Your complete Code
<%@ Page Language="C#" AutoEventWireup="true" CodeFile="Default10.aspx.cs" Inherits="Default10" %>

<!DOCTYPE html>

<html xmlns="http://www.w3.org/1999/xhtml">
<head runat="server">
    <title></title>
</head>
<body>
    <form id="form1" runat="server">
    <div>
 
        <asp:GridView ID="GridView1" runat="server" AllowSorting="True" AutoGenerateColumns="False" DataKeyNames="Id" DataSourceID="SqlDataSource1">
            <Columns>
                <asp:BoundField DataField="Id" HeaderText="Id" InsertVisible="False" ReadOnly="True" SortExpression="Id" />
                <asp:BoundField DataField="namet" HeaderText="namet" SortExpression="namet" />
                <asp:BoundField DataField="Income" HeaderText="Income" SortExpression="Income" />
            </Columns>
        </asp:GridView>
        <asp:SqlDataSource ID="SqlDataSource1" runat="server" ConnectionString="<%$ ConnectionStrings:ConnectionString %>" SelectCommand="SELECT * FROM [footerex]"></asp:SqlDataSource>
 
    </div>
    </form>
</body>
</html>

Output
How to sort Gridview Data in ASP.NET

How to sort Gridview Data in ASP.NET

Saturday, October 10, 2015

Jquery watermark text of textbox example

In this article i will show you, water text of textBox using JQuery. i will give you an example of it. When first time browser load, all textbox generate a function, which are contains title of the textbox. Also add a class with all textboxes. Lets see the example of JQuery Watermark text:


<!DOCTYPE html>
<html xmlns="http://www.w3.org/1999/xhtml">
<head>
    <title></title>
    <style>
        .text-based{
            color:#808080;
            font-weight:bold;

        }

    </style>

    <script src="Scripts/jquery-1.10.2.js"></script>
    <script>
        $(document).ready(function () {
            $('input[type="text"]').each(function () {

                this.value = $(this).attr('title');
                $(this).addClass('text-based');

                $(this).focus(function () {

                    if (this.value == $(this).attr('title')) {

                        this.value = '';
                        $(this).removeClass('text-based');
                    }


                });
                $(this).blur(function () {
                    if (this.value == '') {
                        this.value = $(this).attr('title');
                        $(this).addClass('text-based');

                    }

                })
            })

        });

    </script>
</head>
<body>
    UserName: <input type="text" value="" name="username" title="Enter UserName"/>
</body>
</html>

Code Generate the following output:


Jquery watermark text of textbox example

Friday, October 9, 2015

JQuery: image tag created dynamically

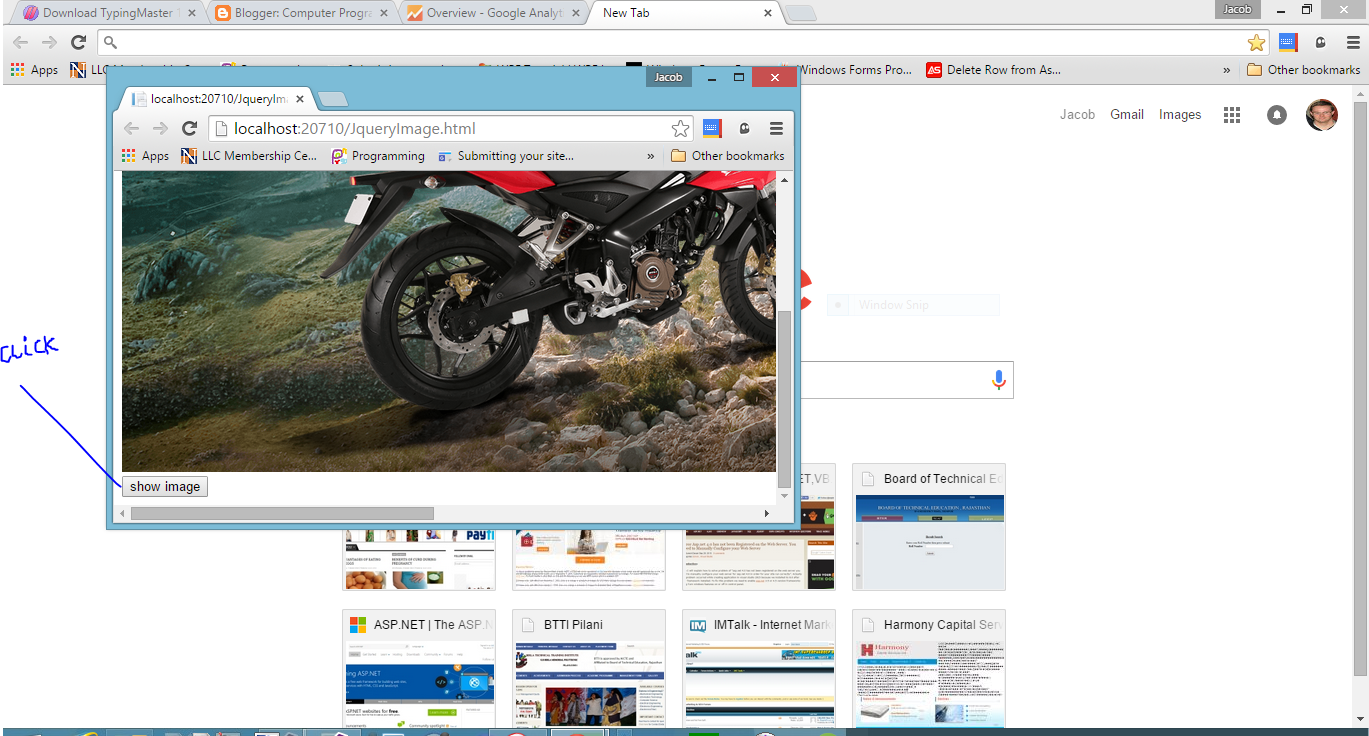
In this article i will show you how to add image tag dynamically using JQuery. In this article i will show you how to add image tag using JQuery/JavaScript. First of all add a .JS script in the page. When we click on button then generate a jquery function. In this function, first to add a image tag with "$" sign. Also add image attribute with the image . Add dynamically created image in the division.


<!DOCTYPE html>
<html xmlns="http://www.w3.org/1999/xhtml">
<head>
    <title></title>
    <script src="Scripts/jquery-1.10.2.js"></script>
    <script>
        $(function () {
            $("#btnimg").click(function () {
                var img = $('<img id="runtime">');
                img.attr('src', "image/12.png");
                img.appendTo("#div1");
            });


        });
    </script>
</head>
<body>
    <div id="div1">

    </div>
    <input type="button" id="btnimg" value="show image"/>

</body>
</html>

Code generate the following output:

JQuery: image tag created dynamically


Wednesday, October 7, 2015

open new form, close existing wpf form c#

This thread solve all realted questions which is generated on open new form, close existing wpf form c#. Also this thread solve other related thread like:

  • WPF Application still runs in background after closing.
  • My Windows Store app is still running in debug mode after I close it.
  • VS2012 Debugging fails on subsequent runs.
  • WPF Main application stops responding if a child window is being moved around.
  • Application doesn't exit if it creates a window which is not shown.
  • How main WPF window knows when secondary WPF window is closed.
  • When shutting down the application, not all windows are closed.
  • How to connect WPF Application project to Windows Game project?
  • Clarification on WPF Window.Show() and Window.Close() and how they work with Multiple Windows.
  • WPF App Doesn't Shut Down When Closing Main Window.

Now the solution of all thread is, following steps which is mentioned below:
Step-1 :   Add two new window in wpf solution explorer. like first.xaml and second.xaml 

Step-2 :  Add a button control in first window from the toolbox.

Step-3 : Add this code into your first.xaml.cs file.


        private void Button_Click(object sender, RoutedEventArgs e)
        {
            second sc = new second();
            sc.Owner = this;
            this.Hide();
            sc.ShowDialog();
        }

Step-4 :  Also add this code into your second.xaml.cs file.

protected override void OnClosed(EventArgs e)
        {
            base.OnClosed(e);
            Application.Current.Shutdown();
        }

Now, run your application, but first to set the start page from app.xaml file. 
How to set startup page in wpf:
1. Open app.xaml file; also set startupUri like

<Application x:Class="WpfApplication1.App"
             xmlns="http://schemas.microsoft.com/winfx/2006/xaml/presentation"
             xmlns:x="http://schemas.microsoft.com/winfx/2006/xaml"
             StartupUri="first.xaml">
    <Application.Resources>
         
    </Application.Resources>
</Application>

Tuesday, October 6, 2015

jQuery Crop Image in Asp.net using Jcrop jQuery and Upload to Folder

Introduction
In this article i will show you how to crop image using JQuery, In previous article i was show you how to define the crop section of the image using JQuery. In this article i will show you how to upload cropped image into specified directory using ASP.NET c#. Copy this code and paste into your page.


Source code :

<%@ Page Language="C#" AutoEventWireup="true" CodeFile="cropimage.aspx.cs" Inherits="cropimage" %>

<!DOCTYPE html>

<html xmlns="http://www.w3.org/1999/xhtml">
<head runat="server">
    <title></title>
    <script src="http://code.jquery.com/jquery-1.8.2.js"></script>
    <link href="jquery.Jcrop.css" rel="stylesheet" />
    <script src="jquery.Jcrop.js"></script>
    <script>
        $(function () {
            $("#cropimage1").Jcrop({
                onSelect: croparea

            });
        });
        function croparea(c) {
            $("#coordinate_x").val(c.x);
            $("#coordinate_y").val(c.y);
            $("#coordinate_w").val(c.w);
            $("#coordinate_h").val(c.h);
        }


    </script>
    
</head>
<body>
    <form id="form1" runat="server">
    <div>
        <img src="image/12.PNG" id="cropimage1" runat="server" />
        <input type="hidden" id="coordinate_x" runat="server"/>
          <input type="hidden" id="coordinate_y" runat="server"/>
          <input type="hidden" id="coordinate_w" runat="server"/>
          <input type="hidden" id="coordinate_h" runat="server"/>
        <asp:Button ID="Button1" runat="server" Text="Crop" OnClick="Button1_Click" />
        <img src="" id="cropimg" runat="server" visible="false" />
    
    </div>
    </form>
</body>
</html>

Code behind code

using System;
using System.Collections.Generic;
using System.Drawing;
using System.IO;
using System.Linq;
using System.Web;
using System.Web.UI;
using System.Web.UI.WebControls;
using Image = System.Drawing.Image;

public partial class cropimage : System.Web.UI.Page
{
    protected void Page_Load(object sender, EventArgs e)
    {

    }
    protected void Button1_Click(object sender, EventArgs e)
    {
        string filename = "12.PNG";
        string filepath = Path.Combine(Server.MapPath("~/image"), filename);
        Image outputfile = Image.FromFile(filepath);
        Rectangle cropcoordinate = new Rectangle(Convert.ToInt32(coordinate_x.Value), Convert.ToInt32(coordinate_y.Value), Convert.ToInt32(coordinate_w.Value), Convert.ToInt32(coordinate_h.Value));
        string confilename, confilepath;
        Bitmap bitmap = new Bitmap(cropcoordinate.Width, cropcoordinate.Height, outputfile.PixelFormat);
        Graphics grapics = Graphics.FromImage(bitmap);
        grapics.DrawImage(outputfile, new Rectangle(0, 0, bitmap.Width, bitmap.Height), cropcoordinate, GraphicsUnit.Pixel);
        confilename = "Crop_" + filename;
        confilepath = Path.Combine(Server.MapPath("~/cropimag"), confilename);
        bitmap.Save(confilepath);
        cropimg.Visible = true;
        cropimg.Src = "~/cropimag/" + confilename;


    }
}

In this aricle i have two file for cropping the image , first to download the file from this url. Now in the code behind use Rectangle class is used to defined the section of the image. Now put the coordinate,which is retrieved from JQuery Jcrop function into the rectangle class. 

© Copyright 2013 Computer Programming | All Right Reserved