-->

Saturday, January 30, 2016

ASP.NET GridView on JQuery Modal Popup

Introduction
In this article, I will show you how to display GridView in modal Popup, you can say how to display a division in model popup. Here we have two javascript file, both working as reference in this example also we have a style sheet to display division in proper format. By using the dialog method we can display model popup on screen. Lets check the example of model Popup which consists of GridView.

Source Code
<%@ Page Language="C#" AutoEventWireup="true" CodeFile="showgridviewinmodalpopup.aspx.cs" Inherits="showgridviewinmodalpopup" %>

<!DOCTYPE html>

<html xmlns="http://www.w3.org/1999/xhtml">
<head runat="server">
    <title></title>
      <link href="http://code.jquery.com/ui/1.11.4/themes/ui-lightness/jquery-ui.css" rel="stylesheet" type="text/css"/>
<script type="text/javascript" src="http://code.jquery.com/jquery-1.8.2.js"></script>
<script type="text/javascript" src="http://code.jquery.com/ui/1.10.3/jquery-ui.js"></script>
  <script>
      $(function () {
          $("#Button1").click(function () {
              $("#popupdiv").dialog({
                  title: "Show Modal POPUP",
                  width: 350,
                  height: 300,
                  modal: true,
                  buttons: {
                      Close: function () {
                          $(this).dialog('close');
                      }
                  }


              });


          })


      });


  </script>
</head>
<body>
    <form id="form1" runat="server">
    <div id="popupdiv" style="display:none">
    <asp:GridView runat="server" ID="g1" AutoGenerateColumns="false">
        <Columns>
            <asp:BoundField DataField="Id" HeaderText="ID" />
            <asp:BoundField DataField="username" HeaderText="UserName" />
            <asp:BoundField DataField="Password" HeaderText="Password" />
            <asp:BoundField DataField="email" HeaderText="Email" />
        </Columns>


    </asp:GridView>
    </div>
        <input id="Button1" type="button" value="button" />
           </form>
</body>
</html>

Code-Behind File
using System;
using System.Collections.Generic;
using System.Linq;
using System.Web;
using System.Web.UI;
using System.Web.UI.WebControls;
using System.Data.SqlClient;
using System.Configuration;

public partial class showgridviewinmodalpopup : System.Web.UI.Page
{
    protected void Page_Load(object sender, EventArgs e)
    {
        if (!Page.IsPostBack)
        {
            SqlConnection con = new SqlConnection();
            con.ConnectionString = ConfigurationManager.ConnectionStrings["ConnectionStringtr"].ToString();
            con.Open();

            SqlCommand cmd = new SqlCommand();
            cmd.CommandText = "select * from [user_table]";
            cmd.Connection = con;
            SqlDataReader rd = cmd.ExecuteReader();
            g1.DataSource = rd;
            g1.DataBind();
         
        }
    }
 
}

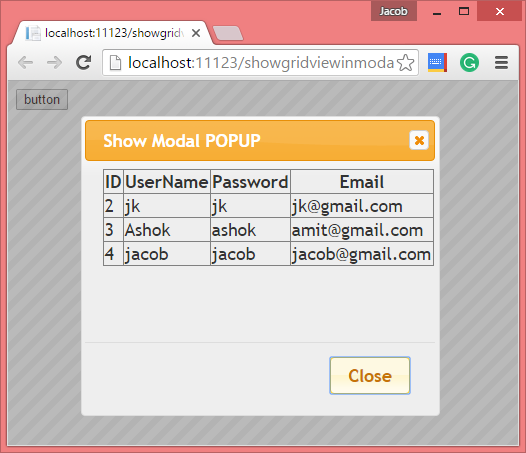
Code Generate the following output:


Thursday, January 28, 2016

JQuery ASP.NET GridView details on Modal Popup

In this article, I will show you how to show details of the grid view's row on modal popup. Before doing this article, I will show details of row in second page. You can say that  all information of particular data shown on modal popup. Lets take an example:

<%@ Page Language="C#" AutoEventWireup="true" CodeFile="GRIDVIEWDETAILS.aspx.cs" Inherits="GRIDVIEWDETAILS" %>

<!DOCTYPE html>

<html xmlns="http://www.w3.org/1999/xhtml">
<head runat="server">
    <title></title>
    <link href="http://code.jquery.com/ui/1.11.4/themes/ui-lightness/jquery-ui.css" rel="stylesheet" type="text/css"/>
<script type="text/javascript" src="http://code.jquery.com/jquery-1.8.2.js"></script>
<script type="text/javascript" src="http://code.jquery.com/ui/1.10.3/jquery-ui.js"></script>
    <script>
        function popup(idn,un,ps,em)
        {
            $("#userid").text(idn);
            $("#usern").text(un);
            $("#pwd").text(ps);
            $("#eml").text(em);
            $("#popupdiv").dialog({
                title: "Show modal popup window",
                width: 350,
                height: 250,
                modal: true,
                buttons: {
                    Close: function () {
                        $(this).dialog('close');
                    }
                }


            })
         
        }


    </script>
</head>
<body>
    <form id="form1" runat="server">
    <div id="popupdiv" title="JQuery Modal" style="display:none">
        id:<label id="userid"></label><br />
        userName :<label id="usern"></label><br />
        Password : <label id="pwd"></label><br />
        Email : <label id="eml"></label>
        </div>


        <asp:GridView AutoGenerateColumns="false" ID="g1" runat="server">
            <Columns>
                <asp:BoundField DataField="Id" HeaderText="ID" />
                <asp:BoundField DataField="username" HeaderText="UserName" />
                <asp:BoundField DataField="Password" HeaderText="Password" />
                <asp:BoundField DataField="email" HeaderText="Email" />
              <asp:TemplateField>
                  <ItemTemplate>

                      <a href="#" onclick='popup("<%# Eval("Id") %>","<%# Eval("username") %>","<%# Eval("Password") %>","<%# Eval("email") %>")'>Check</a>

                  </ItemTemplate>

              </asp:TemplateField>

            </Columns>


        </asp:GridView>
   
 
    </form>
</body>
</html>

According to mentioned code, we have a grid view with 4 columns and one hyperlink column. Hyperlink column contains four parameters. When we click on it then all these are pass into JavaScript function. In this function, generate modal popdialog by using dialog method.

using System;
using System.Collections.Generic;
using System.Configuration;
using System.Data.SqlClient;
using System.Linq;
using System.Web;
using System.Web.UI;
using System.Web.UI.WebControls;


public partial class GRIDVIEWDETAILS : System.Web.UI.Page
{
    protected void Page_Load(object sender, EventArgs e)
    {
        if (!Page.IsPostBack)
        {
            SqlConnection con = new SqlConnection();
            con.ConnectionString = ConfigurationManager.ConnectionStrings["ConnectionStringtr"].ToString();
            con.Open();

            SqlCommand cmd = new SqlCommand();
            cmd.CommandText = "Select * from [user_table]";
            cmd.Connection = con;

            SqlDataReader rd = cmd.ExecuteReader();
            g1.DataSource = rd;
            g1.DataBind();
        }
    }

Code generate the following output:


Friday, January 22, 2016

Merge two Data Column and bind GridView in ASP.NET

In this article, I will show you how to merge two data column into single one. First of all, bind DataTable with four columns i.e SNO, FirstName, LastName and City. Bind the DataTable source with GridView. Now, You can change the binding view of Gridview using OnRowDataBound event.

<%@ Page Language="C#" AutoEventWireup="true" CodeFile="Default12.aspx.cs" Inherits="Default12" %>

<!DOCTYPE html>

<html xmlns="http://www.w3.org/1999/xhtml">
<head runat="server">
    <title></title>
</head>
<body>
    <form id="form1" runat="server">
    <div>
    <asp:GridView runat="server" ID="g1" AutoGenerateColumns="false" OnRowDataBound="g1_RowDataBound">

        <Columns>

            <asp:BoundField DataField="SNO" HeaderText="Serial Number" />
            <asp:BoundField DataField="" HeaderText="Name(First+Last)" />
            <asp:BoundField DataField="City" HeaderText ="City" />

        </Columns>


    </asp:GridView>
    </div>
    </form>
</body>
</html>


Code Behind Code

using System;
using System.Collections.Generic;
using System.Data;
using System.Linq;
using System.Web;
using System.Web.UI;
using System.Web.UI.WebControls;

public partial class Default12 : System.Web.UI.Page
{
    protected void Page_Load(object sender, EventArgs e)
    {
        if(!Page.IsPostBack)
        {
            DataTable dt = new DataTable();
            dt.Columns.AddRange(new DataColumn[4] { new DataColumn("SNO"), new DataColumn("FirstName"), new DataColumn("LastName"), new DataColumn("City") });
            dt.Rows.Add(1, "jacob ", "lefore", "New York");
            dt.Rows.Add(2, "Bill ", "Smith", "US1");
            dt.Rows.Add(3, "Smith ", "Bill", "US2");
            dt.Rows.Add(4, "Ammey ", "Bella", "US3");
            g1.DataSource = dt;
            g1.DataBind();
        }

    }
    protected void g1_RowDataBound(object sender, GridViewRowEventArgs e)
    {
        if (e.Row.RowType == DataControlRowType.DataRow)
        {
            e.Row.Cells[1].Text = string.Format("{0}-{1}", DataBinder.Eval(e.Row.DataItem, "FirstName"), DataBinder.Eval(e.Row.DataItem, "LastName"));
        }
    }
}

Tuesday, January 12, 2016

ASP.NET C# add Multiple table into DataSet

In this article, I will show you, How to add multiple Database tables in DataSet. I write many articles on DataSet. We all know that we can store multiple Database Table in it. To do this task, first of all add two Gridview control on web form, now your web form look like :

Source Code

<%@ Page Language="C#" AutoEventWireup="true" CodeFile="addmultipletable.aspx.cs" Inherits="addmultipletable" %>

<!DOCTYPE html>

<html xmlns="http://www.w3.org/1999/xhtml">
<head runat="server">
    <title></title>
</head>
<body>
    <form id="form1" runat="server">
    <div>

        <asp:GridView ID="GridView1" runat="server">
        </asp:GridView>
        <br />
        <asp:GridView ID="GridView2" runat="server">
        </asp:GridView>

    </div>
    </form>
</body>
</html>

Here, I am using two Gridview control. Both are bind with different tables. Actually i am retriving two tables using SQL Query. For the binding we are using two class i.e SqlConnection and SqlCommand.

Code Behind File

using System;
using System.Collections.Generic;
using System.Configuration;
using System.Data;
using System.Data.SqlClient;
using System.Linq;
using System.Web;
using System.Web.UI;
using System.Web.UI.WebControls;

public partial class addmultipletable : System.Web.UI.Page
{
    protected void Page_Load(object sender, EventArgs e)
    {
        bindgrid();
       //bindsecondgrid();
    }

    private void bindgrid()
    {
        string query="select * from [user_table]";
        query +="select * from [customer]";
        SqlConnection con = new SqlConnection();
        con.ConnectionString=ConfigurationManager.ConnectionStrings["ConnectionStringtr"].ToString();
        con.Open();
        SqlCommand cmd=new SqlCommand();
        cmd.CommandText =query;
        cmd.Connection=con;
        DataSet ds=new DataSet();
        SqlDataAdapter da=new SqlDataAdapter(cmd);
        da.Fill(ds);
        GridView1.DataSource = ds.Tables[0];
        GridView1.DataBind();
        GridView2.DataSource = ds.Tables[1];
        GridView2.DataBind();
      //  throw new NotImplementedException();
    }
}

Sunday, January 10, 2016

Change System date Format using c#

If you want to change Your system date format using c# then you must to use RegistryKey class. This class is available in Microsoft.Win32 namespace. By using this class you can change the short and long date format, Before any changes the Date format look like.

Change System date Format using c#

Now, after the code you can change the Date format:

using Microsoft.Win32;

private void button1_Click(object sender, EventArgs e)
        {
            RegistryKey regkey = Registry.CurrentUser.OpenSubKey(@"Control Panel\International", true);
            regkey.SetValue("sShortDate", "10/12/87");
            regkey.SetValue("sLongDate", "10/12/87");
        }

Customized Date Format

Friday, January 8, 2016

Export DataGridView to Excel using OpenXML and ClosedXML

In this article, I will explain you, How to export data of DataGridView to Excel file. In this article, I will use OpenXML and ClosedXml libraries for export data. We can also export data of DataGridView using Foreach loop by fetching each row of it. To do this task, first of all Download two assemblies i.e :

  1. Open XML SDK 2.0 For Microsoft Office 
  2. Closed XML

Now, Add windows form into your project. Add a DataGridView and single button on it.

using System;
using System.Windows.Forms;
using System.IO;
using System.Data;
using System.Reflection;
using ClosedXML.Excel;

namespace Export_DataTable_Excel
{
    public partial class Form1 : Form
    {
        public Form1()
        {
            InitializeComponent();
            this.BindData();
        }

        private void BindData()
        {
            DataTable dt = new DataTable();
            dt.Columns.AddRange(new DataColumn[3] { new DataColumn("StudentId", typeof(int)),
            new DataColumn("StudentName", typeof(string)),
            new DataColumn("StudentCity",typeof(string)) });
            dt.Rows.Add(1, "Jacob lefore", "US");
            dt.Rows.Add(2, "Ammey smith", "UK");
            dt.Rows.Add(3, "Bill Smith", "Fr");
            dt.Rows.Add(4, "Robert", "Ru");
            this.dataGridView1.DataSource = dt;
        }

        private void ExportExcel_Click(object sender, EventArgs e)
        {
     
            DataTable dt = new DataTable();

 
            foreach (DataGridViewColumn column in dataGridView1.Columns)
            {
                dt.Columns.Add(column.HeaderText, column.ValueType);
            }

   
            foreach (DataGridViewRow row in dataGridView1.Rows)
            {
                dt.Rows.Add();
                foreach (DataGridViewCell cell in row.Cells)
                {
                    dt.Rows[dt.Rows.Count - 1][cell.ColumnIndex] = cell.Value.ToString();
                }
            }

            //Exporting to Excel
            string folderPath = "C:\\my\\";
            if (!Directory.Exists(folderPath))
            {
                Directory.CreateDirectory(folderPath);
            }
            using (XLWorkbook xlfile = new XLWorkbook())
            {
               xlfile.Worksheets.Add(dt, "students");
               xlfile.SaveAs(folderPath + "data.xlsx");
            }
        }
    }
}

Code Generates the following output

Export DataGridView to Excel using OpenXML and ClosedXML

Program x to power y in C Language

Introduction 

The meaning of x to the power of y is , a variable x is multiply for y time. Lets take a simple example a variable x is hold 2 and y hold 5. Now the answer is 2 multiply for 5 times such as..
z=2*2*2*2*2;
z=32

Method-1: 

Design a Algorithm in c

Step-1 : Take two value in variable x and y by user input.
Step-2 :  Use pow function in  "C" , which is available in math.h header file.
Step-3 :  Take another variable Z for holding answer of the x to the power of y.
Step-4 : Print z 
Step-5 : End of the program.

Program :

#include<conio.h>
#include<stdio.h>
#include<math.h>
void main()
{
int x,y,z;
printf("enter X value");
scanf("%d",&x);
printf("Enter Y value");
scanf("%d",&y);
z=pow(x,y);
printf("output of the x power y is%d",z);
getch();
}

Output
Program x to power y in C


Method-2 : Using recursion

Algorithm of the program

Step-1: Step-1 : Take two value in variable x and y by user input.
Step-2: Create a function  and pass values of x and y  to the function.
Step-3 : Call same function for y times 
Step-4 : Return function 

Program

#include<conio.h>
#include<stdio.h>
#include<math.h>
void main()
{
int x,y,z;
clrscr();
printf("enter X value");
scanf("%d",&x);
printf("Enter Y value");
scanf("%d",&y);
z=fun(x,y);
printf("output of the x power y is%d",z);
getch();
}
int fun(int a,int b)
{
if(b>=1)
{
return a*fun(a,--b);
}
else
return 1;
}


Output
Program x to power y in C

Method -3:Using third variable

Algorithm:
Step-1: Take two value in variable x and y by user input.
Step-2: Run for loop for y times.
Step-3 : Take third variable z with 1 value
Step-4 : Multiply x with z for y times in for loop
Step-5 : Take output value in z variable
Step-6 :  End of the program

Program


#include<conio.h>
#include<stdio.h>
#include<math.h>
void main()
{
int x,y,i,z=1;
clrscr();
printf("enter X value");
scanf("%d",&x);
printf("Enter Y value");
scanf("%d",&y);
for(i=0;i<y;i++)
{
z=x*z;
}
printf("output of the x power y is%d",z);
getch();
}

Output

Program x to power y in C

© Copyright 2013 Computer Programming | All Right Reserved