-->

Sunday, September 22, 2013

How to pass value from one page to another page in ASP.NET

There are various techniques to pass values from one page to another page . These are Session, ViewState, QueryString, findControl , etc
Here we use one by one for passing values from one page to another page.

Use Session: 

Syntax : 
Session["Session variable"] = variable;
variable = Session["Session variable"].Tostring();

Note : Session value store in all page of browser.

Use QueryString 

Syntax : Basically query string pass in URL
http://dotprogramming.blogspot.com/default.aspx?id=7    // here id=7 define query string data

lets take an simple example
Step-1 : Take two Web forms (first.aspx and second.aspx)
Step-2 : first page contain one textbox , one button and one hyperlink control

<%@ Page Language="C#" %>

<!DOCTYPE html PUBLIC "-//W3C//DTD XHTML 1.0 Transitional//EN" "http://www.w3.org/TR/xhtml1/DTD/xhtml1-transitional.dtd">

<script runat="server">

    protected void Button1_Click(object sender, EventArgs e)
    {
        Session["username"] = TextBox1.Text;
    }
</script>

<html xmlns="http://www.w3.org/1999/xhtml">
<head runat="server">
    <title></title>
</head>
<body>
    <form id="form1" runat="server">
    <div>
    Enter Session data :
        <asp:TextBox ID="TextBox1" runat="server"></asp:TextBox><br />
        <asp:Button ID="Button1" runat="server" Text="Store Session"
            onclick="Button1_Click" />
        <br />
        <asp:HyperLink ID="HyperLink1" runat="server" NavigateUrl ="~/second.aspx?id=7" >QueryString</asp:HyperLink>
        <br />
    </div>
    </form>
</body>
</html>

Step-3 : Second page contains two label control.

<%@ Page Language="C#" %>

<!DOCTYPE html PUBLIC "-//W3C//DTD XHTML 1.0 Transitional//EN" "http://www.w3.org/TR/xhtml1/DTD/xhtml1-transitional.dtd">

<script runat="server">

    protected void Page_Load(object sender, EventArgs e)
    {
        Label1.Text = "Session data " + Session["username"].ToString();
        Label2.Text = "query string data" + Page.Request.QueryString["id"].ToString();
    }
</script>

<html xmlns="http://www.w3.org/1999/xhtml">
<head runat="server">
    <title></title>
</head>
<body>
    <form id="form1" runat="server">
    <div>
        <asp:Label ID="Label1" runat="server" Text=""></asp:Label><br />
        <asp:Label ID="Label2" runat="server" Text=""></asp:Label>

    </div>
    </form>
</body>
</html>


Output
How to pass value from one page to another page in ASP.NET

How to pass value from one page to another page in ASP.NET

How to use LoginView Control in ASP.NET

The LoginView Control

The LoginView control is a Web Server control, which is used to display two different views of a Web page of any website, depending on whether the user has logged on to a Web page as a registered user or a visitor. The LoginView control provides a way of altering the look of the page or showing different content to different groups of users. This control has the built-in functionality to gether the current user's status and roles. If the user is authenticated, the control displays the appropriate information to the user with the help of its three view templates which are:
  • AnonymousTemplate : Displayed when the user is not logged in
  • LoggedInTemplate : Displayed when the user is logged in 
  • RoleGroups : Displayed when the user who has logged in, is a member of a specific role with defined role group templates
Note :  Before apply this example create a user using Administrative toolbar

There are some steps for using LoginView Control in ASP.NET
Step-1: Drop LoginView Control onto the ("Default.aspx") page, In source page a LoginView contol having three template first one is <AnonymousTemplate> template second one is <LoggedInTemplate> and last one is <RoleGroups> template.

Step-2: In <AnonymousTemplate> Either you can write some text or place login control. Here this example contain some text with link.

<AnonymousTemplate>
        please login now
        <a href="login.aspx">Login</a>     
     
        </AnonymousTemplate>
Step-3: In <LoggedInTemplate> you can place LoginName Control or LoginStatus Control with welcome message.
Step-4: Run Your Application

Complete code is 
Default.aspx page code


<%@ Page Language="C#" AutoEventWireup="true" CodeFile="Default.aspx.cs" Inherits="_Default" %>

<!DOCTYPE html PUBLIC "-//W3C//DTD XHTML 1.0 Transitional//EN" "http://www.w3.org/TR/xhtml1/DTD/xhtml1-transitional.dtd">

<html xmlns="http://www.w3.org/1999/xhtml">
<head runat="server">
    <title></title>
</head>
<body>
    <form id="form1" runat="server">
    <div>
 
        <asp:LoginView ID="LoginView1" runat="server">
        <RoleGroups></RoleGroups>
        <AnonymousTemplate>
        please login now
        <a href="login.aspx">Login</a>
     
     
        </AnonymousTemplate>
        <LoggedInTemplate>
        Welcome ,
            <asp:LoginName ID="LoginName1" runat="server" />
            <asp:LoginStatus ID="LoginStatus1" runat="server" />
        </LoggedInTemplate>
        </asp:LoginView>
 
    </div>
    </form>
</body>
</html>

Login.aspx page code


<%@ Page Language="C#" AutoEventWireup="true" CodeFile="login.aspx.cs" Inherits="login" %>

<!DOCTYPE html PUBLIC "-//W3C//DTD XHTML 1.0 Transitional//EN" "http://www.w3.org/TR/xhtml1/DTD/xhtml1-transitional.dtd">

<html xmlns="http://www.w3.org/1999/xhtml">
<head runat="server">
    <title></title>
</head>
<body>
    <form id="form1" runat="server">
    <div>
 
        <asp:Login ID="Login1" runat="server">
        </asp:Login>
 
    </div>
    </form>
</body>
</html>

Output
Anonymous template result in asp.net

login page link open in asp.net

LoggedIn Template result in asp.net

ASP.NET MEMBERSHIP : WebSite Administrative tool, Login , Login Status and LoginName Control


There are two options in membership first one windows authentication and second one is forms authentication. Bydeafult DOTNET framework use windows authentication where your username and password stored in windows.
In authentication tag by default mode is selected as windows in web.config file.
Using administrative tool you can implement security in the application. Using some steps you can implement security to the application, these steps are
Step-1: Select “ASP.NET Configuration” in Website tab.
ASP.NET Configuration” in Website tab

Step-2: Select Security link which is given in the administrative page.
Select Security link which is given in the administrative page


Step-3: Select “select authentication type” in the user tab.
Select “select authentication type” in the user tab.

Step-4: Select “from the internet” radio button.
Select “from the internet” radio button.
Step-5: Refresh your application and Again check authentication mode in web.config file , where you get mode is forms
Step-6: Again open administrative tool bar and select security link.
Step-7: Select “create user “in Users tab.
Select “create user “in Users tab.


Step-8: Fill all required field with strong password because Microsoft recommend strong password.
Fill all required field with strong password because Microsoft recommend strong password.

Step-9: Now drop LoginStatus and LoginName  control to the WebForm (“Default.aspx” page) from ToolBox.
 LoginStatus and LoginName

Step-10 : Take another webform name as “login.aspx” for login control
Step-11: Drop login control to the login.aspx page.
Drop login control to the login.aspx page.


Step-12:Run your Application.
first page of login control

ASP.NET MEMBERSHIP
ASP.NET MEMBERSHIP


Saturday, September 21, 2013

TextBlock Control Introduction: WPF

According to previous post, Label control derives from Content Control and can: display other type of data as well as string, perform all the functions of a content control. There are some drawbacks in label control such as it cannot support multi line texts.

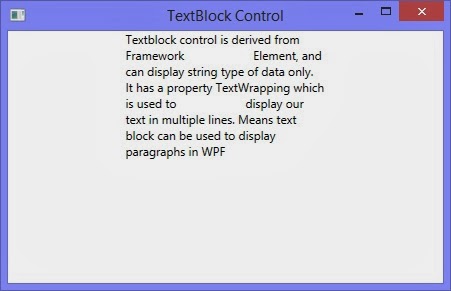
Textblock control is derived from Framework Element, and can display string type of data only. It has a property TextWrapping which is used to display our text in multiple lines. Means text block can be used to display paragraphs in WPF. A textblock can be drawn in XAML code with below line:

<TextBlock Text="text block" Width="200"/>

It will show the above text in the width specified. If we want to show some more text, then we have to use TextWrapping property of this textblock. If we don’t enable text wrapping then it will only show the text that can be shown in specified width.
<TextBlock Text="Textblock control is derived from Framework
Element, and can display string type of data only.
It has a property TextWrapping which is used to
display our text in multiple lines. Means text
block can be used to display paragraphs in WPF"
Width="200" TextWrapping="Wrap"/>

Now when we run this code, it will show the text written above. The width will be fixed as 200 and height will be increased according to the given text.

How to use TextBlock Control in WPF XAML

If we also specified height here, then the text will not be shown. Just placed the height as 200 here and check out the output as:

Use TextBlock Control with Height in WPF XAML

Friday, September 20, 2013

How to remove selected item from ListBox in ASP.NET


<%@ Page Language="C#" %>

<!DOCTYPE html PUBLIC "-//W3C//DTD XHTML 1.0 Transitional//EN" "http://www.w3.org/TR/xhtml1/DTD/xhtml1-transitional.dtd">

<script runat="server">

    protected void Button1_Click(object sender, EventArgs e)
    {
        if (ListBox1 .Items .Count !=0)
        {
            ListBox1.Items.RemoveAt(ListBox1.SelectedIndex);
        }
    }
</script>

<html xmlns="http://www.w3.org/1999/xhtml">
<head runat="server">
    <title></title>
</head>
<body>
    <form id="form1" runat="server">
    <div>
        <asp:ListBox ID="ListBox1" runat="server" Height="142px" Width="117px">
            <asp:ListItem>APPLE</asp:ListItem>
            <asp:ListItem>MANGO</asp:ListItem>
            <asp:ListItem>ORANGE</asp:ListItem>
        </asp:ListBox>
        <br />
        <br />
        <asp:Button ID="Button1" runat="server" onclick="Button1_Click"
            Text="REMOVE SELECTED" Width="143px" />
    </div>
    </form>
</body>
</html>

Output
Item in listbox in asp.net
How to remove selected item from ListBox in ASP.NET

Clear or Remove item from DropDownList in ASP.NET


<%@ Page Language="C#" %>

<!DOCTYPE html PUBLIC "-//W3C//DTD XHTML 1.0 Transitional//EN" "http://www.w3.org/TR/xhtml1/DTD/xhtml1-transitional.dtd">

<script runat="server">

    protected void Button1_Click(object sender, EventArgs e)
    {
        DropDownList1.Items.Clear();
    }
</script>

<html xmlns="http://www.w3.org/1999/xhtml">
<head runat="server">
    <title></title>
</head>
<body>
    <form id="form1" runat="server">
    <div>
        <asp:DropDownList ID="DropDownList1" runat="server" Height="47px" Width="171px">
            <asp:ListItem>Apple </asp:ListItem>
            <asp:ListItem>Mango</asp:ListItem>
            <asp:ListItem>Orange</asp:ListItem>
        </asp:DropDownList>
        <br />
        <br />
        <asp:Button ID="Button1" runat="server" onclick="Button1_Click" Text="CLEAR"
            Width="88px" />
    </div>
    </form>
</body>
</html>

Output
item in dropdownlist in asp.net
Clear or Remove item from DropDownList in ASP.NET


How to create User Profiles in ASP.NET

You have now been familiarized with the basic concept of personalization. In ASP.NET  websites can be personalized by using the concept of user profiles and themes. Themes are used to enhance the look and feel of a Web page , but are incapable of storing and using the information of a specific user for personalization. In ASP.NET  you can use the concept of user profiles to display information of a specific user for personalization. For example , if a user revisits a shopping website , the details of the items purchased in the either visit can also be displayed.
A user profile is a collection of various properties that describes the information you want to store for a specific user. You can store the properties associated with a user in a user profile. The Data that is stored in a profile can be accessed programmatically.

Lets take an Example  How to create User Profiles in ASP.NET

Step-1 :  Write some properties under profile tag in web.config file

<system.web>
      <anonymousIdentification enabled ="true"/>
      <profile>
        <properties >
          <add name ="SName" allowAnonymous ="true"  />
          <add name ="CName" defaultValue ="ASP.NET" allowAnonymous ="true" />
          <add name ="RollNo" defaultValue ="101" allowAnonymous ="true" />
        </properties>
      </profile>
        <compilation debug="false" targetFramework="4.0" />
    </system.web>


Step-2: Write this code under ".aspx" page

<%@ Page Language="C#" %>

<!DOCTYPE html PUBLIC "-//W3C//DTD XHTML 1.0 Transitional//EN" "http://www.w3.org/TR/xhtml1/DTD/xhtml1-transitional.dtd">

<script runat="server">

    protected void Button1_Click(object sender, EventArgs e)
    {
        Profile.SName = TextBox1.Text;
        Profile.CName = TextBox2.Text;
        Profile.RollNo = TextBox3.Text;
    }
</script>

<html xmlns="http://www.w3.org/1999/xhtml">
<head runat="server">
    <title></title>
</head>
<body>
    <form id="form1" runat="server">
    <div>
    Welcome User

        <br />
        Student Name :<%= Profile .SName %>
        <br />
        Course Name :<%= Profile .CName %>
        <br />
        Student RollNo:<%= Profile .RollNo  %>
        <br />
        Enter Student Name :
        <asp:TextBox ID="TextBox1" runat="server"></asp:TextBox>
        <br />
        Enter Course Name :
        <asp:TextBox ID="TextBox2" runat="server"></asp:TextBox>
        <br />
        Enter Roll No :&nbsp;&nbsp;&nbsp;&nbsp;&nbsp;&nbsp;&nbsp;&nbsp;&nbsp;
        <asp:TextBox ID="TextBox3" runat="server"></asp:TextBox>
        <br />
        <asp:Button ID="Button1" runat="server" onclick="Button1_Click" Text="Submit" />

    </div>
    </form>
</body>
</html>


Default value Output
1. Default value show in output first
How to create User Profiles in ASP.NET
2. Enter value show in output
How to create User Profiles in ASP.NET
3. Close your current output browser window and re-run your application, profile  save the variable value

© Copyright 2013 Computer Programming | All Right Reserved