
Featured Post

How to use Tabs in ASP.NET CORE

I want to show Components in a tabs , so first of all create few components. In this project we have three components, First View Component  public class AllViewComponent : ViewComponent     {         private readonly UserManager<ApplicationUser> _userManager;         public AllViewComponent(UserManager<ApplicationUser> userManager)         {             _userManager = userManager;         }         public async Task<IViewComponentResult> InvokeAsync()         {             List<StudentViewModel> allUsers = new List<StudentViewModel>();             var items = await _userManager.Users.ToListAsync();             foreach (var item in items)             {                 allUsers.Add(new StudentViewModel {Id=item.Id, EnrollmentNo = item.EnrollmentNo, FatherName = item.FatherName, Name = item.Name, Age = item.Age, Birthdate = item.Birthdate, Address = item.Address, Gender = item.Gender, Email = item.Email });             }            

Bind DetailsView with insert, edit and delete in ASP.NET

You can easily bind your DetailsView data control in asp.net using SqlDataSource, SqlDataSource provides connectivity between front end to back-end with all insert, edit and delete features. This example covers that how to bind your DetailsView with database. These are following steps

Step-1 : Create a SQL Table with some fields like
sno int (primaryKey, Isidentity=true)
name nvarchar(50)
address nvarchar(250)


Step-2 : Add SqlDataSource Control to Design window from toolbox
Step-3 : Select 'Configure Data Source' link using show Smart tag.

'Configure Data Source'


Step-4 : Select Database or ConnectionString from Dropdown menu.
ConnectionString

Step-5 : Select Table-name from Dropdown menu also select Advanced tab.
Table-name from Dropdown menuAdvanced tab

Step-6 : Select Insert, Update and delete checkbox option.
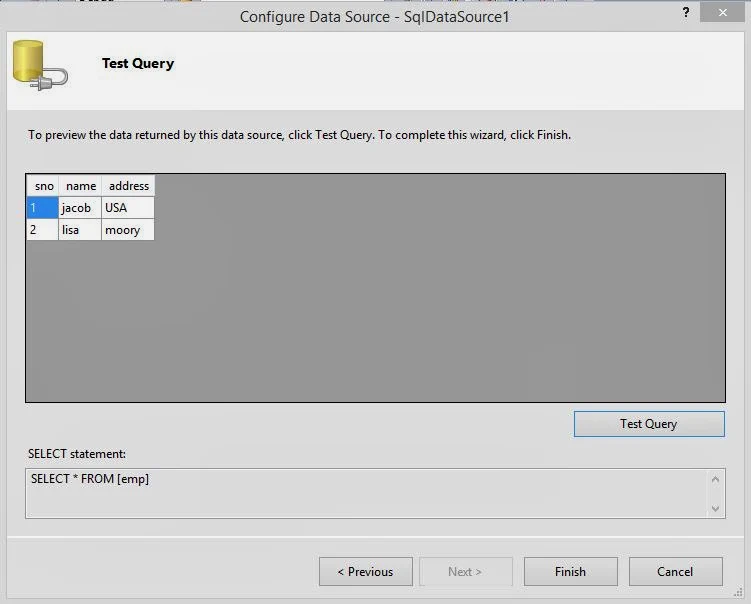
Step-7 : Click to Test Query and  Finish button.

Step-8 : Add DetailsView Control to the page, check all insert, update, and delete features using show smart teg.
Bind DetailsView with insert, edit and delete in ASP.NET

Now generate source code in page file

<%@ Page Language="C#" AutoEventWireup="true" CodeFile="Default5.aspx.cs" Inherits="Default5" %>

<!DOCTYPE html PUBLIC "-//W3C//DTD XHTML 1.0 Transitional//EN" "http://www.w3.org/TR/xhtml1/DTD/xhtml1-transitional.dtd">

<html xmlns="http://www.w3.org/1999/xhtml">
<head runat="server">
    <title></title>
</head>
<body>
    <form id="form1" runat="server">
    <div>
    
        <asp:SqlDataSource ID="SqlDataSource1" runat="server" 
            ConnectionString="<%$ ConnectionStrings:ConnectionString %>" 
            DeleteCommand="DELETE FROM [emp] WHERE [sno] = @sno" 
            InsertCommand="INSERT INTO [emp] ([name], [address]) VALUES (@name, @address)" 
            SelectCommand="SELECT * FROM [emp]" 
            UpdateCommand="UPDATE [emp] SET [name] = @name, [address] = @address WHERE [sno] = @sno">
            <DeleteParameters>
                <asp:Parameter Name="sno" Type="Int32" />
            </DeleteParameters>
            <InsertParameters>
                <asp:Parameter Name="name" Type="String" />
                <asp:Parameter Name="address" Type="String" />
            </InsertParameters>
            <UpdateParameters>
                <asp:Parameter Name="name" Type="String" />
                <asp:Parameter Name="address" Type="String" />
                <asp:Parameter Name="sno" Type="Int32" />
            </UpdateParameters>
        </asp:SqlDataSource>
    
    </div>
    <asp:DetailsView ID="DetailsView1" runat="server" AllowPaging="True" 
        AutoGenerateRows="False" DataKeyNames="sno" DataSourceID="SqlDataSource1" 
        Height="50px" Width="125px">
        <Fields>
            <asp:BoundField DataField="sno" HeaderText="sno" InsertVisible="False" 
                ReadOnly="True" SortExpression="sno" />
            <asp:BoundField DataField="name" HeaderText="name" SortExpression="name" />
            <asp:BoundField DataField="address" HeaderText="address" 
                SortExpression="address" />
            <asp:CommandField ShowDeleteButton="True" ShowEditButton="True" 
                ShowInsertButton="True" />
        </Fields>
    </asp:DetailsView>
    </form>
</body>
</html>

Code Generate the following output

Bind DetailsView with insert, edit and delete in ASP.NET

Comments

Popular Post

Polynomial representation using Linked List for Data Structure in 'C'

Polynomial representation using Linked List The linked list can be used to represent a polynomial of any degree. Simply the information field is changed according to the number of variables used in the polynomial. If a single variable is used in the polynomial the information field of the node contains two parts: one for coefficient of variable and the other for degree of variable. Let us consider an example to represent a polynomial using linked list as follows: Polynomial:      3x 3 -4x 2 +2x-9 Linked List: In the above linked list, the external pointer ‘ROOT’ point to the first node of the linked list. The first node of the linked list contains the information about the variable with the highest degree. The first node points to the next node with next lowest degree of the variable. Representation of a polynomial using the linked list is beneficial when the operations on the polynomial like addition and subtractions are performed. The resulting polynomial can also

How to use Tabs in ASP.NET CORE

I want to show Components in a tabs , so first of all create few components. In this project we have three components, First View Component  public class AllViewComponent : ViewComponent     {         private readonly UserManager<ApplicationUser> _userManager;         public AllViewComponent(UserManager<ApplicationUser> userManager)         {             _userManager = userManager;         }         public async Task<IViewComponentResult> InvokeAsync()         {             List<StudentViewModel> allUsers = new List<StudentViewModel>();             var items = await _userManager.Users.ToListAsync();             foreach (var item in items)             {                 allUsers.Add(new StudentViewModel {Id=item.Id, EnrollmentNo = item.EnrollmentNo, FatherName = item.FatherName, Name = item.Name, Age = item.Age, Birthdate = item.Birthdate, Address = item.Address, Gender = item.Gender, Email = item.Email });             }            

Memory representation of Linked List Data Structures in C Language

                                 Memory representation of Linked List              In memory the linked list is stored in scattered cells (locations).The memory for each node is allocated dynamically means as and when required. So the Linked List can increase as per the user wish and the size is not fixed, it can vary.                Suppose first node of linked list is allocated with an address 1008. Its graphical representation looks like the figure shown below:       Suppose next node is allocated at an address 506, so the list becomes,   Suppose next node is allocated with an address with an address 10,s the list become, The other way to represent the linked list is as shown below:  In the above representation the data stored in the linked list is “INDIA”, the information part of each node contains one character. The external pointer root points to first node’s address 1005. The link part of the node containing information I contains 1007, the address of