Featured Post

How to use Tabs in ASP.NET CORE

I want to show Components in a tabs , so first of all create few components. In this project we have three components, First View Component  public class AllViewComponent : ViewComponent     {         private readonly UserManager<ApplicationUser> _userManager;         public AllViewComponent(UserManager<ApplicationUser> userManager)         {             _userManager = userManager;         }         public async Task<IViewComponentResult> InvokeAsync()         {             List<StudentViewModel> allUsers = new List<StudentViewModel>();             var items = await _userManager.Users.ToListAsync();             foreach (var item in items)             {                 allUsers.Add(new StudentViewModel {Id=item.Id, EnrollmentNo = item.EnrollmentNo, FatherName = item.FatherName, Name = item.Name, Age = item.Age, Birthdate = item.Birthdate, Address = item.Address, Gender = item.Gender, Email = item.Email });             }            

ASP.NET FILEUPLOAD CONTROL INSERT IMAGE INTO DATABASE

Introduction

First of all, I would like to thank all of the readers who have read my previous articles. What a great support I have got from you people. By using ASP.NET File upload control, we can easily insert images into Table or you can say that we can create image gallery projects. With the help of JQuery, we put some dynamic effects like upload multiple files one by one. you can also do by JQuery to create button work as File upload. I really felt great when article Bind GridView was displayed on this blog page. Following are the articles that I have written so far for beginners as well as developers.


Follow some steps for inserting Images into database using asp.net fileupload control.

STEP-1 : Create Database Table

HOW TO INSERT IMAGE INTO DATABASE


STEP-2: Drag asp.net fileupload control from ToolBox and Drop it in Design window.


  <form id="form1" runat="server">  
   <div>  
     <asp:FileUpload ID="FileUpload1" runat="server" /><BR />  
     <asp:Button ID="Button1" runat="server" Text="Submit" />  
     <br />  
     <br />  
     <asp:Label ID="Result" runat="server"></asp:Label>  
   </div>  
   </form>  

fileuploadcontrol
STEP 3: Make a new directory in website folder name as "upload".
STEP 4:  Double click on submit button and raise click event.

 using System;  
 using System.Collections.Generic;  
 using System.Linq;  
 using System.Web;  
 using System.Web.UI;  
 using System.Web.UI.WebControls;  
 using System.Data.SqlClient;  
 using System.Configuration;  
 using System.Data;  
 public partial class FILEUPLOAD : System.Web.UI.Page  
 {  
   protected void Page_Load(object sender, EventArgs e)  
   {  
   }  
   protected void Button1_Click(object sender, EventArgs e)  
   {  
     string imagedata = string.Empty;  
     if (FileUpload1.HasFile)  
     {  
       FileUpload1.SaveAs(Server.MapPath("~/upload/" + FileUpload1.FileName));  
       imagedata = "~/upload/" + FileUpload1.FileName;  
     }  
     using (SqlConnection con = new SqlConnection())  
     {  
       con.ConnectionString =ConfigurationManager .ConnectionStrings ["ConnectionString"].ToString ();  
       con.Open ();  
       using (SqlCommand cmd=new SqlCommand ())  
       {  
         cmd.Parameters.AddWithValue("@ur", imagedata);  
         cmd.CommandText ="insert into imagedata(url) values(@ur)";  
         cmd.Connection =con;  
         if (string.IsNullOrEmpty(imagedata))  
         {  
           Result.Text = "choose right image";  
         }  
         else  
         {  
           int a = cmd.ExecuteNonQuery();  
           if (a > 0)  
             Result.Text = "data inserted";  
           else  
             Result.Text = "failed";  
         }  
       }  
     }  
   }  
 }  

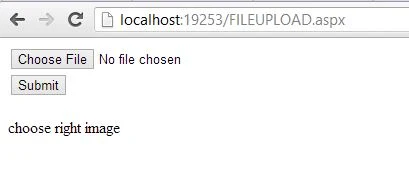
Output of the program
How to insert image into database using file upload control

How to insert image into database using file upload control
Here, first to insert images in website folder also get the File path during fileupload. Now, insert the file into Table as like Text. 

Comments

Popular Post

Polynomial representation using Linked List for Data Structure in 'C'

Polynomial representation using Linked List The linked list can be used to represent a polynomial of any degree. Simply the information field is changed according to the number of variables used in the polynomial. If a single variable is used in the polynomial the information field of the node contains two parts: one for coefficient of variable and the other for degree of variable. Let us consider an example to represent a polynomial using linked list as follows: Polynomial:      3x 3 -4x 2 +2x-9 Linked List: In the above linked list, the external pointer ‘ROOT’ point to the first node of the linked list. The first node of the linked list contains the information about the variable with the highest degree. The first node points to the next node with next lowest degree of the variable. Representation of a polynomial using the linked list is beneficial when the operations on the polynomial like addition and subtractions are performed. The resulting polynomial can also

How to use Tabs in ASP.NET CORE

I want to show Components in a tabs , so first of all create few components. In this project we have three components, First View Component  public class AllViewComponent : ViewComponent     {         private readonly UserManager<ApplicationUser> _userManager;         public AllViewComponent(UserManager<ApplicationUser> userManager)         {             _userManager = userManager;         }         public async Task<IViewComponentResult> InvokeAsync()         {             List<StudentViewModel> allUsers = new List<StudentViewModel>();             var items = await _userManager.Users.ToListAsync();             foreach (var item in items)             {                 allUsers.Add(new StudentViewModel {Id=item.Id, EnrollmentNo = item.EnrollmentNo, FatherName = item.FatherName, Name = item.Name, Age = item.Age, Birthdate = item.Birthdate, Address = item.Address, Gender = item.Gender, Email = item.Email });             }            

Memory representation of Linked List Data Structures in C Language

                                 Memory representation of Linked List              In memory the linked list is stored in scattered cells (locations).The memory for each node is allocated dynamically means as and when required. So the Linked List can increase as per the user wish and the size is not fixed, it can vary.                Suppose first node of linked list is allocated with an address 1008. Its graphical representation looks like the figure shown below:       Suppose next node is allocated at an address 506, so the list becomes,   Suppose next node is allocated with an address with an address 10,s the list become, The other way to represent the linked list is as shown below:  In the above representation the data stored in the linked list is “INDIA”, the information part of each node contains one character. The external pointer root points to first node’s address 1005. The link part of the node containing information I contains 1007, the address of