-->

Monday, April 14, 2014

How to Use Checkbox in WPF

Checkbox is a GUI element that permits the user to make a binary choice i.e. user may have to answer yes or no. Now a days programming have a new option to set the value to null. It means checkbox may be used as a three state which are checked, unchecked and intermediate.

The following screenshot shows three states of a checkbox

CheckBox control in WPF

In the above image all the three checkboxes have IsThreeState property to true and some more properties like the following code in xaml:
<CheckBox IsThreeState="True" Content="Checked" IsChecked="True"></CheckBox>
<CheckBox IsThreeState="True" Content="UnChecked" IsChecked="False"></CheckBox>
<CheckBox IsThreeState="True" Content="Intermediate" IsChecked="{x:Null}"></CheckBox>

IsChecked property is used to set the state of checkbox. You may have three options for these state values as I have used in above code snippet. Checkbox is mostly used in objective type answers or we can say Boolean type answers. Gender value may also be store through checkbox control.


We can perform the desired function, when the checkbox is checked or unchecked using the events respectively.
private void Checkbox_Checked(object sender, RoutedEventArgs e)
{
MessageBox.Show("Checkbox Checked");
}

private void Checkbox_Unchecked(object sender, RoutedEventArgs e)
{
MessageBox.Show("Checkbox Checked");
}
Each time when a checkbox is checked or unchecked, a message will be shown defined in the above code snippets. To add a checkbox dynamically with checked property true we can write the following code:

CheckBox chkBox = new CheckBox();
chkBox.Name = "checkBox";
chkBox.Content = "Checked";
chkBox.IsChecked = true;
chkBox.IsThreeState = true;
this.Content = chkBox;
The above code will replace all the content of the window with this checkbox. So if you want to add this to any other container like stackpanel or anything, then you have to add this as a children of that container.

Sunday, August 25, 2013

How to use CheckBox Control in ASP.NET

Introduction
The Checkbox control creates a check box that can be selected by clicking it. The control exists within the System.Web.UI.WebControls namespace. The Checkbox control displays checkmarks that allow the user to toggle between a True or False condition.

Public Properties of the Checkbox Class
AutoPostBack : Obtains a value showing , if the CheckBox state automatically post back to the server when clicked or not.
Checked : Obtains a value showing , if the CheckBox control is checked or not.
Text : Obtains the text label associated with the CheckBox control.

Example of CheckBox control in ASP.NET


<%@ Page Language="C#" AutoEventWireup="true" CodeFile="Default.aspx.cs" Inherits="_Default" %>

<!DOCTYPE html>

<html xmlns="http://www.w3.org/1999/xhtml">
<head runat="server">
    <title></title>
</head>
<body>
    <form id="form1" runat="server">
    <div>
    <h2>CHECKBOX EXAMPLE</h2>
        <br/>
        <asp:CheckBox ID="CheckBox1" runat="server" AutoPostBack="True" OnCheckedChanged="CheckBox1_CheckedChanged" Text="Apple" />

        <br />
        <asp:CheckBox ID="CheckBox2" runat="server" AutoPostBack="True" OnCheckedChanged="CheckBox2_CheckedChanged" Text="Mango" />

    </div>
        <asp:CheckBox ID="CheckBox3" runat="server" AutoPostBack="True" OnCheckedChanged="CheckBox3_CheckedChanged" Text="Orange" />
        <br />
        <br />
        <asp:ListBox ID="ListBox1" runat="server" Height="145px" Width="112px"></asp:ListBox>
    </form>
</body>
</html>

Codebehind Code
using System;
using System.Collections.Generic;
using System.Linq;
using System.Web;
using System.Web.UI;
using System.Web.UI.WebControls;

public partial class _Default : System.Web.UI.Page
{
    protected void Page_Load(object sender, EventArgs e)
    {

    }
    protected void CheckBox1_CheckedChanged(object sender, EventArgs e)
    {
        if (CheckBox1 .Checked==true)
        {
            ListBox1.Items.Add(CheckBox1.Text);

         
        }
        else
        {
            ListBox1.Items.Remove(ListBox1.Items.FindByText(CheckBox1.Text));
        }

    }
    protected void CheckBox2_CheckedChanged(object sender, EventArgs e)
    {
        if (CheckBox2.Checked == true)
        {
            ListBox1.Items.Add(CheckBox2.Text);


        }
        else
        {
            ListBox1.Items.Remove(ListBox1.Items.FindByText(CheckBox2.Text));
        }

    }
    protected void CheckBox3_CheckedChanged(object sender, EventArgs e)
    {
        if (CheckBox3.Checked == true)
        {
            ListBox1.Items.Add(CheckBox3.Text);


        }
        else
        {
            ListBox1.Items.Remove(ListBox1.Items.FindByText(CheckBox3.Text));
        }

    }
}

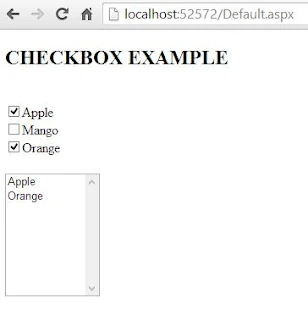
Code Generate the following Output
How to use CheckBox Control in ASP.NET
This example shows when you select any one checkbox which is taken in this example then your checkbox Text add to the ListBox . If you unselect it then remove Text from the list.Because AutoPostBack property is working here.
ListBox1.Items.Remove() : If you want to remove item from list then use remove method of the list.
ListBox1.Items.FindByText() : If you want to search any item from the list then use FindbyText() method.

© Copyright 2013 Computer Programming | All Right Reserved