-->

Friday, December 25, 2015

How to bind Bulleted List control in asp.net

Following some steps for binding bulleted list control using SqlDataSource

In this article, I will show you, How to bind BulletedList in ASP.NET. In this article, I will take SQL DataSource control to bind it. ASP.NET Provide inbuilt control to bind any other control like ListBox, ComboBox, BulletedList. After bind it, it will look like list of unordered list of HTML.Lets  to Start how to bind it. I will Give you, video as well as code for this.


Step-1 : Open visual studio
Step-2:  Click  File-->New-->WebSite
starting screen

Step-3: Right click on website name in solution explorer, Add-->Add new item 

web form


Step-4: Make Database table 
Step-5: Drag Bulleted list from toolbox and drop on design window.
Step-6: Select Show smart tag of Bulleted list
show smart tag

Step-7: On Bulledted list task click choose data source link
Step-8: Select New DataSource from Data Source configuration wizard.

choose data source

Step-9: Select SQL Database from Data Source Configuration wizard. and click ok button

data configuration wizard

Step-10 : Select existing database from configure data source.

connection string property

Step-11 : Change Connection name according to you and click ok
web.config file

Step-12 : Select table from name ,select table field name and press ok button

table view

Step-13: Click test query button and finish the process
Step-14: Select a data field to display in the bulleted list.
Step-15: Select a data field for the value of the bulleted list. and press ok button
select one those field in bulleted list

Run your application
how to bind bulleted list in asp.net

Finally source of the code are:


<%@ Page Language="C#" AutoEventWireup="true" CodeFile="Default2.aspx.cs" Inherits="Default2" %>

<!DOCTYPE html>

<html xmlns="http://www.w3.org/1999/xhtml">
<head runat="server">
    <title></title>
</head>
<body>
    <form id="form1" runat="server">
    <div>
    
        <asp:BulletedList ID="BulletedList1" runat="server" DataSourceID="SqlDataSource1" DataTextField="Name " DataValueField="Url">
        </asp:BulletedList>
        <asp:SqlDataSource ID="SqlDataSource1" runat="server" ConnectionString="<%$ ConnectionStrings:ConnectionString %>" SelectCommand="SELECT * FROM [mytab]"></asp:SqlDataSource>
    
    </div>
    </form>
</body>
</html>
Top Related Article

Monday, November 18, 2013

How to Develop your Own Custom Controls in C#

Custom control, the control with combined features of other controls, can be developed by any programmer easily. A custom control will not only be usable in the same application, but also it can be used in any other application that may be on other system. This designed control can be easily embedded in other applications.

Custom control have some basic features as well as some functionality that may be known by the programmer:
  • Improves encapsulation.
  • Simplifying a programming model.
  • Can swap out a control with another one.
  • Combines UI elements in a simple way.
  • Using these controls programmer can develop unique controls.

Types

User Control: combines other controls in a logical unit. Inherit from System.Windows.Forms.UserControl class.

Inherited controls: developed by an existing .NET control that is as close as you want to develop. We have to create a custom class and inherit an existing abstract class that is close to what we are developing.

Owner-drawn controls: inherit from a base class like System.Windows.Forms.Control. These controls provides most customizable UI.

Extender providers: These are used to add features to other controls on a form, means these are not necessarily at all.

These controls may be used in our other applications and it reduces the amount of code and the code duplication. It also helps in modularize your code. In the next article we will explain about the steps to create a custom control and also about the events, need to override to create custom textbox.

Monday, November 4, 2013

Exploring the visual studio 2012 IDE : Part-2

Toolbox

The Toolbox contains a number of tabs and each tab contains a list of controls and components that can be dragged onto your Web form. The Toolbox is docked on the left-side of the IDE; however, if it is not visible, you can access the Toolbox from the View menu or press the CTRL+ALT+ X keys together to open it.

There are different sets of controls available, depending on the type of the designer that is active in the editor. If you are designing a Web Form, you will get a specific set of tools that work with Web controls. If you are designing Windows Form, you will get a specific set of tools in the visual studio IDE for windows controls. If you are designing an XML document, there will be some other controls available within the TollBox. You can also add other customized tabs to the Toolbox wherein you can place your favorite controls and components or add your own customized controls.
ToolBox vs2012


The Code Editor Window

The Code Editor window allows you to write and edit code. You can press the F7 key to switch from the web Forms Designer to Code Editor. Alternatively, you can switch to code Editor by selecting View-->Code. You can use the same editor to create different types of files, such as text files and XML documents. In such a case, this window is called Text Editor
Code Editor window in vs2012

Using the Code Editor window, you can set breakpoints for debugging the application, and collapse sections of code to increase readability. The code Editor window also contain the intellisense feature that makes programming easier.

Intellisense

intelliSense is an extremely useful feature in visual studio. This, as you type the code, provides a list of options for making language references easily accessible and helps you in finding the information you need.
Intellisense is very helpful, as it automatically completes typing for you. For example, when you type TextBox1 and then a period operator(.), Intellisense displays a list of options. Now you can directly enter the member function or variable by using the list of options.
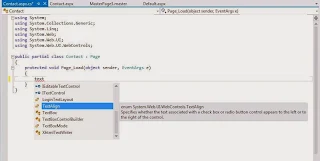
Intellisense in vs2012

The Intellisense technology makes writting of code easier and less prone to errors. It provides quick access to valid member functions or variables, including global variables through the members list. You can select these member functions and variables from the list and use it in your code. Intellisense is also used to view code comments, function declarations, and variable type information. By default, Intellisense works automatically. However, if you prefer to invoke Intellisense explicitly with a menu command or a key combination, disable it by turning it off selecting the Tools-->Options-->Text Editor-->All Languages-->General Option and then deselect the Auto members and Parameter information check boxes. Now, if you want to incorporate the intellisense functionality in the code, You will have to use the Intellisense menu item in the Edit menu.
Visual Studio provides a new features wherein you can make the Intellisense drop-down list transparent. To do so, press the CTRL key while the Intellisense drop-down list is open and you can see the Intellisense drop-down list in a transparent mode that enable you to look at the code without closing the Intellisense.

Transparent Intellisense using ctrl key in vs2012

Various options available in Intellisense are as follows:

List Members- Displays a list of valid member variables or functions for the selected class or structure selecting from the list inserts the member into your code.
Quick Info--Displays the complete declaration for any identifier in your code. Intellisense usually runs as soon as you type the period after a class instance. However, there are occasions where you need to force Intellisense to appear. For example, suppose you misspell a method name, then the Intellisense will not appear because of the wrong function name. You can bring Intellisense appear by pressing CTRL+j keys together. This allows you to select the appropriate method through Intellisense and replace the misspelled method name with the selected one.
Parameter info--Displays the complete declaration, including a parameter list for the method, such as number, name and types of parameters required by a method. You can also force Intellisense for parameter information for methods. For that, type an open parenthesis after the name of the function. Intellisense displays a complete list of the declaration function in a pop-up window and the first parameter appear in bold. By the time you specify the first parameter , the next parameter in the list is highlighted in bold. To close the list, you can press ESC at any time or keep typing the parameters till you complete the method. If you close the closing parenthesis, the parameter list also closes automatically.

Complete Word -- Shows the rest of a variable or function name once you have entered sufficient initial characters to differentiate the term. When you start typing a word and typed sufficient initial character so that it uniquely identifiers a given word in your current file, try pressing the CTRL+SPACEBAR+ keys together. The usual Intellisense drop-down list will be displayed by the specified starting characters. Simply select the appropriate word to complete the word quickly. If the series of starting letters uniquely identifies a single word in the Intellisense list, then the complete word will be inserted automatically. For example, to make the fontFamily property appear quickly on the code Editor, type font on the Code Editor. An Intellisense drop-Down list appear with options starting from Font, such as font, fontConverter, FontFamily, FontHeight. The moment you enter F, the selected item becomes FontFamily and you can press the Enter key to make the FontFamily word appear quickly on the code Editor.

Sunday, October 27, 2013

Exploring the visual studio 2012 IDE : Part-1

Introduction

Visual Studio 2012 provides an IDE to web developers, which is full of toolbars and windows. The windows are dockable, which allows to rearrange them on the IDE as per your requirements. The IDE can also be used for detecting and correcting the errors in your application. The following are the different parts of the visual studio 2012 IDE

  • Start Page
  • Menu Bar 
  • Toolbars 
  • Toolbox
  • The code Editor Window 
  • The Solution Explorer Window
  • The Property Window
  • The Object Browse Window
  • The Class View Window
  • The Server Explorer Window
  • The CSS Style Manager Window
  • The Output Window
  • The Task List Window
  • The Error List Window
  • The Command Window
  • The Dynamic Help Window

Start Page

When you open Visual Studio 2012, the very first window displayed is the Start Page.

 Visual Studio 2012, the very first window displayed is the Start Page

The Recent Projects/WebSites pane displays few projects/WebSites which you have created recently. The Start Page allows you to select from the most recent projects/WebSites on which you have recently worked. The following panes are displayed on the Start Page:
Recent Projects/WebSites : Displays a list of the most recent projects / websites you opened with visual studio, as shown in above figure . You can open the projects by clicking on the Hyperlink having the project's name. At the bottom of the Recent Projects pane two CheckBox are there first one for close page after project load and second one for Show page on startup.

Start : At the Above of the Recent Projects pane , you can see three links - one is for opening an existing project and the other for creating a new project and other for connecting to Team foundation server.

Getting Started: Contains links to various programming tasks in the product's documentation such as Manage your project in the cloud, Learning Resources etc.

Menu Bar

The Menu Bar of the Visual Studio IDE provides different menus for different Visual Studio commands

Menu bar in Visual studio 2012

Most of the menus are displayed as toolbars. Further, if you observe , not all options are available at all times. This is because the options that cannot be applied to the current state of the IDE are made either invisible or disable. For example, when you design the form, the Edit menu bar is quite short; however , when you perform the edit operation, it is quite lengthy.

ToolBars

Toolbars are shortcuts to the most frequently performed actions. You can fin the same commands in menus, but these shortcuts of toolbars are much faster to use than menus. You will find several common toolbars on the Visual Studio IDE, such as standard , layout , formatting , Debug, and Image Editor etc.

ToolBars in visual studio 2012

You can also build your own custom toolbars. Visual Studio displays the toolbars according to the selected object.

Monday, August 26, 2013

Print Image using PrintDialog Box

To print images in windows forms Graphics class and its various methods are used. Graphics class provides methods for sending objects to a device such as printer. Add a printDocument,  printDialog and a button to the windows form application.

In the code behind file create an object of Bitmap class which will be used to create an image. Write a function to capture the screen to be printed just like written in the below code:
private void CaptureScreen()
{
Graphics graphics = this.CreateGraphics();
graphics.DrawRectangle(Pens.Black, 50, 50, 300, 100);
image = new Bitmap(300, 300, graphics);
Graphics g = Graphics.FromImage(image);
g.CopyFromScreen(this.Location.X, this.Location.Y, 0, 0, this.Size);
}
In the above code a rectangle will be drawn at the given location. CopyFromScreen() function used to performs a bit-block transfer of the color data, corresponding to a rectangle of pixels, from the screen to the drawing surface.

In the click event of code write the following code:
CaptureScreen();
printDocument1.PrintPage += printDocument_PrintPage;
printDialog1.Document = printDocument1;
DialogResult res = printDialog1.ShowDialog();
if (res == DialogResult.OK)
printDocument1.Print();
The above code is somewhat same to the code used in printing text except the calling of CaptureScreen() method.

Print page event of print document should be look like:
void printDocument_PrintPage(object sender, PrintPageEventArgs e)
{
e.Graphics.DrawImage(image, 50, 100);
}

Run the project and click on print button. On the print Dialog box click on ok with selected printer and it will print whatever is on your screen at the given points. When I print this then it had printed as the following image:

Print image using PrintDialog Box
See also: Printing Text

FolderBrowserDialog Control in Windows Forms

Browse for folder dialog box is used to select a folder to save or open a file. Most often you may need to select a particular folder to open or save a file in windows based application. It enables user to select any folder on system and to retrieve the path of a folder selected by the user.
Following image shows the Browse for Folder dialog box:
This dialog box is similar to open file dialog box except that it enables user to work with folders. To show this type of dialog box just add Folder Browser Dialog box from toolbox or create an object of this class.

Write folderBrowserDialog1.ShowDialog(); in the click event of button.

To open the default browse for dialog box write the following code in the click event of a button:
private void folderBrowse_Click(object sender, EventArgs e)
{
FolderBrowserDialog folderBrowserDialog = new FolderBrowserDialog();
folderBrowserDialog.ShowDialog();
}

See also: OpenFileDialog Box Control
© Copyright 2013 Computer Programming | All Right Reserved