-->

Sunday, March 6, 2016

How to retrieve records from database table in MVC

In this article i will show you, How to retrieve record from database table in MVC. This things we have already learned in ASP.NET WEB FORMS, Now the same things we can do in MVC. Before doing this task first to install Entity Framework in the application. Create a Empty MVC project. Add a new database also create table by using this video tutorial. We have a database table with their following fields:

CREATE TABLE [dbo].[Student_Table] (
    [Id]   INT           IDENTITY (1, 1) NOT NULL,
    [Name] NVARCHAR (50) NULL,
    [City] NVARCHAR (50) NULL,
    PRIMARY KEY CLUSTERED ([Id] ASC)
);

Now, Following these steps to retrieve items from table:

Step-1 :  Create a "Student" model class in model folder. Like :

using System.ComponentModel.DataAnnotations.Schema;

namespace WebApplication19.Models
{
    [Table("Student_Table")]
    public class Student
    {
        public int Id { get; set; }
        public string Name { get; set; }
        public string City { get; set; }
    }
}

By using the Table class we can mapped our class to database table. 

Step-2 : Create a "StudentContext" class in model folder. Like

using System.Data.Entity;

namespace WebApplication19.Models
{
    public class StudentContext : DbContext
    {
        public DbSet<Student> students { get; set; }
    }
}

By using "students" property we can communicate with the table.

Step-3 : Create ConnectionString in the Web.Config file, in this way :

<connectionStrings>

    <add name="StudentContext" connectionString="Data Source=(LocalDB)\v11.0;AttachDbFilename=|DataDirectory|\Database.mdf;Integrated Security=True"
      providerName="System.Data.SqlClient" />
  </connectionStrings>
 
here we have a connection name is same as Context Class name.

Step-4 : Now, add a controller in the Controller folder, copy this code under controller action method

using System;
using System.Collections.Generic;
using System.Linq;
using System.Web;
using System.Web.Mvc;
using WebApplication19.Models;

namespace WebApplication19.Controllers
{
    public class HomeController : Controller
    {
        // GET: Home
        public ActionResult Index()
        {
            StudentContext sc = new StudentContext();
            Student singlestu = sc.students.Single(stu => stu.Id == 2);
            return View(singlestu);
        }
    }
}

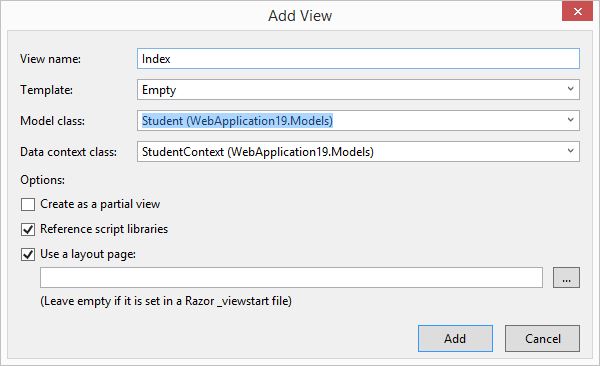
By using the LINQ Query we have to retrieving student details from table who's id is 2. Now, Build the project. Add a View By Right click on Index Action method.Now, appear a screen look like this.

How to retrieve records from database table in MVC

Fill all mentioned fields, according to mentioned snaps. Now, last
Step-5 : Design to view for values.

@model WebApplication19.Models.Student

@{
    ViewBag.Title = "Student";
}

<h2>Single Student Record</h2>
<div>
    Student Id : @Model.Id <br/>
    Student Name : @Model.Name <br/>
    Student City : @Model.City

</div>

Code Generates the following output:
How to retrieve records from database table in MVC


Friday, March 4, 2016

How to install Entity Framework from console and Solutions in MVC

By using the Entity Framework you can can communicate with the Sql Server.  In which we have two approaches i.e "Code First" and "Model First". But, In this article, I will explain you how to install Entity Framework from console and Solutions:
Install From Console:
1. Select "Package Manager Console" by the following path :
 Tools -> NuGet Package Manager--> Package Manager Console

Note : Before type the command in command line, must to ensure your internet connection.

Type command in Command Line:

PM> Install-Package EntityFramework


Install From Solution: 
1. Select "Manage Nuget Packages for Solutions... " by the following path :
 Tools -> NuGet Package Manager--> Manage Nuget Packages for Solutions...

Note : Before type the command in command line, must to ensure your internet connection.
Search Entity Framework in search bar, which reside in right side bar.

Manage Nuget Packages for Solutions...

Thursday, October 22, 2015

Default Listing with Insert and Update in MVC 4

MVC 4 provides simple listing procedure through which developer can create CRUD actions for a database table. Awesome thing is developer don’t need to write a single line of code and will complete the task.
We have added new table Category and updated edmx file in earlier article. Now we will create CRUD actions and their views with default MVC 4 structure. We have created empty controller without using any default action but now we will add a controller with all the default actions.
Follow the procedure for creating a controller and in “Add Controller” window name the controller as CategoryController and select the options as selected in the following screenshot and click on Add button:
CategoryController and select the options as selected

This window is prompting for your context class (inherited from DbContext or may be your edmx entities name) file and the model name for which these actions will be created.
After clicking on Add button, it will add a controller with following 5 actions and corresponding views. Those views are not created on the root, but MVC 4 will create those views under new folder with the same name as controller.
  • Create
  • Delete
  • Detail
  • Edit
  • Index
Run your project and go to specified controller/Index page, it will load all the categories your database have. Have a look on the below screenshot, with three records each having three action-link i.e. Edit, Details and Delete. Beside these individual action links this table structure also have Create New action on the top through which it will redirect to another view.

So we have saved lot of time that may waste to write the code for all these actions and also for creating their views. This MVC 4 feature is very simple to use and we can create more control for each table. Developer can customize these actions or their views as per their requirements.
Some developer don’t need all these views or maybe they want to enable all these actions on the single page. In next article we will create listing page for our own and write some line of code for table structure.
© Copyright 2013 Computer Programming | All Right Reserved