-->

Thursday, March 22, 2018

Save and Display Binary Images from Database in DataGridView in Windows Forms

In this article, I am going to show you, How to show images in DataGridView in Windows forms c#. Its easy to bind the DataGridView with the database table which is contain binary image. You can check this code to bind the DataGridView with the image using Entity Framework.


using System;
using System.IO;
using System.Linq;
using System.Windows.Forms;

namespace BankingApplication_Tutorial
{
    public partial class Form4 : Form
    {
        public Form4()
        {
            InitializeComponent();
        }

        private void Form4_Load(object sender, EventArgs e)
        {
            dataGridView1.AutoGenerateColumns = false;
            dataGridView1.ColumnCount = 2;
            dataGridView1.Columns[0].Name = "Id";
            dataGridView1.Columns[0].HeaderText = "Image Id";
            dataGridView1.Columns[0].DataPropertyName = "Id";

            dataGridView1.Columns[1].Name = "Name";
            dataGridView1.Columns[1].HeaderText = "Name";
            dataGridView1.Columns[1].DataPropertyName = "Name";

            DataGridViewImageColumn Imagecolumn = new DataGridViewImageColumn();
            Imagecolumn.Name = "Data Image";
            Imagecolumn.DataPropertyName = "Data";
            Imagecolumn.HeaderText = "Image Show";
            Imagecolumn.ImageLayout = DataGridViewImageCellLayout.Normal;
            dataGridView1.Columns.Insert(2, Imagecolumn);
            dataGridView1.RowTemplate.Height = 100;
            dataGridView1.Columns[2].Width = 100;
            this.bindDataGridView();


        }

        private void bindDataGridView()
        {
            // throw new NotImplementedException();
            banking_dbEntities1 dbe = new banking_dbEntities1();
            var items = dbe.DataGridImages.ToList();
            dataGridView1.DataSource = items;
        }

        private void button1_Click(object sender, EventArgs e)
        {
            banking_dbEntities1 dbe = new banking_dbEntities1();
            using (OpenFileDialog dialog =  new OpenFileDialog())
            {
                if (dialog.ShowDialog() == DialogResult.OK)
                {
                    string filename = dialog.FileName;
                    byte[] bytes = File.ReadAllBytes(filename);
                 
           
            DataGridImage img = new DataGridImage();
                    img.Name = Path.GetFileName(filename);
                    img.Data = bytes;
                    dbe.DataGridImages.Add(img);
                    dbe.SaveChanges();


                        }

            }
            bindDataGridView();
        }
    }
}

Saturday, May 14, 2016

Windows Forms Events

An event is generated when a user performs an action, such as clicking the mouse or pressing a key. When a user clicks a form, the clicks event is generated for the form.
Each form and control has a predefined set of events associated with it. You can instruct an application to perform a specific action when an event takes place. For example, you can write code for adding items to a list as soon as a form is loaded.

Click : Occurs when a user clicks anywhere on a form.
DoubleClick : Occurs when the component is double-clicked.
FormClosed : Occurs when a form is closed.
Deactivate : Occurs when a form losses focus and is no longer active.
Load : Occurs when a form is loaded in the memory for the first time. This event can be used to initialize variables used in a form. This event can also be used to specify the initial values to be displayed in various controls in a form.
MouseMove : Occurs when a mouse is moved over a form.
MouseDown : Occurs when the left mouse button is pressed on a form.
MouseUp : Occurs when the mouse button is released.

You can specify the action to be performed on the occurrence of an event within a special method called, event handler. You can add code for an event handler by using the code Editor window.

To write code for an event corresponding to an object, open the properties window for that object.

Friday, April 15, 2016

Windows Forms Methods

Windows Forms methods enable you to perform various tasks, such as opening, activating and closing the form.

The commonly used methods are explained in the following:
1. Show ( ) 
Description : Is used to display a form.
Example: Form2 frmobj = new Form2();
frmobj.Show();

Explanation : This code creates a new instance of the Form2 form by using the new keyword. The Show() method display the instance of Form2 form.

2. Hide( )
Description: Is used to hide a form.
Example: Form1 frmobj = new Form1();
frmobj.Hide();
//you can use
this.Hide( ); // for current Form1

Explanation: This code creates a new instance of the Form1 form by using the new keyword. The Hide() method hides the instance of Form1 form.

3. Activate ( )
Description: Is used to activate a form and set the focus on it. When you use this method. It brings the form to the front(if it is the current application) or flashes the form caption(if it is not the current application) on the task bar.
Example: Form1 frmobj = new Form1();
frmobj.Activate();
Explanation : This code sets focus on a form named Form1.

4. Close ( )
Description: Is used to close a form.
Example: Form1 frmobj = new Form1();
frmobj.Close();
Explanation: This code closes the form named Form1.

5. SetDesktopLocation()
Description: Is used to set the desktop location of a form at runtime. This method takes the X and Y coordinates of the desktop as its parameters.
Example: Form1 frmobj = new Form1();
frmobj.SetDesktopLocation(200,200);
Explanation : This code displays the form named Form1 at the specified location.

Thursday, April 7, 2016

Types of Dialog Boxes in Windows Form C#

Windows provides the following type of dialog boxes:
1. Modal
2. System Modal
3. Modeless

Modal Dialog Box : A modal dialog box does not allow you to switch focus to another area of the application, which has invokes the dialog box. However, you can switch to other windows application while the modal dialog box is being displayed on the screen.
For example, the Save as dialog box of Microsoft word is a modal dialog box. If you are trying to save a word file by using the Save As dialog box, you cannot make any changes in the word document until it is saved. The following figure shows the save as dialog box.


Modal Dialog Box


System Modal Dialog Box
The System modal dialog box takes control of the entire Windows environment. For example, the Windows Log On dialog box is a system modal dialog box.
The following figure displays the Log On to Windows dialog box.
Sometimes, error messages are displayed by using a system modal dialog box. When such messages appear on the screen, the user is not allowed to switch to, or interact with, any other Windows application until the system modal dialog box is closed.

System Modal Dialog Box


Modeless Dialog Box

Types of Dialog Boxes in Windows Form C#

The modeless dialog box stays on the screen and is available for use at any time. For example, the Find and Replace dialog box of Microsoft Word is a modeless dialog box. This modeless dialog box allows you to switch to another area of the application, which has invoked the dialog box, or to another windows application.

Wednesday, February 10, 2016

By using Single LINQ Query retrieve foriegn key table column

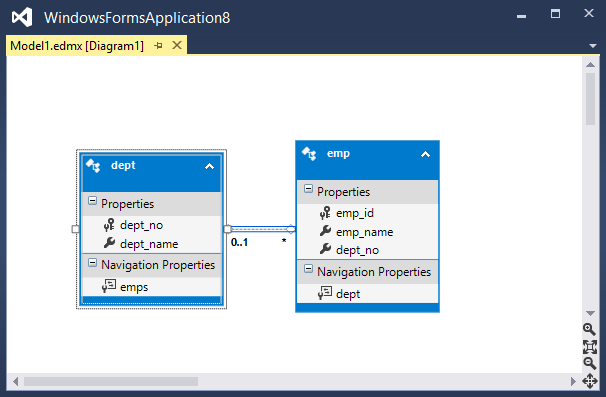
In this article, I will explain you, How to retrieve data from two joined table using single LINQ Query. Here we have two joined table in mentioned diagram. Both tables are joined from dept_no, so if you want to retrieve record from both table like:
Retrieve emp_id and emp_name who belongs to IT department.


employeeEntities empl = new employeeEntities();

            var query = from g in empl.emps
                        join m in empl.depts on g.dept_no equals m.dept_no
                        where m.dept_name == "IT"
                        select new
                        {
                            Emp_Name = g.emp_name,
                            Emp_ID = g.emp_id
                        };
               
            dataGridView1.DataSource = query.ToList();
In this code, empl is the context object through which we can access columns of both tables. emp is the foreign key table map with dept table using dept_no column. Emp_Name and Emp_ID is the reference name , which are displayed on table. Bind the query result with the dataGridView. 

Tuesday, February 9, 2016

[Solved] Rows cannot be programmatically removed unless the DataGridView is data-bound to an IBindingList that supports change notification and allows deletion.

[Solved] Rows cannot be programmatically removed unless the DataGridView is data-bound to an IBindingList that supports change notification and allows deletion. When you bind the Datagridview with List in windows form. You get error when you delete row from it. According to article title, first to implement your List from IBindingList interface, if you want to solve this issue. Suppose, you want to bind your DataGridView with this class, which is mentioned below:

public partial class userAccount
    {
        public decimal Account_No { get; set; }
        public string Name { get; set; }
         }
    }

Then you write simple code for this :

List<userAccount> ua= new List<userAccount>();
ua.Add(new userAccount(){Account_No=1000000008, Name ="Jacob"});
dataGridView1.DataSource = ua;

After binding the DataGridview, you will write the code for remove row from dataGridview.

dataGridView1.Rows.RemoveAt(dataGridView1.SelectedRows[0].Index);

After that you got error, which is mentioned below:

[Solution]

Bind DataGridView with IBindingList<userAccount> . Now the code is:

BindingList<userAccount>  bi = new BindingList<userAccount> ();
bi.Add(new userAccount(){Account_No=1000000008, Name ="Jacob"});
dataGridView1.DataSource = bi;

After binding the DataGridview, you will write the code for remove row from dataGridview.

bi.RemoveAt(dataGridView1.SelectedRows[0].Index);
© Copyright 2013 Computer Programming | All Right Reserved