-->

Tuesday, July 23, 2013

Programming techniques and logic in c language

Introduction

The tools like algorithm and flow charts help in understanding the problem and analyzing it. Once the problem and the required solution format are clear , the programming is too easy . In order to program the logical structure derived from algorithm or flowchart , one of the programming languages is picked . The selection of the programming language also depends on the nature of the problem.
You will see the different programming techniques that are used to solve a problem. The solution of the problem is nothing but to design the program . Before going into the actual design , one should understand the features, merits and demerits of each programming technique .

After selecting the technique for programming , the next step is the selection of logic . In general , a program can be written in different ways. The different ways give rise to the logic of the program. One of the programs whose logic is simple and understandable is finally selected for implementation. The logic of the program depends on the capability of the programming language . The capabilities of the programming language include the availability of different types of statements . A good logic selection will also improve the performance and efficiency of the designed program.

Related post

Introduction to programming techniques

Now , let us see " what are the different types of programming techniques?"
Definition : A method used to design the program to solve a problem or task is called programming technique. The following content shows the number of techniques available for programming.

Programming Techniques:

  • Top-down
  • Bottom-up
  • Unstructured
  • Structured
  • Modular

Monday, July 22, 2013

How to prevent duplicate child forms in windows forms C#

In my previous post we have create an MDI container form in which we have opened some individual forms called child forms. Each form contains a property MdiParent that is used to get or set the parent form of a particular form.
Form2 obj = new Form2();
obj.MdiParent = this;
obj.Show();

As we know, in MDI container application user opens multiple child forms at a time. Most often when user opens a child form, application opens a new instance of the form, doesn't matter the form is previously opened or not. This is programmer’s job to check if the same form is previously opened then bring that form to front otherwise create a new instance.

To check the instance is null or not we have to write following code in our code behind file of form that will be the child form.
private static Form3 instance;
public static Form3 GetInstance()
{
if (instance == null)
instance = new Form3 ();
return instance;
}

In above code we have defined a new object of type Form3. Each time when we call this method it will check this object whether it is null or not. If this is null it will create a new instance of the form otherwise it simply return that object.

Our next task is to set the value of that instance to null each time user closes that form. Each form has a FormClosing event which occur whenever user closes the form, before the form will closed. We will set the instance to null in this FormClosing event of the form.
Instance = null;

In the MDI parent form replace the above three line of code with the following code:
Form3 obj = Form3.GetInstance();
obj.MdiParent = this;

if (!obj.Visible)
obj.Show();
else
obj.BringToFront();

Through the above code we will use the newly defined method i.e. GetInstance() in place of its constructor. Now when user opens this child form it will check that if that form is visible then it will bring that in front otherwise display the form to user using show method.

Sunday, July 21, 2013

Filter data in datagridview according to combobox in c#

As we have previously studied that datagridview is used for display rows and columns of data in a grid format in windows form. Mostly data are previously defined which are to be shown in datagridview. Sometimes we have to change the data on basis of some conditions.

In previous post we have learnt to bind a datagridview with search option and in else case all the data from database will bind to datagridview in C# language. In this post we will learn to bind datagridview with the selected index changed event of combobox in C#.

The selection changed event of combobox occurs when the value of selected index property changes. We are going to change our data of datagridview according to that changed value.

Let’s create a student class, which will be used to bind our datagridview, having some properties like below:
public class Student
{
public string Name { get; set; }
public int Age { get; set; }
public string Address { get; set; }
public string Branch { get; set; }
}

Create a new list of student that will be the data source of datagridview and insert some records in that list having branch CS or IT as I have inserted in my example using C# language. Set this list as a data source of datagridview.
dataGridView1.DataSource = studentList;

Now when we run this project all the records will be shown in datagridview. We want to change the data of datagridview according to selection changed event. So write the below code in selection changed event of combobox
if (comboBox1.SelectedItem != null)
{
string branch = comboBox1.Text;
var students = studentList.Where(a => a.Branch.Equals(branch));
dataGridView1.DataSource = students.ToList();
}

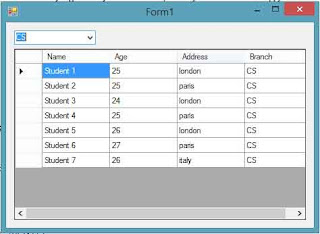
Run this project now and change the selection value of combobox to CS and we will show the data of datagridview have been changed as following image:

Filter data in datagridview according to combobox in c#

Change the selection value to IT and the data will be changed as following image:


Filter data in datagridview according to combobox in c#
Go for example

How to use TextBox control in ASP.NET

Introduction

The TextBox control is an input control , which allows you to enter text. The TextBox control exists within the System.Web.UI.WebControls namespace.
You can set the style of the TextBox by using the TextMode property . By default , the TextMode property is set to SingleLine to create a single-line HTML . text field but it can also be set to MultiLine for a multiline textbox.
You can convert a mode of TextBox control to a Password control, where the text, which the user types is masked with special symbols such as asterisks (*).
The display width of a textbox is set with its columns property and if it is a multiline textbox , the display height is set with the Rows property.

Public Properties of the TextBox Classes
AutoCompleteType : Obtains or sets a value that indicates the AutoComplete behavior of the TextBox control.
AutoPostBack : Obtains or sets a value that indicates whether an automatic postback to the server occurs when the TextBox control loses focus.
CausesValidation : Obtains or sets a value indicating whether validation is performed when the textbox control is set to validate when a postback occurs.
Columns : Obtains or set the display width of the textbox in characters.
MaxLength : Obtains or sets the maximum number of characters allowed in the textbox.
ReadOnly : Obtains or sets a value indicating whether the contents of the TextBox control can be changed.
Rows : Obtains or sets the number of rows displayed in a multiline textbox.
Text : Obtains or sets the text content of the TextBox control.


TextMode : Obtains or sets the behavior mode (single-line , multiline or password) of the TextBox control.
ValidationGroup : Obtains or sets the group of controls for which the TextBox control causes validation when it postback to the server.
Wrap : Obtains or sets a value indicating whether the text content wraps within a multiline textbox.

Public Event of the TextBox Class
TextChanged : Occurs when the user changes the text of the TextBox.


Example of the TextBox Control

<%@ Page Language="C#" %>
<!DOCTYPE html>
<script runat="server">
    protected void Button1_Click(object sender, EventArgs e)
    {
        TextBox1.Text = " this is the single line textbox";
        TextBox2.Text = " this is the multi-line text box having 10 rows.";
        TextBox4.Text = TextBox3.Text;
    }
</script>

<html xmlns="http://www.w3.org/1999/xhtml">
<head runat="server">
    <title></title>
</head>
<body>
    <form id="form1" runat="server">
    <div>
 
        <asp:Label ID="Label1" runat="server" style="font-weight: 700" Text="Different types of TextBox control"></asp:Label>
        <br />
        <br />
        <asp:Button ID="Button1" runat="server" OnClick="Button1_Click" Text="Click me" />
        <br />
        <br />
        <asp:TextBox ID="TextBox1" runat="server" Height="27px" Width="220px"></asp:TextBox>
        <br />
        <br />
        <asp:TextBox ID="TextBox2" runat="server" Rows="10" TextMode="MultiLine"></asp:TextBox>
        <br />
        <br />
        <asp:Label ID="Label2" runat="server" style="font-weight: 700" Text="Enter Password"></asp:Label>
        <br />
        <asp:TextBox ID="TextBox3" runat="server" Height="23px" TextMode="Password" Width="211px"></asp:TextBox>
        <br />
        <br />
        <asp:TextBox ID="TextBox4" runat="server" Height="23px" Width="206px"></asp:TextBox>
 
    </div>
    </form>
</body>
</html>

Friday, July 19, 2013

ASP PROGRAM : How to use Wizard Control in ASP.NET

ASP PROGRAM : Introduction
The wizard control provides navigation and a User Interface (UI) to collect related data across multiple steps. It also allows you to implement liner or non-linear navigation through the steps such as skipping unnecessary steps or returning to a previously completed step to change some value. The appearance of the wizard control is fully customized by using templates , skins and style settings; for example , you can use the HeaderTemplate , SideBarTemplate, StartNavigationTemplate , FinishNavigationTemplate , and StepNavigationTemplate properties to customized the interface of the Wizard control.

Public Properties of the Wizard Class
ActiveStep : Obtains the step in the WizardSteps collection , which is currently displayed to the end-user
ActiveStepIndex : Obtains or sets the index value of the current WizardStepBase object.
CancelButtonImageUrl : Obtains or sets the URL of the image displayed for the cancel button.
CancelButtonStyle : Obtains a reference to a collection of style properties that describes the appearance of the cancel button .
CancelButtonText : Obtains or sets the text caption that is displayed for the cancel button.
CancelButtonType : Obtains or sets the type of button that is rendered as the cancel button.
CancelDestinationPageUrl : Obtains or sets the URL that the end user is directed to when they click the cancel button.
CellPadding : Obtains or sets the amount of space between the data of the cell and the cell border.
CellSpacing : Obtains or sets the space between the cells
DisplayCancelButton : Obtains or sets a boolean value showing whether to display a cancel button.
DisplaySideBar : Obtains or sets a Boolean value showing whether to display the sidebar area on the wizard control.

Example of Wizard Control 

When you add a Wizard control on a Web page (Default.aspx), it adds the following code to the source code of the web page
<asp:Wizard ID="Wizard1" runat="server" ActiveStepIndex="0">
            <WizardSteps>
                <asp:WizardStep runat="server" title="Step 1">
                </asp:WizardStep>
                <asp:WizardStep runat="server" title="Step 2">
                </asp:WizardStep>
            </WizardSteps>
        </asp:Wizard>
If you want to add some controls to the Wizard control then you must drop some controls between opening and closing tag of WizardStep

<asp:WizardStep runat="server" title="Step 1">
//Put some controls here
                </asp:WizardStep>
<%@ Page Language="C#" %>

<!DOCTYPE html>

<script runat="server">

    protected void Page_Load(object sender, EventArgs e)
    {

    }

    protected void RadioButtonList1_SelectedIndexChanged(object sender, EventArgs e)
    {
     
            result.Text = "your gender are <br/>" + RadioButtonList1.SelectedItem.Text;
   
    }
</script>

<html xmlns="http://www.w3.org/1999/xhtml">
<head runat="server">
    <title></title>
</head>
<body>
    <form id="form1" runat="server">
    <div>
 
        <asp:Wizard ID="Wizard1" runat="server" ActiveStepIndex="0">
            <WizardSteps>
                <asp:WizardStep runat="server" title="Step 1">
                    Your Gender are<br />
                    <asp:RadioButtonList ID="RadioButtonList1" runat="server" AutoPostBack="True" OnSelectedIndexChanged="RadioButtonList1_SelectedIndexChanged">
                        <asp:ListItem>Male</asp:ListItem>
                        <asp:ListItem>Female</asp:ListItem>
                    </asp:RadioButtonList>
                    <br />
                    <asp:Label ID="result" runat="server"></asp:Label>
                </asp:WizardStep>
                <asp:WizardStep runat="server" title="Step 2">
                    Welcome
                </asp:WizardStep>
            </WizardSteps>
        </asp:Wizard>
 
    </div>
    </form>
</body>
</html>


Output
ASP PROGRAM : How to use Wizard Control in ASP.NET

ASP PROGRAM : How to use Wizard Control in ASP.NET

Thursday, July 18, 2013

How to Bind Bulleted List using XMLDataSource in ASP.NET


Related Post

<%@ Page Language="C#" %>
<!DOCTYPE html>
<script runat="server">
</script>
<html xmlns="http://www.w3.org/1999/xhtml">
<head runat="server">
    <title></title>
</head>
<body>
    <form id="form1" runat="server">
    <div>
   
        <asp:BulletedList ID="BulletedList1" runat="server" DataSourceID="XmlDataSource1" DataTextField="Text" DataValueField="url" DisplayMode="HyperLink">
        </asp:BulletedList>
        <asp:XmlDataSource ID="XmlDataSource1" runat="server" DataFile="~/database/adver.xml"></asp:XmlDataSource>
   
    </div>
    </form>
</body>
</html>
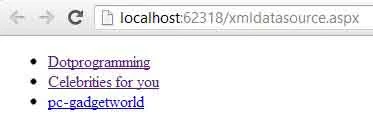
Output
Bind Bulleted list using xmldata source in asp.net

How to use ImageControl in ASP.NET

Introduction 
The Image control is standard Web Server control, which is used to display an image on a Web page. This control exists within the System.Web.UI.WebControl namespace. You set the Uniform resource Locator (URL) of the image with the ImageUrl property of the Image control. The alignment of the image in relation to other elements on the Web page is specified by setting the ImageAlign property.

Public properties of the image Class
AlternateText : Obtains or sets the alternate text displayed in the image control when the image is not available . Browsers that support the ToolTips featurs display this text as a tooltip.
DescriptionUrl : Obtains or sets the location to a detailed description for the image.
Enabled : Obtains or sets a value indicating whether the control is enabled.
Font : Obtains or sets the font properties for the text associated with the control.
GenerateEmptyAlternateText : Obtains or sets a value indicating whether the control generates an alternate text attribute for an empty string value.
ImageAlign : Obtains or sets the alignment of the image control in relation to other controls on the Web page.

ImageUrl : Obtains or sets the location of an image to where it display in the Image control.

Example of Image control in asp.net

First insert image in any folder or root folder of the website

ImageControl example in asp.net

<%@ Page Language="C#" %>

<!DOCTYPE html>

<script runat="server">

</script>

<html xmlns="http://www.w3.org/1999/xhtml">
<head runat="server">
    <title></title>
</head>
<body>
    <form id="form1" runat="server">
    <div>
        <asp:Image ID="Image1" runat="server" ImageUrl ="~/Img/images.jpg" />
    </div>
    </form>
</body>
</html>
Related Post

© Copyright 2013 Computer Programming | All Right Reserved