-->

Monday, July 29, 2013

Specify relative positions of controls in window form C#

When a window form is open, working normally, all the controls are set as the programmer set them with their parent form, it means that form is in normal state. Resize the form and check that the controls still remains of the same size and additional space is blank on the form.

Anchor property of the form is used to put the controls to its relative position on the form, means a control is automatically take its relative position as its parent control is resized. Each control has its four edges i.e. left, top, right and bottom. By default a control is added to the form with its Anchor property to top and left. When we resize a form then the control is still in top and left corner of the form and size of the control is fixed.
For example drag and drop a listview in the form and resize the form, the listview will not change its points of all the four edge.

Anchor property of the control in windows form C#

In the properties window change the anchor property of the listview to “Top, Bottom, Left, Right”, run the form and check the difference.

Anchor property of controls in windows forms C#

This is how we have specify the relative position of the control from designer part. We can set this anchor property through code behind file

listView1.Anchor = AnchorStyles.Left | AnchorStyles.Top | AnchorStyles.Right | AnchorStyles.Bottom;

Anchor property and dock property are mutually exclusive, means one can be set at a time. The last property change will be effective in both of these two.

How to change Theme Dynamically using QueryString in ASP.NET

Introduction About Theme
Using theme you can change your page look or design.Themes define the style properties of a web page . Now, let's explore the elements of themes , such as skins, Cascading Style Sheets (CSS), and images. A skin is a file with the .skin extension that contains property settings for individual controls, such as Button, Textbox, or Label. You can either define skins for each control in different skin files or define skins for all the controls in a single file. The skin files with the .skin extension are created inside the subfolder of the App_Themes folder in the Solution Explorer window of a website.
<%@ Page Language="C#" AutoEventWireup="true" CodeFile="runtime.aspx.cs" Inherits="runtime" %>

<!DOCTYPE html>

<html xmlns="http://www.w3.org/1999/xhtml">
<head runat="server">
    <title></title>
</head>
<body>
    <form id="form1" runat="server">
    <div>
        <asp:DropDownList ID="DropDownList1" runat="server" Height="54px" OnSelectedIndexChanged="DropDownList1_SelectedIndexChanged" Width="208px" AutoPostBack="True">
            <asp:ListItem>Select Theme</asp:ListItem>
            <asp:ListItem>Red</asp:ListItem>
            <asp:ListItem>Green</asp:ListItem>
        </asp:DropDownList>
    </div>
    </form>
</body>
</html>

Codebehind


using System;
using System.Collections.Generic;
using System.Linq;
using System.Web;
using System.Web.UI;
using System.Web.UI.WebControls;

public partial class runtime : System.Web.UI.Page
{  
    protected void Page_PreInit(Object sender, EventArgs e)
    {
        if (Request.QueryString["Theme"] != null)
        {
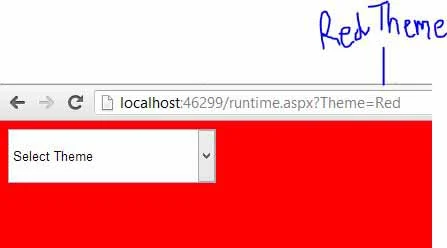
            Page.Theme = Request.QueryString["Theme"].ToString();
        }
     
    }
    protected void Page_Load(object sender, EventArgs e)
    {
        DropDownList1.AutoPostBack = true;

    }
    protected void DropDownList1_SelectedIndexChanged(object sender, EventArgs e)
    {      
            Response.Redirect("~/runtime.aspx?Theme=" + DropDownList1.SelectedValue);
     
        DropDownList1.AutoPostBack = false;
     

    }
}
Output
How to change theme using dropdownlist

How to change theme using dropdownlist

Sunday, July 28, 2013

How to use MultiView and View Control in ASP.NET

The MultiView Control
The MultiView control is a container for a group of view controls . It allows you to define a group of View controls , where each View control contains child controls . Your application can then render a specific View control based on specific criteria , such as user identity, user preferences, and information passed in a querystring parameter. The MultiView control is also used to create wizard . To allow user to navigate between View controls within a MultiView control, you can add a LinkButton or Button control to each View control.

Public properties of the MultiView Class
ActiveViewIndex : Obtains or set the index value of the active View control within a MultiView control.
EnableTheming : Obtains or sets a value showing whether themes apply to the MultiView control.
Views : Obtains the collections of view controls in the MultiView control.

Public Methods of the MultiView Class
GetActiveView : Obtains the current active View control within a MultiView control.
setActiveView : Sets the specified View control to the active view within a MultiView control.

Public Event of the MultiView Class
ActiveViewChnaged : Raised when the active View control of a multiView control changes between posts to the server.

The View Control 
The view control is a container for a group of controls . A View control must always be stored within a MultiView control. Only one View control can be defined as the active view within a MultiView control at a time. A view control can contain any type of controls, including other MultiView controls. A View control does not support any style properties . To apply styles to a View Control , You have to add one or more panel controls to the View controls. To allow users to navigate between multiple View controls within a MultiView control , you can add a LinkButton or Button control to each View Control.

Public Properties of the View Class
EnableTheming : Obtains or sets a value showing if themes apply to this controls or not.
Visible : Obtains or sets a value which indicates whether the  View control is visible.


<%@ Page Language="C#" %>

<!DOCTYPE html>

<script runat="server">

    protected void Button1_Click(object sender, EventArgs e)
    {
        MultiView1.Visible = true;
        MultiView1.SetActiveView(View1);
    }

    protected void Button2_Click(object sender, EventArgs e)
    {
        MultiView1.Visible = true;
        MultiView1.SetActiveView(View2);
    }
</script>

<html xmlns="http://www.w3.org/1999/xhtml">
<head runat="server">
    <title></title>
    <style type="text/css">
        .auto-style1 {
            font-size: larger;
        }
    </style>
</head>
<body>
    <form id="form1" runat="server">
        <strong><span class="auto-style1">Select Buttons for birthday gift </span></strong>

    <div>
 
        <asp:Button ID="Button1" runat="server" Text="Gift 1" OnClick="Button1_Click" />&nbsp;
        <asp:Button ID="Button2" runat="server" Text="Gift 2" OnClick="Button2_Click" />
 
        <br />
        <asp:MultiView ID="MultiView1" runat="server" ActiveViewIndex ="0" Visible ="false">
            <asp:View ID="View1" runat ="server">
                <asp:Image ID="Image1" runat="server" Height="165px" ImageUrl="~/picture/images.jpg" Width="194px" />

            </asp:View>
            <asp:View ID="View2" runat ="server" >
                <asp:Image ID="Image2" runat="server" Height="165px" ImageUrl="~/picture/motorola droid.jpg" Width="191px" />

            </asp:View>
        </asp:MultiView>
 
    </div>
    </form>
</body>
</html>


Output
How to use MultiView and View Control in ASP.NET

How to use MultiView and View Control in ASP.NET

Friday, July 26, 2013

How to Change file attributes in C# Programming

File attributes are metadata associated with computer files that define system behaviour.  Same as files, folders, volumes and other file system objects may have these attributes. All the operating system have often four attributes i.e. archive, hidden, read-only and system. Windows has more attributes. Read more about File Attributes

User have to right click on desired file or folder and then open properties, to change the attributes of that file or folder. If one want to change attributes of multiple files then he/she has to either select all the files and then change or change attributes of each file or folder one by one.

In programming context we can do this task with a predefined class i.e. FileAttributes which provides all the attributes for files and directories. We can easily change the desired attribute of a file or directory using the above class FileAttributes that is exists in System.IO namespace.

Design a new form in windows form application that will look like the below form:


Change file attributes in C#

There are some controls which are used for specific task in this project, we will discuss them one by one:
  • TextBox: show the path of folder selected by user.
  • Browse Button: open a folderBrowserDialog which select a path of folders and files.
  • CheckBox: if checked program will check all the sub-folders for files.
Except these controls there are three more buttons which are used to play with attributes of files or folders as their text shows. For example "Remove all" will remove all the attributes of files and folder at selected path.

Write the following code in the click event of Only Hidden button:
private void btnSetHidden_Click(object sender, EventArgs e)
        {
            count = 0;
            setHidden(txtPath.Text);
            lblStatus.Text = "Number Of Scanned Files And Folders:" + count.ToString();
        }
In the above code there is an integer variable count that will count the scanned file and folders. Then it will call a function setHidden(string ) that will use the selected path and set the hidden property to true of all the files and folders at that selected path.


The code of this function is:
private void setHidden(string dir)
{
if (!Directory.Exists(dir))
{
lblStatus.Text = "Invalid path!";
return;
}
if (chkSub.Checked)
{
foreach (string d in System.IO.Directory.GetDirectories(dir))
{
count++;
lblStatus.Text = dir;
setHidden(d);
DirectoryInfo df = new DirectoryInfo(d);

df.Attributes = System.IO.FileAttributes.Hidden;
foreach (string fil in System.IO.Directory.GetFiles(d))
{
FileInfo f = new FileInfo(fil);
f.Attributes = System.IO.FileAttributes.Hidden;
Application.DoEvents();
count++;
}
}
}
}
In above code it will change the attribute of a directory and then all the files in that directory. Here, a new Method doEvents() is used which process all windows messages currently in the message queue. Calling this method causes the current thread to be suspended while all waiting window messages are processed. You can read more about DoEvents().

Go for example.

How to use CustomValidator control in ASP.NET

Introduction
The CustomValidator control is used to customize and implement data validation as per your requirement. Occasionally, You might need to validate your data in a way that is not possible directly with the help of existing the Validation controls. For example , if you want to find out whether a number is odd or even , you cannot use an existing validation control for doing that because this functionality is not included in any of the Validation controls. To solve this problem , you need a Validation control that can be customized to solve this problem. The CustomValidator control exists within the System.Web.UI.WebControls namespace. The CustomValidator control checks whether or not the input you have given, such as prime, even, or odd number, matches a given condition.

Public Properties of the CustomValidator Class:
ClientValidationFunction : Obtains or sets the name of the custom client-side script function used for validation.
ValidateEmptyText : Obtains or sets s Boolean value indicating whether empty text should be validated or not.


<%@ Page Language="C#" AutoEventWireup="true" CodeFile="logincontrol.aspx.cs" Inherits="logincontrol" %>
<!DOCTYPE html>
<html xmlns="http://www.w3.org/1999/xhtml">
<head runat="server">
    <title></title>
</head>
<body>
    <form id="form1" runat="server">
    <div>  
        Enter number :
        <asp:TextBox ID="TextBox1" runat="server" Height="19px" Width="234px"></asp:TextBox>
&nbsp;<asp:CustomValidator ID="CustomValidator1" runat="server" ControlToValidate="TextBox1" ErrorMessage="CustomValidator" OnServerValidate="CustomValidator1_ServerValidate"></asp:CustomValidator>
        <br />
        <asp:Button ID="Button1" runat="server" OnClick="Button1_Click" Text="Submit" />
        <br />  
    </div>
    </form>
</body>
</html>
Code-Behind file


using System;
using System.Collections.Generic;
using System.Linq;
using System.Web;
using System.Web.UI;
using System.Web.UI.WebControls;
public partial class logincontrol : System.Web.UI.Page
{    protected void Page_Load(object sender, EventArgs e)
    {
        }
    protected void Button1_Click(object sender, EventArgs e)
    {
    }
    protected void CustomValidator1_ServerValidate(object source, ServerValidateEventArgs args)
    {
        if (Convert.ToInt32(args.Value) % 2 == 0)
        {
            Response.Write("even number");

        }
        else
        {
            Response.Write("odd number");
        }
    }
}

Wednesday, July 24, 2013

Example of AutoComplete Type property of TextBox Control in ASP.NET

Obtains or sets a value that indicates the AutoComplete behavior of the TextBox control.
Introduction
AutoComplete means your textbox control should filled automatically after given some word or letter into your textbox. Suppose you have a email input textbox on your browser screen and this textbox automatically  filled after giving some words or letter.
Lets take an Example:
<%@ Page Language="C#" %>
<!DOCTYPE html>
<script runat="server">
</script>
<html xmlns="http://www.w3.org/1999/xhtml">
<head runat="server">
    <title></title>
</head>
<body>
    <form id="form1" runat="server">
    <div>
        <asp:TextBox ID="TextBox1" runat="server" AutoCompleteType="Email" Height="26px" Width="270px"></asp:TextBox>
    </div>
    </form>
</body>
</html>
Output
Example of AutoComplete Type property of TextBox Control in ASP.NET

In this example we set email as a AutoCompleteType property of the textbox control. In above image you can see when we enter "n" letter into the textbox then a popup appear bellow to the textbox with having email id which start  letter "n".

If you want to disable your AutoComplete property of the TextBox control then set Disabled value. 
you can set for  Re-Type password ,  Email -conformation etc. 

Tuesday, July 23, 2013

How to make comment box in ASP.NET

Basically CommentBox shows list of data. So we can use repeater control for this types of application.The Basic logic behind of this application is.

  • Feed your user data to database table first
  • Show data from database table using repeater control.
Introduction on repeater control
The Repeater control is a data bound control that is used to display repeated list of items from the associated data source. It is a single WebControl that allows splitting markup tags across the templates . The Repeater control does not provide support to in-Built layout or styles . Therefore, While working with the repeater control you have to explicitly declare all layout  , formatting , and style. In other words , The Repeater control does not support built-in selection or editing features.


Create database Table

Make Stored procedure 
CREATE PROCEDURE insrtdata

AS
select * from commentbox

RETURN 0


<%@ Page Language="C#" %>
<!DOCTYPE html>
<script runat="server">
    protected void Page_Load(object sender, EventArgs e)
    {
     
            System.Data.SqlClient.SqlConnection con = new System.Data.SqlClient.SqlConnection();
            con.ConnectionString = ConfigurationManager.ConnectionStrings["ConnectionString"].ToString();
            con.Open();
            System.Data.SqlClient.SqlCommand cmd = new System.Data.SqlClient.SqlCommand();
            cmd.CommandText = "insrtdata";
            cmd.CommandType = System.Data.CommandType.StoredProcedure;
            cmd.Connection = con;
            System.Data.SqlClient.SqlDataAdapter da = new System.Data.SqlClient.SqlDataAdapter(cmd);
            System.Data.DataSet ds = new System.Data.DataSet();
            da.Fill(ds);
            Repeater1.DataSource = ds;
            Repeater1.DataBind();        
    }

    protected void Button1_Click(object sender, EventArgs e)
    {
        System.Data.SqlClient.SqlConnection con = new System.Data.SqlClient.SqlConnection();
        con.ConnectionString = ConfigurationManager.ConnectionStrings["ConnectionString"].ToString();
        con.Open();
        System.Data.SqlClient.SqlCommand cmd = new System.Data.SqlClient.SqlCommand();
        cmd.Parameters.AddWithValue("@na",nametxt .Text);
        cmd.Parameters.AddWithValue("@em",emailtxt .Text);
        cmd.Parameters.AddWithValue("@web",webtxt .Text);
        cmd.Parameters.AddWithValue("@con",contenttxt .Text);
        cmd.CommandText = "insert into [commentbox](Name,Email,Website,Content)values(@na,@em,@web,@con)";
        cmd.Connection = con;
        cmd.ExecuteNonQuery();
     

    }
</script>

<html xmlns="http://www.w3.org/1999/xhtml">
<head runat="server">
    <title></title>
</head>
<body>
    <form id="form1" runat="server">
    <div>
 
        Your Comment:<br />
        Name :&nbsp;&nbsp;
        <asp:TextBox ID="nametxt" runat="server" Height="24px" Width="231px"></asp:TextBox>
        <br />
        <br />
        Email :&nbsp;&nbsp;&nbsp; <asp:TextBox ID="emailtxt" runat="server" Height="23px" Width="230px"></asp:TextBox>
        <br />
        <br />
        Website:
        <asp:TextBox ID="webtxt" runat="server" Height="23px" Width="230px"></asp:TextBox>
        <br />
        <br />
        Content :
        <asp:TextBox ID="contenttxt" runat="server" Rows="5" TextMode="MultiLine"></asp:TextBox>
        <br />
        <br />
        <asp:Button ID="Button1" runat="server" OnClick="Button1_Click" Text="Submit " />
 
    </div>
        <asp:Repeater ID="Repeater1" runat="server">
         
            <ItemTemplate>
                <hr />
             
                    <div style="background-color: #CCCC00">
Welcome,<asp:Label ID="Label1" runat="server" Text='<%# Eval("Name") %>'></asp:Label>
                        <asp:Label ID="Label2" runat="server" Text='<%# Eval("Email") %>'></asp:Label>
                    </div>
           
                <div style="background-color: #3399FF">
                    <asp:Literal ID="lit" runat ="server" Text ='<%# Eval("Content") %>' Mode ="Transform" />
                    <br />
                    <asp:HyperLink ID="HyperLink1" runat="server" NavigateUrl ='<%# Eval("Website") %>' Text ='<%# Eval("Website") %>' />
                      </div></ItemTemplate>
        </asp:Repeater>
    </form>
</body>
</html>

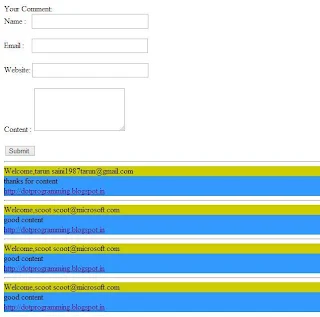
Output
How to make comment box in ASP.NET

© Copyright 2013 Computer Programming | All Right Reserved