-->

Monday, August 5, 2013

Basics about XAML in context of WPF Application

XAML, stands for eXtensible Application Markup Language, is a declarative XML based language used for initializing structured values and objects. In the context of WPF, XAML is used to describe visual user interface. The GUI created in XAML can be expressed using any .NET language like C# or VB.

As this is simply based on XML, programmers are able to share and edit content amongst themselves without compilation. Whenever you will create a page or a window in WPF, it will create a XAML document and a code behind file, which together creates the page or window.

Here is the basic XAML code for creating a textblock in Grid element.
<Grid>
        <TextBlock Text="My First WPF Application" FontSize="30" HorizontalAlignment="Center" VerticalAlignment="Center"></TextBlock>
</Grid>
In the above code use <TextBlock> element to identify the TextBlock control. The FontSize property is used to get or set the font size of the content of the element. Here font size of the text block is 30 pixels.

Horizontal alignment property is used to get or set the horizontal alignment of this element when it is within a parent element like a panel etc. The horizontal alignment may be center, left, right and stretch according to programmer’s requirement. The default value is Stretch.

Vertical alignment property is same as horizontal property. It is also may have four values i.e. center, left, right and stretch programmer’s requirement. The default value is Stretch.

We can also use the above properties like the following code:
<TextBlock Text="My First WPF Application">
<TextBlock.FontSize>30</TextBlock.FontSize>
<TextBlock.HorizontalAlignment>Center</TextBlock.HorizontalAlignment>
<TextBlock.VerticalAlignment>Center</TextBlock.VerticalAlignment>
</TextBlock>
The window will be look like the following screenshot:

Basic about XAML in WPF application

Both type of syntaxes are same. There are many more properties for each elements which will use as per the requirements.

Sunday, August 4, 2013

How to use menu control in ASP.NET

About menu control

The Menu control is another navigation control, which is also used to display site navigation information . The Menu control can however , displays the site structure vertically as well as horizontally. It can be used as a databound  control , for example , binding the menu control with a SiteMapDataSource control. It can also retrieve the data to be displayed from the items that are added to the Item collection of the Menu control at runtime. The Menu control supports binding data with hierarchical datasource, such as XML files. You can also add the database items to the Menu control at runtime using the Item collection of the Menu control . The Menu control consists of one or more MenuItems properties displayed at different levels of hierarchy. Each MenuItem, in turn, consists of properties to set the style of the individual MenuItem. The menu control contains two types of menus:

  • Static menu -- This type of menu is displayed completely with all the menu options on the screen. The entire structure of the static menu, including the parent menu items and their sub menus, is visible.
  • Dynamic menu -- This type of menu contains static part which is displayed on the screen as well as the dynamic part which appears when user passes the mouse pointer over the static part of the menu.

Example

first take a "sitemap" file for binding menu control. Right click on your application name in solution explorer and select Web.sitemap file.
Sitemap file for menu control

A sitemap is a xml file which include different siteMapNode.


<?xml version="1.0" encoding="utf-8" ?>
<siteMap xmlns="http://schemas.microsoft.com/AspNet/SiteMap-File-1.0" >
    <siteMapNode url="http://dotprogramming.blogspot.in" title="Programing"  description="Its world best programming site">
        <siteMapNode url="http://www.google.com" title="Google"  description="" />
        <siteMapNode url="http://www.msn.com" title="microsoft"  description="" />
    <siteMapNode url ="http://pc-gadgetworld.blogspot.in" title ="pc-gadget" description ="" >
     <siteMapNode title ="left child"  />
      <siteMapNode title ="right child " />

    </siteMapNode>
    </siteMapNode>
</siteMap>
Diagrammatic view of sitemap file
How to use menu control in ASP.NET

Binding Menu with Sitemap file
<%@ Page Language="C#" %>
<!DOCTYPE html>
<script runat="server">
</script>
<html xmlns="http://www.w3.org/1999/xhtml">
<head runat="server">
    <title></title>
</head>
<body>
    <form id="form1" runat="server">
    <div>
   
        <asp:Menu ID="Menu1" runat="server" DataSourceID="SiteMapDataSource1" Orientation="Horizontal" StaticDisplayLevels="2">
        </asp:Menu>
        <asp:SiteMapDataSource ID="SiteMapDataSource1" runat="server" />  
    </div>
    </form>
</body>
</html>

Friday, August 2, 2013

How to change back color of the gridview column in ASP.NET

Step-1 : Bind GridView using SqlDataSource in ASP.NET.
Step-2 : Select Edit column link using show smart tag.

How to change back color of the gridview column  in ASP.NET

Step-3 : Select fields in left pane.
How to change back color of the gridview column  in ASP.NET

Step-4 : Select itemStyle in Style tab in right pane
How to change back color of the gridview column  in ASP.NET

Step-5 : Change back color of the column using back color property.
How to change back color of the gridview column  in ASP.NET


Wednesday, July 31, 2013

How to get cell value from gridview in asp.net

Computer Programming : GridView, combination of rows and columns. Single row contains one or more then one cells. If you want to get cell value from GridView, select Gridview row first. After that you can get cell value/Text from selected rows.

Step-1 : Bind GridView using SqlDataSource in ASP.NET
Step-2 : Drag and drop one label control onto design window
Step-3 : Select "Enable Selection" using show smart tag.


How to get cell value from gridview in asp.net


Step-4 : Double click on Gridview and handle SelectedIndexChanged event

protected void GridView1_SelectedIndexChanged(object sender, EventArgs e)
    {

    }


Step-6 : Write code for getting value from gridview cell

 protected void GridView1_SelectedIndexChanged(object sender, EventArgs e)
    {
        Label1 .Text =GridView1 .SelectedRow .Cells [2].Text ;
    }
Output
How to get cell value from gridview in asp.net

Whole code
<%@ Page Language="C#" AutoEventWireup="true" CodeFile="sqldatabindgrid.aspx.cs" Inherits="sqldatabindgrid" %>

<!DOCTYPE html>

<html xmlns="http://www.w3.org/1999/xhtml">
<head runat="server">
    <title></title>
</head>
<body>
    <form id="form1" runat="server">
    <div>
 
        <asp:GridView ID="GridView1" runat="server" AutoGenerateColumns="False" DataKeyNames="Id" DataSourceID="SqlDataSource2" OnSelectedIndexChanged="GridView1_SelectedIndexChanged">
            <Columns>
                <asp:CommandField ShowSelectButton="True" />
                <asp:BoundField DataField="Id" HeaderText="Id" InsertVisible="False" ReadOnly="True" SortExpression="Id" />
                <asp:BoundField DataField="name1" HeaderText="name1" SortExpression="name1" />
                <asp:BoundField DataField="Record_detail " HeaderText="Record_detail " SortExpression="Record_detail " />
                <asp:BoundField DataField="photo" HeaderText="photo" SortExpression="photo" />
                <asp:BoundField DataField="Address" HeaderText="Address" SortExpression="Address" />
                <asp:BoundField DataField="DOB" HeaderText="DOB" SortExpression="DOB" />
                <asp:BoundField DataField="Date" HeaderText="Date" SortExpression="Date" />
                <asp:BoundField DataField="Nomination" HeaderText="Nomination" SortExpression="Nomination" />
                <asp:BoundField DataField="present_time" HeaderText="present_time" SortExpression="present_time" />
                <asp:BoundField DataField="charge" HeaderText="charge" SortExpression="charge" />
            </Columns>
        </asp:GridView>
        <asp:SqlDataSource ID="SqlDataSource2" runat="server" ConnectionString="<%$ ConnectionStrings:ConnectionString %>" SelectCommand="SELECT * FROM [crimefile]"></asp:SqlDataSource>
         
    </div>
        <asp:Label ID="Label1" runat="server"></asp:Label>
    </form>
</body>
</html>

Codebehind file
using System;
using System.Collections.Generic;
using System.Linq;
using System.Web;
using System.Web.UI;
using System.Web.UI.WebControls;

public partial class sqldatabindgrid : System.Web.UI.Page
{
    protected void Page_Load(object sender, EventArgs e)
    {

    }
    protected void GridView1_SelectedIndexChanged(object sender, EventArgs e)
    {
        Label1 .Text =GridView1 .SelectedRow .Cells [2].Text ;
    }
}

Tuesday, July 30, 2013

How to bind GridView using SqlDataSource in ASP.NET

Step-1 : First design database table in visual studio
Step-2 : Drag and drop GridView control from ToolBox to Design window
Step-3 : Select Choose data source by show smart tag.

choose data source from show smart tag

Step-4 : Select SQL Database in Data Source Configuration wizard.
data source configuration wizard in asp.net

Step-5 : Select your database by dropdownlist in "Choose your data connection" wizard 
your connection string will appeared.

Choose your data connection

Step-6 : Select Table or Column name using "Configure the select statement"  wizard.
Configure the select statement

Step-7: Press Test Query button
Test your query window

Step-8: Run your Application
Bind gridview
<%@ Page Language="C#" AutoEventWireup="true" CodeFile="sqldatabindgrid.aspx.cs" Inherits="sqldatabindgrid" %>

<!DOCTYPE html>

<html xmlns="http://www.w3.org/1999/xhtml">
<head runat="server">
    <title></title>
</head>
<body>
    <form id="form1" runat="server">
    <div>
 
        <asp:GridView ID="GridView1" runat="server" AutoGenerateColumns="False" DataKeyNames="Id" DataSourceID="SqlDataSource2">
            <Columns>
                <asp:BoundField DataField="Id" HeaderText="Id" InsertVisible="False" ReadOnly="True" SortExpression="Id" />
                <asp:BoundField DataField="name1" HeaderText="name1" SortExpression="name1" />
                <asp:BoundField DataField="Record_detail " HeaderText="Record_detail " SortExpression="Record_detail " />
                <asp:BoundField DataField="photo" HeaderText="photo" SortExpression="photo" />
                <asp:BoundField DataField="Address" HeaderText="Address" SortExpression="Address" />
                <asp:BoundField DataField="DOB" HeaderText="DOB" SortExpression="DOB" />
                <asp:BoundField DataField="Date" HeaderText="Date" SortExpression="Date" />
                <asp:BoundField DataField="Nomination" HeaderText="Nomination" SortExpression="Nomination" />
                <asp:BoundField DataField="present_time" HeaderText="present_time" SortExpression="present_time" />
                <asp:BoundField DataField="charge" HeaderText="charge" SortExpression="charge" />
            </Columns>
        </asp:GridView>
        <asp:SqlDataSource ID="SqlDataSource2" runat="server" ConnectionString="<%$ ConnectionStrings:ConnectionString %>" SelectCommand="SELECT * FROM [crimefile]"></asp:SqlDataSource>
        <asp:SqlDataSource ID="SqlDataSource1" runat="server" ConnectionString="<%$ ConnectionStrings:ConnectionString %>" SelectCommand="SELECT * FROM [crimefile]"></asp:SqlDataSource>
 
    </div>
    </form>
</body>
</html>

Monday, July 29, 2013

Specify relative positions of controls in window form C#

When a window form is open, working normally, all the controls are set as the programmer set them with their parent form, it means that form is in normal state. Resize the form and check that the controls still remains of the same size and additional space is blank on the form.

Anchor property of the form is used to put the controls to its relative position on the form, means a control is automatically take its relative position as its parent control is resized. Each control has its four edges i.e. left, top, right and bottom. By default a control is added to the form with its Anchor property to top and left. When we resize a form then the control is still in top and left corner of the form and size of the control is fixed.
For example drag and drop a listview in the form and resize the form, the listview will not change its points of all the four edge.

Anchor property of the control in windows form C#

In the properties window change the anchor property of the listview to “Top, Bottom, Left, Right”, run the form and check the difference.

Anchor property of controls in windows forms C#

This is how we have specify the relative position of the control from designer part. We can set this anchor property through code behind file

listView1.Anchor = AnchorStyles.Left | AnchorStyles.Top | AnchorStyles.Right | AnchorStyles.Bottom;

Anchor property and dock property are mutually exclusive, means one can be set at a time. The last property change will be effective in both of these two.

How to change Theme Dynamically using QueryString in ASP.NET

Introduction About Theme
Using theme you can change your page look or design.Themes define the style properties of a web page . Now, let's explore the elements of themes , such as skins, Cascading Style Sheets (CSS), and images. A skin is a file with the .skin extension that contains property settings for individual controls, such as Button, Textbox, or Label. You can either define skins for each control in different skin files or define skins for all the controls in a single file. The skin files with the .skin extension are created inside the subfolder of the App_Themes folder in the Solution Explorer window of a website.
<%@ Page Language="C#" AutoEventWireup="true" CodeFile="runtime.aspx.cs" Inherits="runtime" %>

<!DOCTYPE html>

<html xmlns="http://www.w3.org/1999/xhtml">
<head runat="server">
    <title></title>
</head>
<body>
    <form id="form1" runat="server">
    <div>
        <asp:DropDownList ID="DropDownList1" runat="server" Height="54px" OnSelectedIndexChanged="DropDownList1_SelectedIndexChanged" Width="208px" AutoPostBack="True">
            <asp:ListItem>Select Theme</asp:ListItem>
            <asp:ListItem>Red</asp:ListItem>
            <asp:ListItem>Green</asp:ListItem>
        </asp:DropDownList>
    </div>
    </form>
</body>
</html>

Codebehind


using System;
using System.Collections.Generic;
using System.Linq;
using System.Web;
using System.Web.UI;
using System.Web.UI.WebControls;

public partial class runtime : System.Web.UI.Page
{  
    protected void Page_PreInit(Object sender, EventArgs e)
    {
        if (Request.QueryString["Theme"] != null)
        {
            Page.Theme = Request.QueryString["Theme"].ToString();
        }
     
    }
    protected void Page_Load(object sender, EventArgs e)
    {
        DropDownList1.AutoPostBack = true;

    }
    protected void DropDownList1_SelectedIndexChanged(object sender, EventArgs e)
    {      
            Response.Redirect("~/runtime.aspx?Theme=" + DropDownList1.SelectedValue);
     
        DropDownList1.AutoPostBack = false;
     

    }
}
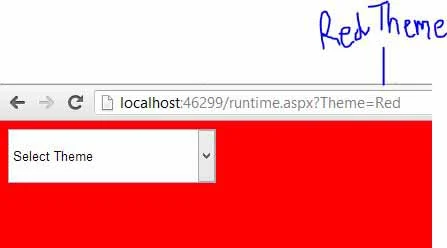
Output
How to change theme using dropdownlist

How to change theme using dropdownlist
© Copyright 2013 Computer Programming | All Right Reserved