-->

Monday, September 9, 2013

How to Add SubMenus in Menu control: WPF

What will be the use of Menu control if we add only one line menus like in our previous post? Menu control is used to organize elements in hierarchy view. In previous post we have added some menu items, in this post we will add some child elements in those elements.

Just use the below lines of code in XAML to generate a menu control with some child elements:
<Menu IsMainMenu="True">
<MenuItem Header="_First">
<MenuItem Header="Child 1"></MenuItem>
<MenuItem Header="Child 2"></MenuItem>
<MenuItem Header="Child 3"></MenuItem>
</MenuItem>
<MenuItem Header="_Second">
<MenuItem Header="Child 4"></MenuItem>
<MenuItem Header="Child 5"></MenuItem>
<MenuItem Header="Child 6"></MenuItem>
</MenuItem>
<MenuItem Header="_Third">
<MenuItem Header="Child 7"></MenuItem>
<MenuItem Header="Child 8"></MenuItem>
</MenuItem>
</Menu>

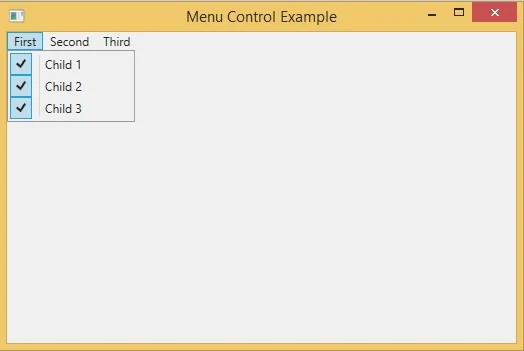
It will add three children to first element, three to second element and two to third element. The image shows the first three:

How to add Submenu and expand them WPF


Menu control provides a checkbox feature with each of the item, that can be enable using IsCheckable property to true. After enable the items cab be checked individually like:

How to create a checkable menus in WPF

AccessKey Property of TextBox in ASP.NET

In previous article , we have already learned about TextBox Control. Using the AccessKey property you can directly navigate to the control Or you can say directly focus to the control. Accesskey property is basically used for when you have a large page content and you want to directly navigate to particular control on that time you should use AccessKey property. Another one example is , suppose your mouse are not working properly on that time AccessKey will working for focusing control.
AccessKey Property of TextBox in ASP.NET
source : franz.com
In Above mentioned diagram suppose you have not mouse Then , i am asking you that How to do check, given CheckBoxes. Lastly i am telling you that if you want make user friendly software then you should use AccessKey property with some value. Bydefault AccessKey is set to null no more value assign to Accesskey that means not set.  

Lets take a simple example


<%@ Page Language="C#" %>

<!DOCTYPE html>

<script runat="server">

</script>

<html xmlns="http://www.w3.org/1999/xhtml">
<head runat="server">
    <title></title>
    <style type="text/css">
        .auto-style1 {
            text-decoration: underline;
        }
    </style>
</head>
<body>
    <form id="form1" runat="server">
    <div>
 
        <span class="auto-style1">U</span>serName :
        <asp:TextBox ID="TextBox1" runat="server" AccessKey="U" Width="159px"></asp:TextBox>
        <br />
        <span class="auto-style1">P</span>assWord :&nbsp;
        <asp:TextBox ID="TextBox2" runat="server" AccessKey="P" Width="157px"></asp:TextBox>
        <br />
        <asp:Button ID="Button1" runat="server" Text="Submit" />
 
    </div>
    </form>
</body>
</html>

Output
AccessKey Property of TextBox in ASP.NET

AccessKey Property of TextBox in ASP.NET

Sunday, September 8, 2013

How to Add Menu Control: WPF

Any GUI window in our computer like Notepad, MS Word, browsers or even visual studio have its own menu bar. As compare to other controls Menu bar helps user to do the desired task in simple & easy way. Menu bar can be added as the Menu control in programming languages.


WPF menu control enables the user to organize elements in hierarchy view. To add a menu bar, you have to just drag-n-drop the Menu control from the toolbox or write following code in XAML:

<Menu/>

It may be our main menu with IsMainMenu property to true. Writing above line of code will show nothing in the window, till we don’t add any item in it. Item can be added using MenuItem class with Header property.

In the following lines of XAML code, I have add three items in the menu bar.
<Menu IsMainMenu="True">
<MenuItem Header="First"></MenuItem>
<MenuItem Header="Second"></MenuItem>
<MenuItem Header="Third"></MenuItem>
</Menu>

Just run the code and it will show a window containing a menu bar with three items:

Menu bar control in WPF

Now as in other windows, user presses the left Alt key and menu bar has been highlighted, keyboard shortcut cab also be used by using underscore before the character as in following code.
<Menu IsMainMenu="True">
<MenuItem Header="_First"></MenuItem>
<MenuItem Header="_Second"></MenuItem>
<MenuItem Header="_Third"></MenuItem>
</Menu>

Now it will be used by keyboard shortcut as in other windows. Run the project and press left alt key it will highlight the menu bar as in following image:

Highlighted menu bar control WPF

How to get root directory information of the specified path in ASP.NET

Path class

Suppose you have a specified path such as "C:/my files/abc.txt" and you want to access root of the specified path (Root is "C:/"). If your path does not contain root directory information then your path class method returns null value or empty string. For accessing root information use GetPathRoot( ) method of the  Path class which is stored in System.IO namespace.

 Lets take an example 

using System;
using System.Collections.Generic;
using System.ComponentModel;
using System.Data;
using System.Drawing;
using System.Linq;
using System.Text;
using System.Threading.Tasks;
using System.Windows.Forms;
using System.IO;

namespace WindowsFormsApplication2
{
    public partial class Form6 : Form
    {
        public Form6()
        {
            InitializeComponent();
        }

        private void button1_Click(object sender, EventArgs e)
        {
            string path = textBox1.Text;
            string getroot = Path.GetPathRoot(path);
            label2.Text = "Your root directory is "+getroot;


        }
    }
}

.    Output
How to get root directory information of the specified path in ASP.NETHow to get root directory information of the specified path in ASP.NET


How to Bind ListView with string List: WPF

As we all know the listview is inherited class of listbox and have almost all the properties of listbox. We have learnt listbox binding with string list in our earlier post. In this article we bind the listview with the same string list.

Just place a listview having only name property, because we have to access that listview in our code behind file. We can also use height and width property of the listview, if the data items are of lengthy string.
<ListView>
<ListView.Name>listView</ListView.Name>
</ListView>

Now use the same list of string as in previous post i.e.
List<string> strList = new List<string>();
strList.Add("London");
strList.Add("Italy");
strList.Add("California");
strList.Add("France");
listView.ItemsSource = strList;

Now look out the last statement, it will set the item source of the listview as this string list. When we run the project it will show a listview with four items:

Bind listview with string list in WPF C#


To get selected item the same procedure will follow as in listview bind with grid resource.

How to use Image in Button: WPF

Most often a button control is used with the content property and sometimes with an image in our programming fields. We have learnt about the content property of the button, now in this article we will place an image in a button control.

To place an image we have to sure first, that the image is in our project’s directory. Now write the following code in XAML just below the grid node (default placed node in a file).
<Grid>
<Button Width="200" Height="50">
<Button.Background>
<ImageBrush ImageSource="buttonImage.png"></ImageBrush>
</Button.Background>
</Button>
</Grid>

In the above code I have set the image named buttonImage.png as the background of the button. It will place a button with an image as in the following image.

Set Image as a background of a button: WPF

As we can see the image has been stretched in the button. To place the image as is, the following code will help you:
<Button Width="200" Height="50">
<Button.ContentTemplate>
<DataTemplate>
<Image Source="buttonImage.png"></Image>
</DataTemplate>              
</Button.ContentTemplate>          
</Button>

Run the project now and the image is placed as it is, the remaining space will be left blank.

Set image as a content template of a button: WPF C#

How to bind GridView using XML file in ASP.NET

Introduction about XML

XML stands for xtensible markup language. It have many features such as:
  • Xml is used for carry data .
  • Xml structure is based on tree structure.
  • Xml is not a presentation language 
  • XML use user defined tags for making structre.
  • Xml language is a case-sensitive language. 
  • XML is a Text File 
Now at a time if you want to make a structural database in xml file then you follow some steps . these steps are:
Step-1: First defined root node like <bookstore> 
Step-2: Declare child node <bookstore> <book>
Now you can consider book tag is your table name which you create in SQL and bookstore represent the database name.
Step-3 : Declare your column name inside the <book> tag such as Title of the book, author and price of the book .
now your file look like that.
Book store tree
Step-4 repeat your step 2-3 again
Now your complete code is

<?xml version="1.0" encoding="utf-8" ?>
<bookstore>
  <book>
    <title>
      ASP.NET
    </title>
    <author>
      SCOTT
    </author>
    <price>
      20$
    </price>
  </book>
<book>
    <title>
      PHP
    </title>
    <author>
      JECOB
    </author>
    <price>
      20$
    </price>
  </book>


</bookstore>

Dataset

Dataset is a collection of data-Table. So easily you can bind any control with Dataset . Dataset is a class file which stored in System.Data namespace. Here in this example using Dataset we can read xml file from the source. 
lets take an example , How to bind GridView using XML file in ASP.NET


<%@ Page Language="C#" AutoEventWireup="true" CodeFile="Default12.aspx.cs" Inherits="Default12" %>

<!DOCTYPE html>

<html xmlns="http://www.w3.org/1999/xhtml">
<head runat="server">
    <title></title>
</head>
<body>
    <form id="form1" runat="server">
    <div>
        <asp:GridView ID="GridView1" runat="server">
        </asp:GridView>
    </div>
    </form>
</body>
</html>

Codebehind

using System;
using System.Collections.Generic;
using System.Linq;
using System.Web;
using System.Web.UI;
using System.Web.UI.WebControls;
using System.Data;

public partial class Default12 : System.Web.UI.Page
{
    protected void Page_Load(object sender, EventArgs e)
    {
        DataSet ds = new DataSet();
        ds.ReadXml(Server.MapPath("XMLFile.xml"));
        GridView1.DataSource = ds;
        GridView1.DataBind();
    }
}
Output
How to bind GridView using XML file in ASP.NET

© Copyright 2013 Computer Programming | All Right Reserved