-->

Saturday, September 14, 2013

How to access Text property , Value ,Index from DropDownList in ASP.NET

Top article

Introduction


Text Property : you can access or set the item text which is in DropDownList. If you want to access the text of the DropDownList then simply you can use
String var=DropDownList1.items[i].Text; (this is correct)
Here items[i] is directly denote to collection so you can not use 
String var=DropDownList1.items.Text;  ( This is incorrect)
If you want to add items to the DropDownList , simply you can use add method 
DropDownList1.Items.Add("hello");

Lets take an example to access index,Text and value of the selected item in DropDownList

In above mentioned top article we learn how to bind DropDownList with XmlDataSource in ASP.NET. Also this example show that how to access the text of DropDownList.
<%@ Page Language="C#" %>

<!DOCTYPE html>

<script runat="server">

    protected void DropDownList1_SelectedIndexChanged(object sender, EventArgs e)
    {
        Label1.Text += "Your Selected value is <br/>" + DropDownList1.SelectedValue;
        Label1.Text += "<br/> Your Selected Text is <br/>" + DropDownList1.SelectedItem.Text;
        Label1.Text += "<br/> Your Selected Item Index is <br/>" + DropDownList1.SelectedIndex.ToString();
     
     
    }

    protected void Page_Load(object sender, EventArgs e)
    {

    }
</script>

<html xmlns="http://www.w3.org/1999/xhtml">
<head runat="server">
    <title></title>
</head>
<body>
    <form id="form1" runat="server">
    <div>
 
        <asp:DropDownList ID="DropDownList1" runat="server" AutoPostBack="True" DataSourceID="XmlDataSource1" DataTextField="Text" DataValueField="url" OnSelectedIndexChanged="DropDownList1_SelectedIndexChanged">
        </asp:DropDownList>
        <asp:XmlDataSource ID="XmlDataSource1" runat="server" DataFile="~/XMLFile.xml"></asp:XmlDataSource>
 
    </div>
        <asp:Label ID="Label1" runat="server"></asp:Label>
    </form>
</body>
</html>

Output
How to access Text property , Value ,Index from DropDownList in ASP.NET

Friday, September 13, 2013

How to bind RadioButtonList control with XmlDataSource in ASP.NET

Introduction

If you want to bind RadioButtonList control with the XmlDataSource then you first create a xml file with some child nodes. So take a Xml file into your projcet.

  • Right click on your project name--> Add-->Add new item
  • Select ".xml" file. Specify name of the file which you want.
<?xml version="1.0" encoding="utf-8" ?>
<Links>
  <link Text="Best Programming Blog" url="http://dotprogramming.blogspot.com" />
  <link Text="Best Gadget Blog" url="http://pc-gadgetworld.blogspot.com/" />
<link Text="Best ASP.NET Site" url="http://www.asp.net" />
<link Text="Best Search Engine" url="http://www.google.com" />
</Links>

Here is the simple structure of the file . <Links> tag is the root tag of other child tag and <Link> tag take some attribute such as Text and url . Now if you bind RadioButtonList control with XmlDataSource then you should specify DataText filed to text and DataVlaue Field is Url

Binding steps

Step-1: Drop RadioButtonList control to design window from toolbox.
Step-2: Choose DataSource using showsmart tag.
Step-3: Select <New Data Source> in open dialog box.
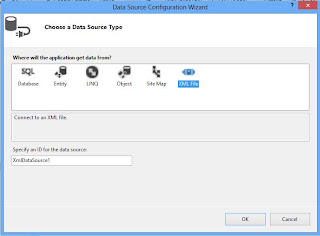
Step-4: Select Xml file in given DataSource.
Select Xml file in given DataSource


Step-5: Browse xml file from project solution.


Browse xml file from project solution


Step-6: Select Text in DataText field and url in value field.


Select Text in DataText field and url in value field.


Complete Source Code
<%@ Page Language="C#" %>

<!DOCTYPE html>

<script runat="server">

    protected void RadioButtonList1_SelectedIndexChanged(object sender, EventArgs e)
    {
        Label1.Text = "You are selected " + RadioButtonList1.SelectedItem.Text;
    }
</script>

<html xmlns="http://www.w3.org/1999/xhtml">
<head runat="server">
    <title></title>
</head>
<body>
    <form id="form1" runat="server">
    <div>
        <asp:RadioButtonList ID="RadioButtonList1" runat="server" AutoPostBack="True" OnSelectedIndexChanged="RadioButtonList1_SelectedIndexChanged" DataSourceID="XmlDataSource1" DataTextField="Text" DataValueField="url">

        </asp:RadioButtonList>
        <asp:XmlDataSource ID="XmlDataSource1" runat="server" DataFile="~/XMLFile.xml"></asp:XmlDataSource>
        <asp:Label ID="Label1" runat="server"></asp:Label>
    </div>
    </form>
</body>
</html>

Output
How to bind RadioButtonList control with XmlDataSource in ASP.NET

How to Customize ToolTip Control: WPF

As in previous post, we have discussed about the tooltip control or tooltip property of the WPF controls. We can customize this tooltip according to our requirements. As in windows operating system, some controls use a rectangle in its tooltip service.

The following code will use a stack panel control in the tooltip of button. The stack panel have two textboxes and an image displayed in the screenshot shown below.
<Button Margin="5" Content="Submit" Width="200" Height="30">
<Button.ToolTip>
<StackPanel Width="180" Height="150">
<TextBlock Margin="2" Text="Introduction of Button" Background="Aqua" Foreground="Red"/>
<Image Margin="2" Source="wall.jpg" Height="100"></Image>
<TextBlock Margin="2" Text="For more help click F1" Background="BlueViolet" Foreground="Azure"/>
</StackPanel>
</Button.ToolTip>
</Button>
Run the project and a button will show, when we hover the mouse on it then the tooltip will display. Look out the following image:

How to Customize ToolTip control in WPF, XAML


Tooltip service have its open and close events to act on appearing and disappearing of the tooltip. It have some special properties to be used mostly by the programmer.

  • ShowDuration: to specify the duration till the tooltip will be shown. It is in millisecond.
  • ShowOnDisable: it enable or disable the tooltip when the control is disabled.
  • Placement: to place the tooltip on desired direction. It may be left, right, bottom, absolute and some more.
  • HasDropShadow: enable or disable the drop shadow effect of tooltip.

Some more properties are there, but can be used as per need.

How to Use ToolTip Control: WPF

In windows, when we hover our mouse on anything (may be an icon, button and etc.) that we are using, then a message displays. That message contains some information about that thing. That message is called tooltip of that thing, which can be enable using the tooltip service of programming.

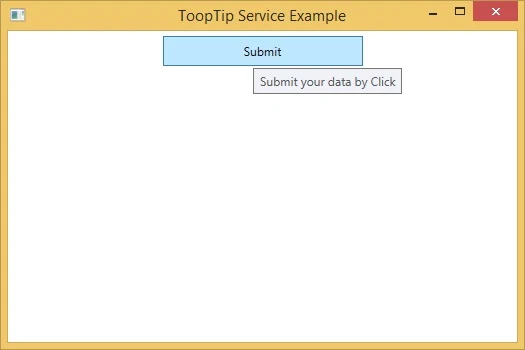
Just use the below XAML code and a button is placed on the window.
<Button Margin="5" Content="Submit" Width="200" Height="30">
<Button.ToolTip>
Submit your data by Click
</Button.ToolTip>
</Button>

When we hover our mouse on the button, it will show a tooltip (shown in image) containing about the button.

Enable tooltip for the controls in WPF and XAML

Every control automatically has its tooltip property just like the above button. Whatever the tooltip contains becomes the content of that tooltip.

Thursday, September 12, 2013

How to Use Radio Button in: WPF

This is another control derives from the Toggle Button. It has a different in-built feature that the toggle button doesn’t have. That feature is mutual exclusion, it means if 2 or more radio buttons are grouped together on a form/user control, then only one can be checked at a time. User cant checked multiple radio buttons.

When we check a radio button, all others got unchecked in a single group. Following code will show three radio buttons having individual state:
<RadioButton Margin="5" Name="radioButton1" IsChecked="True" Content="Checked"></RadioButton>
<RadioButton Margin="5" Name="radioButton2" IsChecked="False" Content="UnChecked"></RadioButton>
<RadioButton Margin="5"  Name="radioButton3" IsChecked="{x:Null}" Content="InDeterminate"></RadioButton>

Run the above code and it will display three radio buttons displayed in the following image:

How to use Radio Button in WPF

As the toggle button, it has also IsThreeState property for enable its all three states to be used. To group more than radio buttons we have to specify the same GroupName for all the radio buttons.

To show some text with a radio button, we have to use content property as used in above code.

How to Use Toggle Button: WPF

Toggle button is a sticky button, which have two states i.e. checked and Unchecked by default. It don’t have cancel behaviours of the button. Clicking this first time will set IsChecked property to true, and second time clicking will set IsChecked property to false.

The following XAML code will show two toggle buttons with IsChecked property true and false respectively. As the checkbox button, toggle button also have IsThreeState property means it have three states i.e. checked, unchecked and indeterminate.

<ToggleButton Margin="5" Height="20" Width="100" IsChecked="True"/>
<ToggleButton Margin="5" Height="20" Width="100" IsChecked="False"/>

When we want to use the third state, then the value of IsChecked will be {x:Null} and it will also look like false value. The above code will show the window with two toggle button like following image:


To use third property we have to set IsThreeState property to true. Now first click set the IsChecked to true, second will set null and third will set to false. It have individual event for all the three states:
private void ToggleButton_Checked(object sender, RoutedEventArgs e)
{
}

private void toggleButton_Unchecked(object sender, RoutedEventArgs e)
{
}

private void toggleButton_Indeterminate(object sender, RoutedEventArgs e)
{
}

How to access subDirectories of a Directory in C#

About

A directory or a folder can contains multiple directories or files. If you want to access all those directories which is under in a parent directory Then you should use DirecotryInfo class for accessing subDirectories of a parent Directory.In previous example we had seen that how to create a subDirectory under parent Directory.Now in this example we will seen that how to access all subDirectories under parent Directory.

Logic behind the program is

Step-1 : Create a instance of DirectoryInfo Class with parent directory path.
Step-2 : Now check , If parent directory is exist or not in specified path
Step-3: If Exist then get all subdirectories under parent directory and assign to an array using GetDirectories() method
Step-4 : Items add into List.

NoteGetDirectories() method does not access compressed directories

Lets take an example How to access subDirectories 

using System;
using System.Collections.Generic;
using System.ComponentModel;
using System.Data;
using System.Drawing;
using System.Linq;
using System.Text;
using System.Threading.Tasks;
using System.Windows.Forms;
using System.IO;

namespace WindowsFormsApplication2
{
    public partial class Form5 : Form
    {
        public Form5()
        {
            InitializeComponent();
        }

        private void button1_Click(object sender, EventArgs e)
        {
            string dirpath = textBox1.Text;
            DirectoryInfo dirinfo = new DirectoryInfo(dirpath);
            if (dirinfo .Exists)
            {
                DirectoryInfo[] subdir = dirinfo.GetDirectories();
                foreach (DirectoryInfo  item in subdir)
                {
                    listBox1.Items.Add(item);
                }
            }


        }
    }
}


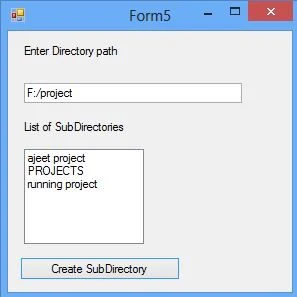
Output
How to access subDirectories of a Directory in C#

How to access subDirectories of a Directory in C#

© Copyright 2013 Computer Programming | All Right Reserved