-->

Wednesday, September 18, 2013

How to bind CheckBoxList using SqlDataSource in ASP.NET

SqlDataSource 

The SqlDataSource control is a DataSource control that allows a server control, Such as the GridView control, to access Data located in a relational database, such as Microsoft SQL Server and Oracle.
This control also generates a connection string to interact with data in an ASP.NET page. These connection strings are generated through the Configure Data Source wizard. A Connection String contains informattion about the server, database , and security you are working with in your application , for example
Data Source= .\SqlExpress; Initial Catalog =Database name ; Integrated Security = True
The SqlDataSource control automatically opens a database connection , which is provided in the connection string, executes the SQL queries , and then close the connection. When you add a SqlDataSource control to an ASP.NET page , the following code appears in the HTML code of the page.

<asp:SqlDataSource ID="SqlDataSource1" runat="server"> </asp:SqlDataSource>

CheckBoxList 

You can use a CheckBoxList control to display a number of check boxes at once as a column of check boxes . The CheckBoxList control exists within the System.Web.UI.WebControls namespace. This control is often useful when you want to bind the data from a data source to checkboxes . The CheckBoxList control creates multiselection checkbox groups at runtime by binding these control to a data source.

Lets take an example for binding CheckBoxList using SqlDataSource
Step-1: Drop CheckBoxList control to design window 
Step-2: Choose DataSource from showSmart tag ..... 
Step-3:  Same as GridView Binding

Complete Source code


<%@ Page Language="C#" %>

<!DOCTYPE html PUBLIC "-//W3C//DTD XHTML 1.0 Transitional//EN" "http://www.w3.org/TR/xhtml1/DTD/xhtml1-transitional.dtd">

<script runat="server">

</script>

<html xmlns="http://www.w3.org/1999/xhtml">
<head runat="server">
    <title></title>
</head>
<body>
    <form id="form1" runat="server">
    <div>
  
        <asp:CheckBoxList ID="CheckBoxList1" runat="server"
            DataSourceID="SqlDataSource1" DataTextField="name" DataValueField="id">
        </asp:CheckBoxList>
        <asp:SqlDataSource ID="SqlDataSource1" runat="server"
            ConnectionString="<%$ ConnectionStrings:ConnectionString %>"
            SelectCommand="SELECT * FROM [mytab]"></asp:SqlDataSource>
  
    </div>
    </form>
</body>
</html>

Output
How to bind CheckBoxList using SqlDataSource in ASP.NET

Tuesday, September 17, 2013

How to Insert,Edit,Delete Record using SqlDataSource in ASP.NET

If you bind your application with database in traditional ASP program then you should use RecordSet and write lots of code for binding . But in ASP.NET Microsoft reduce lots of code for binding application. In ASP.NET you can use SqlDataSource for connecting front-end to back-end.

lets take an example , Add insert , update and delete functionality through SqlDataSource.
Step-1: Drop SqlDataSource control to the design window.
Step-2: Select Configure Data Source using Show Smart tag.
Step-3: Select Connection from DropdownList , expand connection string
now your connection string are
Data Source=(LocalDB)\v11.0;AttachDbFilename=|DataDirectory|\Database.mdf;Integrated Security=True
Click Next to continue
Step-4: Select Advanced.. Button for adding insert,edit and delete functionality.
How to Insert,Edit,Delete Record using SqlDataSource
If your database table contain one primary key then you can select "Generate INSERT, UPDATE, AND DELETE STATEMENT"  And click to Ok button.

How to Insert,Edit,Delete Record using SqlDataSource
Step-5: After finishing process , Drop one DetailsView Control to the page. and Choose SqlDataSource1 for connecting database using ShowSmart tag.
How to Insert,Edit,Delete Record using SqlDataSource in ASP.NET
Step-6: Select all given CheckBox
How to Insert,Edit,Delete Record using SqlDataSource in ASP.NET

Complete code
<%@ Page Language="C#" %>

<!DOCTYPE html>

<script runat="server">

</script>

<html xmlns="http://www.w3.org/1999/xhtml">
<head runat="server">
    <title></title>
</head>
<body>
    <form id="form1" runat="server">
    <div>
 
        <asp:SqlDataSource ID="SqlDataSource1" runat="server" ConnectionString="<%$ ConnectionStrings:ConnectionString %>" DeleteCommand="DELETE FROM [footerex] WHERE [Id] = @Id" InsertCommand="INSERT INTO [footerex] ([namet], [Income]) VALUES (@namet, @Income)" SelectCommand="SELECT * FROM [footerex]" UpdateCommand="UPDATE [footerex] SET [namet] = @namet, [Income] = @Income WHERE [Id] = @Id">
            <DeleteParameters>
                <asp:Parameter Name="Id" Type="Int32" />
            </DeleteParameters>
            <InsertParameters>
                <asp:Parameter Name="namet" Type="String" />
                <asp:Parameter Name="Income" Type="Int32" />
            </InsertParameters>
            <UpdateParameters>
                <asp:Parameter Name="namet" Type="String" />
                <asp:Parameter Name="Income" Type="Int32" />
                <asp:Parameter Name="Id" Type="Int32" />
            </UpdateParameters>
        </asp:SqlDataSource>
 
    </div>
        <asp:DetailsView ID="DetailsView1" runat="server" AllowPaging="True" AutoGenerateRows="False" DataKeyNames="Id" DataSourceID="SqlDataSource1" Height="50px" Width="125px">
            <Fields>
                <asp:BoundField DataField="Id" HeaderText="Id" InsertVisible="False" ReadOnly="True" SortExpression="Id" />
                <asp:BoundField DataField="namet" HeaderText="namet" SortExpression="namet" />
                <asp:BoundField DataField="Income" HeaderText="Income" SortExpression="Income" />
                <asp:CommandField ShowDeleteButton="True" ShowEditButton="True" ShowInsertButton="True" />
            </Fields>
        </asp:DetailsView>
    </form>
</body>
</html>


Output
How to Insert,Edit,Delete Record using SqlDataSource in ASP.NET

How to Insert,Edit,Delete Record using SqlDataSource in ASP.NET

Monday, September 16, 2013

How to Bind ComboBox with DataTable: WPF

DataTable is an object of ADO.NET library, which is used to store temporary data in tabular form in memory. When we are creating data table in code part, then we have to add some columns and have to add some rows.

We have learnt about the combo box introduction and its binding with the list of string in our earlier posts. In this article we will bind this combo box to a data table. Just add a combo box and write some properties as in below code:
<ComboBox Name="cmbBox" Height="25" Width="200"
ItemsSource="{Binding}"></ComboBox>

Now in code part, create an object of data table and add three columns i.e. Name, Age and Address, like in below c# code:
DataTable dt = new DataTable();
dt.Columns.Add("Name");
dt.Columns.Add("Age");
dt.Columns.Add("City");

After adding columns, now its time to add some rows and insert some records in that. So write the below c# code in code part to add three rows:
DataRow dr = dt.NewRow();
dr["Name"] = "Jacob";
dr["Age"] = 25;
dr["City"] = "France";
dt.Rows.Add(dr);

DataRow dr1 = dt.NewRow();
dr1["Name"] = "Julia Martin";
dr1["Age"] = 26;
dr1["City"] = "France";
dt.Rows.Add(dr1);

DataRow dr2 = dt.NewRow();
dr2["Name"] = "Brandon";
dr2["Age"] = 24;
dr2["City"] = "London";
dt.Rows.Add(dr2);

We have successfully created a data table with three columns and add three rows with some valid data. To bind this data table to above combo box, we have to write these two lines in c# code part:

cmbBox.DataContext = dt;
cmbBox.DisplayMemberPath = dt.Columns[0].ToString();

The first line will assign the data context of combo box to the data table, while the second line will set the column name to be displayed in combo box. Run the project the check the combo box:

How to bind combo box with data table in WPF C#, XAML

How to Customize Status Bar in WPF

In earlier post, we have learnt about placing a status bar and add some items on that. WPF provides some advanced options with status bar i.e. we can add some more items or even containers in status bar. In this article we will add a stack panel, image and some more items in a status bar.

Just write the following code in our XAML code window:
<StatusBar Name="statusBar" VerticalAlignment="Bottom">
<StackPanel Orientation="Horizontal">
<StackPanel>
<StatusBarItem Margin="5" >Status 1</StatusBarItem>
<StatusBarItem Margin="5" >Status 2</StatusBarItem>
<StatusBarItem Margin="5" >Status 3</StatusBarItem>
</StackPanel>
<Image Margin="5" Source="wall.jpg" Width="100" Height="30"></Image>
<ProgressBar Width="150" Height="20" Name="progressBar" Value="45"
HorizontalAlignment="Right" Margin="5"></ProgressBar>
</StackPanel>
</StatusBar>

Run the project and it will show a window with three strings in a stack panel, an image and a progress bar. The first stack panel also contain a nested stack panel. These items are added just for example, not for any purpose.

Customize status bar in WPF


Just like the above code, we can place any control in the status bar, according to our requirements.

Status Bar Control: WPF

As the name implies, this control is used to show the status of our progress in our application. The status may be like line/column no. in Notepad, page no. in MS Word, or some text in visual studio. It is very easy to add a status bar in our WPF applications.

Just drag-n-drop the Status bar control on the window, it will display a horizontal bar on the window. It can contains strings, images or other containers like panels. A single item can be added using StatusBarItem in the control. The following XAML code will be used to add a status bar in a window.
<StatusBar Name="statusBar" VerticalAlignment="Bottom">
<StatusBarItem Name="statusBarItem">Value Inserted</StatusBarItem>          
</StatusBar>

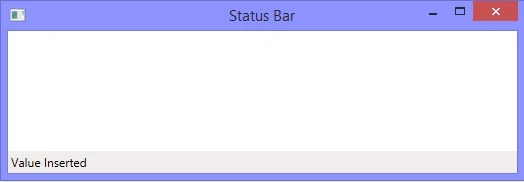
In the above code the status bar has been placed on bottom by using VerticalAlignment property. When we run the code, it will add a status bar as shown in following image:

status Bar control introduction in WPF

To add a progress bar control with above string, just use the following code:
<StatusBar Name="statusBar" VerticalAlignment="Bottom">
<StatusBarItem Name="statusBarItem">Value Inserted</StatusBarItem>
<ProgressBar Width="150" Height="20" Name="progressBar" Value="45"
HorizontalAlignment="Right"></ProgressBar>
</StatusBar>

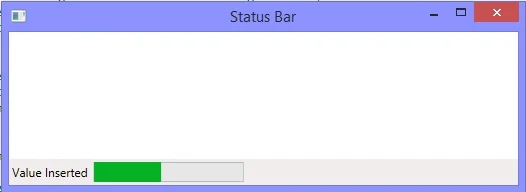
When we run the code, it will display a string on left with a progress bar on right side of the window.

Status bar control with string and progress bar in WPF

How to use RequiredFieldValidator on ListBox in ASP.NET

If you want to apply RequiredField Validator to ListBox control then you should drop Required FieldValidator on design window. In previous example how to use RequiredFieldValidator control.

<%@ Page Language="C#" %>

<!DOCTYPE html>

<script runat="server">

    protected void Button1_Click(object sender, EventArgs e)
    {
        Label1.Text = "you are selected <br/>" + ListBox1.SelectedItem.Text;
    }
</script>

<html xmlns="http://www.w3.org/1999/xhtml">
<head runat="server">
    <title></title>
</head>
<body>
    <form id="form1" runat="server">
    <div>
 
        <asp:ListBox ID="ListBox1" runat="server" Height="136px" Width="110px">
            <asp:ListItem>Apple </asp:ListItem>
            <asp:ListItem>Mango</asp:ListItem>
            <asp:ListItem>Orange</asp:ListItem>
        </asp:ListBox>
        <br />
        <asp:RequiredFieldValidator ID="RequiredFieldValidator1" runat="server" ControlToValidate="ListBox1" ForeColor="#FF3300">Select any one in given list</asp:RequiredFieldValidator>
        <br />
        <asp:Label ID="Label1" runat="server"></asp:Label>
        <br />
        <asp:Button ID="Button1" runat="server" OnClick="Button1_Click" Text="Submit" />
 
    </div>
    </form>
</body>
</html>

Output
How to use RequiredFieldValidator on ListBox in ASP.NET

How to bind ListBox using SqlDataSource in ASP.NET

ListBox is a collection of string . If you want to bind ListBox to database using SqlDataSource then you can follow same step as a Gridview binding.

How to bind GridView using SqlDataSource in ASP.NET

After making connection string in web.config file your wizard asking about DataTextField and DataValue field.
Select DataText Field in SqlDataSource


<%@ Page Language="C#" %>

<!DOCTYPE html>

<script runat="server">

</script>

<html xmlns="http://www.w3.org/1999/xhtml">
<head runat="server">
    <title></title>
</head>
<body>
    <form id="form1" runat="server">
    <div>
 
        <asp:ListBox ID="ListBox1" runat="server" DataSourceID="SqlDataSource1" DataTextField="namet" DataValueField="Id"></asp:ListBox>
        <asp:SqlDataSource ID="SqlDataSource1" runat="server" ConnectionString="<%$ ConnectionStrings:ConnectionString %>" SelectCommand="SELECT * FROM [footerex]"></asp:SqlDataSource>
 
    </div>
    </form>
</body>
</html>

Output
How to bind ListBox using SqlDataSource  in ASP.NET

© Copyright 2013 Computer Programming | All Right Reserved