As the name implies, this control is used to show the status of our progress in our application. The status may be like line/column no. in Notepad, page no. in MS Word, or some text in visual studio. It is very easy to add a status bar in our WPF applications.
Just drag-n-drop the Status bar control on the window, it will display a horizontal bar on the window. It can contains strings, images or other containers like panels. A single item can be added using StatusBarItem in the control. The following XAML code will be used to add a status bar in a window.
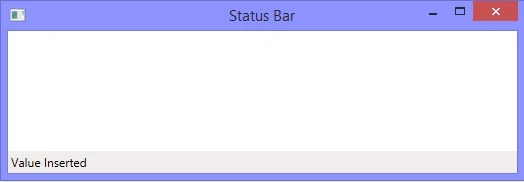
In the above code the status bar has been placed on bottom by using VerticalAlignment property. When we run the code, it will add a status bar as shown in following image:
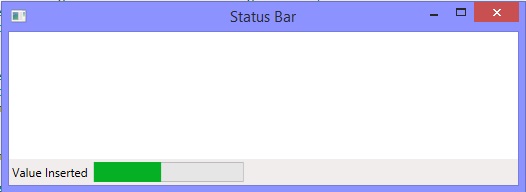
To add a progress bar control with above string, just use the following code:
When we run the code, it will display a string on left with a progress bar on right side of the window.

Just drag-n-drop the Status bar control on the window, it will display a horizontal bar on the window. It can contains strings, images or other containers like panels. A single item can be added using StatusBarItem in the control. The following XAML code will be used to add a status bar in a window.
<StatusBar Name="statusBar" VerticalAlignment="Bottom">
<StatusBarItem Name="statusBarItem">Value Inserted</StatusBarItem>
</StatusBar>
<StatusBarItem Name="statusBarItem">Value Inserted</StatusBarItem>
</StatusBar>
In the above code the status bar has been placed on bottom by using VerticalAlignment property. When we run the code, it will add a status bar as shown in following image:

To add a progress bar control with above string, just use the following code:
<StatusBar Name="statusBar" VerticalAlignment="Bottom">
<StatusBarItem Name="statusBarItem">Value Inserted</StatusBarItem>
<ProgressBar Width="150" Height="20" Name="progressBar" Value="45"
HorizontalAlignment="Right"></ProgressBar>
</StatusBar>
<StatusBarItem Name="statusBarItem">Value Inserted</StatusBarItem>
<ProgressBar Width="150" Height="20" Name="progressBar" Value="45"
HorizontalAlignment="Right"></ProgressBar>
</StatusBar>
When we run the code, it will display a string on left with a progress bar on right side of the window.