-->

Tuesday, May 3, 2016

Get the Cell value of selected Row From DataGrid in WPF

In this article i will show you, how to get the cell value from datagrid in WPF. We all know that dataGrid is use for storing data in a tabular format. By using AutoGenerateColumns we will show our table columns in it.  If you want to show your customized columns in it the  add DataGridTemplate Column.  In it we have cell template, by using this we can design our dataGrid cells. In the first DataTemplate i will take a button control through it we can show the cell value of dataGrid.


<Window x:Class="WpfApplication13.MainWindow"
        xmlns="http://schemas.microsoft.com/winfx/2006/xaml/presentation"
        xmlns:x="http://schemas.microsoft.com/winfx/2006/xaml"
        Title="MainWindow" Height="350" Width="525">
    <Grid>
        <DataGrid Name="grid1" AutoGenerateColumns="False">
            <DataGrid.Columns>
                <DataGridTemplateColumn>
                    <DataGridTemplateColumn.CellTemplate>
                        <DataTemplate>
                            <Button Name="b1" Click="b1_Click" Content="click" />
                        </DataTemplate>
                    </DataGridTemplateColumn.CellTemplate>
                </DataGridTemplateColumn>
                <DataGridTextColumn Header="Id" Binding="{Binding Id}" />
                <DataGridTextColumn Header="Name" Binding="{Binding Name}"/>

            </DataGrid.Columns>
         
        </DataGrid>
    </Grid>
</Window>

In this XAML code we have a Id and Name property which is bind with public property of student class.

using System;
using System.Windows;

namespace WpfApplication13
{
    /// <summary>
    /// Interaction logic for MainWindow.xaml
    /// </summary>
    public partial class MainWindow : Window
    {
        public MainWindow()
        {
            InitializeComponent();
           grid1.ItemsSource = Student.getStudent();
        }

        private void b1_Click(object sender, RoutedEventArgs e)
        {
            Student st = grid1.SelectedItem as Student;
            string studentid = Convert.ToString(st.Id);
            string studentName = st.Name;
            MessageBox.Show(studentid + " " + studentName);

        }
    }
}

using System.Collections.ObjectModel;

namespace WpfApplication13
{
    class Student
    {
        public int Id { get; set; }
        public string Name { get; set; }
        public static ObservableCollection<Student> getStudent()
        {
            var student = new ObservableCollection<Student>();
            student.Add(new Student() { Id = 1, Name = "Jacob" });
            student.Add(new Student() { Id = 2, Name = "Bill" });
            return student;


        }
    }
}

Wednesday, April 27, 2016

Bind ComboBox with Enum Type in WPF


In this article i will show you, How to Bind ComboBox with Enum properties.  Enum is a type, which is used to fix no of values like Sunday, Monday, Tuesday...etc.). By using XAML, you can add static resources for enumeration. In WPF We have a ObjectDataProvider for enumeration. Lets check the code.

XAML Code :

<Window x:Class="WpfApplication1212.Window2"
        xmlns="http://schemas.microsoft.com/winfx/2006/xaml/presentation"
        xmlns:x="http://schemas.microsoft.com/winfx/2006/xaml"
        xmlns:local1="clr-namespace:WpfApplication1212"
        xmlns:codeg="clr-namespace:System;assembly=mscorlib"
        Title="Window2" Height="300" Width="300">
    <Window.Resources>
        <ObjectDataProvider MethodName="GetValues" ObjectType="{x:Type codeg:Enum}" x:Key="myenu">
            <ObjectDataProvider.MethodParameters>
                <x:Type Type="local1:week1" />
            </ObjectDataProvider.MethodParameters>
        </ObjectDataProvider>
    </Window.Resources>
    <Grid>
        <ComboBox ItemsSource="{Binding Source={StaticResource myenu}}" />
    </Grid>
</Window>

Enumeration code 

using System;
using System.Collections.Generic;
using System.Linq;
using System.Text;
using System.Threading.Tasks;

namespace WpfApplication1212
{
    class Order
    {
    }
    public enum week1
    {
        sun,mon,tue,wed,
    }
}

Thursday, April 21, 2016

WPF: How to take image and button control in WPF ListView

Good Morning: Today i will teach you how to add controls in ListView. In this article i will add button control and image control. According to my previous article image control bind with source, so  it required source for binding, so i have create a ImageSource public property in class. We know that ListView contain only single view i.e GridView. A GridView contain rows and column , also we can say that cell is a combination of rows and column. In this article i have create CellTemplate.  Inside the CellTemplate we have a Data Template. In the Code behind page, we have a class with one property i.e "ImageSource", which is used for Image binding. Add a list control with class type, in it we have two images. Lets check the code and their output
XAML Code
<Window x:Class="WpfApplication11.ImageinListview"
        xmlns="http://schemas.microsoft.com/winfx/2006/xaml/presentation"
        xmlns:x="http://schemas.microsoft.com/winfx/2006/xaml"
        Title="ImageinListview" Height="300" Width="300">
    <Grid>
        <ListView Name="List1" MouseDoubleClick="getSelectedItem">
            <ListView.View>
                <GridView>
                    <GridViewColumn Header="Action">
                        <GridViewColumn.CellTemplate>
                            <DataTemplate>
                                <Button Content="Click Me" Click="Button_Click"/>                              
                            </DataTemplate>                        
                           
                        </GridViewColumn.CellTemplate>                      
                    </GridViewColumn>
                    <GridViewColumn Header="Image">
                        <GridViewColumn.CellTemplate>
                            <DataTemplate>
                                <Image Source="{Binding ImageSource}" Width="100" Height="100"/>
                            </DataTemplate>
                        </GridViewColumn.CellTemplate>

                    </GridViewColumn>

                </GridView>
            </ListView.View>        
           
        </ListView>
       
    </Grid>
</Window>

Code Behind Code:

using System.Collections.Generic;
using System.Windows;
using System.Windows.Documents;
using System.Windows.Input;

namespace WpfApplication11
{
    /// <summary>
    /// Interaction logic for ImageinListview.xaml
    /// </summary>
    public partial class ImageinListview : Window
    {
        public ImageinListview()
        {
            InitializeComponent();
            bindlist();
        }

        private void bindlist()
        {
           // throw new NotImplementedException();
            List<imgs> listr = new List<imgs>();
            listr.Add(new imgs() { ImageSource = "/imag/11.png" });
            listr.Add(new imgs() { ImageSource = "/imag/bleaching.jpg" });
            List1.ItemsSource = listr;


        }
        private void getSelectedItem(object sender, MouseButtonEventArgs e)
        {
            imgs imgh = List1.SelectedItems[0] as imgs;
            MessageBox.Show(imgh.ImageSource);
        }

        private void Button_Click(object sender, RoutedEventArgs e)
        {
    
        }
    }
    public class imgs
    {
        public string ImageSource { get; set; }
    }
}
Code generate the following output

WPF: How to take image and button control in WPF ListView


Saturday, April 16, 2016

BackgroundWorker Example in WPF C#

Background Worker is used to do processing in background.  I mean to say that if you have two work and you want to do complete both task at same time then must to use BackgroundWorker class. You can do two task at same time , like in gmail, attach a file with writing some text in the Text. Use this example and see more things about BackgroundWorker class.


XAML Code: 

<Grid>
        <Button Content="Run BackGround Work" HorizontalAlignment="Left" Margin="38,32,0,0" VerticalAlignment="Top" Width="209" Click="Button_Click"/>

        <Label Content="" HorizontalAlignment="Left" Margin="38,68,0,0" VerticalAlignment="Top" Name="processlbl"/>

        <Label Content="" HorizontalAlignment="Left" Margin="217,68,0,0" VerticalAlignment="Top" Name="Completelbl"/>

        <Button Content="Other Task" HorizontalAlignment="Left" Margin="48,157,0,0" VerticalAlignment="Top" Width="199" Click="Button_Click_1"/>

        <TextBox Name="t1" HorizontalAlignment="Left" Height="23" Margin="48,198,0,0" TextWrapping="Wrap" Text="" VerticalAlignment="Top" Width="199"/>

        <Label Content="" HorizontalAlignment="Left" Margin="60,226,0,0" VerticalAlignment="Top" Name="outputlbl"/>

    </Grid>

Code Behind Code:

using System.ComponentModel;
using System.Windows;

namespace WpfApplication11
{
    /// <summary>
    /// Interaction logic for MainWindow.xaml
    /// </summary>
    public partial class MainWindow : Window
    {
        BackgroundWorker worker = new BackgroundWorker();
        public MainWindow()
        {
            InitializeComponent();
            worker.DoWork += worker_Dowork;
            worker.RunWorkerCompleted += worker_RunworkerCompleted;
        }

        private void worker_RunworkerCompleted(object sender, RunWorkerCompletedEventArgs e)
        {
            if (!e.Cancelled)
            {
                Completelbl.Content = "Complete Backgroung Work";
            }
            else
            {
                Completelbl.Content = "Fail";
            }
        }
        private delegate void mydelegate(int i);
        private void displayi(int i)
        {
            processlbl.Content = "Background work:" + i.ToString();
        }
        private void worker_Dowork(object sender, DoWorkEventArgs e)
        {
            for (int i = 0; i < 20; i++)
            {
                System.Threading.Thread.Sleep(2000);
                if(worker.CancellationPending)
                {
                    e.Cancel = true;
                    return;
                }
                mydelegate deli = new mydelegate(displayi);
                processlbl.Dispatcher.BeginInvoke(System.Windows.Threading.DispatcherPriority.Normal, deli, i);
            }
        }

        private void Button_Click(object sender, RoutedEventArgs e)
        {
            worker.RunWorkerAsync();
        }

        private void Button_Click_1(object sender, RoutedEventArgs e)
        {
            outputlbl.Content = t1.Text;
        }
    }
}

Tuesday, December 22, 2015

Example of Customized TabItem of TabControl in WPF

Customized Tab Item Example:
Tab Item is the item control of Tab control. In this article, I will show you, how to add images, TextBlock and any other control inside TabControl. Also I will show you how to move Tab Control's tabs using buttons like Pre, Next, Get Item of Selected tab. When we press Previous button then next tab move to previous button. Similarly for all buttons. 


<Window x:Class="WpfApplication9.tabcon"
        xmlns="http://schemas.microsoft.com/winfx/2006/xaml/presentation"
        xmlns:x="http://schemas.microsoft.com/winfx/2006/xaml"
        Title="tabcon" Height="300" Width="300">
    <Grid>
        <!--<TabControl>
            <TabItem Header="First Item">
                <Label Content="Items in the first tab"/>
            </TabItem>
            <TabItem Header="Second Item"/>
            <TabItem Header="Third Item"/>
           
           
        </TabControl>-->
        <DockPanel>
            <StackPanel Orientation="Horizontal" DockPanel.Dock="Bottom">
                <Button Name="prebutton" Click="prebutton_Click" Height="36" Width="54">Pre</Button>
                <Button Name="Nextbutton" Click="Nextbutton_Click"  Height="36" Width="54">Next</Button>
                <Button Name="selectbutton" Click="selectbutton_Click"  Height="36" Width="54">select</Button>
            </StackPanel>
            <TabControl Name="sample">
                <TabItem Header="First Item">
                    <Label Content="Content in First tab"/>
                </TabItem>
                <TabItem>
                    <TabItem.Header>
                        <TextBlock Text="Second Tab" Foreground="Red"/>
                    </TabItem.Header>
                </TabItem>
                <TabItem Header="Third Tab"/>
            </TabControl>
           
        </DockPanel>
    </Grid>
</Window>

Code Behind

using System;
using System.Collections.Generic;
using System.Linq;
using System.Text;
using System.Threading.Tasks;
using System.Windows;
using System.Windows.Controls;
using System.Windows.Data;
using System.Windows.Documents;
using System.Windows.Input;
using System.Windows.Media;
using System.Windows.Media.Imaging;
using System.Windows.Shapes;

namespace WpfApplication9
{
    /// <summary>
    /// Interaction logic for tabcon.xaml
    /// </summary>
    public partial class tabcon : Window
    {
        public tabcon()
        {
            InitializeComponent();
        }

        private void prebutton_Click(object sender, RoutedEventArgs e)
        {
            int nindex = sample.SelectedIndex - 1;
            if (nindex < 0)
                nindex = sample.Items.Count - 1;
            sample.SelectedIndex = nindex;
        }

        private void Nextbutton_Click(object sender, RoutedEventArgs e)
        {
            int nindex = sample.SelectedIndex + 1;
            if (nindex >= sample.Items.Count)
                nindex = 0;
            sample.SelectedIndex = nindex;
        }

        private void selectbutton_Click(object sender, RoutedEventArgs e)
        {
            MessageBox.Show("Selected Tab is:" + (sample.SelectedItem as TabItem).Header);
        }
    }
}

Wednesday, December 16, 2015

Example of Context menu in WPF

Context Menu Introduction:
Context menu means a window appear when we click on right button of mouse on selected Text. Today, we will design context menu with the help of WPF. Here, we will take a Input control with context menu also context menu contain MenuItem.


XAML Code
<Grid>
        <RichTextBox >
            <RichTextBox.ContextMenu>
                <ContextMenu>
                    <MenuItem Command="Cut">
                        <MenuItem.Icon>
                            <Image Source="apple.png"/>
                        </MenuItem.Icon>
                    </MenuItem>
                    <MenuItem Command="Copy">
                        <MenuItem.Icon>
                            <Image Source="grapes.png"/>
                        </MenuItem.Icon>
                    </MenuItem>
                </ContextMenu>              
               
            </RichTextBox.ContextMenu>
                 
           
        </RichTextBox>

    </Grid>
Suppose, your richTextBox is disabled and you want to show context menu on disabled item then use this code:

<RichTextBox IsEnabled="False" ContextMenuService.ShowOnDisabled="True">

Tuesday, December 8, 2015

Password Box example in WPF

If you want to design login control then must to set the special character in password box. Today, we will learn, how to design password box in WPF. In WPF, we have a PasswordBox tag in XAML , through this we can add Password box in WPF. I have a simple login control through you can see password control.


The complete code of login control

<Window x:Class="WpfApplication8.password"
        xmlns="http://schemas.microsoft.com/winfx/2006/xaml/presentation"
        xmlns:x="http://schemas.microsoft.com/winfx/2006/xaml"
        Title="password" Height="300" Width="300">
    <Grid> 
        <StackPanel Margin="20">
            <Label>Password Box Example</Label>
            <WrapPanel>
                <Label>Username:</Label>
                <TextBox Width="100"/>
            </WrapPanel>
            <WrapPanel>
                <Label>Password:</Label>
                <PasswordBox PasswordChar="x" MaxLength="8" Width="100"/>
            </WrapPanel>
            
            
        </StackPanel>
        
    </Grid>
</Window>

Code Generates the following output:


Monday, December 7, 2015

WPF common "enable all" checkbox in the top

Introduction
In this WPF article, I will show you, single checkbox enable all other remaining checkboxes; if it is unchecked then remaining them also unchecked. To do this task, first of add single checkbox for all other checkboxes in the stack panel. Now, add other child checkboxes in nested stack panel. look at, simple xaml code view.


<Window x:Class="WpfApplication8.MainWindow"
        xmlns="http://schemas.microsoft.com/winfx/2006/xaml/presentation"
        xmlns:x="http://schemas.microsoft.com/winfx/2006/xaml"
        Title="MainWindow" Height="350" Width="525">
    <Grid>
        <StackPanel Margin="10">
            <Label FontWeight="Bold">Technical Skills</Label>
            <StackPanel Margin="20,10">
                <CheckBox IsThreeState="True" Name="AllSelect" Checked="AllSelect_Checked" Unchecked="AllSelect_Checked">Enable All</CheckBox>
                <StackPanel Margin="20,10">
                    <CheckBox Name="singlecheckjava" Checked="singlecheckjava_Checked" Unchecked="singlecheckjava_Checked">Java</CheckBox>
                    <CheckBox Name="singlecheckcpp" Checked="singlecheckjava_Checked" Unchecked="singlecheckjava_Checked">C++</CheckBox>
                    <CheckBox Name="singlecheckphp" Checked="singlecheckjava_Checked" Unchecked="singlecheckjava_Checked">PHP</CheckBox>          


                </StackPanel>
            </StackPanel>      
         
         
        </StackPanel>
    </Grid>
</Window>
Here, we have checked and unchecked events. Both are calling same function in "Allselect" checkbox. In the child checkboxes also we have checked and unchecked event , they are calling same method. So in this program we have two method that is "AllSelect_Checked" and "singlecheckjava_Checked".

Code Behind Code 

using System;
using System.Collections.Generic;
using System.Linq;
using System.Text;
using System.Threading.Tasks;
using System.Windows;
using System.Windows.Controls;
using System.Windows.Data;
using System.Windows.Documents;
using System.Windows.Input;
using System.Windows.Media;
using System.Windows.Media.Imaging;
using System.Windows.Navigation;
using System.Windows.Shapes;

namespace WpfApplication8
{
    /// <summary>
    /// Interaction logic for MainWindow.xaml
    /// </summary>
    public partial class MainWindow : Window
    {
        public MainWindow()
        {
            InitializeComponent();
        }

        private void AllSelect_Checked(object sender, RoutedEventArgs e)
        {
            bool allcheckbox = (AllSelect.IsChecked == true);
            singlecheckjava.IsChecked = allcheckbox;
            singlecheckcpp.IsChecked = allcheckbox;
            singlecheckphp.IsChecked = allcheckbox;

        }

        private void singlecheckjava_Checked(object sender, RoutedEventArgs e)
        {
            AllSelect.IsChecked = null;
            if ((singlecheckjava.IsChecked == true) && (singlecheckcpp.IsChecked == true) && (singlecheckphp.IsChecked == true))
                AllSelect.IsChecked = true;
            if ((singlecheckjava.IsChecked == false) && (singlecheckcpp.IsChecked == false) && (singlecheckphp.IsChecked == false))
                AllSelect.IsChecked = false;
        }
    }
}

Tuesday, November 17, 2015

Drop Shadow example in WPF

In this article, I will show you, How to create Shadow of controls. Through this, we can show 3d view of control. First of all, I will apply this style on manually created designs like Ellipse, Rectangle etc. After that I will apply same things on controls. So, add a new window in the project. Add this code in between the <grid> ...</grid> section of xaml file.


 <Rectangle Height="150" Width="150" Stroke="Black" StrokeThickness="2">
            <Rectangle.BitmapEffect>
                <DropShadowBitmapEffect Color="Black" Direction="-50" ShadowDepth="40" Softness=".8"/>
               
            </Rectangle.BitmapEffect>
            <Rectangle.Fill>
                <ImageBrush ImageSource="apple.png"/>
               
            </Rectangle.Fill>
        </Rectangle>      

BitmapEffect creates the shadow effect behind the object. In the above-mentioned code we have Direction attribute. With the help of Direction attribute we can show shadow of control at user defined position. 

<Button Width="150" Margin="71,167,71,59">
            <Button.BitmapEffect>
                <DropShadowBitmapEffect Color="Black" Direction="-50" ShadowDepth="40" Softness=".7"/>
            </Button.BitmapEffect>
            <Image Source="apple.png" Stretch="Fill"/>


Code generates the following output

Drop Shadow example in WPF

Wednesday, November 11, 2015

WPF Window attribute | Properties examples

Introduction
In this article, we will learn many more attributes or you can say properties of window tag in WPF. First of, I will take Width and Height properties of Window Tag. Width defines Horizontal size of window and Height vertically. Both takes numbers. If you do some changes in these attribute then your window will resize. Now, come to Next attribute that is Title, Define the label of title bar, which is the Top most bar of your window. Title is aligned in center bydefault. 


Icon: If you want to put image in left corner which is realted to your project like suppose your project window is related to login, now you can put login image into your title bar in left corner.

ResizeMode : Change the window size at run time, if you want. Minimize and Maximize button appear by using this arrtibute. Also you can hide both buttons, if you assign "NoResize" value in it. By using this value, hide minimize and maximize button as well as resize arrow. 

ShowInTaskbar : The default value of it is 'True'. It means when your application will run  then your application icon will display into your taskbar. If you assign False then does not appear in Taskbar.

SizeToContent : Define the window size which is totaly depend on your content. If you assign 'width' as a value in it then your window's width resized. Similarly in case of Height.

TopMost : Your window will always appear at top position. The Default value of it is false.

Monday, November 2, 2015

Insert data into Database table WPF

In this article, I will show you how to insert data into Database table using EDMX file. So, before copy this code first to add EDMX file in the project with full configuration. In the source code, we have two text block, two text box and one button control.
Description
I explained, example of login form in WPF, WPF listview with item template binding, Start learning with WPF,


Source code (XAML)
 <Window x:Class="WpfApplication7.MainWindow"  
     xmlns="http://schemas.microsoft.com/winfx/2006/xaml/presentation"  
     xmlns:x="http://schemas.microsoft.com/winfx/2006/xaml"  
     Title="MainWindow" Height="350" Width="525">  
   <Grid>  
     <TextBlock HorizontalAlignment="Left" Margin="75,68,0,0" TextWrapping="Wrap" Text="Username" VerticalAlignment="Top"/>  
     <TextBlock HorizontalAlignment="Left" Margin="75,124,0,0" TextWrapping="Wrap" Text="Password" VerticalAlignment="Top"/>  
     <TextBox Name="t1" HorizontalAlignment="Left" Height="23" Margin="166,70,0,0" TextWrapping="Wrap" Text="TextBox" VerticalAlignment="Top" Width="120"/>  
     <TextBox Name="t2" HorizontalAlignment="Left" Height="23" Margin="166,123,0,0" TextWrapping="Wrap" Text="TextBox" VerticalAlignment="Top" Width="120"/>  
     <Button Content="SAVE" HorizontalAlignment="Left" Margin="166,173,0,0" VerticalAlignment="Top" Width="75" Click="Button_Click"/>  
   </Grid>  
 </Window>  

Code behind code

   private void Button_Click(object sender, RoutedEventArgs e)  
     {  
       dbEntities dbe = new dbEntities();  
       usertable ut = new usertable();  
       ut.Username = t1.Text;  
       ut.Password = t2.Text;  
       dbe.usertables.Add(ut);  
       dbe.SaveChanges();  
     }  
Code Generates the following output


Get last record from Database using LINQ in WPF

Today, I faced a problem which is related to banking application like account number. When I load the application to create new account for new customer then account number automatically increased by one from previously stored account. So, I want to pick last field value of Database table.


Get last record from Database using LINQ in WPF


Let's see the example:

  <Grid>  
     <Button Content="Button" HorizontalAlignment="Left" Margin="70,79,0,0" VerticalAlignment="Top" Width="75" Click="Button_Click"/>  
   </Grid>  

Code behind code

   private void Button_Click(object sender, RoutedEventArgs e)  
     {  
       DatabaseEntities dbe = new DatabaseEntities();  
       var getlastrec = dbe.users.ToArray().LastOrDefault();  
       MessageBox.Show(getlastrec.Id.ToString());  
     }  

Here DatabaseEntities is the context class. In this context class, we have public properties that is users. Through this we can get all records from user table, which is exist in model folder. Before doing this code, must to add EDMX file

Wednesday, October 28, 2015

WPF menu bar with dockpanel | additem | Image | Icon | Checkbox | Click event

In this article, I will teach you, how to add WPF menu bar at top position in window, Add items in it, add image as icon in it, also handle click event on each items of it. I explained, how to add items with underline.

<Window x:Class="WpfApplication5.MainWindow"
xmlns="http://schemas.microsoft.com/winfx/2006/xaml/presentation"
xmlns:x="http://schemas.microsoft.com/winfx/2006/xaml"
<DockPanel>
Title="MainWindow" Height="350" Width="525"> <Grid> <Menu DockPanel.Dock="Top">
<MenuItem Header=" second child"/>
<MenuItem Header="_First Parent"> <MenuItem Header="New" Command="New"/>
</MenuItem.Icon>
<MenuItem Header="Third child with image"> <MenuItem.Icon> <Image Source="mango.png"/>
<MenuItem Header="Second first child" IsCheckable="True" IsChecked="True" Click="MenuItem_Click"/>
</MenuItem> </MenuItem> <MenuItem Header="Second Parent"> </MenuItem> </Menu> </DockPanel>
</Window>
</Grid>

The above-mentioned XAML code define, a menu control inside in DockPanel control at top position. The first item in the menu works as container. In the first menu item, we have three child items. First child item contains shortcut key by using command attribute. Second child item appears as simple text, last item contain image. Similarly add another menu item in the menu control for making second parent item with click event. 


  private void MenuItem_Click(object sender, RoutedEventArgs e)  
     {  
       MessageBox.Show("second parent first child clicked");  
     }  
When, I press child item of second parent item then appear a message box on the screen.
Code generates the following output:

WPF menu bar with dockpanel | additem | Image | Icon | Checkbox | Click event

Example of Login form in WPF

Today, I will teach you, how to design login form in WPF. Also, I will teach you, how it will work. In this example, I will take two text boxes, two Text Blocks and one button control from ToolBox. Now, create a database table with some following fields:

 CREATE TABLE [dbo].[users] (  
   [Id]    INT      NOT NULL IDENTITY,  
   [username] NVARCHAR (50) NULL,  
   [password] NVARCHAR (50) NULL,  
   PRIMARY KEY CLUSTERED ([Id] ASC)  
 );  

In this database table, I have three column, first column is automatic incremented by one.

 <Window x:Class="WpfApplication5.additemwpflistview"  
     xmlns="http://schemas.microsoft.com/winfx/2006/xaml/presentation"  
     xmlns:x="http://schemas.microsoft.com/winfx/2006/xaml"  
     Title="additemwpflistview" Height="300" Width="300">  
   <Grid>  
     <TextBlock HorizontalAlignment="Left" Margin="10,41,0,0" TextWrapping="Wrap" Text="UserName" VerticalAlignment="Top"/>  
     <TextBox Name="t1" HorizontalAlignment="Left" Height="23" Margin="94,41,0,0" TextWrapping="Wrap" Text="" VerticalAlignment="Top" Width="120"/>  
     <TextBlock HorizontalAlignment="Left" Margin="15,91,0,0" TextWrapping="Wrap" Text="Password" VerticalAlignment="Top"/>  
     <TextBox Name="t2" HorizontalAlignment="Left" Height="23" Margin="94,84,0,0" TextWrapping="Wrap" Text="" VerticalAlignment="Top" Width="120"/>  
     <Button Content="Login" HorizontalAlignment="Left" Margin="94,130,0,0" VerticalAlignment="Top" Width="75" Click="Button_Click"/>  
   </Grid>  
 </Window>  

Note: Before doing all such things, must to add EDMX file in the project.


  private void Button_Click(object sender, RoutedEventArgs e)  
     {  
       DatabaseEntities dbe = new DatabaseEntities();  
       if(t1.Text!= string.Empty || t2.Text!=string.Empty)  
       {  
         var users = dbe.users.FirstOrDefault(a => a.username.Equals(t1.Text));  
         if(users!=null)  
         {  
           if(users.password.Equals(t2.Text))  
           {  
             WPFListview l1 = new WPFListview();  
             l1.ShowDialog();  
           }  
         }  
       }  
     }  

Code generates the following output:

Example of Login form in WPF


Monday, October 26, 2015

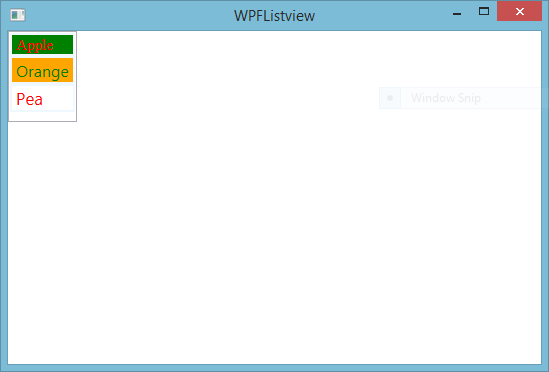
WPF Listview formatting, styling

In this article, I will teach you, how to change Background color, foreground color, font style, and many more things. I explained already many more things about WPF Listview like
  1. How to add items in it using XAML code
  2. How to bind the WPF Listview.view from Gridview.
  3. WPF Listview binding from EDMX file 
  4. Binding it with List of string type.
Also covered many more articles, which is related to styling and formatting. You can see my video article for Learn WPF styling using static as well as dynamic. Today, I will put some styles in XAML code. Let's see

   <ListView Name="list1" HorizontalAlignment="Left" VerticalAlignment="Top">  
       <ListViewItem FontFamily="Times New Roman" FontSize="15" Foreground="Red" Background="Green" BorderBrush="AliceBlue" BorderThickness="2">Apple</ListViewItem>  
       <ListViewItem FontSize="16" Foreground="Green" Background="orange" BorderBrush="AliceBlue" BorderThickness="2">Orange</ListViewItem>  
       <ListViewItem FontSize="17" Foreground="Red" Background="White" BorderBrush="AliceBlue" BorderThickness="2">Pea</ListViewItem>  
       <ListBoxItem>  
         </ListBoxItem>  
     </ListView>  

Code generates the following output

WPF Listview formatting, styling

Sunday, October 25, 2015

WPF Listview with ItemTemplate binding using EDMX file

In this article, I will teach you, how to bind WPF Listview with ItemTemplate using EDMX file. Also, I will give you an example of it. So far we have discussed basics of WPF Listview control. Let's see, what's are covered about WPF:

  1. WPF Listview binding with Gridview cell template using EDMX file
  2. WPF LISTVIEW BINDING USING EDMX FILE
  3. wpf listview bind with list of string type
Let's see the example of this example:

 <Window x:Class="WpfApplication5.MainWindow"  
     xmlns="http://schemas.microsoft.com/winfx/2006/xaml/presentation"  
     xmlns:x="http://schemas.microsoft.com/winfx/2006/xaml"  
     Title="MainWindow" Height="350" Width="525">  
   <Grid>  
     <ListView Name="list1">  
       <ListView.ItemTemplate>  
         <DataTemplate>  
           <WrapPanel>  
             <TextBlock Text="Id="/>  
             <TextBlock Text="{Binding Id}"/>  
             <TextBlock Text=","/>  
             <TextBlock Text="Name="/>  
             <TextBlock Text="{Binding Emp_Name}"/>  
           </WrapPanel>  
         </DataTemplate>  
       </ListView.ItemTemplate>  
     </ListView>  
   </Grid>  
 </Window>  

Before doing code in code-behind file, add EDMX file in project.

  public partial class MainWindow : Window  
   {  
     public MainWindow()  
     {  
       InitializeComponent();  
       loaditemTemplate();  
     }  
     private void loaditemTemplate()  
     {  
       DatabaseEntities dbe = new DatabaseEntities();  
       list1.ItemsSource = dbe.Employees.ToList();  
     }  
   }  

Code generates the following output

WPF Listview with ItemTemplate binding using EDMX file

Saturday, October 24, 2015

First 3 WPF videos, start your learning

I will give you a WPF videos series. If you watch each then you do start your career with WPF. Through WPF videos, you can design light weight application. Let's start step by step. In first video you learn about basics of WPF projects, let's see


In this video, I will teach you many more things about WPF start like

  1. How to start Visual Studio for WPF application.
  2. Create new project for WPF, select C# language in left pane, select WPF application in middle pane.
  3. First-page name of the default window is MainWindow.xaml. It contains default WPF Grid control.
  4. Add a TextBlock with Text property inside WPF grid.
  5. Learn, How to run WPF application.
Now, come to next video of WPF videos series. First of all, I will teach you about WPF panels. So, here, I share you a video of stack panel.

Check it, what is inside. Drag WPF stack panel control from ToolBox, drop it in Window. When we add it in Window then XAML automatically update with stack panel code. Here, we have HorizontalAlignment=left, Height="100", width="100", verticalAlignement="Top".  You can resize it by all corners using design window. Now, you can add buttons and other controls inside stack panel. A button control has content property, which is used as a label. By using orientation property, we can set controls alignment either horizontally and vertically. By using this video also, I explain you, how to add image in stack panel. Stack panel contains another stack panel. Now, come to next video of WPF videos series.

Grid panel is also a container. It has two things that are RowDefinition and ColumnDefinition. WPF grid is the most popular control in presentation foundation. By using this, we can add controls in it a specific cell  of Rows and columns. If, your controls are outside from grid then you can place it in WPF Grid, watch this video and learn, how to place control inside WPF Grid.

Friday, October 23, 2015

WPF Listview items with images

WPF ListView is a container of other single controls. I mean to say that you can put other single control in it. Other controls considered as a Listview item. You can put only simple single string or control like TextBlock. Lets to check the demo of this line.

1:     <ListView>  
2:        <ListViewItem>  
3:          <TextBlock Text="Fruits"/>  
4:        </ListViewItem>  
5:        <ListViewItem>  
6:          Vegetables  
7:        </ListViewItem>  
8:      </ListView>  

In this code, we have both string as well control. You can take other containers in it like StackPanel etc. as a ListView Item. In previous example, i taken Gridview control as view of Listview. Now, i will take image with Text in it as a single WPF Listview item.

1:  <ListView>  
2:        <ListViewItem>  
3:          <StackPanel Orientation="Horizontal">  
4:            <Image Source="apple.png"/>  
5:            <TextBlock Text="Apple"/>  
6:          </StackPanel>         
7:        </ListViewItem>  
8:        <ListViewItem>  
9:          <StackPanel Orientation="Horizontal">  
10:            <Image Source="mango.png"/>  
11:            <TextBlock Text="mango"/>  
12:          </StackPanel>  
13:        </ListViewItem>  
14:        <ListViewItem>  
15:          <StackPanel Orientation="Horizontal">  
16:            <Image Source="grapes.png"/>  
17:            <TextBlock Text="grapes"/>  
18:          </StackPanel>  
19:        </ListViewItem>  
20:      </ListView>  
Copy this code and paste into your WPF window, before doing this, please add three image into your project,. These three images names are apple.png, mango.png and grapes.png.

WPF Listview items with images


Thursday, October 22, 2015

WPF Listview binding with Gridview cell template using EDMX file

Good evening, welcome to WPF programming. I already explained, how to bind WPF listview from string type list also explained binding it with database table using EDMX file. In this article, I will give you an example of cell template of Gridview, which is inside in WPF Listview. You can say, I will update previous WPF listview article. If you want to customize your Gridview cell in WPF Listview control then use cell template.


Note: Before doing this task, read previous

You need to change only XAML file without any changes in code behind code. The previous XAML code is:

<Grid>
<ListView Name="listgrid">
<ListView.View>  
<GridView>  
<GridViewColumn Header="Id" DisplayMemberBinding="{Binding Id}"/>
<GridViewColumn Header="Name" DisplayMemberBinding="{Binding Emp_Name}"/>
</GridView> </ListView.View> </ListView>
</Grid>

Now, replace it with below-mentioned code

<Grid>
<ListView Name="listgrid">
<ListView.View>
 <GridView> 
<GridViewColumn Header="Id" DisplayMemberBinding="{Binding Id}"/>
<GridViewColumn Header="Name">
<GridViewColumn.CellTemplate>
<DataTemplate>
<TextBlock Text="{Binding Emp_Name}" FontWeight="Bold"/>
</DataTemplate> 
</GridViewColumn.CellTemplate> 
</GridViewColumn>
</GridView> </ListView.View>
</Grid>
</ListView>

Now, codes generate the following output:

WPF Listview binding with Gridview cell template using EDMX file

WPF LISTVIEW BINDING USING EDMX FILE

In previous WPF listview article, I explained, how to bind listview from List of string type. In this article, I will explain you, how to bind listview using EDMX file. We all know about powerful features of  WPF listview i.e Gridview. Lets, take an example of it.

  <Grid>  
     <ListView Name="listgrid">  
       <ListView.View>  
         <GridView>  
           <GridViewColumn Header="Id" DisplayMemberBinding="{Binding Id}"/>  
           <GridViewColumn Header="Name" DisplayMemberBinding="{Binding Emp_Name}"/>  
         </GridView>          
       </ListView.View>     
     </ListView>  
   </Grid>  

In the mentioned code, Gridview is a view of WPF Listview with two columns that are Id and name. Here, DisplayMemberBinding is the property of GridviewColumn, which is used to bind listview columns from field of model class.

  public partial class MainWindow : Window  
   {  
     public MainWindow()  
     {  
       InitializeComponent();  
       loadlistview();  
     }  
     private void loadlistview()  
     {  
       DatabaseEntities dbe = new DatabaseEntities();  
       listgrid.ItemsSource = dbe.Employees.ToList();  
     }  
   }  

Here, DatabaseEntities, context class in EDMX model, also Employees is the public property in DataContext class. Learn How to add EDMX file with database file.
Now, code generate the following output:

WPF LISTVIEW BINDING USING EDMX FILE
© Copyright 2013 Computer Programming | All Right Reserved