-->

Friday, September 27, 2013

How to Bind ListBox using Complex DataType in ASP.NET

Step-1: Define class properties in class
Step-2: Create a List<DataType> object in code file.
Step-3: Add fields to the list.
Step-4: Bind ListBox with list
Step-5: Assign DataMember to the ListBox.


Create a class file in ASP.NET
using System;
using System.Collections.Generic;
using System.Linq;
using System.Web;

/// <summary>
/// Summary description for Fruits
/// </summary>
public class Fruits
{
    public string  Fruits_Name { get; set; }
    public decimal Fruits_price { get; set; }
 

Take a ListBox on Design window
<%@ Page Language="C#" AutoEventWireup="true" CodeFile="Default5.aspx.cs" Inherits="Default5" %>

<!DOCTYPE html PUBLIC "-//W3C//DTD XHTML 1.0 Transitional//EN" "http://www.w3.org/TR/xhtml1/DTD/xhtml1-transitional.dtd">

<html xmlns="http://www.w3.org/1999/xhtml">
<head runat="server">
    <title></title>
</head>
<body>
    <form id="form1" runat="server">
    <div>
        <asp:ListBox ID="ListBox1" runat="server"
            ></asp:ListBox>
    </div>
    </form>
</body>
</html>

Codebehind Code
using System;
using System.Collections.Generic;
using System.Linq;
using System.Web;
using System.Web.UI;
using System.Web.UI.WebControls;

public partial class Default5 : System.Web.UI.Page
{
    List<Fruits> listitem = new List<Fruits>();

    protected void Page_Load(object sender, EventArgs e)
    {
        listitem.Add(new Fruits() { Fruits_Name = "Apple", Fruits_price = 45.40M });
        listitem.Add(new Fruits() { Fruits_Name = "Mango", Fruits_price = 30.40M });
        listitem.Add(new Fruits() { Fruits_Name = "Orange", Fruits_price = 36.40M });
        listitem.Add(new Fruits() { Fruits_Name = "grapes", Fruits_price = 89.40M });
        ListBox1.DataSource = listitem;
        ListBox1.DataTextField = "Fruits_Name";
        ListBox1.DataBind();

    }
}

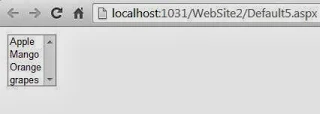
Output
How to Bind ListBox using Complex DataType in ASP.NET

Thursday, September 26, 2013

How to Bind DropDownList using Complex DataType in ASP.NET

Step-1: Define class properties in class
Step-2: Create a List<DataType> object in code file.
Step-3: Add fields to the list.
Step-4: Bind DropDownlist with list
Step-5: Assign DataMember to the DropDownList.


Create a class file in ASP.NET
using System;
using System.Collections.Generic;
using System.Linq;
using System.Web;

/// <summary>
/// Summary description for Fruits
/// </summary>
public class Fruits
{
    public string  Fruits_Name { get; set; }
    public decimal Fruits_price { get; set; }
 

Take a DropDownList on Design window
<%@ Page Language="C#" AutoEventWireup="true" CodeFile="Default5.aspx.cs" Inherits="Default5" %>

<!DOCTYPE html PUBLIC "-//W3C//DTD XHTML 1.0 Transitional//EN" "http://www.w3.org/TR/xhtml1/DTD/xhtml1-transitional.dtd">

<html xmlns="http://www.w3.org/1999/xhtml">
<head runat="server">
    <title></title>
</head>
<body>
    <form id="form1" runat="server">
    <div>
        <asp:DropDownList ID="DropDownList1" runat="server">
        </asp:DropDownList>
    </div>
    </form>
</body>
</html>

Codebehind Code
using System;
using System.Collections.Generic;
using System.Linq;
using System.Web;
using System.Web.UI;
using System.Web.UI.WebControls;

public partial class Default5 : System.Web.UI.Page
{
    List<Fruits> listitem = new List<Fruits>();

    protected void Page_Load(object sender, EventArgs e)
    {
        listitem.Add(new Fruits() { Fruits_Name = "Apple", Fruits_price = 45.40M });
        listitem.Add(new Fruits() { Fruits_Name = "Mango", Fruits_price = 30.40M });
        listitem.Add(new Fruits() { Fruits_Name = "Orange", Fruits_price = 36.40M });
        listitem.Add(new Fruits() { Fruits_Name = "grapes", Fruits_price = 89.40M });
        DropDownList1.DataSource = listitem;
       DropDownList1.DataTextField = "Fruits_Name";
        DropDownList1.DataBind();

    }
}

Output
How to Bind DropDownList using Complex DataType in ASP.NET

Wednesday, September 25, 2013

How to Retrieve Data from SQL Database: Windows Forms

In my previous post, I have created a connection object and then get all the records from the database table. What if we want to bind our datagridview without writing a single line of code? So in this article we will do something like this.


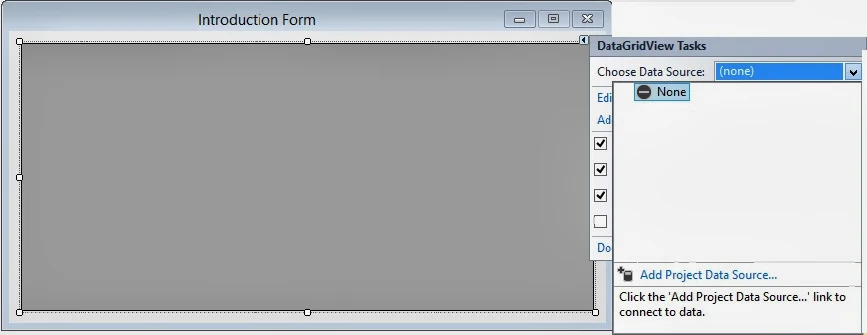
 Just drag-n-drop a datagridview on the form and name it, if you want. A datagridview tasks pop-up menu appears automatically as shown:

How to Retrieve Data From SQL Server Database and bind to DataGridView in Windows Forms

Select the Choose Data Source drop-down list and then Add Project Data Source as shown:

How to Retrieve Data From SQL Server Database and bind to DataGridView in Windows Forms

Now Data Source Configuration wizard will open, select Database as your data source. The wizard will look like:

How to Retrieve Data From SQL Server Database and bind to DataGridView in Windows Forms

By clicking on Next button, It will prompt for the database model you want to use. Select dataset, it will determines the type of data objects our application will use.

How to Retrieve Data From SQL Server Database and bind to DataGridView in Windows Forms

In the next step we have to choose our connection that is used by the application use to connect to the database.

How to Retrieve Data From SQL Server Database and bind to DataGridView in Windows Forms

Click on New Connection and it will prompt for Choose Data Source dialog box having some more options to select.

How to Retrieve Data From SQL Server Database and bind to DataGridView in Windows Forms

Select Microsoft SQL Server which is used to connect to MS SQL Server, and the data provider should be .NET Framework Data Provider for SQL Server. Add Connection dialog box will appear as shown:

How to Retrieve Data From SQL Server Database and bind to DataGridView in Windows Forms

Write the server name as given “(LocalDb)\v11.0”, and select appropriate database name from the drop down list below. I have select StockDb here. Just click on Test Connection to check our connection succeeded or not.

How to Retrieve Data From SQL Server Database and bind to DataGridView in Windows Forms

Press ok and it will show Data Source Configuration wizard again with the specified connection and also connection string.

How to Retrieve Data From SQL Server Database and bind to DataGridView in Windows Forms

Choose the table name from the tree view shown. I have select Groups table because I want to show the records of groups table. Finish now with selecting the data set name. If you will forget the dataset name, it will used the by default name.

How to Retrieve Data From SQL Server Database and bind to DataGridView in Windows Forms

It will show the datagridview binding with the columns names of groups table as shown in the above image. Now run the project and look out the records bind to the datagridview

How to Retrieve Data From SQL Server Database and bind to DataGridView in Windows Forms

As I have said above, we have not wrote a single line of code.

How to Enable Spell Check in TextBox: WPF

WPF Textbox control is used to input some value by the user at run time. Now it is not sure that the entered values are correct, it means user can write anything wrong in the textbox. So it is programmer’s job to check the value and correct it if wrong.

WPF textbox control provides a spell check functionality something same as MS Word. We have to use SpellCheck and Language property of the textbox. SpellCheck will enable the feature and language will decide the language in which spell check is to be performed.

<TextBox Width="300" Height="25" Margin="5"
Text="This si not teh correct line written by teh usre"
SpellCheck.IsEnabled="True" Language="En-Us">
</TextBox>

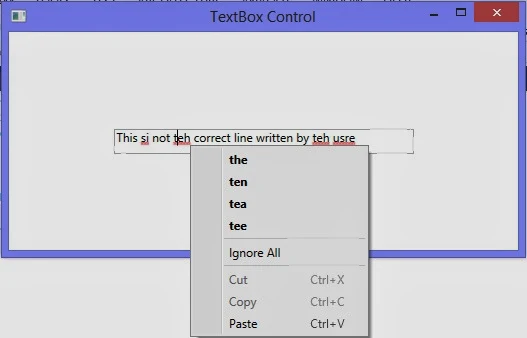
The code above will show a textbox with the given text. According to US English language, the textbox will place some red lines on the wrong words, as shown in the following image.

Enable SpellCheck in WPF Textbox Control


As in MS Word, when we right click on the wrong word, then it will show some help options in the context menu, as shown in the following image:

Show Context Menu in WPF Textbox control spell check

How to create user profile using Complex DataType in ASP.NET

User profile

A user profile is a collection of various properties that describes the information you want to store for a specific user. You can store the properties associated with a user in a user profile. The data that is stored in a profile can be accessed programmatically.
The profile feature in ASP.NET  allows you to define and store user-specific settings. In addition, a website can be more user friendly if it is customized according to the preferences of a user. For example, a shopping website displays the shopping cart that consists of the items that are frequently purchased by the user. To Induce such functionality, a website needs to retrieve and load the user’s data when the request for a Web page is made for the first time. After the request is completed, the current settings, such as the address and phone number of a user, must be stored on the server. Consequently, when  the same user request for the same Web page, the respective settings stored on the server corresponding to a user are retrieved.
The user’s profile is defined in the machine.config  or web.config file . The following Syntax of the web.config file contains the description of a user profile.
    <profile>
        <properties >
          <add name="Address" type ="string"/>
          <add name ="phone" type ="integer"/>
         
        </properties>      
       
       
      </profile>


The preceding syntax defines a profile by using properties in the web.config file. The <add> element defines the properties of a profile. The properties of a user profile consists of both simple data type and complex data types.

Lets take an Simple Example


Web.config file code

<system.web>
    <anonymousIdentification enabled ="true"/>
    <profile>
      <properties >
        <add name="name" type ="string" allowAnonymous ="true"/>
        <add name ="DOB" type ="dateofbirth" allowAnonymous ="true"/>

      </properties>


    </profile>
    <authentication mode="Forms" />
    <compilation debug="false" targetFramework="4.0" />

  </system.web>

Class File Code 

using System;
using System.Collections.Generic;
using System.Linq;
using System.Web;

/// <summary>
/// Summary description for dateofbirth
/// </summary>
public class dateofbirth
{ private string day;
        private string month;
        private string year;
        public string Day
        {
            get
            {
                return day;
            }
            set
            {
                day = value;

            }
        }
        public string Month
        {
            get
            {
                return month;
            }
            set
            {
                month = value;
            }
        }
        public string Year
        {
            get
            {
                return year;
            }
            set
            {
                year = value;
            }
        }
public dateofbirth()
{


}

}

Source code

<%@ Page Language="C#" %>

<!DOCTYPE html PUBLIC "-//W3C//DTD XHTML 1.0 Transitional//EN" "http://www.w3.org/TR/xhtml1/DTD/xhtml1-transitional.dtd">

<script runat="server">

    protected void Button1_Click(object sender, EventArgs e)
    {
        Profile .name =TextBox1 .Text ;
            Profile .DOB.Day=TextBox2 .Text ;
            Profile .DOB.Month =TextBox3 .Text ;
            Profile.DOB.Year = TextBox4.Text;
    }
</script>

<html xmlns="http://www.w3.org/1999/xhtml">
<head runat="server">
    <title></title>
</head>
<body>
    <form id="form1" runat="server">
    <div>Your DateOfBirth is
    <%= Profile.DOB .Day %>/
    <%= Profile .DOB .Month  %>/<%= Profile .DOB .Year %><br />
    Your Profile Name is
    <%=Profile .name %>
    </div>
    Enter Name:<asp:TextBox ID="TextBox1" runat="server"></asp:TextBox>

    <br />
    Enter Day:<asp:TextBox ID="TextBox2" runat="server"></asp:TextBox>

    <br />
    Enter Month: <asp:TextBox ID="TextBox3" runat="server"></asp:TextBox>

    <br />
    Enter Year : <asp:TextBox ID="TextBox4" runat="server"></asp:TextBox>

    <br />
    <asp:Button ID="Button1" runat="server" onclick="Button1_Click" Text="Submit" />
    <br />

    </form>
</body>

</html>


Output
How to create user profile using Complex DataType in ASP.NET

Instance of class cann’t access member of the class within the class

“Clubing data member and member function known as class.”

lets take an Example
Class A
{
Data member;
Member function;
}

If we create instance of the class in other class, that instance cannot access member of the class

lets take an Example

Class B
{
A  obj=new A();
A.Datamember;  // Error  instance member cann’t access datamember within the class
}

Solution :
Every executable statementmust be in a definition block( inside a function , constructor)
Class B
{
A obj =new A();
Public B()
{
Obj.DataMember=value; // you can access the datamember

}

Tuesday, September 24, 2013

How to Use TextBox Control in WPF

The previous controls i.e. Label, TextBlock and etc. are used to display fix text in a window. Their text can be changed but through the programming, not by the user. Now to input some value by the user, or enable text editing, the text box control is used. The textbox control can contain only unformatted text in its text property.

<TextBox Width="200" Height=”25” Text="WPF Textbox control"></TextBox>

The above code will place a textbox control having width two hundred and above text in the textbox. The textbox is shown in the following image:

How to use Single line textbox in WPF XAML


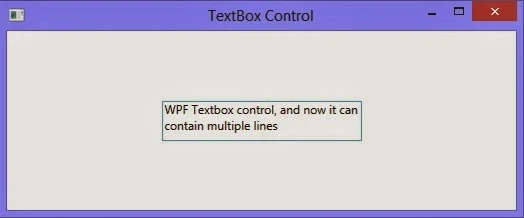
In the above textbox only one line can be written, means we can’t either enter a new line in to the textbox or cant inset more lines by default. To enable multiline, it have two properties to do that i.e. TextWrapping and AcceptReturn. To insert a multiline textbox, write following code:

<TextBox Width="200" Height="40" Margin="5" Text="WPF Textbox control" TextWrapping="Wrap" AcceptsReturn="True"></TextBox>

Now when we run and write some more lines, then it will show something like this:

How to use Multiline textbox control in WPF XAML


In the next post we will enable spell check for this textbox control.
© Copyright 2013 Computer Programming | All Right Reserved