-->

Tuesday, May 27, 2014

Understanding Attributes in Asp.Net MVC

Earlier article was about to handle browser request from the user and then invokes related controller and actions written for that particular URL. What is to be done after these requests can also be specified by the programmer in Asp.Net MVC, as this article will discuss.

Asp.Net MVC provides a way to use some extra features for actions and controller, these features are called Attributes and Filters. We have discusses about Required attribute in creating MVC View Model using required field validations.

The first and most attribute, MVC use by default is [Authorize] which specifies which action is to be executed by authenticated users only or it may be used for whole controller. The syntax for this authorize attribute is:

[Authorize]
Public ActionResult Profile()
{
return View();
}

Now whenever an un-authorized user will try to get access of this profile action, it will redirect the request to login page or the page specified.

Attributes can also take parameters specified in their declaration, they may be positional or named. Positional parameter corresponds to attribute’s public constructor like the one specified below. It will change the name of this action profile to Details, as specified as the parameter.

[ActionName(“Details”)]
Public ActionResult Profile()
{ return View(); }

Named parameter correspond to public property or field of the respective attribute. For example authorize attribute have some named parameters like order, roles and users as written in following code:

[Authorize(Roles="Role1, Role2", Users="User1, User2")]
Public ActionResult Profile()
{ return View(); }

By specifying these named parameters, this profile action will only be accessed by the users having role "Role1" and "Role2". If we talk about the users, this action will only be accessed by only the person having username "User1" and "User2".
Attribute is a class which inherits from the abstract class System.Attribure. 
So we have to inherit from the same System.Attribute class to create our own attribute. Each attribute class (created by us) will must ends with the word "Attribute". E.g.
  • AuthorizeAttribute
  • RequiredAttribute
  • ActionNameAttribute
  • CustomizedAttribute
  • ValueCheckAttribute

Search Value using Non-Clustered index: SQL Server

Similar to the clustered index, a non-clustered index also contains the index also contains the index key values and the row locators that point to the storage location of the data in a table. However, in a non-clustered index, the physical order of the rows is not the same as the index order.

Non-clustered indexes are typically created on columns used in joins and the WHERE clause. These indexes can also be created on columns where the values are modified frequently. The SQL Server creates non-clustered indexes by default when the CREATE INDEX command is given. There can be as many as 249 non-clustered indexes per table.

The data in a non-clustered index is present in a random order, but the logical ordering is specified by the index. The data rows may be randomly spread throughout a table. The non-clustered index tree contains the index keys in a sorted order, with the leaf level of the index containing a pointer to the data page and the row number in the data page.
  • The SQL Server perform the following steps when it uses a non-clustered index to search for a value:
  • The SQL Server obtains the address of the root page from the sysindexes table.
  • The search value is compared with the key values on the root page.
  • The page with the highest key value less than or equal to the search value is found.
  • The page pointer is followed to the next lower level in the index.
  • Steps 3 and 4 are repeated until the data page is reached.
  • The rows are searched on the leaf page for the specified value. If a match is not found, the table contains no matching rows. If a match is found, the pointer is followed to the data page and row-ID in the table and requested row is retrieved. 
Search Value using Non-Clustered index: SQL Server

The figure displays a non-clustered index present on the Eid attribute o the Employee table. To search for any value, the SQL Server would start from the root page and move down the B-Tree until it reaches a leaf page that contains a pointer to the required record. It would then use this pointer to access the record in the table. For example, to search for the record containing Eid E006 by using the non-clustered index, the following steps would be performed by the SQL Server:

  • The SQL Server starts from page 603, which is the root page.
  • It searches for the highest key value on the page, the page with a key value less than or equal to the search value, that is, to the page containing the pointer to Eid E005.
  • The search continues from page 602.
  • Eid E005 is found and the search continues to page 203.
  • Page 203 is searched to find a pointer to the actual row. Page 203 is the last page, or the leaf page, of the index.
  • The search then moves to page 302 of the table to find the actual row.

In an index, more than one row can contain duplicate values. However, if you configure an index to contain unique values, the index will also contain unique values. Such an index is called a unique index. You can create a unique index on a columns that contain unique values, such as the primary key columns.
A unique index can be clustered or non-clustered depending on the nature of the column

Types of Indexes provided by SQL Server

As described in the earlier article indexes can be managed easily. The SQL Server allows you to create the following types of indexes:

Clustered Index

A clustered index is an index that sorts and stores the data rows in the table based on their key values. Therefore, the data is physically sorted in the table when a clustered index is defined on it. Only one clustered index can be created per table. Therefore, you should build the index on attributes that have a high percentage of unique values and are not modified often.

In a clustered index, data is stored at the leaf level of the B-Tree. The SQL Server performs the following steps when it uses a clustered index to search for a value:
  • The SQL Server obtains the address of the root page from the sysindexes table, which is a system table containing the details of all the indexes in the database.
  • The search value is compared with the key values on the root page.
  • The page with the highest key value less than or equal to the search value is found.
  • The page pointer is followed to the next lower level in the index.
  • Steps 3 and 4 are repeated until the data page is reached.
  • The rows of data are searched on the data page until the search value is found. If the search value is not found on the data page, no rows are returned by the query.
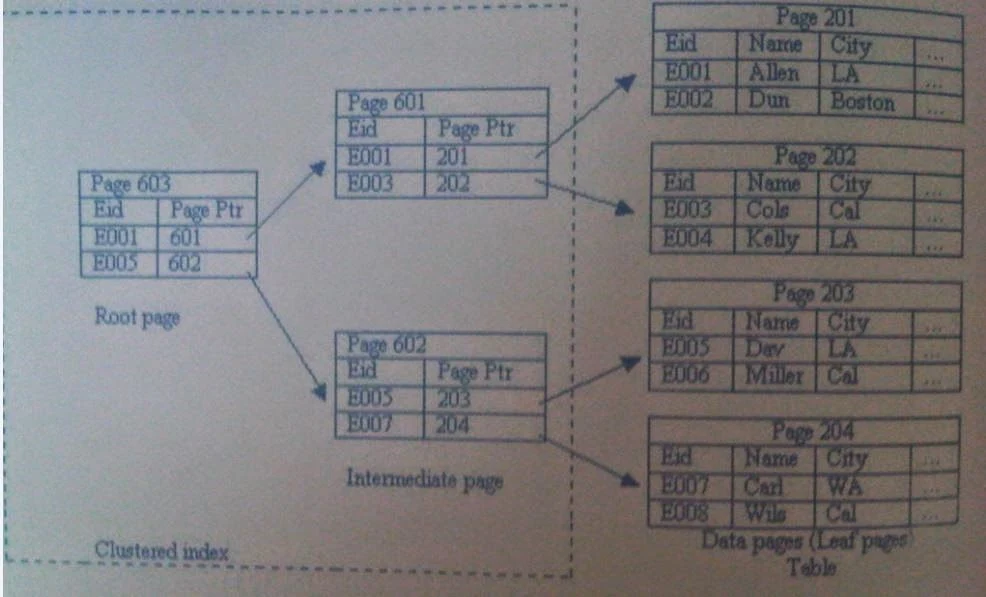
Consider the following figure where the rows of the Employee table are sorted according to the Eid attribute and stored in the table.
Types of Indexes provided by SQL Server

Working of a Clustered Index

The preceding figure displays a clustered index on the Employee table. To search for any record, the SQL Server would start at the root page. It would then move down the B-Tree and the data values would be found on the leaf pages of the B-Tree. For example, if the row containing Eid E006 was to be searched by using a clustered index (refer to the preceding figure), the SQL Server perform the following steps:
  • The SQL Server starts from page 603, the root page.
  • The SQL Server searches for the highest key value on the page, which is less than or equal to the search value. The result of this search is the page containing the pointer to Eid E005.
  • The search continues from page 602. There, Eid E005 is found and the search continues to page 203.
  • Page 203 is searched to find the required row.
A clustered index determines the order in which the rows are actually stored. Therefore, you can define only one clustered index on a table.

How to Create and Manage Indexes in SQL Server

Database developer is often required to improve the performance of queries. SQL Server allows implementing indexes to reduce the execution time of queries. In addition they can restrict the view of data to different users by implementing views.

The SQL Server also provides an in-built full-text search capability that allows fast searching of data. This article discusses how to create and manage indexes and views.

Creating and Managing Indexes

When a user queries data from a table based on conditions, the server scans all the data stored in the database table. With an increasing volume of data, the execution time for queries also increases. As a database developer, you need to ensure that the users are able to access data in the least possible time. SQL Server allows you to create indexes on tables to enable quick access to data. In addition, SQL Server allows you to create XML indexes for columns that store XML data.

At times, the table that you need to search contains voluminous data. In such cases, it is advisable to create partitioned indexes. A partitioned index makes the index more manageable and scale able as they store only data of a particular partition.

As a database developer, you need to create and manage indexes. Before creating an index, it is important to identify the different types of indexes.

Identifying the Types of Indexes

Before identifying the types of indexes, it is important to understand the need to implement an index.
The data in the database tables is stored in the form of data pages. Each data page is 8 KB in size. Therefore, data of the complete table is stored in multiple data pages. When a user queries a data value from the table, the query processor searches for the data value in all the data pages. When it finds the value, it returns the result set. With an increasing volume of data, this process of querying data takes time.

To reduce the data query time, the SQL Server allows you to important indexes on tables. An index is a data structure associated with a table that helps in fast search of data in the table. Indexes in the SQL Server are like the indexes at the back of a book that you can use to locate text in the book.

Benefits provided by using Indexes:


  • Accelerate queries that join tables, and perform sorting and grouping
  • Enforce uniqueness of rows, (if configured for that)

An index contains a collection of keys and pointers. Keys are values built from one or more columns in the table with which the key is associated. The column on which the key is built is the one on which the data is frequently searched. Pointers store the address of the storage location where a data page is stored in the memory, as depicted in the following figure.

How to Create and Manage Indexes in SQL Server

When the users query data with conditions based on the key columns, the query processor scans the indexes, retrieves the address of the data page where the required data is stored in the memory, and accesses the information. The query processor does not need to search for data in all the data pages. Therefore, the query execution time is reduced.

The keys in the indexes are stored in a B-Tree in the memory. A B-Tree is a data-indexing method that organizes the index into a multi-level set of nodes. Each page in an index B-Tree is called an index node. Each index contains a single root page at the top of the tree. This root page, or root node, branches out into n number of pages at each intermediate level until it reaches the bottom, or leaf level, of the index. The index tree is traversed by following pointers from the upper-level pages down through the lower-level pages.

The key values in the root page and the intermediate pages are sorted in the ascending order. Therefore, in the B-Tree structure, the set of nodes on which the server will search for data values is reduced. This enables the SQL Server to find the records associated with the key values quickly and efficiently. When you modify the data of an indexed column, the associated indexes are updated automatically.

Complaints Management Project in ASP.NET

Download this project

Project cost : 200Rs or $8
Pay me at:
PayPal id : saini1987tarun@gmail.com

Via bank transfer

ICICI bank account number is :    153801503056
Account holder name is :                 Tarun kumar saini
IFSC code is :                                   ICIC0001538

SBBJ bank detail :                             61134658849
Account holder name:                        Tarun kumar saini
IFSC code :                                        SBBJ0010398

CONTACT ME

narenkumar851@gmail.com

Introduction

In this project, you can create your complaints to admin department. Review your complaints by the admin department and try to solve the problem.

Project Module

I have two module in this project first one is consumer module and last one admin module.

How to work(Step by step guide)

Step-1 : First to complete the consumer registration.
Step-2 :  Login in your account using consumer login panel.
Step-3 : Fill the complaints form, after login.
Step-4 : Check Status after few time in consumer panel.
Step-5 : Open Admin account using admin login panel.
Step-6 : Check New or old consumer complaints and try to solve the problem if possible.
Step-7 : Update the pending status

Requirements

Software : Visual Studio 2010

Project Screen

Home page
Complaints Management Project in ASP.NET
Code 
<%@ Page Title="Home Page" Language="C#" MasterPageFile="~/Site.master" AutoEventWireup="true"
    CodeFile="Default.aspx.cs" Inherits="_Default" %>

<%@ Register src="UserControl/complaintform.ascx" tagname="complaintform" tagprefix="uc1" %>

<asp:Content ID="HeaderContent" runat="server" ContentPlaceHolderID="HeadContent">
</asp:Content>
<asp:Content ID="BodyContent" runat="server" ContentPlaceHolderID="MainContent">
    <h2>
        Complaint Form Fill by Consumer</h2>
    <p>
        <table style="width:100%;">
            <tr>
                <td>
                    <uc1:complaintform ID="complaintform1" runat="server" />
                </td>
                <td valign="top">
                    <asp:Image ID="Image1" runat="server" Height="526px" 
                        ImageUrl="~/images/complaint-handling-cartoon.jpg/" Width="340px" />
                </td>
            </tr>
        </table>
    </p>
<p>
        &nbsp;</p>
    </asp:Content>

Consumer login Form
consumer login panel of complaint management

Solution Explorer View
Complaints Management Project in ASP.NET


How to download this project

Step-1 : mail to me  ( narenkumar851@gmail.com)
Step-2 : Project Cost $10  or 400 Rs

How to Modify XML Data using Functions in SQL Server

Similar to any other type of data, programmer might also need to modify the XML data. To modify data, you can use the modify function provided by the XML data type of the SQL Server. The modify function specifies an XQuery expression and a statement that specifies the kind of modification that needs to be done.

This function allows you to perform the following modifications:

  • Insert: Used to add nodes to XML in an XML column or variable. For example, the management of AdventureWorks wants to add another column specifying the type of customer, in the CustDetails table. The default value in the Type column should be ‘Credit’. To resolve this problem, the database developer of AdventureWorks will create the following query:

    UPDATE CusomtDetails SET Cust_Details.modify (‘ inser attribute Type{“Credit”} as first into (/Customer) [1]’)
  • Replace: Used to update the XML data. For example, James Stephen, one of the customers of AdventureWorks, has decided to change his customer type from Credit to Cash. As a database developer, you can create the following query to reflect this change:
  • Delete: Used to remove a node from the XML data. For example, the management of AdventureWorks has decided to remove the ‘City’ column from the customer details. You can write the following query to display the results:

    UPDATE CustomDetails SET Cust_Details.modify (‘delete (/Customer/@City) [1]’)

Add 3 months in current month in asp.net

 <form id="form1" runat="server">
    <div>
   
        <asp:Button ID="Button1" runat="server" onclick="Button1_Click" Text="Click" BackColor="#99CCFF" />
   
    </div>
    <asp:Label ID="Label1" runat="server" BackColor="Yellow"></asp:Label>
    </form>
Code Behind
 protected void Button1_Click(object sender, EventArgs e)
    {
        {        
            DateTime now = DateTime.Now;        
            DateTime after3Months = now.AddMonths(3);
            Label1.Text = "now = " + now.ToLongDateString();
            Label1.Text += "<br /><br />after added 3 months to now= ";
            Label1.Text += after3Months.ToLongDateString();
        }

    }
Code Generate the following output

Add 3 months in current month in asp.net
© Copyright 2013 Computer Programming | All Right Reserved