-->

Sunday, July 20, 2014

Configuring Full-Text Search in SQL Server

The full-text query feature in the SQL Server enables users to search for a wide range of text in the SQL tables. Consider an example. The sales management team of AdventureWorks, Inc. makes frequent searches on the ProductDescription table to develop marketing strategies. The search is based on the data stored in the Description column of the table.

A bike racing competition is scheduled to begin in Texas. The sales manager of AdventureWorks wants to see the details of all the bikes that are related to racing, so that a marketing strategy can be designed to increase the sale of these bikes. Specifically, he wants a list of all the bikes that have the keyword ‘race winner’ in the description.

As the data is large, the search query takes a long time to retrieve data from the table. In this scenario, you can apply a full-text index on the Description column of the ProductDescription table to improve the speed of searching.

To retrieve the required details by using full-text search, you need to configure full-text search on the database. For this, you need to perform the following tasks:
  • Enable the full-text search in the database.
  • Create a full-text catalog.
  • Create a unique index.
  • Create a full-text index.
  • Populate the full-text index.

Enabling the Full-Text Search in the Database

Before using the full text search feature of the SQL Server, you need to enable the database using the following statement:
USE AdventureWorks
GO
Sp_fulltext_database enable
GO

Creating a Full-Text Catalog

A full-text catalog serves as a container to store full-text indexes. After enabling the full text search, you need to create a full-text catalog. A full-text catalog is a container that contains full-text indexes. A full-text catalog may have multiple full-text indexes. You can create a full-text catalog by using the following command:
CREATE FULLTEXT CATALOG cat1 AS DEFAULT

Creating a Unique Index

After creating the full-text catalog, you need to identify a unique index on the table. This unique index will be mapped to the values in the full-text index. You can use an existing unique index defined on the table, or create a new one. For example, you can create a unique index on the Production.ProductDescription table, as shown in the following statement:

CREATE UNIQUE INDEX Ix_Desc ON Production.ProductDescription
(ProductDescriptionID)

Creating a Full-Text Index

After you have created the full-text catalog and a unique index, you can create a full-text index on the table. A full-text index stores information about significant words and their location within a given column. You can use this information to compute full-text queries that search for rows with particular words or combinations of words. Full-text indexes can be crated on the base tables but not on the views or the system tables.

There are certain words that are used often and may hinder a query. These words are called noise words and are excluded from the search string. For example, if you search string is “Who is the governor of California”, a full-text search will not look for words, such as ‘is’ and ‘the’. Some noise words are a, an, the, and are.

Based on the preceding scenario, you can create a full-text index on the ProductionDescription table. This index is based on the lx_desc index created earlier on the Description column of the table.
Note: You can also create full-text index in the Object Explorer window by right-clicking the table, on which you need to create the full-text index, and selecting Full-Text index-Define Full-Text Index.
Altering, Dropping and Renaming Views in SQL Server

In addition to creating view in sql server, database developer also need to manage them. Management of a view includes altering, dropping, or renaming described below.

Altering views

If you define a view with a SELECT * statement and then alter the structure of the underlying tables by adding columns, the new columns do not appear in the view. Similarly, when you select all the columns in a CREATE VIEW statement, the columns list is interpreted only when you first create the view. To add new columns in the view, you must alter the view.

You can modify a view without dropping it. This ensures that permissions on the view are not lost. You can modify a view without affecting its dependent objects. To modify a view, you need to use the ALTER VIEW statement. The syntax of the ALTER VIEW statement is:

ALTER VIEW view_name [ (column_name) ]
[WITH ENCRYPTION]
AS select_statement
[WITH CHECK OPTION]
Where,

  • View_name specifies the view to be altered.
  • Column_name specifies the name of the column(s) to be used in a view.
  • WITH ENCRYPTION option enerypts the text of the view in the syscomments view.
  • AS specifies the action to be performed by the view.
  • Select_statement specifies the SELECT statement that defines a view
  • WITH CHECK OPTION forces the data modification statements to follow the criteria given in the SELECT statement.

For example, you created a view to retrieve selected data from the Employee and EmployeeDepartmentHistory tables. You need to alter the view definition by including the LoginID attribute from the Employee table.

To modify the definition, you can write the following statement:

ALTER VIEW vwEmployeeDepData
AS
SELECT e.EmployeeID, LoginID, MaritalStatus, DepartmentID
FROM HumanResources.Employee e JOIN
HumanResources.EmployeeDepartmentHistory d
ON e.EmployeeID = d.employeeID

The preceding code alters the view definition by including the LoginID attribute from the Employee Table.

Dropping Views

You need to drop a view when it is no longer required. You can drop a view from a database by using the DROP VIEW statement. When a view is dropped, it has no effect on the underlying table(s). Dropping a view removes its definition and all the permissions assigned to it.

Further, if you query any view that references a dropped table, you receive an error message. Dropping a table that references a view does not drop the view automatically. You have to use the DROP VIEW statement explicitly.
The syntax of the DROP VIEW statement is:  DROP VIEW view_name

For example, you can use the following statement to remove the vwEmployeeDepData view:
DROP VIEW vwEmployeeDepData

The preceding statement will drop the vwEmployeeDepData view from the database.

You can drop multiple views with a single DROP VIEW statement. The names of the view that need to be dropped are separated by commas in the DROP VIEW statement

Renaming Views

At times, you might need to change the name of a view. You can rename a view without dropping it. This ensures that permissions on the view are not lost. A view can be renamed by using the sp_rename system stored procedure.
The syntax of the sp_rename procedure is:  Sp_rename old_viewname, new_viewname
Where,

  • Old_viewname is the view that needs to be renamed.
  • New_viewname is the new name of the view.

For example, you can use the following statement to rename the vwSal view:
Sp_rename vwSal, vwSalary

The preceding command renames the vwSal view as vwSalary.

While renaming views, you must ensure the following:

  • The view must be in the current database.
  • The new name for the view must follow the rules for identifiers.
  • The view can only be renamed by its owner.
  • The owner of the database can also rename the view.

How to Implement Custom Role Provider in Asp.Net MVC

As I have discussed in earlier article that programmer need to implement custom provides to enable its own database works with in-built functionality. My previous article was to implement custom membership provider and in this article I will continue with custom role provider in MVC.

By following these simple steps we will complete the task:

  • Create a class "Custom_RoleMembership" in Models folder in your MVC application.
  • Inherit this from RoleProvider class exists in "System.Web.Security" namespace.
  • Right click on RoleProvider and select on “Implement Abstract Class”, it will all the override function need to be implement by us.
  • Just implement GetRolesForUser(string username) method and replace that function with the following code:

    public override string[] GetRolesForUser(string username)
    {
    //Get roles for this username and return in string array
    if(username=="admin")
    return new string[] { "Admin" };
    return null;
    }


  • Go to HomeController and place an attribute like below:

    [Authorize(Roles = "Admin")]
    public ActionResult Index()
    {
    ViewBag.Message = "Modify this template to jump-start your ASP.NET MVC application.";
    return View();
    }
  • Open web.config file and place below code under system.web tag

    <roleManager defaultProvider="Custom_RoleMembership" enabled="true">
      <providers>
    <clear />
    <add name="Custom_RoleMembership"
    type="CustomMembershipP.Models.Custom_RoleMembership"  />
      </providers>
    </roleManager>

Now run the application and open Index page, it will redirect you on login view. Login with username = admin and password = password and debug this application, it will check the above method GetRolesForUser(). If there is a role for this user then it will go to index view otherwise return to login page.

In my case I have used only one username and return admin only from the method. But you can check the roles in your database and return them in string array. If there is a role “admin” in your array then only it will open index page.

Saturday, July 19, 2014

How to Implement Custom Membership in Asp.Net MVC

In Asp.Net MVC, default membership works with pre-defined/specified data source where programmer don’t worry about anything related to authentication. To implement authentication with desired data source, programmer must implement custom membership as explained in the article. Using custom membership, programmer can easily authenticate user’s visit through self-written code.

This article will describe some simple steps to complete the task:

  • Create a class named "Custom_Membership" in Models folder in your MVC application.
  • Inherit this from MembershipProvider class exists in “System.Web.Security” namespace.
  • Right click on MembershipProvider and select on “Implement Abstract Class”, it will all the override function need to be implement by us.
  • Just implement ValidateUser() method and replace that function with the following code:

    public override bool ValidateUser(string username, string password)
    {
    if (username == "admin" && password == "password")
    {
    return true;
    }
    return false;
    }

  • Go to AccountController >> Login action and change the login functionality as:

    public ActionResult Login(LoginModel model, string returnUrl)
    {
    if (ModelState.IsValid && Membership.ValidateUser(model.UserName, model.Password))
    {
    FormsAuthentication.SetAuthCookie(model.UserName, model.RememberMe);
    return RedirectToLocal(returnUrl);
    }
    ModelState.AddModelError("", "The user name or password provided is incorrect.");
    return View(model);
    }

  • Open web.config file of the root and add following in system.web tag

    <membership defaultProvider="Custom_Membership">
      <providers>
    <clear/>
    <add name="Custom_Membership"
    type="CustomMembershipP.Models.Custom_Membership"/>
      </providers>
    </membership>
Run the MVC application and open Login page, it provide an error related to membership, to resolve through error just delete “[InitializeSimpleMembership]” attribute from AccountController.

Again run the application and enter username and password as provided above in ValidateUser() function. It will login successfully, now you can override any of the function in your custom membership class.

Thursday, July 17, 2014

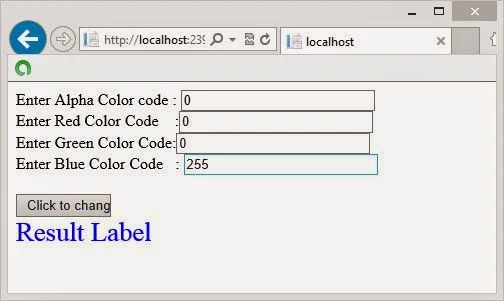
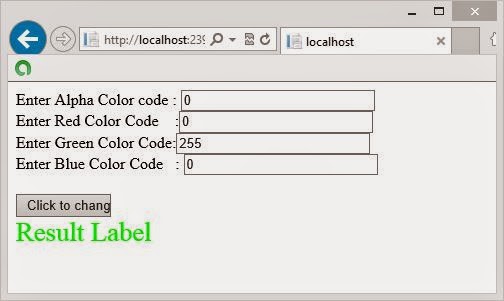
How to change text color from ARGB value in ASP.NET

ARGB( ) takes four integer input parameter as a argument. Method name explain all things automatically. This name contain four color code, first "A" for Alpha which take 0-255 integer value. Similarly "R" for RED , "G" for Green and "B" for blue. Now lets take an simple example of ARGB( ) method.

How to change text color from ARGB value in ASP.NETSource code

<form id="form1" runat="server">
    <div>
    
        Enter Alpha Color code :
        <asp:TextBox ID="TextBox1" runat="server" Width="190px"></asp:TextBox>
        <br />
        Enter Red Color Code&nbsp;&nbsp;&nbsp; :<asp:TextBox ID="TextBox2" runat="server" Width="190px"></asp:TextBox>
        <br />
        Enter Green Color Code:<asp:TextBox ID="TextBox3" runat="server" Width="190px"></asp:TextBox>
        <br />
        Enter Blue Color Code&nbsp;&nbsp; :
        <asp:TextBox ID="TextBox4" runat="server" Width="190px"></asp:TextBox>
        <br />
        <br />
        <asp:Button ID="Button1" runat="server" OnClick="Button1_Click" Text="Click to change " Width="95px" />
        <br />
    
    </div>
        <asp:Label ID="Label1" runat="server" Font-Size="20pt" Text="Result Label "></asp:Label>
    </form>

CodeBehind Code


protected void Button1_Click(object sender, EventArgs e)
    {
       
        int alpha = int.Parse (TextBox1.Text);
        int red = int.Parse (TextBox2.Text);
        int green = int.Parse (TextBox3.Text);
        int blue =int.Parse ( TextBox4.Text);
        Label1.ForeColor = System.Drawing.Color.FromArgb(alpha, red, green, blue);


    }   

Code generate the following output


How to change text color from ARGB value in ASP.NET

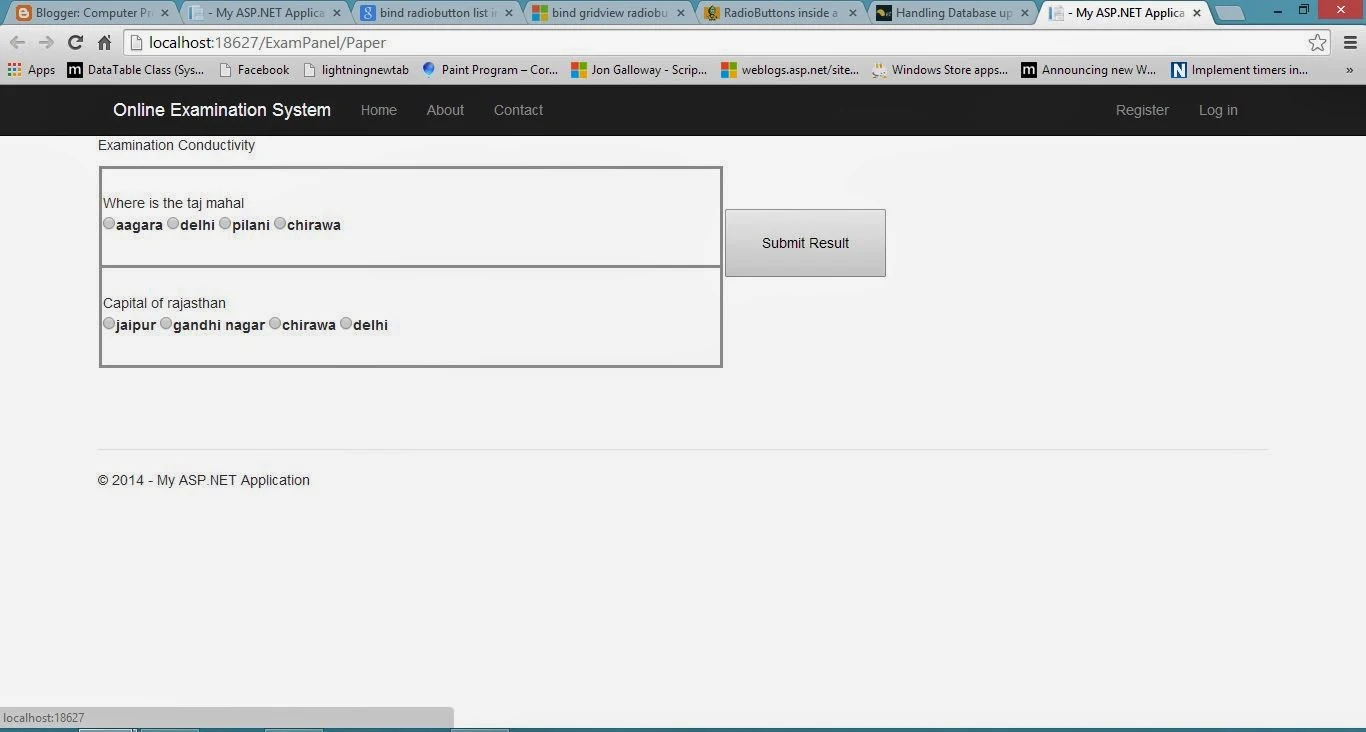
How to Bind Radio Button Control inside the Grid View control in ASP.NET

Binding process of control is same , You can bind all of controls from this method. In previous article we have  already discussed about Bind GridView in asp.net. In this example we have four radio buttons and one label control. Bind the text  of  radio button use <%# Eval(" Attribute of table") %> .
How to Bind Radio Button Control inside the Grid View control in ASP.NET

<asp:GridView ID="GridView2" runat="server" Height="202px" Width="624px" AutoGenerateColumns ="False" ShowHeader="False" AllowPaging="True">
      <Columns>
<asp:TemplateField>
    <ItemTemplate>
        <asp:Label ID="Label1" runat="server" Text='<%# Eval("Question") %>'></asp:Label><br />
     
            <asp:RadioButton ID="R1" runat="server" Text ='<%# Eval ("Answer-1") %>' GroupName ="g1" />
         <asp:RadioButton ID="R2" runat="server" Text ='<%# Eval ("Answer-2") %>' GroupName ="g1" />
         <asp:RadioButton ID="R3" runat="server" Text ='<%# Eval ("Answer-3") %>' GroupName ="g1"/>
         <asp:RadioButton ID="R4" runat="server" Text ='<%# Eval ("Answer-4") %>' GroupName ="g1"/>
    </ItemTemplate>
    <ItemStyle BorderColor="#999999" BorderStyle="Solid" BorderWidth="3px" />
</asp:TemplateField></Columns> </asp:GridView>

Codebehind code

 private void Bindabledata()
    {
        SqlConnection con = new SqlConnection();
        con.ConnectionString = ConfigurationManager.ConnectionStrings["ConnectionString"].ToString();
        con.Open();
        SqlCommand cmd = new SqlCommand();
        cmd.CommandText = "select * from [Question_Table]";
        cmd.Connection = con;
        DataSet ds = new DataSet();
        SqlDataAdapter da = new SqlDataAdapter(cmd);
        da.Fill(ds);
        GridView2.DataSource = ds;
        GridView2.DataBind();

    }

Code generate the following output

Sunday, July 13, 2014

Clock in windows phone 8

In this article,  i will use  DispatcherTimer class for creating timer control. Using interval property of this class, i will set the increment counter. After set the interval you can call tick event of this class. On tick event you can take current date and time. .
To create a new app in windows phone 8, the steps are listed below:
Create a new project by going through File | New Project | Windows Phone Application - Visual C#. Give a desired project name( World Clock is my app name).
create a new app in windows phone 8

From Solution Explorer, open MainPage.xaml file. (If Solution Explorer window is currently not opened then open it via View>>Other Windows>>Solution Explorer).
Inside Control Panel code fragment, add following code to create world clock app.

Source code (MainPage.xaml)

 <TextBlock HorizontalAlignment="Left" Margin="10,10,0,0" TextWrapping="Wrap" Text="" VerticalAlignment="Top" Width="436" Height="63" x:Name="label1" FontSize="30" Grid.ColumnSpan="2"/>

Code behind 

   DispatcherTimer t1 = new DispatcherTimer();
    t1.Interval = TimeSpan.FromSeconds(1);
            t1.Tick += OnTick;
            t1.Start();

  void OnTick(Object sender, EventArgs args)
        {
            label1.Text = DateTime.Now.ToString();
        }

Code Generate the following output

Clock in windows phone 8

© Copyright 2013 Computer Programming | All Right Reserved