-->

Friday, August 1, 2014

Bind ListBox with Image in windows Phone

Its a Great application in which we can develop products catalog application. Lets take a simple example to show product image with product name time. If you want to show image with  text, first to create class products.cs with two properties in the project. Now your code look like
using System;
using System.Collections.Generic;
using System.Linq;
using System.Text;
using System.Threading.Tasks;

namespace WorldClock
{
    class products
    {
        public string  name { get; set; }
        public string imagepath { get; set; }
    }
}

Create a list collection with product type. Add some items into it. Now, after adding items, you can bind list with the list collection.
First to add ListBox in the page. Bind this with itemSource property, now add two control (Textblock and image) in DataTemplate.

<ListBox ItemsSource="{Binding}" ScrollViewer.VerticalScrollBarVisibility="Visible" Margin="0,152,19,243" x:Name="list1">
                <ListBox.ItemTemplate>
                    <DataTemplate>
                        <StackPanel Orientation="Vertical">
                        <Image x:Name=" img1" Source="{Binding ImagePath}" MaxWidth="50" MaxHeight="50" FlowDirection="LeftToRight" HorizontalAlignment="Left"></Image>
                            <TextBlock x:Name="t1" Text="{Binding timename}"></TextBlock>

                        </StackPanel>

                    </DataTemplate>

                   
                </ListBox.ItemTemplate>

            </ListBox>

create a list collection with product type in .cs file. Now add some items in list collection. Bind Listbox with list collection.

public partial class productitem : PhoneApplicationPage
    {
        public productitem()
        {
            InitializeComponent();
            List<products> p1 = new List<products>();
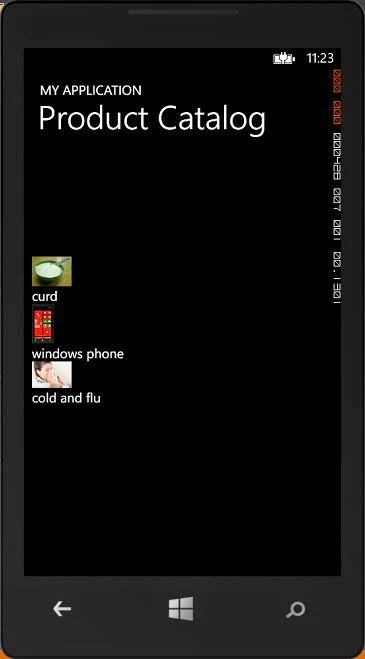
            p1.Add(new products() { name = "curd", imagepath = "image/curd.jpg" });
            p1.Add(new products() { name = "windows phone", imagepath = "image/phone.jpg" });
            p1.Add(new products() { name = "cold and flu", imagepath = "image/cold-and-flu.jpg" });
            list1.DataContext = p1;

        }
    }

Code Generate the following output

Bind ListBox with Image in windows Phone

Thursday, July 31, 2014

How to add item into the listBox in windows phone


ListBox is a container in which we can add strings. User can select by clicking. Article contain different topics , these are
 1. Add ListBox Control with items using XAML
 2. Add ListBox Control in code file


There are some basic steps to complete that tasks
Add ListBox control with items using XAML
Step-1 :  Add ListBox control in contentPanel using xaml code , now your code llok like
<ListBox x:Name=" ListBox1" >
 </ListBox>
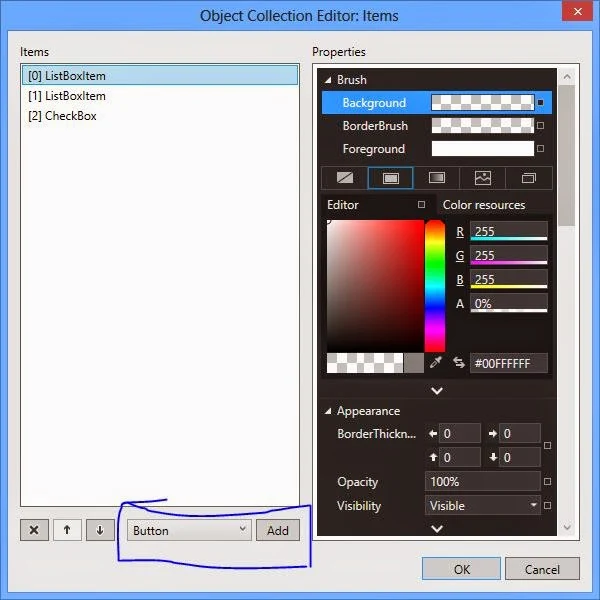
Step-2 :  Open ListBox properties and select Items(collection) ellipse symbol. After pressing ellipse button , A new window will appear
Open ListBox properties and select Items

Step-3 :  Using Object Collection Editor, add controls to the List Box by selecting controls from Dropdown List.
Object Collection Editor


Step-4  : After adding controls, you can assign content property of them.
Step-5 : Now, Press Ok button after adding items.
Step-6 : Now , Your complete code look like

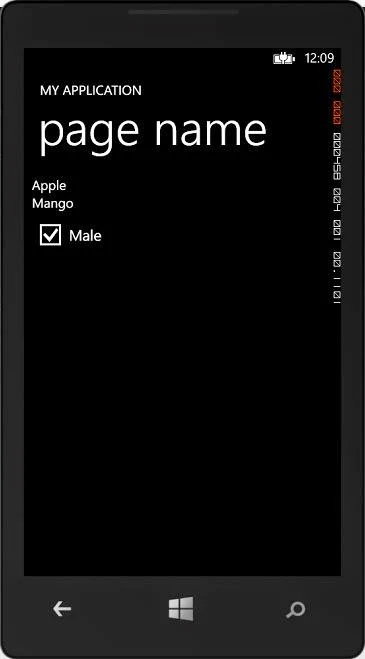
<ListBox x:Name=" L1" >
                <ListBoxItem Content="Apple"/>
                <ListBoxItem Content="Mango"/>
                <CheckBox Content="Male" IsChecked="True"/>

            </ListBox>

Code Generate the following output

How to add item into the listBox in windows phone

Wednesday, July 30, 2014

Getting started with windows phone App C#

Now start code with windows phone, first to develop app in windows phone. Get the tool you need, build your first app and test it in your system simulator. you can run this in your phone also. Before learning this article, must to learn XAML syntax. After that you can easily transfer your skills to develop windows phone app that use xaml for the UI and c#. 


This topic contains the following sections.

Get set up
Create your first app
Get set up
Download the Windows Phone SDK 8.0, which includes all the tools you need to create Windows Phone apps: Microsoft Visual Studio Express 2012 for Windows Phone, project templates for creating new Windows Phone apps, the Windows Phone emulator for testing, and more.
Create your first app

he first step in creating a Windows Phone app is to create a new project in Visual Studio.
To create the project

  1. Make sure you’ve downloaded and installed the Windows Phone SDK. 
  2. Launch Visual Studio from the Windows Start screen. If the Registration window appears, you can register the product, or you can temporarily dismiss the prompt.
  3. Create a new project by selecting the FILE | New Project menu command.
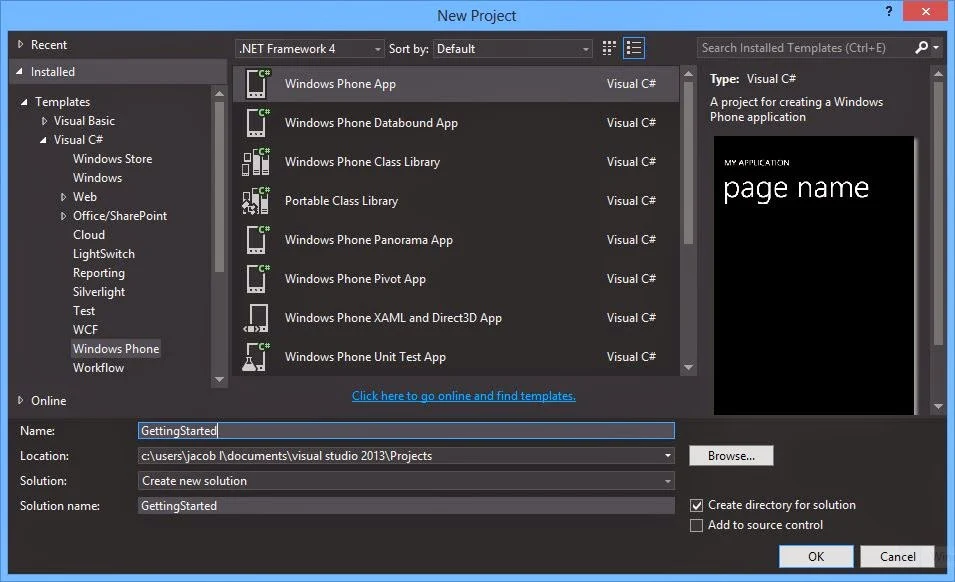
  4. In the New Project window, expand the installed Visual C# or Visual Basic templates, and then select the Windows Phone templates.
  5. In the list of Windows Phone templates, select the Windows Phone App  template.Create your first app
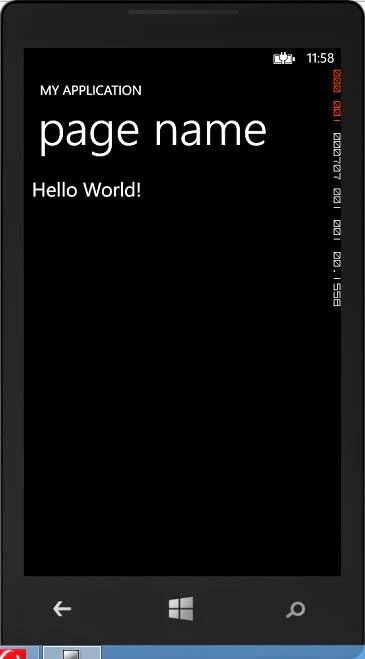
  6. Add TextBlock from toolBox into ContentPanel, now your code look like

<Grid x:Name="ContentPanel" Grid.Row="1" Margin="12,0,12,0">
            <TextBlock HorizontalAlignment="Left" TextWrapping="Wrap" Text="Hello World!" FontSize=" 30" VerticalAlignment="Top"/>

        </Grid>

Code Generate the following output


Getting started with windows phone App C#

How to Submit data on DropDown Selection changed in MVC Razor

Submitting the form by button, programmer have to assign only the type of that button and on click this button all the data can be get on the server side. On drop-down change we have manually submit the form by either specifying "OnSelectionChanged" event or some jquery functions.

In earlier article I have created DropDownList in MVC, to submit the form we can simply use only submit function on change event of the list.

@Html.DropDownList("ddlname", "List to bind", "--default title--", new { onchange = "submit();" })

After writing this code on change it will post all the data on the form to server-side but programmer have to use same name in action method as used here “ddlname”. When we use view-model to bind the data then dropdown list’s code will be changed as:

@Html.DropDownListFor(model => model.Property , "List to bind", "--default title--", new { onchange = "submit();" })

This code will contains the value of the property of model as used here. The value will submit on change the selection of this drop-down list. Programmer can change other controls value by using this code.

Suppose we have to select country, state and city on the form in hierarchy manner. On change the country, states drop-down list should change and on change of state, city drop-down list should change. By implement this functionality we can use this submit functionality.

How to Use Multiple Submit Button in MVC Razor

The most common method to get the data on server from client side. Submit button on the form can be used to post all the form data to be used further by programmer. Generally one form only have a single submit because of user want to post data only once.

To submit data in different ways programmer can use more than one submit button. A form can have multiple submit buttons as per the requirement of programmer. We can send the button’s name on the button click.

The action should have the same name of the button to get the value of clicked button. Suppose all the button’s have same name as submit as written below:

<input type = "submit" name = "btnsubmit" value= "submit1" />
<input type = "submit" name = "btnsubmit" value= "submit2" />
<input type = "submit" name = "btnsubmit" value= "submit3" />

Now in controller’s action the variable should be of string type and name as “submit” as below:

[HttpPost]
public ActionResult SubmitData(string btnSubmit)
{
If (btnSubmit == "submit1")
{
//code to execute
}

If (btnSubmit == "submit2")
{
//code to execute
}

If (btnSubmit == "submit3")
{
//code to execute
}
}

According to this code we can implement different functionality on each submit button with all the data posted on the form. These button will only post the data containing as input on the form and also inside the form element.

Monday, July 28, 2014

How to add Hyperlink button control by using code in windows phone

In previous article we have already learned about  Hyperlink Button control.  Using the HyperlinkButton control you can navigate one page to another in windows phone. The following example creates a HyperlinkButton control named hyper and then adds it to ContentPanel grid.

To add the Hyperlink Button control by using code

Open MainPage.xaml.cs.

Add the following code in the constructor.
C#

public MainPage()
        {
            InitializeComponent();
            HyperlinkButton h1 = new HyperlinkButton();
            h1.Content = "My Button";
            ContentPanel.Children.Add(h1);
            h1.Click += new RoutedEventHandler(HyperlinkButton_Click);


            // Sample code to localize the ApplicationBar
            //BuildLocalizedApplicationBar();

        }

 private void HyperlinkButton_Click(object sender, EventArgs e)
        {
            NavigationService.Navigate(new Uri("/secondpage.xaml", UriKind.Relative));
        }

Create Hyperlink Button control instance , assign string to the content property of Hyperlink Button. Now add this control into Content Panel. When we click on it then page navigate to other page. The name of other page is "secondpage.xaml". So raise click event for that, using NavigationService.Navigate ( ) method you can move one page to another.

Code generate the following code

How to add Hyperlink button control by using code in windows phoneHow to add Hyperlink button control by using code in windows phone


Saturday, July 26, 2014

How to add a Hyperlink Button control to a page in Windows Phone 8

This topic describes the various ways to add a Hyperlink Button control to a Windows Phone 8 project. The Hyperlink Button control is part of the libraries in Windows Phone SDK 8.0.
This topic contains the following sections.

  1. Adding a Hyperlink Button control by using the Toolbox.
  2. Adding the Hyperlink Button control by using XAML.
  3. Adding the Hyperlink Button control by using code.

Adding a Hyperlink Button control by using the Toolbox

The easiest way to add a Hyperlink Button control and reference it properly is to drag it from the Toolbox and drop it to your XAML designer or XAML view.

To add a Hyperlink Button control from the Toolbox
  1. In the HyperlinkApplication project, open the Toolbox, and then open the All Windows Phone Controls.
  2. From the Toolbox, drag the HyperlinkButton control to the XAML or designer view.Visual Studio performs the following tasks automatically.
In the <phone:PhoneApplicationPage> start tag of the XAML page.
Adds the following XAML if you drag the control to the design view.

<HyperlinkButton Content="HyperlinkButton" HorizontalAlignment="Left" Margin="103,213,0,0" Grid.Row="1" VerticalAlignment="Top"/>

    3. Add single attribute in HyperlinkButton tag, which is NavigateUri="http://www.google.com".
    4. Must Add TargetName property with the NavigateUri property, if you use this for external url. It does not matter what value you use for this property.  Now your complete code look like

<HyperlinkButton TargetName="Google" NavigateUri="http://www.google.com/" Content="HyperlinkButton" HorizontalAlignment="Left" Margin="103,213,0,0" Grid.Row="1" VerticalAlignment="Top"/>

Code generate the following output

How to add a Hyperlink Button control to a page in Windows Phone 8How to add a Hyperlink Button control to a page in Windows Phone 8
© Copyright 2013 Computer Programming | All Right Reserved