-->

Monday, March 2, 2015

How to bind ComboBox using edmx in windows form c#

Introduction

In my previous article i have already explained about bind combo box with entity framework using code first approach. also bind combo box with ado.net. Now, today i am discussing about edmx file. Before bind the combo box with edmx file , first to add edmx file in the solution or you can say project. Now, add a combo box in the form.

Copy the following code and paste in class constructor after  InitializeComponent(); method.

 Student_DBEntities dc = new Student_DBEntities();
            var item = dc.Student_record;
            comboBox1.DataSource = item.ToList();
            comboBox1.DisplayMember = "Student_Name";

Now, Code generate the following output:

How to bind ComboBox using edmx in windows form c#

The following video cover all such types of things which is mentioned in the article, i am giving you this video for better understanding:

Here,
  1. Student_DBEntities is a context class through which we can access or manipulate database record. (Check the context file in your solution).
Context class in edmx folder
  1. Student_record is a public property through which we can communicate database table.
How to bind ComboBox using edmx in windows form c#

Sunday, March 1, 2015

Difference between malloc( ) and calloc() in C language

In c language article we will see the difference between malloc() and calloc(). Both are the functions in c language. See the table which is mentioned below:


Malloc()
Calloc()
The Syntax of malloc() is :
Ptr = (data_type *) malloc(size);

The required number of bytes to be allocated is specified as argument i.e. size un bytes.
The Syntax of calloc() is :
Ptr = (data_type*)calloc(n,size);
Takes two arguments: n is number of blocks to be allocated, size is number of bytes to be allocated for each block.
Allocates a block of memory of size bytes.
Allocates multiple blocks of memory, each block with the same size.
Allocated space will not be initialized
Each byte of allocated space is initialized to zero.
Since no initialization takes place, time efficiency is higher than calloc()
Calloc() is slightly more computationally expensive because of zero filling but, occasionally, more convenient than malloc().
This function can allocate the required size of memory even if the memory is not available contiguously but available at different locations
This function can allocate the required number of blocks contiguously. If required memory cannot be allocated contiguously, it returns NULL.

Advantages and Disadvantages of pointers in C language

By this time, you might have understood the concepts of  C pointers and if any problem is given, you should be in a position to solve. After understanding the full concepts of pointers, we should be in a position to answer the question " What are the advantages and disadvantages of pointers?"

Advantages

  1. More than one value can be returned using pointer concept (pass by reference).
  2. Very compact code can be written using pointers.
  3. Data accessing is much faster when compared to arrays.
  4. Using pointers, we can access byte or word locations and the CPU register directly. The pointers in C are mainly useful in processing of non-primitive data structures such as arrays, linked list etc.


Disadvantages

  1. Un-initialized pointers or pointers containing invalid addresses can cause system crash.
  2. They are likely to be used incorrectly causing bugs that are very difficult to identify and rectify.
  3. They are confusing and difficult to understand in the beginning and if they are misused the result is unpredictable.

Saturday, February 28, 2015

Insert data into database table using edmx file in windows form c#

Introduction

In my previous article i have already explained about login control, in which i was add edmx file. Now, today we will learn about register control or you can say how to insert data into database.
Steps

  1. First to prepare database table with some fields.
  2. Create a new project in the windows form.
  3. Add edmx file in the solution.
  4. If you want to add data using input control in the database table then take some text boxes and other control in the form. Otherwise you can do this without input field--see the example, which is explained below.


Now, the model class in the entity framework is: (check your solution explorer after add edmx file in the project)


namespace WindowsFormsApplication4
{
    using System;
    using System.Collections.Generic;
    
    public partial class Student_record
    {
        public int Id { get; set; }
        public string Student_Id { get; set; }
        public string Student_Name { get; set; }
        public string Address { get; set; }
        public string Father_Name { get; set; }
        public string Mobile { get; set; }
        public string Mother_Name { get; set; }
        public string Picture { get; set; }
    }
}

Similarly you have to check the Context class which is also add with the model class in the entity data model.

Student_DBEntities sd = new Student_DBEntities();
             Student_record student_recod = new Student_record();
             student_recod.Student_Name = "jacob";
             student_recod.Mobile = "+123 123654 89";
             student_recod.Father_Name = "Bill Smith";
             student_recod.Address = "USA";
             student_recod.Mother_Name = "Ammey";
             sd.Student_record.Add(student_recod);
             sd.SaveChanges();

Here,


  1. Student_DBEntitties is a context class, through which we can access all the record from the database table.
  2. Student_record is the model class which is defined above already.
  3. Add record by the object of the class.
  4. sd.Student_record is a public property.
  5. Update record by the SaveChanges() method.

Thursday, February 26, 2015

Custom login control using edmx file in windows forms application C#

Introduction

Login contol provide some privilege to the project or you can say its a entry point of the project. Though this form we can move to the next form. If your input text is valid then move to the next but if your input is wrong then move failed. So, the main function of the project is check each entry of the table with the TextBox.

Design login control in windows form


  1. Add Two TextBox with the label control.
  2. Add one button control with click event , Look like
login control in windows form

Add EDMX file with the help of following steps:

  1. Add ADO.NET Entity Data Model by the add new item component.
  2. Add ADO.NET Entity Data Model
  3. Now, select EF designer from database in the entity data model wizard.
  4. select EF designer from database
  5. Now create the connection by pressing the 'new connection' button , also select the check box where your connection string save into your application configuration file. Now, press to next button.
  6. Now create the connection by pressing the 'new connection' button
  7. Select entity framework version , i select 5.0 in the project.
  8. Select entity framework version , i select 5.0 in the project.
  9. Select table, views , stored procedure in the appeared window.
  10. Select table, views , stored procedure in the appeared window.
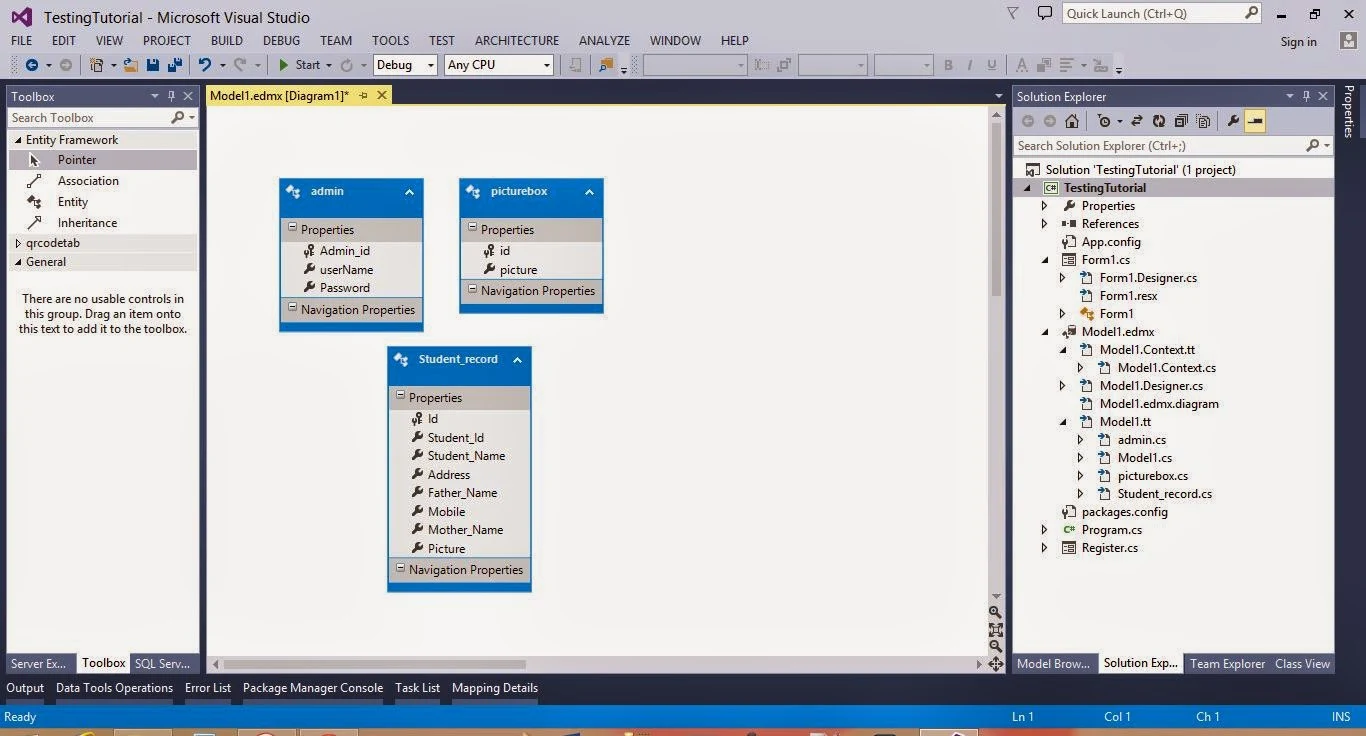
  11.  Now, your model look likeentity data model

Copy and paste the below code inside the button click event.


private void button1_Click(object sender, EventArgs e)
        {
            Student_DBEntities dc = new Student_DBEntities();
            if (usrBox.Text != string.Empty && pwdBox.Text != string.Empty)

            {
                var existuser = dc.admins.FirstOrDefault(a => a.userName.Equals(usrBox.Text));
                if(existuser!=null)
                {
                    if (existuser.Password.Equals(pwdBox.Text))
                        MessageBox.Show("Login Sucess");
                    else
                        MessageBox.Show("try again later");
                }

            }
        }

Here,
  1. Student_DBEntities is a DataContext , which is take connection string in the constructor. Also take public property of the model class, through this we can access all the data from database table.
  2. admins is the public property of data context class.
Code generate the following output - please see the video:

Sunday, February 22, 2015

C language: Searching in graph

Similar to traversal of graph two searching techniques of the graph are used which are Breadth First Search and Depth First Search. Both the techniques are same as respective traversal techniques. In case of breadth first search the traversal algorithm for breadth first is used. The algorithm is terminated with a message search successful whenever the deleted item from QUEUE is the node to be searched otherwise the algorithm is terminated with a message search unsuccessful when the QUEUE is empty. The formal algorithm for BFS is:

GRAPHBFS
[goal node is the node to be searched]
Mark the start node and insert it in the QUEUE
If the start node is the goal node Then:
Write: 'Search Successful' ; Exit
[End of If]
Repeat While QUEUE is not empty
Delete QUEUE
If deleted node is the goal node Then:
Write: ' Search successful;; Exit.
Else
Mark the unmarked adjacent nodes of the deleted node.
Insert the marked nodes(if any) of the deleted node in the QUEUE.
[End of If]
[End of While]
Write: 'Search unsuccessful'
Exit.

In case of depth first search the traversal algorithm for depth first is used. The algorithm is terminated with a message search successful whenever the popped item from STACK  is the node to be searched otherwise the algorithm is terminated with a message search unsuccessful when the STACK is empty. The formal algorithm for DFS is:

GRAPHDFT
[goal node is the node to be searched]
Mark the start node and push it on to the STACK
If the start node is the goal node Then:
Write: 'Search Successful'; Exit
[End of If]
Repeat While STACK is not empty
POP STACK.
If popped node is the goal node Then:
Write: ' Search successful'; Exit.
Else
Mark the unmarked adjacent nodes of the popped node. 
Push the marked nodes of the deleted node(if any) on to the STACK.
[End of While]
Write: 'Search unsuccessful'
Exit. 

C Language: Depth First Traversal in Graph

This traversal techniques is based on the fact of visiting all the nodes of graph in the depth of it. It means start from the start node of the graph and reach to last node of the graph in its depth (so that no further unexplored adjacent node exist). From the start node explore all the adjacent nodes but visit one of the adjacent nodes. From the visited adjacent node further explore all the adjacent nodes of it and again select one of the adjacent nodes and further explore it. In this way the exploration of the adjacent node carried till to reach the last node. Once the last node is reached then back track from the last node to previous node to visit the next adjacent node of it. The data structure stack is used in this type of traversal. 
Consider the following graph:
Depth First Traversal in Graph
The adjacent nodes of node

The depth first traversal of the above graph, assuming node 'A' as start node is:

A     E      D      C     B

You can observe from the traversal result that the first node visited is the starting node. Then the next node visited is 'E' one of the adjacent nodes of the start node 'A'. Then the adjacent nodes of 'E' that are not marked are explored. The only marked node is 'D'. It is visited. There are no further adjacent nodes of 'D'  that are not marked . So, we have reached the other end of the graph. Now backtrack from 'D' to 'E' no adjacent nodes of 'E' are left to be visited. Again backtrack from 'E' to 'A'. There are two adjacent nodes left that are not visited. So, node 'C' is visited next. There are no adjacent nodes of node 'C' that are left for visiting. Again backtrack from 'C' to 'A' and visited the last node 'B' which is adjacent of 'A' all the nodes of the graph are visited and the traversal is complete. 

As we backtrack in the technique of depth first traversal it is necessary to use the last in first out data structure that is stack to store the nodes that are to be backtracked.
You can again remember that the traversal result may be different to the one given above. It differs because the adjacent nodes of a visited node may be pushed on the stack in any order. So, the other result of depth first traversal of the above graph are:

A        B       D       C        E
A        C       D       B        E     etc.

The formal algorithm of DFT(Depth First Search) is : 
GRAPHDFT
[TA is the one dimensional array of size n where n is is the number of nodes in the given graph] 
Mark the start node and push it on to the stack 
Repeat While STACK is not empty
POP STACK 
Add popped node to TA at the next position. 
Mark the unmarked adjacent adjacent nodes of the popped node.
Push the marked nodes of the deleted node (if any) on to the STACK.
[End of While] 
Print TA from the first position as traversal.
Exit.

The above algorithm works in the following manner. 
Consider the following graph

Let us assuming the start node as node 'A' let us mark and push the node 'A' on to the stack. So, the stack is:
Depth First Traversal in Graph

when pop stack is executed, the node obtained is 'A'. It is added to the traversed array. So, the traversed array is:
Depth First Traversal in Graph


The marked adjacent nodes to popped node 'A' are, 'B', 'C' and 'E'. Mark and push the nodes 'B', 'C' and 'E' on to the stack (in any order). So, the stack is:
Depth First Traversal in Graph

stack is not empty the processes is repeated.
When pop stack is executed, the node obtained is 'E'. It is added to the traversed array. So the traversed array is:
Depth First Traversal in Graph

The marked adjacent node of popped node 'E' is 'D' mark and push it on to the stack. So, the stack is:
Depth First Traversal in Graph

Stack is not empty the processes is repeated. When pop stack is executed, the node obtained is 'D'. It is added to the traversed array. So, the traversed array is :
Depth First Traversal in Graph

The adjacent nodes of poped node 'D' are 'B' and 'C' but they are already marked node. So, no nodes are pushed. So, the stack is:

Depth First Traversal in Graph

Stack is not empty the proceses is repeated. When pop stack is executed, the node obtained is 'C'. It is added to the traversed array. So, the traversed array is:
Depth First Traversal in Graph

The adjacent node of poped node 'C' are 'A' and 'D' but they are already marked nodes. So, no nodes are pushed. So, the stack is
stack is not empty the processes is repeated. When popped stack is executed, the node obtained is 'B'. It is added to the traversed array. So, the traversed array is 
Depth First Traversal in Graph

the adjacent node of popped node 'B' is 'D' but it is already marked. So, no node are pushed. So, the stack is:
Depth First Traversal in Graph

Stack is empty stop the process. When the TA array is printed we get the Depth first traversal as:

© Copyright 2013 Computer Programming | All Right Reserved