-->

Wednesday, July 29, 2015

Splash Screen in WPF example

The means of splash screen is a screen through which we can show the booting process of a thread. When you start your computer then first to load booting process after then load operating system. I will do the same thing in wpf. This screen appear before loading the start page. So lets to start it:


1. First to add a new window in the project.
2. Add these properties inside window tag.

 Title="SplashScreen"
 Height="300"
Width="300"
ResizeMode="NoResize"
WindowStyle="None"
WindowStartupLocation="CenterScreen"
Background="Green"
BorderThickness="8"
BorderBrush="Black"

3. Now, you complete code is:

<Window x:Class="SplashSCreen.SplashScreen"
        xmlns="http://schemas.microsoft.com/winfx/2006/xaml/presentation"
        xmlns:x="http://schemas.microsoft.com/winfx/2006/xaml"
        xmlns:d="http://schemas.microsoft.com/expression/blend/2008"
        xmlns:mc="http://schemas.openxmlformats.org/markup-compatibility/2006"
        xmlns:local="clr-namespace:SplashSCreen"
        mc:Ignorable="d"
        Title="SplashScreen" Height="300" Width="300" ResizeMode="NoResize" WindowStyle="None" WindowStartupLocation="CenterScreen" Background="Green" BorderThickness="8" BorderBrush="Black">
 
4. Add a label control in the page with content, like

<Grid>
        <Label x:Name="label" Content="Data Uploading......." HorizontalAlignment="Left" Margin="37,128,0,0" VerticalAlignment="Top" Width="187"/>

    </Grid>

5. Now, add this code in the app.xaml.cs file 

App.xaml.cs file

using System;
using System.Collections.Generic;
using System.Configuration;
using System.Data;
using System.Diagnostics;
using System.Linq;
using System.Threading;
using System.Threading.Tasks;
using System.Windows;

namespace SplashSCreen
{
    /// <summary>
    /// Interaction logic for App.xaml
    /// </summary>
    public partial class App : Application
    {
        private const int min_spl_time = 4000;
        protected override void OnStartup(StartupEventArgs e)
        {
            SplashScreen splash = new SplashScreen();
            splash.Show();
            Stopwatch timer = new Stopwatch();
            timer.Start();
            base.OnStartup(e);
            MainWindow main = new MainWindow();
            timer.Stop();
            int remaining_time = min_spl_time - (int)timer.ElapsedMilliseconds;
            if (remaining_time > 0)
                Thread.Sleep(remaining_time);
            splash.Close();
        }
    }
}
Here SplashScreen is the name of window or you can say class name. 

Delete DataGrid row from DataGrid using entity framework(EDMX file) in WPF

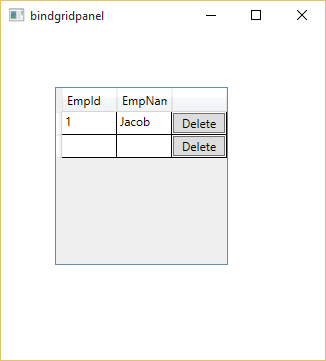
Before deleting the data from the dataGrid, first to load the DataGrid using Edmx file. This is done in previous article. In this article we have new column that is DataGridTemplateColumn , in which we have cell template. When we click on button then row is deleted from DataGrid. Before deleting data from DataGrid , access emp_id from selected row .


<Window x:Class="SplashSCreen.bindgridpanel"
        xmlns="http://schemas.microsoft.com/winfx/2006/xaml/presentation"
        xmlns:x="http://schemas.microsoft.com/winfx/2006/xaml"
        xmlns:d="http://schemas.microsoft.com/expression/blend/2008"
        xmlns:mc="http://schemas.openxmlformats.org/markup-compatibility/2006"
        xmlns:local="clr-namespace:SplashSCreen"
        mc:Ignorable="d"
        Title="bindgridpanel" Height="300" Width="300">
    <Grid>
        <DataGrid CanUserDeleteRows="True" AutoGenerateColumns="False" ColumnWidth="*" x:Name="dataGrid" HorizontalAlignment="Left" Margin="54,56,0,0" VerticalAlignment="Top" Height="178" Width="173">
            <DataGrid.Columns>
                <DataGridTextColumn Binding="{Binding Emp_Id}" Header="Emp_Id" />

                <DataGridTextColumn Binding="{Binding Emp_Name}" Header="Emp_Name" />
                <DataGridTemplateColumn>
                    <DataGridTemplateColumn.CellTemplate>
                        <DataTemplate>
                            <Button  Content="Delete" x:Name="dlt_button" Click="dlt_button_Click"></Button>
                         
                         
                        </DataTemplate>
                    </DataGridTemplateColumn.CellTemplate>
                </DataGridTemplateColumn>
            </DataGrid.Columns>
     
     
        </DataGrid>

    </Grid>
</Window>


Codebehind model

using System.Linq;
using System.Windows;

namespace SplashSCreen
{
    /// <summary>
    /// Interaction logic for bindgridpanel.xaml
    /// </summary>
    public partial class bindgridpanel : Window
    {
        TutorialEntities TE = new TutorialEntities();
        public bindgridpanel()
        {
            InitializeComponent();
            loadgrid();
        }

        private void loadgrid()
        {
           
            var data = from d in TE.emps select d;
            dataGrid.ItemsSource = data.ToList();
        }

        private void dlt_button_Click(object sender, RoutedEventArgs e)
        {
            int empid = (dataGrid.SelectedItem as emp).Emp_Id;
            emp employee = (from r in TE.emps where r.Emp_Id == empid select r).SingleOrDefault();
            TE.emps.Remove(employee);
            TE.SaveChanges();
            dataGrid.ItemsSource = TE.emps.ToList();
     

        }
    }
}


Code Generate the following output

Delete DataGrid row from DataGrid using entity framework(EDMX file) in WPF


Tuesday, July 28, 2015

Bind DataGrid using Entity framework (EDMX model) in wpf

In this article we will learn how to bind DataGrid using EDMX file in wpf. I already bind dataGrid in window form using EDMX. In both article, i notice that only one difference between both that is xaml file. Lets to start to design this in wpf:


<Window x:Class="SplashSCreen.bindgridpanel"
        xmlns="http://schemas.microsoft.com/winfx/2006/xaml/presentation"
        xmlns:x="http://schemas.microsoft.com/winfx/2006/xaml"
        xmlns:d="http://schemas.microsoft.com/expression/blend/2008"
        xmlns:mc="http://schemas.openxmlformats.org/markup-compatibility/2006"
        xmlns:local="clr-namespace:SplashSCreen"
        mc:Ignorable="d"
        Title="bindgridpanel" Height="300" Width="300">
    <Grid>
        <DataGrid AutoGenerateColumns="False" ColumnWidth="*" x:Name="dataGrid" HorizontalAlignment="Left" Margin="54,56,0,0" VerticalAlignment="Top" Height="178" Width="173">
            <DataGrid.Columns>
                <DataGridTextColumn Binding="{Binding Emp_Id}" Header="Emp_Id" />

                <DataGridTextColumn Binding="{Binding Emp_Name}" Header="Emp_Name" />
             
            </DataGrid.Columns>
     
     
        </DataGrid>

    </Grid>
</Window>


Above mentioned code define the binding structure. I have one dataGrid control in the window. x:Name is a property of each control which is define the class instance , through which we can access other property of control in business logic. I have two Text column in dataGrid which take two attribute first one is Binding and another one is Header. Header represent the DataGrid column name and binding define the actual name of database table column's name.

Note : Before going to code behind must to add EDMX file in the project.

using System.Linq;
using System.Windows;

namespace SplashSCreen
{
    /// <summary>
    /// Interaction logic for bindgridpanel.xaml
    /// </summary>
    public partial class bindgridpanel : Window
    {
        TutorialEntities TE = new TutorialEntities();
        public bindgridpanel()
        {
            InitializeComponent();
            loadgrid();
        }

        private void loadgrid()
        {
         
            var data = from d in TE.emps select d;
            dataGrid.ItemsSource = data.ToList();
        }
}
}

Code generate the following output


Bind DataGrid using Entity framework (EDMX model) in wpf

After add the edmx file in the project , you can access the public property of context class (here i have 'emps'). Through which we can apply operation on dataGrid. 

Monday, July 27, 2015

Add image in wpf window background

If you want to add image in window background of WPF application then you should use Window.Background tag in xaml. Before set the image in background you must to add the image in the solution explorer. If you add image in the subfolder then specified the path of the folder like below example.

<Window x:Class="SplashSCreen.MainWindow"
        xmlns="http://schemas.microsoft.com/winfx/2006/xaml/presentation"
        xmlns:x="http://schemas.microsoft.com/winfx/2006/xaml"
        xmlns:d="http://schemas.microsoft.com/expression/blend/2008"
        xmlns:mc="http://schemas.openxmlformats.org/markup-compatibility/2006"
        xmlns:local="clr-namespace:SplashSCreen"
        mc:Ignorable="d"
        Title="MainWindow" Height="500" Width="525">


    <Window.Background>
        <ImageBrush ImageSource="image/nokia.jpg" />
    </Window.Background>


    <Grid>
     
    </Grid>
</Window>

Now, code generate the following output:

How to bind ListBox in wpf

Today i am taking about listBox in WPF. In previous articles of windows form and web form i already discussed about  ListBox. In this article i will use same control in different technology(WPF). We know that ListBox is a container of Objects. Listbox contain ItemsSource property of it which is used to bind it with the database table. You can manually define the listbox items using ListBox itemTemplate. Look at this example :


<Grid>
        <ListBox ItemsSource="{Binding Path=emp}" x:Name="listBox" HorizontalAlignment="Left" Height="225" Margin="58,48,0,0" VerticalAlignment="Top" Width="218">
            <ListBox.ItemTemplate>
                <DataTemplate>
                    <StackPanel>
                        <TextBlock Text="{Binding Path=Emp_Id}"/>
                        <TextBlock Text="{Binding Path=Emp_Name}" />
                    </StackPanel>
                </DataTemplate>
            </ListBox.ItemTemplate>

        </ListBox>


    </Grid>

Code behind code

using System;
using System.Collections.Generic;
using System.Configuration;
using System.Data;
using System.Data.SqlClient;
using System.Linq;
using System.Text;
using System.Threading.Tasks;
using System.Windows;
using System.Windows.Controls;
using System.Windows.Data;
using System.Windows.Documents;
using System.Windows.Input;
using System.Windows.Media;
using System.Windows.Media.Imaging;
using System.Windows.Shapes;

namespace SplashSCreen
{
    /// <summary>
    /// Interaction logic for bindlist.xaml
    /// </summary>
    public partial class bindlist : Window
    {
        public bindlist()
        {
            InitializeComponent();
            loadlist();
        }

        private void loadlist()
        {
            SqlConnection con = new SqlConnection();
            con.ConnectionString = ConfigurationManager.ConnectionStrings["connsetting"].ToString();
            con.Open();
            SqlCommand cmd = new SqlCommand();
            cmd.CommandText = "select * from [emp]";
            cmd.Connection = con;
            DataSet ds = new DataSet();
            SqlDataAdapter da = new SqlDataAdapter(cmd);
            da.Fill(ds, "emp");
            listBox.DataContext = ds;

        }
    }
}

Binding process in the code behind model are same in windows form as well as web forms. Only one difference that is DataSource, here we use DataContaxt.

Code generate the following output:

How to bind ListBox in wpf

Saturday, July 18, 2015

Internet explorer input box show password eye button

Internet explorer's input box show the password when we click on eye button. When we press the button then show the password but when we release it then input character automatically convert into password format. Today, in this article we will design the input box whose will show the password just like eye button. This article designed in html and functionality of the article will handle by JQuery.

The complete code available in the video, so see this and learn more things about JQuery:


In this video, i have two text box, first is used for hide the password and second is used for show the password. When first time load the browser then hide second text box. When user click on show password  button then second textbox take the value of first text box also hide first text box and show second. 

How to Bind Adrotator control in asp.net

Introduction
The Adrotator control displays a sequence of images, known as advertisements, on a Web page. The sequence in which the images appear can be predefined or random in nature. These advertisements, which all Internet users are familiar with, are image files in GIF, JPEG, or other format that the user can click to navigate to the advertiser's website.

Public Properties of the Adrotator Class
 AdvertisementFile : Obtains or sets the path to an XML document that contain advertisement information.


Design a xml file for advertisements name as "advertisements.xml" 
<?xml version="1.0" encoding="utf-8" ?>
<Advertisements>
  <Ad>
    <ImageUrl>security.JPG</ImageUrl>

    <Width>
    200px
  </Width>
    <Height>
      200px
    </Height>
  </Ad>
<Ad>
    <ImageUrl>images.JPG</ImageUrl>
<Width>
    100px
  </Width>
<Height>
      200px
    </Height>
  </Ad>
</Advertisements>
Drag and drop adrotator control onto the design window from toolbox


<%@ Page Language="C#" %>
<!DOCTYPE html>
<script runat="server">
</script>
<html xmlns="http://www.w3.org/1999/xhtml">
<head runat="server">
    <title></title>
</head>
<body>
    <form id="form1" runat="server">
    <div>  
        <asp:AdRotator ID="AdRotator1" runat="server" AdvertisementFile="~/advertisements.xml" />
        </div>
    </form>
</body>
</html>
Output
How to bind adrotator control in asp.net

How to bind Adrotator control in asp.net
© Copyright 2013 Computer Programming | All Right Reserved