-->

Thursday, September 3, 2015

How to show popup on page load using JQuery

Introduction
In this article i will show you how a popup window appears with some controls or text message when first or each time window load . I will give you an example of modal pop window on page load.  .

Description 
In previous article i explained how to show modal pop using JQuery. Here we use same article for modal popup but something change in JQuery function. In this article i will use ready( ) function of document object. In JQuery, if you want to execute some functions and operations on page load then use $(document).ready (function here).


Source Code


<%@ Page Language="C#" AutoEventWireup="true" CodeFile="pageloadmodal.aspx.cs" Inherits="pageloadmodal" %>

<!DOCTYPE html>

<html xmlns="http://www.w3.org/1999/xhtml">
<head runat="server">
    <title></title>
      <link rel="stylesheet" href="http://code.jquery.com/ui/1.10.3/themes/smoothness/jquery-ui.css" />
    <script src="http://code.jquery.com/jquery-1.8.2.js" ></script>
    <script src="http://code.jquery.com/ui/1.10.3/jquery-ui.js" ></script>

    <script>

        $(function () {
            $(document).ready(function () {

                $('#popup').dialog({
                    title: "JQuery popup model",
                    width: 450,
                    height: 250,
                    modal: true,
                    button: {
                        close: function () {
                            $(this).dialog('close');

                        }
                    }

                });
            });


        })
    </script>


</head>
<body>
    <form id="form1" runat="server">
    <div>
        <div id="popup" title="page load modal popup" style="display:none">
            <b>Today News:</b>
            Currently launched windows 10 professional version

        </div>
 
    </div>
    </form>
</body>
</html>


Code Generate the following output

How to show popup on page load using JQuery


How to show login form in modal popup window in ASP.NET

Introduction
In this article i will show you how a login form appear in modal popup. I will give you an example of modal pop with login or register control. When we click on login button then modal popup appears with login form , now user can login from this window.

Description 
In previous article i explained how to show modal pop using JQuery. Here we use same article for modal popup but something change in division.

Source Code


<%@ Page Language="C#" AutoEventWireup="true" CodeFile="Default11.aspx.cs" Inherits="Default11" %>

<%@ Register Src="~/logincontrol.ascx" TagPrefix="uc1" TagName="logincontrol" %>


<!DOCTYPE html>

<html xmlns="http://www.w3.org/1999/xhtml">
<head runat="server">

    <title></title>
    <link rel="stylesheet" href="http://code.jquery.com/ui/1.10.3/themes/smoothness/jquery-ui.css" />
    <script src="http://code.jquery.com/jquery-1.8.2.js"></script>
     <script src="http://code.jquery.com/ui/1.10.3/jquery-ui.js"></script>
    <script>

        $(function () {
            $('#Button1').click(function () {

                $('#popup').dialog({

                    title: "Login Control",
                    width: 500,
                    height: 500,
                    modal: true,
                    buttons: {
                        close: function () {
                            $(this).dialog('close');
                        }
                    }


                });


            });

        })

    </script>

</head>
<body>
    <form id="form1" runat="server">
    <div>
    <div id="popup" title="Login Form" style="display:none">
     
     UserName: <input id="Text1" type="text" /> <br />
Password: <input id="Text2" type="text" /> <br />
        <input id="loginbtn" type="button" value="Login" />

    </div>
        <input id="Button1" type="button" value="click to login" />
    </div>
    </form>
</body>
</html>

Code Generate the following output

How to show login form in modal popup window in ASP.NET


Wednesday, September 2, 2015

Example of simple modal Popup window in JQuery

Introduction 
In this article i will show you how to show a dialog box when we click on button. I will show you a example of modal window using JQuery in ASP.NET. You can use this concept in every language.

Description

In previous article i explained Textbox takes only numeric value,  Example of Text ZoomIn and ZoomOut in Jquery.

Code of modal window

<%@ Page Language="C#" AutoEventWireup="true" CodeFile="Default10.aspx.cs" Inherits="Default10" %>

<!DOCTYPE html>

<html xmlns="http://www.w3.org/1999/xhtml">
<head runat="server">
    <link rel="stylesheet" href="http://code.jquery.com/ui/1.10.3/themes/smoothness/jquery-ui.css" />
    <script src="http://code.jquery.com/jquery-1.8.2.js" ></script>
    <script src="http://code.jquery.com/ui/1.10.3/jquery-ui.js" ></script>
    <script>

        $(function () {
            $('#buttonclick').click(function () {

                $('#popup').dialog({
                    title: "JQuery popup model",
                    width: 450,
                    height: 250,
                    modal: true,
                    button: {
                        close: function () {
                            $(this).dialog('close');

                        }
                    }

                });
            });


        })


    </script>
    <title></title>
</head>
<body>
    <form id="form1" runat="server">
    <div>
    <div id="popup" title="Model PopUp" style="display:none">
        <b>Welcome to dotprogramming.blogspot.com</b>

    </div>
        <input type="button" id="buttonclick" value="Show Model" />
    </div>
    </form>
</body>
</html>
Code generate the following output


Tuesday, September 1, 2015

Example of ConfirmButtonExtender control of ajax in ASP.NET

Introduction

In this article i will show you how to popup confirmation dialog box using ASP.NET C#. Also you can say example of Confirmation dialog box in asp.net. This thing is possible by two ways first one, you can use AJAX ConfirmButtonExtender and second one is JavaScript. I will show you how to use ConfirmButtonExtender of ajax in asp.net

You can check this video to do this things by two ways


<%@ Page Language="C#" AutoEventWireup="true" CodeFile="Default9.aspx.cs" Inherits="Default9" %>

<%@ Register assembly="AjaxControlToolkit" namespace="AjaxControlToolkit" tagprefix="cc1" %>

<!DOCTYPE html>

<html xmlns="http://www.w3.org/1999/xhtml">
<head runat="server">
    <title></title>
</head>
<body>
    <form id="form1" runat="server">
    <div>
 
        <asp:ScriptManager ID="ScriptManager1" runat="server">
        </asp:ScriptManager>
 
        <br />
 
        <asp:Button ID="Button1" runat="server" Text="Delete Record" />
 
        <cc1:ConfirmButtonExtender ID="Button1_ConfirmButtonExtender" runat="server" BehaviorID="Button1_ConfirmButtonExtender" ConfirmText="Are you sure you want to delete it" TargetControlID="Button1" />
 
    </div>
    </form>
</body>
</html>

Show Confirmation Message in ASP.NET C#

Introduction

In this article i will show you how to popup confirmation dialog box using ASP.NET C#. Also you can say example of Confirmation dialog box in asp.net. This thing is possible by two ways first one, you can use AJAX ConfirmationExtender and second one is JavaScript.

You can check this video to do this things by two ways


I-Method (AJAX)


<%@ Page Language="C#" AutoEventWireup="true" CodeFile="Default9.aspx.cs" Inherits="Default9" %>

<%@ Register assembly="AjaxControlToolkit" namespace="AjaxControlToolkit" tagprefix="cc1" %>

<!DOCTYPE html>

<html xmlns="http://www.w3.org/1999/xhtml">
<head runat="server">
    <title></title>
</head>
<body>
    <form id="form1" runat="server">
    <div>
   
        <asp:ScriptManager ID="ScriptManager1" runat="server">
        </asp:ScriptManager>
   
        <br />
   
        <asp:Button ID="Button1" runat="server" Text="Delete Record" />
   
        <cc1:ConfirmButtonExtender ID="Button1_ConfirmButtonExtender" runat="server" BehaviorID="Button1_ConfirmButtonExtender" ConfirmText="Are you sure you want to delete it" TargetControlID="Button1" />
   
    </div>
    </form>
</body>
</html>

II- Method


<%@ Page Language="C#" AutoEventWireup="true" CodeFile="Default9.aspx.cs" Inherits="Default9" %>

<%@ Register assembly="AjaxControlToolkit" namespace="AjaxControlToolkit" tagprefix="cc1" %>

<!DOCTYPE html>

<html xmlns="http://www.w3.org/1999/xhtml">
<head runat="server">
    <title></title>
    <script>
        function validate() {
            confirm("Are you sure");
        }
    </script>
</head>
<body>
    <form id="form1" runat="server">
    <div>
     
        <br />
   
        <asp:Button ID="Button1" runat="server" Text="Delete Record" OnClientClick="validate();" />
   
    </div>
    </form>
</body>
</html>
In the first method we used ConfirmButtonExtender of AJAX control toolkit. In the second method we used java script

Monday, August 31, 2015

how to get data from sql database to gridview by coding

Introduction
In this article i will show you how to get data from sql server to GridView by coding. Example of binding gridview with SQL Server database.
The C# GridView Control
The C# GridView control is a Data bound control that displays the values of a data source in the form of a table . In this table , each column represents a field and each row represents a record . The C# GridView control exists within the System.Web.UI.Controls namespace . When you drag and drop the GridView control on the designer page , the following syntax is added to the source view of the page.

<asp:gridview id="GridView1" runat="server"> </asp:gridview>

ASP.NET reduce lots of code in binding process, provide binding controls such as SqlDataSource for connecting database. The GridView data control has a built-in capability of sorting ,paging , updating and deleting data. You can also set the column fields through the AutoGenerate property to indicate whether bound fields are automatically created for each field in the data source.
In the below mentioned example, step 1 is define for add gridview in the webpage. Now, come to second step create columns in the gridview, which is depend on user choice. Under the <Columns> tag, create TemplateFields, which is used for design first column, according to step 3.


STEP-1 : Drag Gridview from Toolbox and Drop on design window.

    <form id="form1" runat="server">
    <div>  
        <asp:GridView ID="GridView1" runat="server">        
        </asp:GridView>  
    </div>
    </form>

STEP-2 : Create columns inside Gidview

<asp:GridView ID="GridView1" runat="server">
            <Columns >
            </Columns>        
        </asp:GridView>

STEP-3 : Create first column using TemplateField

  <Columns >
<asp:TemplateField>
</asp:TemplateField>
            </Columns>

STEP-4 : Create ItemTemplate inside <asp:TemplateField>
STEP-5 :  Also bind with table Attribute/Field

<asp:TemplateField>
   <ItemTemplate>
    <%# Eval("EmployeeId") %>
        </ItemTemplate>
</asp:TemplateField>

STEP-6:
Make StoredProcedure for retrieving data from database table.

CREATE PROCEDURE [dbo].[getdata]

AS
SELECT * from [Table]

RETURN 0


STEP-7 : Create code for binding data

using System;
using System.Collections.Generic;
using System.Linq;
using System.Web;
using System.Web.UI;
using System.Web.UI.WebControls;
using System.Data.SqlClient;
using System.Data;
using System.Configuration;

public partial class binggrid : System.Web.UI.Page
{
    protected void Page_Load(object sender, EventArgs e)
    {
        if (!Page .IsPostBack)
        {
            getdataload();

        }

    }

    private void getdataload()
    {
        using (SqlConnection con = new SqlConnection())
        {
            con.ConnectionString = ConfigurationManager.ConnectionStrings["ConnectionString"].ToString();
            con.Open();
            using (SqlCommand cmd = new SqlCommand())
            {
                cmd.CommandText = "getdata";
                cmd.Connection = con;
                cmd.CommandType = CommandType.StoredProcedure;
                using (DataSet ds = new DataSet())
                {
                    using (SqlDataAdapter da = new SqlDataAdapter(cmd))
                    {
                        da.Fill(ds);
                        GridView1.DataSource = ds;
                        GridView1.DataBind();

                    }

                }  
         
            }
       
        }

    }
}

Output of the program
C# gridview bind in asp.net

Note : Some Extra Column appear in gridview like EmployeeId, name
if you want to remove these column add attribute inside gridview
<asp:GridView ID="GridView1" runat="server" AutoGenerateColumns ="false">

Main Output of the program are:


C# gridview bind in asp.net
Here we are using single Template field. If you want to make more column then you must take more than one template field. Each template specifies column of the GridView.


Top related post

Friday, August 28, 2015

How to insert data into ms access database table in wpf

Introduction
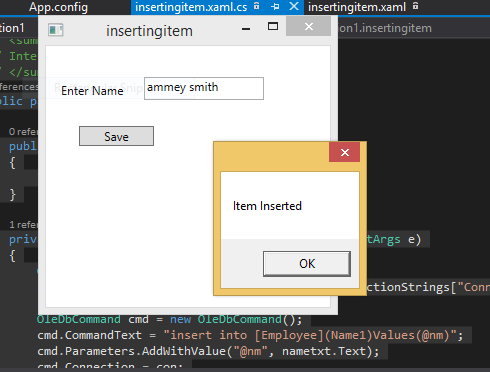
In previous article i explained how to create connection with MS-Access database; How to bind DataGrid with access database. In this article i will teach you how to insert item into Access database using WPF. Lets take a simple example of inserting item into access database in WPF.


Description
First of all create connection with the access database which is already done in previous article. Now, you will do some changes in code of  data grid binding. Like replace DQL query with DML query.

Like :
cmd.CommandText = "Insert into [tablename](columnName)Values(Data)";

Also do not required to execute the query, use ExecuteNonQuery() method to insert data by the input box.

Source Code:

<Window x:Class="WpfApplication1.insertingitem"
        xmlns="http://schemas.microsoft.com/winfx/2006/xaml/presentation"
        xmlns:x="http://schemas.microsoft.com/winfx/2006/xaml"
        Title="insertingitem" Height="300" Width="300">
    <Grid>
        <Label Content="Enter Name" HorizontalAlignment="Left" Margin="10,31,0,0" VerticalAlignment="Top"/>
        <TextBox Name="nametxt" HorizontalAlignment="Left" Height="23" Margin="98,31,0,0" TextWrapping="Wrap" Text="" VerticalAlignment="Top" Width="120"/>
        <Button Click="Button_Click" Content="Save" HorizontalAlignment="Left" Margin="33,80,0,0" VerticalAlignment="Top" Width="75"/>

    </Grid>
</Window>

Code Behind

using System.Windows;
using System.Data.OleDb;
using System.Configuration;

namespace WpfApplication1
{
    /// <summary>
    /// Interaction logic for insertingitem.xaml
    /// </summary>
    public partial class insertingitem : Window
    {
        public insertingitem()
        {
            InitializeComponent();
        }

        private void Button_Click(object sender, RoutedEventArgs e)
        {
            OleDbConnection con = new OleDbConnection();
            con.ConnectionString=ConfigurationManager.ConnectionStrings["Connection"].ToString();
            con.Open();
            OleDbCommand cmd = new OleDbCommand();
            cmd.CommandText = "insert into [Employee](Name1)Values(@nm)";
            cmd.Parameters.AddWithValue("@nm", nametxt.Text);
            cmd.Connection = con;
            int a = cmd.ExecuteNonQuery();
            if (a>0)
            {
                MessageBox.Show("Item Inserted");
                
            }


        }
    }
}

Code generate the following output


© Copyright 2013 Computer Programming | All Right Reserved