-->

Thursday, January 7, 2016

Text to Image Conversion in ASP.NET C#

In this article, I will show you how to convert Text into image. I will take text from TextBoxes and convert it into image using Graphics class. Generated image will be show on image control. I have an example of it.  First of all add one TextBox, One Button and One image control on web form.


<%@ Page Language="C#" AutoEventWireup="true" CodeFile="texttoimage.aspx.cs" Inherits="texttoimage" %>

<!DOCTYPE html>

<html xmlns="http://www.w3.org/1999/xhtml">
<head runat="server">
    <title></title>
</head>
<body>
    <form id="form1" runat="server">
    <div>

        Enter Name :
        <asp:TextBox ID="TextBox1" runat="server" Width="192px"></asp:TextBox>
        <br />
        <br />
        <asp:Button ID="Button1" runat="server" OnClick="Button1_Click" Text="Text 2 Image" />

    </div>
        <p>
            <asp:Image ID="Image1" runat="server" Height="178px" Visible="False" Width="315px" />
        </p>
    </form>
</body>
</html>

By using DrawString ( ) method we can put Text on image. There are following parameter which are put into this method:
Text = Which is taken from textBox.
Font  = Font, it means Font family, Font Size, Font style, font unit etc. You can add all these properties by using Font class.

By using the Bitmap class we can create Image. In it we have two parameters i.e width and height.


Code Behind Code

using System;
using System.Collections.Generic;
using System.Drawing;
using System.Drawing.Imaging;
using System.IO;
using System.Linq;
using System.Web;
using System.Web.UI;
using System.Web.UI.WebControls;

public partial class texttoimage : System.Web.UI.Page
{
    protected void Page_Load(object sender, EventArgs e)
    {

    }
    protected void Button1_Click(object sender, EventArgs e)
    {
        string textboxtext = TextBox1.Text.Trim();
        Bitmap bitmap = new Bitmap(1, 1);
        Font font = new Font("Arial", 20, FontStyle.Regular, GraphicsUnit.Pixel);
        Graphics grap = Graphics.FromImage(bitmap);
        int width = (int)grap.MeasureString(textboxtext, font).Width;
        int height = (int)grap.MeasureString(textboxtext, font).Height;
        bitmap = new Bitmap(bitmap, new Size(width, height));
        grap = Graphics.FromImage(bitmap);
        grap.Clear(Color.White);
        grap.SmoothingMode = System.Drawing.Drawing2D.SmoothingMode.AntiAlias;
        grap.TextRenderingHint = System.Drawing.Text.TextRenderingHint.AntiAlias;
        grap.DrawString(textboxtext, font, new SolidBrush(Color.FromArgb(255, 1, 1)), 0, 0);
        grap.Flush();
        grap.Dispose();

        string savefile = Path.GetFileNameWithoutExtension(Path.GetRandomFileName()) + ".jpg";
        bitmap.Save(Server.MapPath("~/img/") + savefile, ImageFormat.Jpeg);
        Image1.ImageUrl = "~/img/" + savefile;
        Image1.Visible = true;


    }
}

Wednesday, January 6, 2016

Clear all form fields after submit data in ASP.NET C#

In this article, I will show you, How to clear all fields, I mean to say reset all control which is available on web page. I will give you an example of  it. Also, I will provide the message before clear the fields. When you submit your form then get a confirmation message on screen. If you pressed "ok" then form will be submitted and fields will be cleared. If you pressed cancel then you will be return last position (before pressing Button). Let's take an example:


Source Code:

<%@ Page Language="C#" AutoEventWireup="true" CodeFile="clearallfields.aspx.cs" Inherits="clearallfields" %>

<!DOCTYPE html>

<html xmlns="http://www.w3.org/1999/xhtml">
<head runat="server">
    <title></title>
    <style type="text/css">
        .auto-style1 {
            width: 115px;
        }
    </style>
</head>
<body>
    <form id="form1" runat="server">
    <div>
   
        <table style="width:100%;">
            <tr>
                <td class="auto-style1">UserName</td>
                <td>
                    <asp:TextBox ID="TextBox1" runat="server" Width="267px"></asp:TextBox>
                </td>
                <td>&nbsp;</td>
            </tr>
            <tr>
                <td class="auto-style1">Password</td>
                <td>
                    <asp:TextBox ID="TextBox2" runat="server" Width="267px"></asp:TextBox>
                </td>
                <td>&nbsp;</td>
            </tr>
            <tr>
                <td class="auto-style1">Email</td>
                <td>
                    <asp:TextBox ID="TextBox3" runat="server" Width="267px"></asp:TextBox>
                </td>
                <td>&nbsp;</td>
            </tr>
            <tr>
                <td class="auto-style1">&nbsp;</td>
                <td>
                    <asp:Button ID="Button1" runat="server" OnClick="Button1_Click" Text="Save" Width="94px" />
                </td>
                <td>&nbsp;</td>
            </tr>
        </table>
   
    </div>
    </form>
</body>
</html>

Code Behind code

using System;
using System.Collections.Generic;
using System.Linq;
using System.Web;
using System.Web.UI;
using System.Web.UI.WebControls;

public partial class clearallfields : System.Web.UI.Page
{
    protected void Page_Load(object sender, EventArgs e)
    {

    }
    protected void Button1_Click(object sender, EventArgs e)
    {
        string msgstring = "Your Details have been saved";
        string content = "window.onload=function(){ alert('";
        content += msgstring;
        content += "');";
        content += "window.location='";
        content += Request.Url.AbsoluteUri;
        content += "';}";
        ClientScript.RegisterStartupScript(this.GetType(), "SucessMessage", content, true);
        
    }
}

If you want to clear all fields without any message then you can apply this code in button click event

protected void Button1_Click(object sender, EventArgs e)
    {
    
Response.Redirect(Request.Url.AbsoluteUri);
}

Tuesday, January 5, 2016

Bind or Insert Data into DropDownlist using List and ArrayList in ASP.NET C#

In this article, I will show ou how to bind or insert items into Dropdownlist Using ArrayList or List in code behind file. ArrayList is a Collection of String items so it can contain string items Bydefault But in List<type> we have to specify type of items. In this article, I will take list as class type. I will give you an example of both. I am giving  you a youtube video:


1. Add two DropDownlist in the web form.

<%@ Page Language="C#" AutoEventWireup="true" CodeFile="Default11.aspx.cs" Inherits="Default11" %>

<!DOCTYPE html>

<html xmlns="http://www.w3.org/1999/xhtml">
<head runat="server">
    <title></title>
</head>
<body>
    <form id="form1" runat="server">
    <div>

        <asp:DropDownList ID="DropDownList1" runat="server" Height="39px" Width="212px">
        </asp:DropDownList>  <br/>

<asp:DropDownList ID="DropDownList2" runat="server" Height="39px" Width="212px">
        </asp:DropDownList>


    </div>
    </form>
</body>
</html>

2. In the code behind file, I will provide you both ArrayList and List<type>. 

using System;
using System.Collections;
using System.Collections.Generic;
using System.Linq;
using System.Web;
using System.Web.UI;
using System.Web.UI.WebControls;

public partial class Default11 : System.Web.UI.Page
{

    protected void Page_Load(object sender, EventArgs e)
    {
        if (!Page.IsPostBack)
        {
            List<fruits> fitems = new List<fruits>();
            fitems.Add(new fruits(){FruitID=1,FruitName="Apple"});
            fitems.Add(new fruits() { FruitID = 2, FruitName = "Mango" });

DropDownList2.DataSource = fitems;
            DropDownList2.DataTextField = "FruitName";
            DropDownList2.DataValueField = "FruitID";
            DropDownList2.DataBind();
         

ArrayList listitem = new ArrayList();
           listitem.Add("Apple");
            listitem.Add("mango");
            listitem.Add("Grapes");


            foreach (object item in fitems)
            {
                DropDownList1.Items.Add(new ListItem(item.ToString(), item.ToString()));
            }


        }
    }
}

fruits.cs file

using System;
using System.Collections.Generic;
using System.Linq;
using System.Web;

/// <summary>
/// Summary description for fruits
/// </summary>
public class fruits
{
    public int FruitID { get; set; }
    public string FruitName { get; set; }
public fruits()
{
//
// TODO: Add constructor logic here
//
}
}

Monday, January 4, 2016

Introduction | Installation : Programming with Python

Python: Python is a programming language, through this we can design programs for Administrator. Basically, it is used for security reason and many more differences with other languages. Like, if you want to print " hello world" then you can use header files in c and c++ but in python, you don't need. So in python, you can reduce lots of codes. 

Before preceding installation you must to know about programming and algorithm: Programming is a technique which is based on algorithms. Algorithms means, " Step by steps solving a problem".  

How to install Python in your System: Consider the following steps
  1. Open http://www.python.org
  2. Download Desired package for your system software
Introduction | Installation : Programming with Python


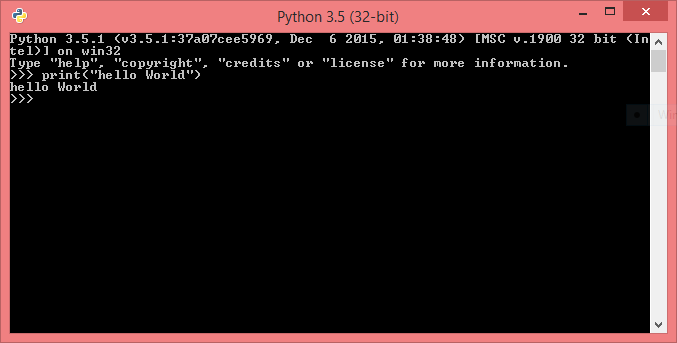
Currently, I am using windows operating system, so I download python package 3.5.1 for windows. After finish downloading you need to start installation by double clicking on executable file. Pick the installed file by using start menu also run python interpreter. If you want to write hello world message using interpreter then you can write the following line of code
print("Hello World")

  
Python Interpreter hello World Message

If you are LINUX/ UNIX user then write the following line into your terminal:

Installing python v3.* in Linux/Unix
Debian Package
sudo apt-get install python3.4
sudo apt-get upgrade python3.4

Rpm Package
rpm --install *.rpm
rpm --upgrade *.rpm

Sunday, January 3, 2016

DropDownlist Bootstrap Style in ASP.NET C#

In this article, I will show you, how to add checkBoxList in DropDownList as item. I mean to say when you drop it then display item in the form of CheckBox list. You can select multiple items from CheckBox list. Selected Items show in the DropDownList header. If you want to design this types of DropDownList then add these files into your head section of page. By using these files, we can convert our ListBox into DropDownList with CheckBox Item. I will Give you complete example of Bootstrap Dropdown Menu.


<%@ Page Language="C#" AutoEventWireup="true" CodeFile="Default10.aspx.cs" Inherits="Default10" %>

<!DOCTYPE html>

<html xmlns="http://www.w3.org/1999/xhtml">
<head runat="server">
    <title></title>
    <script type="text/javascript" src="http://ajax.googleapis.com/ajax/libs/jquery/1.8.3/jquery.min.js"></script>

<link href="http://cdnjs.cloudflare.com/ajax/libs/twitter-bootstrap/3.0.3/css/bootstrap.min.css"
    rel="stylesheet" type="text/css" />

<script type="text/javascript" src="http://cdnjs.cloudflare.com/ajax/libs/twitter-bootstrap/3.0.3/js/bootstrap.min.js"></script>

<link href="http://cdn.rawgit.com/davidstutz/bootstrap-multiselect/master/dist/css/bootstrap-multiselect.css" rel="stylesheet" type="text/css" />

<script src="http://cdn.rawgit.com/davidstutz/bootstrap-multiselect/master/dist/js/bootstrap-multiselect.js" type="text/javascript"></script>
    <script>
        $(function () {
            $('[id*=list1]').multiselect({

                includeSelectAllOption:true

            });
        })


    </script>
</head>
<body>
    <form id="form1" runat="server">
    <div>
    <asp:ListBox ID="list1" runat="server" SelectionMode="Multiple">
        <asp:ListItem Text="Apple" Value="1" />
         <asp:ListItem Text="mango" Value="2" />
         <asp:ListItem Text="Grapes" Value="3" />
         <asp:ListItem Text="Orange" Value="4" />
         <asp:ListItem Text="Pea" Value="5" />


    </asp:ListBox>
        <br />
    </div>
        <asp:Button ID="Button1" runat="server" OnClick="Button1_Click" Text="GetItem" />
    </form>
</body>
</html>

Code Behind File

using System;
using System.Collections.Generic;
using System.Linq;
using System.Web;
using System.Web.UI;
using System.Web.UI.WebControls;

public partial class Default10 : System.Web.UI.Page
{
    protected void Page_Load(object sender, EventArgs e)
    {

    }
    protected void Button1_Click(object sender, EventArgs e)
    {
        string msg = string.Empty;
        foreach (ListItem item in list1.Items)
        {
            if (item.Selected)
            {
                msg += item.Text + " " + item.Value + "\\n";
            }
        }
        ClientScript.RegisterClientScriptBlock(this.GetType(), "alert", "alert('" + msg + "');", true);
    }
}

Friday, January 1, 2016

JQuery: CheckBox show/Hide password when changed

In this article, I will show you, How to show password when we select "Show PassWord" checkbox. If check box is selected then show password otherwise hide. Also I will show you, when we enter some text into the password box then entered text write on the span tag. If you want to learn that how I design it, Follow the following steps:
Step-1 :  Add two TextBox in the body section, also add one span tag and one button control.
Step-2 :  Run Jquery function, get the Id property of  password textbox, apply keyup  function on password textbox. It means when you enter some text into password box then enter text printed together with the cursor. 
Step-3 : Check whether CheckBox is checked or not. If check then write text on span tag.


Complete Code:
<!DOCTYPE html>
<html xmlns="http://www.w3.org/1999/xhtml">
<head>
    <title></title>
    <script src="http://code.jquery.com/jquery-1.10.2.js"></script>
    <script>
        $(function () {
            $('#passtxt').keyup(function () {
                var ischecked = $('#chktxt').prop('checked');
                if (ischecked) {
                    $('#spantxt').html($(this).val());
                    $('#spantxt').show();

                }
                else
                {
                    $('#spantxt').hide();
                }
            })
            $('#chktxt').change(function () {
                var ischecked = $(this).prop('checked');
                if (ischecked) {
                    $('#spantxt').show();

                }
                else
                {
                    $('#spantxt').hide();
                }
            })
        });


    </script>
    </head>
<body>
<form id="form1">
    UserName:<input type="text" id="usertxt"/><br/>
    Password:<input type="password" id="passtxt"/><br/>
    <span id="spantxt" style="display:none"></span>
    <br/>
    <input type="checkbox" id="chktxt"/>Show Password
    <input type="button" value="login"/>

</form>
</body>
</html>

Example of NotifyIcon system tray in windows form c#

If you want to show your windows form application in NotifyIcon toolBar then you can use this example. When you press minimize button of windows form then your application should minimized in system tray. 
Try these steps to minimized your application as System Tray:
Step-1 : Add a new  windows form into your project
Step-2 : Add a NotifyIcon control in currently added form.
Step-3 : Select Show smart tag, add icon file in NotifyIcon control.


Step-4 : Add the following code in code file with respective events

using System;
using System.Collections.Generic;
using System.ComponentModel;
using System.Data;
using System.Drawing;
using System.Linq;
using System.Text;
using System.Threading.Tasks;
using System.Windows.Forms;

namespace WindowsFormsApplication5
{
    public partial class Form3 : Form
    {
        public Form3()
        {
            InitializeComponent();
        }

        private void Form3_Resize(object sender, EventArgs e)
        {
            if (WindowState==FormWindowState.Minimized)
            {

                ShowIcon = false;
                notifyIcon1.Visible = true;
                notifyIcon1.ShowBalloonTip(1000);
            }
        }

        private void notifyIcon1_MouseDoubleClick(object sender, MouseEventArgs e)
        {
            ShowInTaskbar = true;
            notifyIcon1.Visible = false;
            WindowState = FormWindowState.Normal;
        }

        private void Form3_Load(object sender, EventArgs e)
        {
            notifyIcon1.BalloonTipText = "Application minimized";
            notifyIcon1.BalloonTipTitle = "dotprogramming.blogspot.com";
        }
    }
}

Code generates the following output
Example of NotifyIcon system tray in windows form c#

© Copyright 2013 Computer Programming | All Right Reserved