-->

Friday, January 8, 2016

Structure of a C program

The structure of a C program is nothing but the way of framing the group of statements while writing a C program. We put the general structure of a C program first as shown below:

[preprocessor directives]
[global declarations]

returning_type main( )
{
[Declaration Section (local)]

[Executable Section]
}

[User defined functions]

Note : The bold faced characters such as main( ) in one line along with the left parenthesis '(' and the right parenthesis ')' should be typed as they are. The Declaration section and Executable section enclosed within '{' and '}' is called the body of the main function. The data or value returned by the function main( ) is indicated by' returning_type'. Normally main( ) doesn't return any value. So, the returning type void is used. The function main( ) can be preceded by global declarations and preprocessor directives.


Preprocessor directives : The preprocessor statements starts with '#' symbol. These statements instruct the compiler to include the specified file in the beginning of the program. One important point about preprocessor directives is that these statements are never terminated by ';' for example,


#include<stdio.h>  /* Only one file is permitted for one #include */
#include<math.h>


are the files that the compiler includes into the user program. These two files "stdio.h" and "math.h" are called header files and hence the extension '.h' . Using the preprocessor directive the user can define the constant. For example,

#define SIZE 100 /*Only one constant can be defined using one #define */
#define N 50
Here , Size and N are called symbolic constants. Their value is not changed during program execution.

Global declarations: The variables that are declared before all the functions are called global variables. All the functions can access these variables. By default the global variables are initialized with '0'.
main( ) : Each and every C program should have a function main( ) and there should be one and only one function by name 'main( )' . This function is always executable first. The function main( ) may call other functions. The statements enclosed within left and right curly braces are called body of the function main( ).

Declaration section : The local variables that are to be used in the function main( ) should be declared in the declaration section. The variables declared are identified as identifiers by the C compiler. The variables can also be initialized. For example, consider the declarations shown below:


int sum=0 ; /* The declared variables is initialized to 0 */
int a;           /* The declared variable contains garbage(unwanted) value */
float b,c,d;  /* More than one variables can be declared by single statements */

Executable section : This section contains the building blocks of the program. The blocks containing executable statements represent the directions given to the processor to perform the task. A statements may represent an expression to be evaluated, input/output operation , assignment operation, etc. The statements may be even control statements such as if statements , for statement , while statement,do-while statement,etc. Each executable statement of a block should end with a ';' .The symbol ';' is also called as statement terminated or separator.

User defined functions: This is the last optional section of the program structure. The functions written by the user to perform particular or special task are called defined functions. These are called as sub-programs. the basic structure of the user defined function resembles that of the function main( ).

Now, let us write a small program to display the message " dotprogramming":
#include <stdio.h>
main( )
{
printf("dotprogramming");
}

Principles of Programming in C language

Introduction to Programming
Remember your last visit to the super market. You might have purchased many items. What did you do after picking all the items and putting them into the carriage? Probably you met with the billing clerk to make the payment. Have you observed his way of preparing the bill? He picks the items one by one and enters something into the computer repeating the same task for all the items.
Within a count of few minutes or even may be within few seconds he gives the bill , you pay and come out carrying all the required things. So what made him to process the bill so fast? It is nothing but the “program” running in the computer’s memory. If you want to become a billing clerk, then what is needed is to just learn the method to use the program that helps in the billing the items.
Stop, don’t think in that way. You should dream something high! To design a program that helps the billing clerks to prepare the bill fast and in a most efficient way.

Program Concept
By and large computers are used either to run the designed programs or to design the program itself. As an upcoming programmer you are going to use the computer to design the programs. That should be your main dream and aim. Keeping that in mind, let us see “what is program?”
Definition:  A program, strictly, a computer program is a collection of coded instructions to direct a computer to perform a desired set of operations. So, coding the instructions to make a program is an art. This art of making or designing a program is called programming. The person who writes such programs is called programmer.

Another definition of program:

Algorithm + Data Structure = Program

Definition : A program can be defined as the combination or clubbing of algorithm and data structure together into single unit. Here the algorithm refers to the procedure containing primitive steps to solve a particular task. A primitive step implies an easily understandable one. Data structure refer to the modeling of the required data to solve the task.

A programmer can design the program as per the customer's needs. The customer's need is collected as problem . The problem is analyzed to arrived at a solution. This solution provided using certain tools is called program. Whenever a problem arises , the programmer can design a program. The designed program can also be used to solve some related problems with the little modification. Changes is the nature! The new demands, requirements , etc. rise as the time passes. The programmer should react properly to these and should come out with a new solution from the existing solutions. Such existing solutions along with the new solution frame a program library. Now, let us see " what is program library?"

Definition: A library , a store or collection of computer programs is called program library . Each and every program in the library is designed to solve a certain type of problem.

What is canned program?

Definition: A program in a library of computer programs is called canned program. Existence of libraries of programs that are easy to use and designed to solve very general problems is important. The Turbo C compiler, you are going to learn, is the best example that contains many canned programs.
Turbo C compiler container many small programs in the form of built-in-functions contained in header tiles. With the help of such canned programs you can become a very good programmer. So, you should practice using such canned programs. Such canned programs are designed and added to the library. The canned programs are established and maintained by various computer manufacturers and centers.
For example, you will use a function scanf ( ) to read the input for almost all the programs you write and learn throughout the learning of this course. Similarly, you will use printf ( ) to display the messages and values or data on the output screen. Using such library functions or canned programs you build your own programs to solve general purpose or system-oriented problems. These two functions are canned in a header file “stdio.h”.
The C language that you are learning, contains nearly 27 such header files to design a program. All the header files inclusively contain hundreds of built-in functions. The header file “stdio.h” contains 56 built-in functions to solve many problems related to input and output operations. The following list provides a rough idea of number of built-in functions available in C:
“stdio.h” - 56, “conio.h”- 29,
“stdlib.h” - 42, “string.h” - 37,
“math.h” - 30, “ctype.h” - 17, etc.

Thursday, January 7, 2016

Text to Image Conversion in ASP.NET C#

In this article, I will show you how to convert Text into image. I will take text from TextBoxes and convert it into image using Graphics class. Generated image will be show on image control. I have an example of it.  First of all add one TextBox, One Button and One image control on web form.


<%@ Page Language="C#" AutoEventWireup="true" CodeFile="texttoimage.aspx.cs" Inherits="texttoimage" %>

<!DOCTYPE html>

<html xmlns="http://www.w3.org/1999/xhtml">
<head runat="server">
    <title></title>
</head>
<body>
    <form id="form1" runat="server">
    <div>

        Enter Name :
        <asp:TextBox ID="TextBox1" runat="server" Width="192px"></asp:TextBox>
        <br />
        <br />
        <asp:Button ID="Button1" runat="server" OnClick="Button1_Click" Text="Text 2 Image" />

    </div>
        <p>
            <asp:Image ID="Image1" runat="server" Height="178px" Visible="False" Width="315px" />
        </p>
    </form>
</body>
</html>

By using DrawString ( ) method we can put Text on image. There are following parameter which are put into this method:
Text = Which is taken from textBox.
Font  = Font, it means Font family, Font Size, Font style, font unit etc. You can add all these properties by using Font class.

By using the Bitmap class we can create Image. In it we have two parameters i.e width and height.


Code Behind Code

using System;
using System.Collections.Generic;
using System.Drawing;
using System.Drawing.Imaging;
using System.IO;
using System.Linq;
using System.Web;
using System.Web.UI;
using System.Web.UI.WebControls;

public partial class texttoimage : System.Web.UI.Page
{
    protected void Page_Load(object sender, EventArgs e)
    {

    }
    protected void Button1_Click(object sender, EventArgs e)
    {
        string textboxtext = TextBox1.Text.Trim();
        Bitmap bitmap = new Bitmap(1, 1);
        Font font = new Font("Arial", 20, FontStyle.Regular, GraphicsUnit.Pixel);
        Graphics grap = Graphics.FromImage(bitmap);
        int width = (int)grap.MeasureString(textboxtext, font).Width;
        int height = (int)grap.MeasureString(textboxtext, font).Height;
        bitmap = new Bitmap(bitmap, new Size(width, height));
        grap = Graphics.FromImage(bitmap);
        grap.Clear(Color.White);
        grap.SmoothingMode = System.Drawing.Drawing2D.SmoothingMode.AntiAlias;
        grap.TextRenderingHint = System.Drawing.Text.TextRenderingHint.AntiAlias;
        grap.DrawString(textboxtext, font, new SolidBrush(Color.FromArgb(255, 1, 1)), 0, 0);
        grap.Flush();
        grap.Dispose();

        string savefile = Path.GetFileNameWithoutExtension(Path.GetRandomFileName()) + ".jpg";
        bitmap.Save(Server.MapPath("~/img/") + savefile, ImageFormat.Jpeg);
        Image1.ImageUrl = "~/img/" + savefile;
        Image1.Visible = true;


    }
}

Wednesday, January 6, 2016

Clear all form fields after submit data in ASP.NET C#

In this article, I will show you, How to clear all fields, I mean to say reset all control which is available on web page. I will give you an example of  it. Also, I will provide the message before clear the fields. When you submit your form then get a confirmation message on screen. If you pressed "ok" then form will be submitted and fields will be cleared. If you pressed cancel then you will be return last position (before pressing Button). Let's take an example:


Source Code:

<%@ Page Language="C#" AutoEventWireup="true" CodeFile="clearallfields.aspx.cs" Inherits="clearallfields" %>

<!DOCTYPE html>

<html xmlns="http://www.w3.org/1999/xhtml">
<head runat="server">
    <title></title>
    <style type="text/css">
        .auto-style1 {
            width: 115px;
        }
    </style>
</head>
<body>
    <form id="form1" runat="server">
    <div>
   
        <table style="width:100%;">
            <tr>
                <td class="auto-style1">UserName</td>
                <td>
                    <asp:TextBox ID="TextBox1" runat="server" Width="267px"></asp:TextBox>
                </td>
                <td>&nbsp;</td>
            </tr>
            <tr>
                <td class="auto-style1">Password</td>
                <td>
                    <asp:TextBox ID="TextBox2" runat="server" Width="267px"></asp:TextBox>
                </td>
                <td>&nbsp;</td>
            </tr>
            <tr>
                <td class="auto-style1">Email</td>
                <td>
                    <asp:TextBox ID="TextBox3" runat="server" Width="267px"></asp:TextBox>
                </td>
                <td>&nbsp;</td>
            </tr>
            <tr>
                <td class="auto-style1">&nbsp;</td>
                <td>
                    <asp:Button ID="Button1" runat="server" OnClick="Button1_Click" Text="Save" Width="94px" />
                </td>
                <td>&nbsp;</td>
            </tr>
        </table>
   
    </div>
    </form>
</body>
</html>

Code Behind code

using System;
using System.Collections.Generic;
using System.Linq;
using System.Web;
using System.Web.UI;
using System.Web.UI.WebControls;

public partial class clearallfields : System.Web.UI.Page
{
    protected void Page_Load(object sender, EventArgs e)
    {

    }
    protected void Button1_Click(object sender, EventArgs e)
    {
        string msgstring = "Your Details have been saved";
        string content = "window.onload=function(){ alert('";
        content += msgstring;
        content += "');";
        content += "window.location='";
        content += Request.Url.AbsoluteUri;
        content += "';}";
        ClientScript.RegisterStartupScript(this.GetType(), "SucessMessage", content, true);
        
    }
}

If you want to clear all fields without any message then you can apply this code in button click event

protected void Button1_Click(object sender, EventArgs e)
    {
    
Response.Redirect(Request.Url.AbsoluteUri);
}

Tuesday, January 5, 2016

Bind or Insert Data into DropDownlist using List and ArrayList in ASP.NET C#

In this article, I will show ou how to bind or insert items into Dropdownlist Using ArrayList or List in code behind file. ArrayList is a Collection of String items so it can contain string items Bydefault But in List<type> we have to specify type of items. In this article, I will take list as class type. I will give you an example of both. I am giving  you a youtube video:


1. Add two DropDownlist in the web form.

<%@ Page Language="C#" AutoEventWireup="true" CodeFile="Default11.aspx.cs" Inherits="Default11" %>

<!DOCTYPE html>

<html xmlns="http://www.w3.org/1999/xhtml">
<head runat="server">
    <title></title>
</head>
<body>
    <form id="form1" runat="server">
    <div>

        <asp:DropDownList ID="DropDownList1" runat="server" Height="39px" Width="212px">
        </asp:DropDownList>  <br/>

<asp:DropDownList ID="DropDownList2" runat="server" Height="39px" Width="212px">
        </asp:DropDownList>


    </div>
    </form>
</body>
</html>

2. In the code behind file, I will provide you both ArrayList and List<type>. 

using System;
using System.Collections;
using System.Collections.Generic;
using System.Linq;
using System.Web;
using System.Web.UI;
using System.Web.UI.WebControls;

public partial class Default11 : System.Web.UI.Page
{

    protected void Page_Load(object sender, EventArgs e)
    {
        if (!Page.IsPostBack)
        {
            List<fruits> fitems = new List<fruits>();
            fitems.Add(new fruits(){FruitID=1,FruitName="Apple"});
            fitems.Add(new fruits() { FruitID = 2, FruitName = "Mango" });

DropDownList2.DataSource = fitems;
            DropDownList2.DataTextField = "FruitName";
            DropDownList2.DataValueField = "FruitID";
            DropDownList2.DataBind();
         

ArrayList listitem = new ArrayList();
           listitem.Add("Apple");
            listitem.Add("mango");
            listitem.Add("Grapes");


            foreach (object item in fitems)
            {
                DropDownList1.Items.Add(new ListItem(item.ToString(), item.ToString()));
            }


        }
    }
}

fruits.cs file

using System;
using System.Collections.Generic;
using System.Linq;
using System.Web;

/// <summary>
/// Summary description for fruits
/// </summary>
public class fruits
{
    public int FruitID { get; set; }
    public string FruitName { get; set; }
public fruits()
{
//
// TODO: Add constructor logic here
//
}
}

Monday, January 4, 2016

Introduction | Installation : Programming with Python

Python: Python is a programming language, through this we can design programs for Administrator. Basically, it is used for security reason and many more differences with other languages. Like, if you want to print " hello world" then you can use header files in c and c++ but in python, you don't need. So in python, you can reduce lots of codes. 

Before preceding installation you must to know about programming and algorithm: Programming is a technique which is based on algorithms. Algorithms means, " Step by steps solving a problem".  

How to install Python in your System: Consider the following steps
  1. Open http://www.python.org
  2. Download Desired package for your system software
Introduction | Installation : Programming with Python


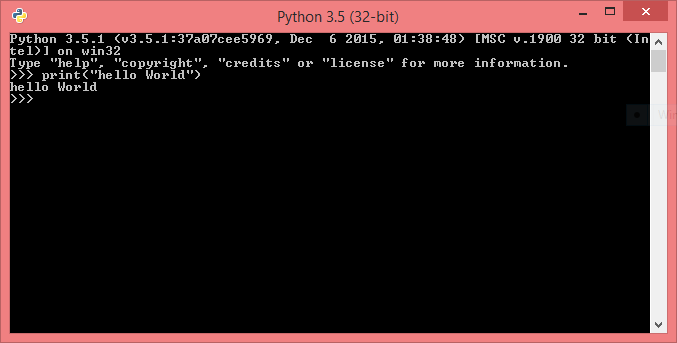
Currently, I am using windows operating system, so I download python package 3.5.1 for windows. After finish downloading you need to start installation by double clicking on executable file. Pick the installed file by using start menu also run python interpreter. If you want to write hello world message using interpreter then you can write the following line of code
print("Hello World")

  
Python Interpreter hello World Message

If you are LINUX/ UNIX user then write the following line into your terminal:

Installing python v3.* in Linux/Unix
Debian Package
sudo apt-get install python3.4
sudo apt-get upgrade python3.4

Rpm Package
rpm --install *.rpm
rpm --upgrade *.rpm

Sunday, January 3, 2016

DropDownlist Bootstrap Style in ASP.NET C#

In this article, I will show you, how to add checkBoxList in DropDownList as item. I mean to say when you drop it then display item in the form of CheckBox list. You can select multiple items from CheckBox list. Selected Items show in the DropDownList header. If you want to design this types of DropDownList then add these files into your head section of page. By using these files, we can convert our ListBox into DropDownList with CheckBox Item. I will Give you complete example of Bootstrap Dropdown Menu.


<%@ Page Language="C#" AutoEventWireup="true" CodeFile="Default10.aspx.cs" Inherits="Default10" %>

<!DOCTYPE html>

<html xmlns="http://www.w3.org/1999/xhtml">
<head runat="server">
    <title></title>
    <script type="text/javascript" src="http://ajax.googleapis.com/ajax/libs/jquery/1.8.3/jquery.min.js"></script>

<link href="http://cdnjs.cloudflare.com/ajax/libs/twitter-bootstrap/3.0.3/css/bootstrap.min.css"
    rel="stylesheet" type="text/css" />

<script type="text/javascript" src="http://cdnjs.cloudflare.com/ajax/libs/twitter-bootstrap/3.0.3/js/bootstrap.min.js"></script>

<link href="http://cdn.rawgit.com/davidstutz/bootstrap-multiselect/master/dist/css/bootstrap-multiselect.css" rel="stylesheet" type="text/css" />

<script src="http://cdn.rawgit.com/davidstutz/bootstrap-multiselect/master/dist/js/bootstrap-multiselect.js" type="text/javascript"></script>
    <script>
        $(function () {
            $('[id*=list1]').multiselect({

                includeSelectAllOption:true

            });
        })


    </script>
</head>
<body>
    <form id="form1" runat="server">
    <div>
    <asp:ListBox ID="list1" runat="server" SelectionMode="Multiple">
        <asp:ListItem Text="Apple" Value="1" />
         <asp:ListItem Text="mango" Value="2" />
         <asp:ListItem Text="Grapes" Value="3" />
         <asp:ListItem Text="Orange" Value="4" />
         <asp:ListItem Text="Pea" Value="5" />


    </asp:ListBox>
        <br />
    </div>
        <asp:Button ID="Button1" runat="server" OnClick="Button1_Click" Text="GetItem" />
    </form>
</body>
</html>

Code Behind File

using System;
using System.Collections.Generic;
using System.Linq;
using System.Web;
using System.Web.UI;
using System.Web.UI.WebControls;

public partial class Default10 : System.Web.UI.Page
{
    protected void Page_Load(object sender, EventArgs e)
    {

    }
    protected void Button1_Click(object sender, EventArgs e)
    {
        string msg = string.Empty;
        foreach (ListItem item in list1.Items)
        {
            if (item.Selected)
            {
                msg += item.Text + " " + item.Value + "\\n";
            }
        }
        ClientScript.RegisterClientScriptBlock(this.GetType(), "alert", "alert('" + msg + "');", true);
    }
}

© Copyright 2013 Computer Programming | All Right Reserved