-->

Thursday, February 25, 2016

GridView rows details on DetailsView using onSelectedIndexChanged event in ASP.NET C#

Bind Details view using onselectedIndexChanged event of Gridview view. First to Bind the Gridview with select command. By using selectedIndexChanged method you can bind the details view. If you want to bind the DetailsView from Gridview Row then use select command name in GridView's button field name. In the Code behind file, first to bind the Gridview from database table. Retrieve the selected Row data using select command, bind DataTable with Retrieved data.


<%@ Page Language="C#" AutoEventWireup="true" CodeFile="Default2.aspx.cs" Inherits="Default2" %>

<!DOCTYPE html>

<html xmlns="http://www.w3.org/1999/xhtml">
<head runat="server">
    <title></title>
</head>
<body>
    <form id="form1" runat="server">
    <div>
        <asp:GridView ID="GridView1" runat="server" AutoGenerateColumns="false" OnSelectedIndexChanged="GridView1_SelectedIndexChanged">
            <Columns>
                <asp:BoundField DataField="Id" HeaderText="ID" />
                <asp:BoundField DataField="name" HeaderText="Name" />
                <asp:TemplateField HeaderText="address">
                    <ItemTemplate>

                        <asp:Label ID="addlabel" Text='<%# Eval("address") %>' runat="server" />

                    </ItemTemplate>
             

                </asp:TemplateField>
                <asp:ButtonField Text="select" CommandName="select" />
            </Columns>


        </asp:GridView>
        <asp:DetailsView ID="DetailsView1" runat="server" Height="50px" Width="125px" AutoGenerateRows="false">
            <Fields>
                <asp:BoundField DataField="Id" HeaderText="ID" />
                <asp:BoundField DataField="name" HeaderText="Name" />
                <asp:BoundField DataField="address" HeaderText="Address" />


            </Fields>


        </asp:DetailsView>
    </div>
    </form>
</body>
</html>

Code Behind Code

using System;
using System.Collections.Generic;
using System.Configuration;
using System.Data;
using System.Data.SqlClient;
using System.Linq;
using System.Web;
using System.Web.UI;
using System.Web.UI.WebControls;

public partial class Default2 : System.Web.UI.Page
{
    protected void Page_Load(object sender, EventArgs e)
    {
        if (!Page.IsPostBack)
        {
            SqlConnection con = new SqlConnection();
            con.ConnectionString = ConfigurationManager.ConnectionStrings["myconnection"].ToString();
            con.Open();
            SqlCommand cmd=new SqlCommand();
            cmd.CommandText="select * from [Registration]";
            cmd.Connection=con;
            SqlDataReader rd = cmd.ExecuteReader();
            GridView1.DataSource = rd;
            GridView1.DataBind();

        }

    }
    protected void GridView1_SelectedIndexChanged(object sender, EventArgs e)
    {
        int id= int.Parse(GridView1.SelectedRow.Cells[0].Text);
        string name = GridView1.SelectedRow.Cells[1].Text;
        string add = (GridView1.SelectedRow.FindControl("addlabel") as Label).Text;
        DataTable dt = new DataTable();
        dt.Columns.AddRange(new DataColumn[] { new DataColumn("ID", typeof(int)), new DataColumn("Name", typeof(string)), new DataColumn("Address", typeof(string)) });
        dt.Rows.Add(id, name, add);
        DetailsView1.DataSource = dt;
        DetailsView1.DataBind();
    }
}

Code Generates the following output
GridView rows details on DetailsView using onSelectedIndexChanged event in ASP.NET C#

Saturday, February 20, 2016

Banking Software Application Project in c#

Introduction
Purchase Banking software project built in window platform. By using this software, we can do banking task easily. In this project,  I have to provide you banking functionality like Create new account, update customer account, deposit money, transfer money etc. I will give you project executable file to run the project. If you want to learn how to design this project then follow these mentioned steps:

[Video Describe full details]


  1. Start from Login screen. If admin username exists in database table then loginIn into the system else give failed message.
banking System Login Failed Screen

2. If login success then enter in main screen.

Banking Software Application Project in c#

3. Similarly all option which is given in the project.


Requirement
Software : Visual Studio 2013. 


How to run you project
Double click on application executable file and run your project.

How to design Banking Software
First to create a login form for Administrator. After successfully login, administrator can do some work in the control panel like:

  1. Add New Customer.
  2. Deposit money to customer bank account.
  3. Transfer money from one account to another account.
  4.  Show list of account which is available in the bank.
  5. Withdrawal amount from account number by the account holder.
  6. Generate balance sheet.
  7. FD form for customers.
Download : mail me : narenkumar851@gmail.com

Thursday, February 18, 2016

How to retrieve items from database table in JAVA using Netbeans

In this article i will explain you, how to retrieve items from database table in Java using Netbeans. In previous article, we have already learned, how to create connection with the derby database using netbeans. Before reading this article, please must to see the previous article for implementations. In this article, i only explain you, how to use executeQuery( ) method and select statement in java.

--How to create connection with database full video tutorial 


Code :

class abc {
    public abc() throws SQLException
    {
        Connection conn=DriverManager.getConnection("jdbc:derby://localhost:1527/student", "tarun", "tarun");
        System.out.println("Connection Created");
        Statement st=conn.createStatement();
        ResultSet rs=st.executeQuery("select * from USERTABLE");
        while(rs.next())
        {
            System.out.println(rs.getString(2));
        }
   
    }

}

Here, we have a table i.e USERTABLE. If you want to learn how to create table in exists database using Netbeans. Read mentioned steps:
Step-1 :  Right click on Connection String, select "connect" from popup menu.
Step-2 :  Expand username which contains Tables, views and stored procedure.
Step-3 :   Right click on table, select create table.


Write the name of table also add columns with their datatypes. 

How to use mouseenter( ) and mouseleave( ) method in JQuery

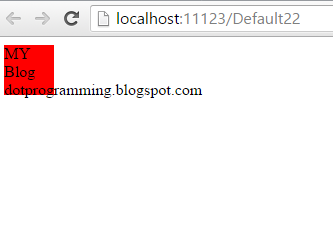
The meaning of mouse enter and mouse leave are, when your cursor enter your object bounary then mouse enter method raised similarly when your cursor goes out of your object boundary then mouse leave method raised. I will give you an example of mouse enter and mouse leave method. Lets see the example, in this, we have division, when your cursor move on your divison boundary then division background changed also text of division will be changed. This also contain mouseleave() method with the same functionality.

<%@ Page Language="C#" AutoEventWireup="true" CodeFile="Default22.aspx.cs" Inherits="Default22" %>

<!DOCTYPE html>

<html xmlns="http://www.w3.org/1999/xhtml">
<head runat="server">
    <title></title>
    <script src="Scripts/jquery-1.10.2.js"></script>
    <script>
        $(document).ready(function()
        {
            $('div').mouseenter(function () {
                $(this).css('background-color', 'green');
                $(this).html('MY website dotprograming.com')
            });


            $('div').mouseleave(function () {
                $(this).css('background-color', 'red');
                $(this).html('MY Blog dotprogramming.blogspot.com');
            })

        })

    </script>
</head>
<body>
    <form id="form1" runat="server">
    <div style="height:50px;width:50px">
    Hello World !
    </div>
    </form>
</body>
</html>

Code generates the following output


Wednesday, February 17, 2016

How to create Database connection in JAVA using Netbeans

If you want to connect database with your java application then first to need a database. First to create database using Netbeans services tab. This tab available under Windows tab. You can also select this tab by using shortcut CTRL+ 5.


services tab in netbeans


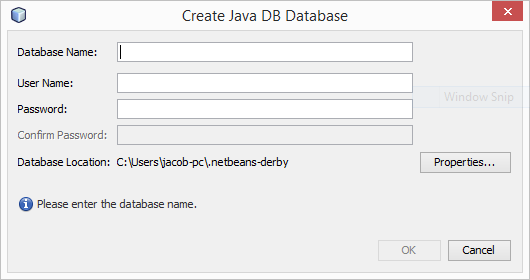
  1. Expand the databases tab, select "Create Database." option. 
create database in netbeans

2. Fill fields which are shown under diagram.

Database fields in Netbeans
 3. After filling the form, you have to create database successfully.
 4. Right Click on your connection string name, select properties for copy the database URL.

java netbeans database properties

5. Copy Database URL, which is used further.

netbeans database properties
6. Create a new java project under projects tab. 
7. Add a Library in the "Libraries" section of your project.
add libraries in projects
8. Select Java DB Driver under Add Library section.

JAVA DB Drivers
9. Open your .java file which is exists in java packages folder of your project. 
10. Create a another class object, which is exists in same package.
11. Now, Open the object class, create constructor in it.
12. paste the code under the constructor.

Connection conn=DriverManager.getConnection("jdbc:derby://localhost:1527/jk", "jk", "jk");
        System.out.println("connection created"); 

Here we have three parameters in getConnection method. 
First refer to database url ; according to 5th step.
Second : Username 
Third :  password.

Tuesday, February 16, 2016

ASP.NET ListBox Insert Multiple selected item into database

In this article, I will show you how to insert multiple selected item in  database table. I have already done one projects on this topic i.e online movie ticket booking system. In this project, i selected multiple tickets by using comma symbol in TextBox. The same article i will do in different manner. In this we have a ListBox with multiple selection mode.
What i do in code behind :

  1. Store the selected of ListBox items to the string type list.
  2. For the each item, i will create a Query statement, Suppose your List contain two items i.e "Apple" and "Mango", Both are selected then use String builder class to Append Query.
  3. Like "insert into [tablename] (fruitname)values('Apple')";  and for second item  "insert into [tablename] (fruitname)values('mango')";

Source Code

<%@ Page Language="C#" AutoEventWireup="true" CodeFile="multipleselect.aspx.cs" Inherits="multipleselect" %>

<!DOCTYPE html>

<html xmlns="http://www.w3.org/1999/xhtml">
<head runat="server">
    <title></title>
</head>
<body>
    <form id="form1" runat="server">
    <div>

    </div>
        <asp:ListBox ID="ListBox1" runat="server" Height="100px" SelectionMode="Multiple" Width="174px">
            <asp:ListItem>Apple</asp:ListItem>
            <asp:ListItem>Grapes</asp:ListItem>
            <asp:ListItem>Orange</asp:ListItem>
            <asp:ListItem>Mango</asp:ListItem>
            <asp:ListItem>Pea</asp:ListItem>
        </asp:ListBox>
        <asp:Button ID="Button1" runat="server" OnClick="Button1_Click" Text="Save" />
    </form>
</body>
</html>

Code Behind Code

using System;
using System.Collections.Generic;
using System.Configuration;
using System.Data.SqlClient;
using System.Linq;
using System.Text;
using System.Web;
using System.Web.UI;
using System.Web.UI.WebControls;

public partial class multipleselect : System.Web.UI.Page
{
    protected void Page_Load(object sender, EventArgs e)
    {

    }
    protected void Button1_Click(object sender, EventArgs e)
    {
        List<string> l1 = new List<string>();
        foreach (ListItem item in ListBox1.Items)
        {
            if (item.Selected)
            {
                l1.Add(item.Text);
            }  
        }
        recordinserted(l1);
    }


    private void recordinserted(List<string> l1)
    {
       StringBuilder stringbi = new StringBuilder(string.Empty);
        foreach (string item in l1)
{
const string qry = "insert into [Fruits](FruitName)values";
            stringbi.AppendFormat("{0}('{1}');",qry,item);
}
        //throw new NotImplementedException();
        SqlConnection con = new SqlConnection();
        con.ConnectionString = ConfigurationManager.ConnectionStrings["ConnectionStringtr"].ToString();
        con.Open();
        SqlCommand cmd = new SqlCommand();
        cmd.CommandText = stringbi.ToString();
        cmd.Connection=con;
        int a= cmd.ExecuteNonQuery();
        if(a>0)
        {
            Response.Write("inserted");
        }
    }
}

Code Generates the following output : 


ASP.NET ListBox Insert Multiple selected item into database

Wednesday, February 10, 2016

By using Single LINQ Query retrieve foriegn key table column

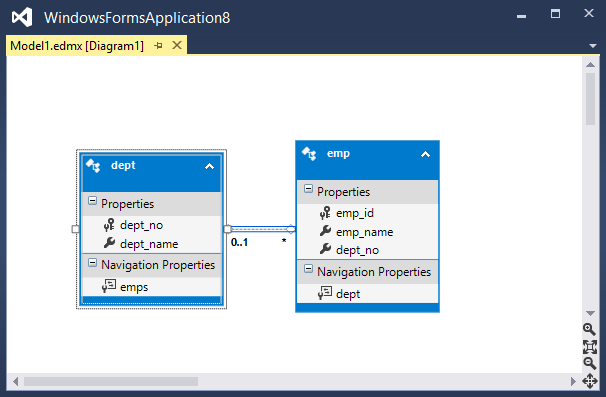
In this article, I will explain you, How to retrieve data from two joined table using single LINQ Query. Here we have two joined table in mentioned diagram. Both tables are joined from dept_no, so if you want to retrieve record from both table like:
Retrieve emp_id and emp_name who belongs to IT department.


employeeEntities empl = new employeeEntities();

            var query = from g in empl.emps
                        join m in empl.depts on g.dept_no equals m.dept_no
                        where m.dept_name == "IT"
                        select new
                        {
                            Emp_Name = g.emp_name,
                            Emp_ID = g.emp_id
                        };
               
            dataGridView1.DataSource = query.ToList();
In this code, empl is the context object through which we can access columns of both tables. emp is the foreign key table map with dept table using dept_no column. Emp_Name and Emp_ID is the reference name , which are displayed on table. Bind the query result with the dataGridView. 
© Copyright 2013 Computer Programming | All Right Reserved