-->

Saturday, April 16, 2016

Find some of Html Table column using JQuery

In this article i will show you how to find sum of single column of a html Table. We all know that a table contain table row and table column. Each row and column contains a cell. in this article i will use Id of the cell. We all know that id of the cell is different from other cell so we arrange id with numerical no like first cell id is amtlbl_0 and further is amtlbl_1, amtlbl_2. by using each method we can get the all ids. So the main logic is get the id which contain text like "amtlbl". In Jquery we have some technique to get the approximate id by using


 $("[id*=amtlbl]")
Check the complete source code: 

<!DOCTYPE html>
<html xmlns="http://www.w3.org/1999/xhtml">
<head>
    <title></title>
    <script src="Scripts/jquery-1.10.2.js"></script>
    <script type="text/javascript">

        $(function () {
            var grandtotal = 0;
            $("[id*=amtlbl]").each(function () {
                grandtotal = grandtotal + parseFloat($(this).html());


            })
            $("[id*=totlbl]").html(grandtotal.toString());

        });

        </script>
</head>
<body>
    <table style="width:100%;">
    <tr><td>Id</td><td>Amount</td><td>City</td></tr>
    <tr><td>1</td><td id="amtlbl_0">200</td><td>Pilani</td></tr>
    <tr><td>2</td><td id="amtlbl_1">800</td><td>Jaipur</td></tr>
    </table>
    <label id="totlbl"/>
</body>
</html>

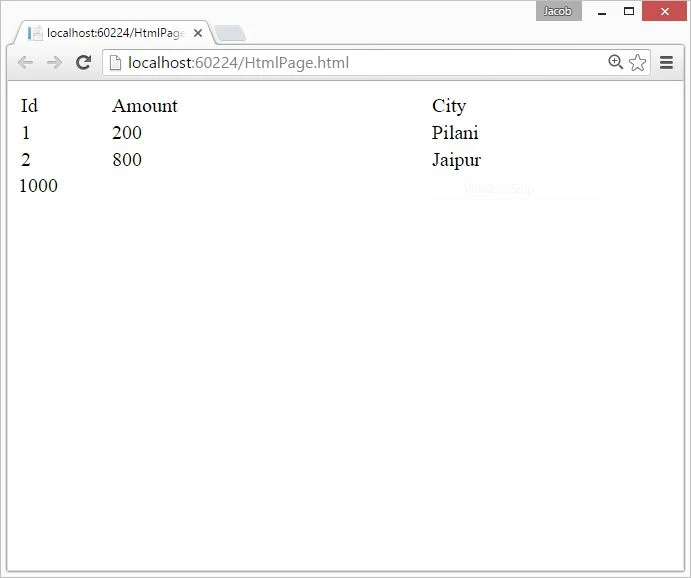
Code generate the following output:


Find some of Html Table column using JQuery

BackgroundWorker Example in WPF C#

Background Worker is used to do processing in background.  I mean to say that if you have two work and you want to do complete both task at same time then must to use BackgroundWorker class. You can do two task at same time , like in gmail, attach a file with writing some text in the Text. Use this example and see more things about BackgroundWorker class.


XAML Code: 

<Grid>
        <Button Content="Run BackGround Work" HorizontalAlignment="Left" Margin="38,32,0,0" VerticalAlignment="Top" Width="209" Click="Button_Click"/>

        <Label Content="" HorizontalAlignment="Left" Margin="38,68,0,0" VerticalAlignment="Top" Name="processlbl"/>

        <Label Content="" HorizontalAlignment="Left" Margin="217,68,0,0" VerticalAlignment="Top" Name="Completelbl"/>

        <Button Content="Other Task" HorizontalAlignment="Left" Margin="48,157,0,0" VerticalAlignment="Top" Width="199" Click="Button_Click_1"/>

        <TextBox Name="t1" HorizontalAlignment="Left" Height="23" Margin="48,198,0,0" TextWrapping="Wrap" Text="" VerticalAlignment="Top" Width="199"/>

        <Label Content="" HorizontalAlignment="Left" Margin="60,226,0,0" VerticalAlignment="Top" Name="outputlbl"/>

    </Grid>

Code Behind Code:

using System.ComponentModel;
using System.Windows;

namespace WpfApplication11
{
    /// <summary>
    /// Interaction logic for MainWindow.xaml
    /// </summary>
    public partial class MainWindow : Window
    {
        BackgroundWorker worker = new BackgroundWorker();
        public MainWindow()
        {
            InitializeComponent();
            worker.DoWork += worker_Dowork;
            worker.RunWorkerCompleted += worker_RunworkerCompleted;
        }

        private void worker_RunworkerCompleted(object sender, RunWorkerCompletedEventArgs e)
        {
            if (!e.Cancelled)
            {
                Completelbl.Content = "Complete Backgroung Work";
            }
            else
            {
                Completelbl.Content = "Fail";
            }
        }
        private delegate void mydelegate(int i);
        private void displayi(int i)
        {
            processlbl.Content = "Background work:" + i.ToString();
        }
        private void worker_Dowork(object sender, DoWorkEventArgs e)
        {
            for (int i = 0; i < 20; i++)
            {
                System.Threading.Thread.Sleep(2000);
                if(worker.CancellationPending)
                {
                    e.Cancel = true;
                    return;
                }
                mydelegate deli = new mydelegate(displayi);
                processlbl.Dispatcher.BeginInvoke(System.Windows.Threading.DispatcherPriority.Normal, deli, i);
            }
        }

        private void Button_Click(object sender, RoutedEventArgs e)
        {
            worker.RunWorkerAsync();
        }

        private void Button_Click_1(object sender, RoutedEventArgs e)
        {
            outputlbl.Content = t1.Text;
        }
    }
}

Friday, April 15, 2016

Windows Forms Methods

Windows Forms methods enable you to perform various tasks, such as opening, activating and closing the form.

The commonly used methods are explained in the following:
1. Show ( ) 
Description : Is used to display a form.
Example: Form2 frmobj = new Form2();
frmobj.Show();

Explanation : This code creates a new instance of the Form2 form by using the new keyword. The Show() method display the instance of Form2 form.

2. Hide( )
Description: Is used to hide a form.
Example: Form1 frmobj = new Form1();
frmobj.Hide();
//you can use
this.Hide( ); // for current Form1

Explanation: This code creates a new instance of the Form1 form by using the new keyword. The Hide() method hides the instance of Form1 form.

3. Activate ( )
Description: Is used to activate a form and set the focus on it. When you use this method. It brings the form to the front(if it is the current application) or flashes the form caption(if it is not the current application) on the task bar.
Example: Form1 frmobj = new Form1();
frmobj.Activate();
Explanation : This code sets focus on a form named Form1.

4. Close ( )
Description: Is used to close a form.
Example: Form1 frmobj = new Form1();
frmobj.Close();
Explanation: This code closes the form named Form1.

5. SetDesktopLocation()
Description: Is used to set the desktop location of a form at runtime. This method takes the X and Y coordinates of the desktop as its parameters.
Example: Form1 frmobj = new Form1();
frmobj.SetDesktopLocation(200,200);
Explanation : This code displays the form named Form1 at the specified location.

Thursday, April 7, 2016

Types of Dialog Boxes in Windows Form C#

Windows provides the following type of dialog boxes:
1. Modal
2. System Modal
3. Modeless

Modal Dialog Box : A modal dialog box does not allow you to switch focus to another area of the application, which has invokes the dialog box. However, you can switch to other windows application while the modal dialog box is being displayed on the screen.
For example, the Save as dialog box of Microsoft word is a modal dialog box. If you are trying to save a word file by using the Save As dialog box, you cannot make any changes in the word document until it is saved. The following figure shows the save as dialog box.


Modal Dialog Box


System Modal Dialog Box
The System modal dialog box takes control of the entire Windows environment. For example, the Windows Log On dialog box is a system modal dialog box.
The following figure displays the Log On to Windows dialog box.
Sometimes, error messages are displayed by using a system modal dialog box. When such messages appear on the screen, the user is not allowed to switch to, or interact with, any other Windows application until the system modal dialog box is closed.

System Modal Dialog Box


Modeless Dialog Box

Types of Dialog Boxes in Windows Form C#

The modeless dialog box stays on the screen and is available for use at any time. For example, the Find and Replace dialog box of Microsoft Word is a modeless dialog box. This modeless dialog box allows you to switch to another area of the application, which has invoked the dialog box, or to another windows application.

Tuesday, April 5, 2016

How to show image from database table in ASP.NET MVC

In this article i will show you, How to display image from database in ASP.NET MVC. To do this task, we will use <img /> tag in view section. First of all, Create a connection with the database using Entity Data model (Learn How to use ADO.NET Entity Data Model). In the controller action method pass the list of data to the view. Like that:

 
 private DatabaseEntities db = new DatabaseEntities();

        // GET: Home
        public ActionResult Index()
        {
            return View(db.Employees.ToList());
        }

In the View section: 

@model IEnumerable<WebApplication23.Employee>

@foreach (Employee item in Model)
{
<img src="@Url.Content(item.Database_Picture_column)" width="100" height="100" />

}

Monday, April 4, 2016

Delete selected item from DropdownList / Select List Using JQuery

In this article i will show you how to delete selected item from DropdownList/Select List Using JQuery. We all know that select/DropdownList contain option tag for value. So, the main logic behind the question is first to get the select list by using their id property then use option tag with selected attribute after that remove.
<%@ Page Language="C#" AutoEventWireup="true" CodeFile="Default10.aspx.cs" Inherits="Default10" %>

<!DOCTYPE html>

<html xmlns="http://www.w3.org/1999/xhtml">
<head runat="server">
    <title></title>
    <script src="Scripts/jquery-1.10.2.js"></script>
    <script type="text/javascript" src="http://ajax.googleapis.com/ajax/libs/jquery/1.8.3/jquery.min.js"></script>
    <script>

        $(function () {
            $("#btdel").bind("click", function () {
                $("#fruitlist option:selected").remove();
            });
                    });


    </script>
</head>
<body>
    <form id="form1" runat="server">
    <div>
    <select id="fruitlist">

        <option value="1">Mango</option>
        <option value="2">Apple</option>
        <option value="3">Orange</option>
        <option value="4">Grapes</option>


    </select>
        <input type="button" id="btdel" value="Delete" />
    </div>
    </form>
</body>
</html>

GridView Row Delete using Delete Command Name Example in ASP.NET C#

In this video i will explain you how to delete row from GridView as well as Database in ASP.NET C#. The main logic behind the code is CommandName, i.e predefined in asp.net library. If you want to update row then you have a Update command Name similarly if you want to delete row from GridView then you have Delete command Name and their respective event. Keep watching and learn better.


© Copyright 2013 Computer Programming | All Right Reserved