-->

Tuesday, May 24, 2016

Import Export project in ASP.NET C#

Project Introduction:

In this project, we have some modules, which is related to Import and Export goods services. This project provides online facilities to pickup your goods from any where in the nation. Actually projects is based on packers and movers functionality. Lots of goods transport one place to another place. We all know about import and export. Suppose, you want to bring goods from other places and that place is far from you place. So , you face too much difficulties. So, i design a packer and mover based project in ASP.NET C#.

Project modules

Project contains lots of things which is related to customer as well as company who pick up goods. So i dived the project in different categories, categories further divided in sub categories.
Module:
  1. User Module (Who Generate pick up request)
  2. Branch Module(Who handle pick up request , i am taking state level branch module)
  3. Agent Module (Who deliever the goods)
  4. Admin (Who handle all such functionality)

Software Requirement of the project : Visual Studio 2013

Front-End and Back End of the project : 

Front-End  : ASP.NET C# ( Here c# work as business logic code)
Back-End : Sql Server 

Project Video :


How to Download the Project:

Mail Me  : narenkumar851@gmail.com 

Sunday, May 22, 2016

How to use ImageMap Control in ASP.NET

Introduction

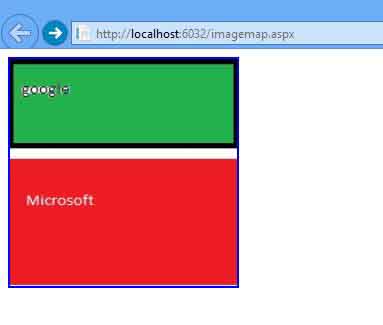
An image map is a picture on a webpage that provides various links , called hotspots, to navigate to other web pages , depending on the place where the user click (on single image). Web Designer frequently use image maps in their websites . An image map can be included in your web page by using the ImageMap Control.

An ImageMap control exists within the System.Web.UI.WebControls namespace. Image maps are often real maps; for example , you can display the map of the USA and define hotspot regions for each of its state and then navigate to the corresponding page containing the information for the selected state.


Public Properties of the ImageMap Class
Enable : Obtains or sets a value indicating whether the control can respond to user interaction.

HotSpotMode : Obtains or sets the default behavior for the HotSpot objects of an ImageMap control when the HotSpot objects are clicked.

HotSpots : Obtains or sets a group of HotSpot objects that represents the defined hotspot regions in an ImageMap Control.

Target : Obtains or sets the target window to show the Web page content when the ImageMap control is clicked.

Public Event of the ImageMap Class
Click : Occurs when a HotSpot object in an ImageMap control is clicked.
<%@ Page Language="C#" %>
<!DOCTYPE html>
<script runat="server">
</script>
<html xmlns="http://www.w3.org/1999/xhtml">
<head runat="server">
    <title></title>
</head>
<body>
    <form id="form1" runat="server">
    <div>
            <asp:ImageMap ID="ImageMap1" runat="server" Height="227px" HotSpotMode="Navigate" ImageUrl="~/imagemap.jpg" Width="227px">
            <asp:RectangleHotSpot HotSpotMode="Navigate" Left="10" NavigateUrl="http://www.google.com" Top="100" />
            <asp:RectangleHotSpot HotSpotMode="Navigate" Left="3" NavigateUrl="http://www.microsoft.com" Top="200" />
        </asp:ImageMap>
   
    </div>
    </form>
</body>
</html>
Output
hotspot

Saturday, May 21, 2016

How to Bind Hyperlink control in datalist in asp.net

Datalist introduction
The Datalist control is a data bound control that displays data by using templates. These templates define controls and HTML elements that should be displayed for an item. The Datalist control exists within the System.Web.UI.WebControl namespace.

Related topics


Some steps for binding Hyperlink control in Datalist

Step-1: Create a DataBase Table with  following fields.


Step-2: Fill this field with following values 

DepartmentID           Name                 Description
1                                  IT                     This is first department Name
2                                  CS                    This is Second Department Name


Step-3 : Create Procedure for retrieving values.

Database.mdf-->Stored Procedures -->Right click -->Add new Stored Procedure

CREATE PROCEDURE GetDepartments
AS
SELECT DepartmentID ,Name ,Description From [Table] ;

RETURN 0

Step-4: Take  a webform in your project name as "Departmentlist.aspx"
Step-5:  Paste this code into your Department.aspx


<%@ Page Language="C#" AutoEventWireup="true" CodeFile="Departmentlist.aspx.cs" Inherits="Departmentlist" %>

<!DOCTYPE html>

<html xmlns="http://www.w3.org/1999/xhtml">
<head runat="server">
    <title></title>
</head>
<body>
    <form id="form1" runat="server">
        <asp:DataList ID="DataList1" runat="server">
            <HeaderTemplate>
                Choose a Department
            </HeaderTemplate>
            <ItemTemplate>
                <asp:HyperLink ID="HyperLink1" runat="server" NavigateUrl ='<%#Link .ToDepartment (Eval ("DepartmentID").ToString ()) %>'
                  Text ='<%# HttpUtility .HtmlEncode (Eval ("Name").ToString ()) %>' ToolTip ='<%# HttpUtility .HtmlEncode (Eval ("Description").ToString ()) %>'   >

                </asp:HyperLink>
            </ItemTemplate>
        </asp:DataList>
    <div>
    
    </div>
    </form>
</body>
</html>

Step-6: Paste this code into your codebehind file


using System;
using System.Data.SqlClient;
using System.Data;


public partial class Departmentlist : System.Web.UI.Page
{
    protected void Page_Load(object sender, EventArgs e)
    {
        SqlConnection con = new SqlConnection();
        con.ConnectionString = @"Data Source=(LocalDB)\v11.0;AttachDbFilename=|DataDirectory|\Database.mdf;Integrated Security=True";
            con.Open ();
        SqlCommand cmd=new SqlCommand ();
        cmd.CommandText ="GetDepartments";
        cmd.CommandType =CommandType .StoredProcedure ;
        cmd.Connection =con;
        DataSet ds = new DataSet();
        SqlDataAdapter da = new SqlDataAdapter(cmd);
        da.Fill(ds, "Department");
        DataList1.DataSource = ds;
        DataList1.DataBind();


    }
}

Step-7 Make a Link class for absolute url


using System;
using System.Web;

/// <summary>
/// Summary description for Link
/// </summary>
public class Link
{
    public static string BuildAbsolute(string relativeuri)
    {
        // get current uri
        Uri uri = HttpContext.Current.Request.Url;
        // build absolute path
        string app = HttpContext.Current.Request.ApplicationPath;
        if (!app.EndsWith("/"))
               
            app += "/";
        relativeuri = relativeuri.TrimStart('/');
        // return the absolute path
        return HttpUtility .UrlPathEncode (String .Format ("http://{0}:{1}{2}",uri .Host ,uri.Port ,app ));


    }
    public static string ToDepartment(string departmentId, string page)
    {
        if (page == "1")
     
            return BuildAbsolute(string.Format("catalog.aspx?DepartmentID={0}", departmentId));
        else
            return BuildAbsolute (string .Format ("catalog.aspx?DepartmentID={0}&Page={1}",departmentId,page ));
           

    }
    //generate a department url for the first page
    public static string ToDepartment(string departmentId)
    {
        return ToDepartment(departmentId, "1");
    }

 
}


Out Put 

Friday, May 20, 2016

Pager Template in FormView Example of ASP.NET C#

In this article i will show you, How to customize paging of FormView using pager template. By using pager template we can changed the structure of paging. I will give you an example of pager template. In this example i will show you, How to prepare paging structure in FormView, after preparing the structure of Edit Item template and Item Template , you can put the structure of pager template. In this example, pager template contain two link button with CommandName and CommandArgument. In CommandName we have single value for both control i.e Page, But CommandArgument contain value i.e "Prev" and "Next". Both CommandArguments are used for specific purpose. I will show you DataBound event, In this, we have pager template information.


<%@ Page Language="C#" AutoEventWireup="true" CodeFile="Default5.aspx.cs" Inherits="Default5" %>

<!DOCTYPE html>

<html xmlns="http://www.w3.org/1999/xhtml">
<head runat="server">
    <title></title>
</head>
<body>
    <form id="form1" runat="server">
    <div>
    
    </div>
        <asp:FormView  ID="FormView1" runat="server" DataKeyNames="Id" AllowPaging="True" OnDataBound="FormView1_DataBound" OnPageIndexChanging="FormView1_PageIndexChanging">
            <EditItemTemplate>
                Id:
                <asp:Label ID="IdLabel1" runat="server" Text='<%# Eval("Id") %>' />
                <br />
                Name:
                <asp:TextBox ID="NameTextBox" runat="server" Text='<%# Bind("Name") %>' />
                <br />
                <asp:LinkButton ID="UpdateButton" runat="server" CausesValidation="True" CommandName="Update" Text="Update" />
                &nbsp;<asp:LinkButton ID="UpdateCancelButton" runat="server" CausesValidation="False" CommandName="Cancel" Text="Cancel" />
            </EditItemTemplate>
            <InsertItemTemplate>
                Id:
                <asp:TextBox ID="IdTextBox" runat="server" Text='<%# Bind("Id") %>' />
                <br />
                Name:
                <asp:TextBox ID="NameTextBox" runat="server" Text='<%# Bind("Name") %>' />
                <br />
                <asp:LinkButton ID="InsertButton" runat="server" CausesValidation="True" CommandName="Insert" Text="Insert" />
                &nbsp;<asp:LinkButton ID="InsertCancelButton" runat="server" CausesValidation="False" CommandName="Cancel" Text="Cancel" />
            </InsertItemTemplate>
            <ItemTemplate>
                Id:
                <asp:Label ID="IdLabel" runat="server" Text='<%# Eval("Id") %>' />
                <br />
                Name:
                <asp:Label ID="NameLabel" runat="server" Text='<%# Bind("Name") %>' />
                <br />

                <asp:LinkButton ID="LinkButton3" runat="server" CommandName="Edit">Edit</asp:LinkButton>
                <br />

            </ItemTemplate>
             
            <PagerTemplate>
                <table>
                    <tr>
                        <td>
                            <asp:LinkButton ID="LinkButton1" runat="server" Text="Previous" CommandName="Page" CommandArgument="Prev"/>
                            <asp:LinkButton ID="LinkButton2" runat="server" Text="Next" CommandName="Page" CommandArgument="Next"/>
                        </td>
                        
                        <td>
                          Page No  <asp:Label ID="l1" runat="server"/>
                           Total Page <asp:Label ID="l2" runat="server"/>
                        </td>

                    </tr>


                </table>


            </PagerTemplate>
            <PagerSettings Mode="NextPrevious" Position="Bottom" />


        </asp:FormView>
       
    </form>
</body>
</html>

Code Behind page

using System;
using System.Collections.Generic;
using System.Configuration;
using System.Data;
using System.Data.SqlClient;
using System.Linq;
using System.Web;
using System.Web.UI;
using System.Web.UI.WebControls;

public partial class Default5 : System.Web.UI.Page
{
    protected void Page_Load(object sender, EventArgs e)
    {
        if (!Page.IsPostBack)
        {
            formviewload();
        }
    }

    private void formviewload()
    {
        //throw new NotImplementedException();
        SqlConnection con = new SqlConnection();
        con.ConnectionString =ConfigurationManager.ConnectionStrings["ConnectionString"].ToString();
        con.Open();
        SqlCommand cmd= new SqlCommand();
        cmd.CommandText ="select * from [Employee]";
        cmd.Connection =con;
        SqlDataAdapter da = new SqlDataAdapter(cmd);
        DataSet ds = new DataSet();
        da.Fill(ds);
        FormView1.DataSource =ds;
        FormView1.DataBind();

    }
    protected void FormView1_DataBound(object sender, EventArgs e)
    {
        FormViewRow pagerrow = FormView1.BottomPagerRow;
        Label pageno = (Label)pagerrow.Cells[0].FindControl("l1");
        Label totalpage = (Label)pagerrow.Cells[0].FindControl("l2");
        if ((pageno!=null) && (totalpage!=null))
        {
            int pagen = FormView1.PageIndex +1;
            int total = FormView1.PageCount;
            pageno.Text = pagen.ToString();
            totalpage.Text = total.ToString();

        }
    }
    protected void FormView1_PageIndexChanging(object sender, FormViewPageEventArgs e)
    {
        FormView1.PageIndex = e.NewPageIndex;
        formviewload();

    }
}

Code generates the following output

Pager Template in FormView Example of ASP.NET C#


Tuesday, May 17, 2016

Code for user registration in ASP.NET MVC


In this video tutorial i will teach you how to insert value into database table. You can say how to register user. If you want to save value into database table then first to create a database table. Check this video to create database in visual studio. After that, you can make a controller class to pass data to the view section. check this video for full demonstration. 

Saturday, May 14, 2016

JQuery Bind function handles Click, DblClick, MouseEnter and MouseLeave Event

In this article i will show you how to use Bind( ) function in JQuery. Bind function is used to call events using string or triggers. I mean to say that  either you can pass event directly in the method or externally using triggers. In this example, i will show you click , double click , Mouse Enter and Mouse Leave event directly in Bind Function. In this example i will show you , when cursor moves on paragraph boundary then class toggle with different color. Lets check this example.
<%@ Page Language="C#" AutoEventWireup="true" CodeFile="Default7.aspx.cs" Inherits="Default7" %>

<!DOCTYPE html>

<html xmlns="http://www.w3.org/1999/xhtml">
<head runat="server">
    <title></title>
    <style>
        p{
            background-color:red;
            padding:5px;
            font-size:larger;
        }
        .over{
            color:white;
            background-color:blue;
        }
        span{
            color:green;
        }
    </style>
    <script src="Scripts/jquery-1.10.2.js"></script>
    <script>
        $(function () {
            $("p").bind("click", function (event) {
                var string = "Get Cordinate" + event.pageX + "and" + event.pageY;
                $("span").text("single Clicked " + string);

            });

            $("p").bind("dblclick", function (event) {
           
                $("span").text("Double Clicked " + this.nodeName);

            });

            $("p").bind("mouseenter mouseleave", function (event) {

                $(this).toggleClass("over");
            });


        })
    </script>
</head>
<body>
    <form id="form1" runat="server">
<p>Click, Double Click, MouseEnter and MouseLeave Event Example</p>
        <span></span>
    </form>
</body>
</html>

Windows Forms Events

An event is generated when a user performs an action, such as clicking the mouse or pressing a key. When a user clicks a form, the clicks event is generated for the form.
Each form and control has a predefined set of events associated with it. You can instruct an application to perform a specific action when an event takes place. For example, you can write code for adding items to a list as soon as a form is loaded.

Click : Occurs when a user clicks anywhere on a form.
DoubleClick : Occurs when the component is double-clicked.
FormClosed : Occurs when a form is closed.
Deactivate : Occurs when a form losses focus and is no longer active.
Load : Occurs when a form is loaded in the memory for the first time. This event can be used to initialize variables used in a form. This event can also be used to specify the initial values to be displayed in various controls in a form.
MouseMove : Occurs when a mouse is moved over a form.
MouseDown : Occurs when the left mouse button is pressed on a form.
MouseUp : Occurs when the mouse button is released.

You can specify the action to be performed on the occurrence of an event within a special method called, event handler. You can add code for an event handler by using the code Editor window.

To write code for an event corresponding to an object, open the properties window for that object.
© Copyright 2013 Computer Programming | All Right Reserved