-->

Friday, January 31, 2014

DropdownList SelectedIndexChanged page reload but value not change

Introduction 

If you want to bind one DropdownList from another DropdownList. But you notice that your first DropdownList take same result, After PostBack your page will refreshed, again Page_Load function will be run.

The reason behind

Because your first Dropdownlist bind on Page_Load Event  with both postback and without postback mode.

Solution of the problem is 

 Bind first DropDownList on Page_Load event with withoutPostBack mode.

Lets take an simple example to demonstrate it

<%@ Page Language="C#" AutoEventWireup="true" CodeFile="Default2.aspx.cs" Inherits="Default2" %>

<!DOCTYPE html PUBLIC "-//W3C//DTD XHTML 1.0 Transitional//EN" "http://www.w3.org/TR/xhtml1/DTD/xhtml1-transitional.dtd">

<html xmlns="http://www.w3.org/1999/xhtml">
<head runat="server">
    <title></title>
</head>
<body>
    <form id="form1" runat="server">
    <div>
    Select Country
        <asp:DropDownList ID="DropDownList1" runat="server" AutoPostBack="True" 
            Height="52px" onselectedindexchanged="DropDownList1_SelectedIndexChanged" 
            Width="279px">
        </asp:DropDownList>
        <br />
        <br />
        Select state
        <asp:DropDownList ID="DropDownList2" runat="server" Height="33px" Width="299px" 
            Visible="False">
        </asp:DropDownList>
    </div>
    </form>
</body>
</html>
using System;
using System.Collections.Generic;
using System.Linq;
using System.Web;
using System.Web.UI;
using System.Web.UI.WebControls;
using System.Data.SqlClient;
using System.Data;
using System.Configuration;


public partial class Default2 : System.Web.UI.Page
{
    protected void Page_Load(object sender, EventArgs e)
    {
        if (!Page.IsPostBack )
        {
            SqlConnection con = new SqlConnection();
            con.ConnectionString = ConfigurationManager.ConnectionStrings["ConnectionString"].ToString();
            con.Open();
            SqlCommand cmd = new SqlCommand();
            cmd.CommandText = "Select * from country";
            cmd.Connection = con;
            SqlDataAdapter da = new SqlDataAdapter(cmd);
            DataSet ds = new DataSet();
            da.Fill(ds);
            DropDownList1.DataSource = ds;
            DropDownList1.DataTextField = "countryname";
            DropDownList1.DataValueField = "countryid";
           
            DropDownList1.DataBind();
            DropDownList1.Items.Insert(0, "select any country");
            con.Close();
            
        }


    }
    protected void DropDownList1_SelectedIndexChanged(object sender, EventArgs e)
    {
        DropDownList2.Visible = true;

        SqlConnection con = new SqlConnection();
        con.ConnectionString = ConfigurationManager.ConnectionStrings["ConnectionString"].ToString();
        con.Open();
        SqlCommand cmd = new SqlCommand();
        cmd.CommandText = "Select * from state where countryid='"+DropDownList1 .SelectedValue+"'";
        cmd.Connection = con;
        SqlDataAdapter da = new SqlDataAdapter(cmd);
        DataSet ds = new DataSet();
        da.Fill(ds);
        DropDownList2.DataSource = ds;
        DropDownList2.DataTextField = "statename";
        DropDownList2.DataValueField = "Stateid";
        DropDownList2.DataBind();
        con.Close();

    }

}

Code Generate the following output
DropdownList SelectedIndexChanged page reload but value not change

How to Querying Data using Joins in Sql Programming: Part 4

Equi Join

In SQL programming, an Equi join is the same as an inner join and joins tables with the help of a foreign key. However, an equi join is used to display all the columns from both the tables. The common column from all the joining tables is displayed.

Consider an example where you apply an equi join between the EmployeeDepartmentHistory, Employee, and Department tables by using a common column, BusinessEntityID. To perform this task, you can use the following query:

SELECT * FROM HumanResources.EmployeeDepartmentHistory d
JOIN HumanResources.Employee e ON d.BusinessEntityID = e.BusinessEntityID
JOIN HumanResources.Department p ON p.DepartmentID = d.DepartmentID

The output of this query displays the EmployeeID column from all the tables, as shown in the following figure.

Equi join sql programming

Self Join

In a self-join, a table is joined with itself. As a result, one row in a table correlates with other rows in the same table. In a self-join, a table name is used twice in the query. Therefore, to differentiate the two instances of a single table, the table is given two alias names.

The following example performs a self-join of the Sales.SalesPerson table to produce a list of all the territories and the sales people working in them.

SELECT st.Name AS TerritoryName, sp.BusinessEntityID, sp.SalesQuota, sp.SalesYTD
FROM Sales.SalesPerson AS sp JOIN Sales.SalesTerritory AS st
ON sp.TerritoryID = st.TerritoryID
ORDER BY st.Name, sp.BusinessEntityID

The output of the self-join is shown in the following figure.

Self join sql programming


How to Querying Data using Joins in Sql Programming: Part 3

A cross join, also known as Cartesian Product in SQL programming, between two tables joins each row from one table with each row of the other table. The number of rows in the result set is the number of rows in the first table multiplied by the number of rows in the second table.

This implies that if Table A has 10 rows and Table B has 5 rows, then all 10 rows of Table A are joined with all 5 rows of Table B. therefore, the result set will contain 50 rows.

Consider following query in which all the BusinessEntityID is retrieved from SalesPerson table and SalesTerritory with their cross join. The where condition will filter the result according to the territoryID, and at the last the result will sort by the resulting BusinessEntityID.

SELECT p.BusinessEntityID, t.Name AS Territory
FROM Sales.SalesPerson p
CROSS JOIN Sales.SalesTerritory t
WHERE p.TerritoryID = t.TerritoryID
ORDER BY p.BusinessEntityID

The preceding query combines the records of both the tables to display the result with all the possible combinations, as shown in the following figure.

How to Querying Data using Cross Joins in Sql Programming


Item selection required for ListBox in ASP.NET

If you want to do it in asp.net that your website visitor select any one option in given ListBox item. Use Required Field Validator for this type of problem, also set initial value. If your initial value is match with your selected item, error message generated on client machine. lets do it in asp.net with sort code example

Selection is required 

<%@ Page Language="C#" %>

<!DOCTYPE html PUBLIC "-//W3C//DTD XHTML 1.0 Transitional//EN" "http://www.w3.org/TR/xhtml1/DTD/xhtml1-transitional.dtd">

<script runat="server">

</script>

<html xmlns="http://www.w3.org/1999/xhtml">
<head runat="server">
    <title></title>
</head>
<body>
    <form id="form1" runat="server">
    <div>
        <strong>Selection Required<br />
        </strong>
    </div>
        <asp:ListBox ID="ListBox1" runat="server" Height="132px" Width="147px">
            <asp:ListItem>Select Control</asp:ListItem>
            <asp:ListItem>Button Control</asp:ListItem>
            <asp:ListItem>Calendar Control</asp:ListItem>
            <asp:ListItem>CheckBox Control</asp:ListItem>
            <asp:ListItem>FileUpload Control</asp:ListItem>
    </asp:ListBox>
    &nbsp;<asp:RequiredFieldValidator ID="RequiredFieldValidator1" runat="server" 
        ControlToValidate="ListBox1" ForeColor="Red" InitialValue="Select Control">Please Select Control</asp:RequiredFieldValidator>
    <br />
    <br />
    <asp:Button ID="Button1" runat="server" Text="Submit" />
    </form>
</body>
</html>

Code Generate the following output

Item selection required for ListBox in ASP.NET

Bind DetailsView with insert, edit and delete in ASP.NET

You can easily bind your DetailsView data control in asp.net using SqlDataSource, SqlDataSource provides connectivity between front end to back-end with all insert, edit and delete features. This example covers that how to bind your DetailsView with database. These are following steps

Step-1 : Create a SQL Table with some fields like
sno int (primaryKey, Isidentity=true)
name nvarchar(50)
address nvarchar(250)


Step-2 : Add SqlDataSource Control to Design window from toolbox
Step-3 : Select 'Configure Data Source' link using show Smart tag.

'Configure Data Source'


Step-4 : Select Database or ConnectionString from Dropdown menu.
ConnectionString

Step-5 : Select Table-name from Dropdown menu also select Advanced tab.
Table-name from Dropdown menuAdvanced tab

Step-6 : Select Insert, Update and delete checkbox option.
Step-7 : Click to Test Query and  Finish button.

Step-8 : Add DetailsView Control to the page, check all insert, update, and delete features using show smart teg.
Bind DetailsView with insert, edit and delete in ASP.NET

Now generate source code in page file

<%@ Page Language="C#" AutoEventWireup="true" CodeFile="Default5.aspx.cs" Inherits="Default5" %>

<!DOCTYPE html PUBLIC "-//W3C//DTD XHTML 1.0 Transitional//EN" "http://www.w3.org/TR/xhtml1/DTD/xhtml1-transitional.dtd">

<html xmlns="http://www.w3.org/1999/xhtml">
<head runat="server">
    <title></title>
</head>
<body>
    <form id="form1" runat="server">
    <div>
    
        <asp:SqlDataSource ID="SqlDataSource1" runat="server" 
            ConnectionString="<%$ ConnectionStrings:ConnectionString %>" 
            DeleteCommand="DELETE FROM [emp] WHERE [sno] = @sno" 
            InsertCommand="INSERT INTO [emp] ([name], [address]) VALUES (@name, @address)" 
            SelectCommand="SELECT * FROM [emp]" 
            UpdateCommand="UPDATE [emp] SET [name] = @name, [address] = @address WHERE [sno] = @sno">
            <DeleteParameters>
                <asp:Parameter Name="sno" Type="Int32" />
            </DeleteParameters>
            <InsertParameters>
                <asp:Parameter Name="name" Type="String" />
                <asp:Parameter Name="address" Type="String" />
            </InsertParameters>
            <UpdateParameters>
                <asp:Parameter Name="name" Type="String" />
                <asp:Parameter Name="address" Type="String" />
                <asp:Parameter Name="sno" Type="Int32" />
            </UpdateParameters>
        </asp:SqlDataSource>
    
    </div>
    <asp:DetailsView ID="DetailsView1" runat="server" AllowPaging="True" 
        AutoGenerateRows="False" DataKeyNames="sno" DataSourceID="SqlDataSource1" 
        Height="50px" Width="125px">
        <Fields>
            <asp:BoundField DataField="sno" HeaderText="sno" InsertVisible="False" 
                ReadOnly="True" SortExpression="sno" />
            <asp:BoundField DataField="name" HeaderText="name" SortExpression="name" />
            <asp:BoundField DataField="address" HeaderText="address" 
                SortExpression="address" />
            <asp:CommandField ShowDeleteButton="True" ShowEditButton="True" 
                ShowInsertButton="True" />
        </Fields>
    </asp:DetailsView>
    </form>
</body>
</html>

Code Generate the following output

Bind DetailsView with insert, edit and delete in ASP.NET

Accept only numbers by the TextBox in ASP.NET

If you want to do it in asp.net that your TextBox accept only number when user input in it. Use CompareField Validator for this type of problem, Normally we use CompareField Validator for password recheck. Today we use it for another purpose, now, take an example.

Accept Only integer type number by TextBox

Step-1 : Add webform into the project.
Step-2 : Take one TextBox and Button control onto the webform.
Step-3 : Also take one Required field and one compare field validator onto the web form.
Step-4 : Set Property of required field validator, these are

ControlToValidate="TextBox1"
Display="Dynamic"
ForeColor="#CC0000"
Text= "Required"

Step-5 : Set Property of CompareField Validator, these are

ControlToValidate="TextBox1"
 Display="Dynamic"
  ForeColor="#CC0000"
  Operator="DataTypeCheck"
   Type="Integer"
   Text= "Enter Only numbers"

Complete code

<%@ Page Language="C#" AutoEventWireup="true" CodeFile="Default4.aspx.cs" Inherits="Default4" %>

<!DOCTYPE html PUBLIC "-//W3C//DTD XHTML 1.0 Transitional//EN" "http://www.w3.org/TR/xhtml1/DTD/xhtml1-transitional.dtd">

<html xmlns="http://www.w3.org/1999/xhtml">
<head runat="server">
    <title></title>
</head>
<body>
    <form id="form1" runat="server">
    <div>
    
        Enter age :
        <asp:TextBox ID="TextBox1" runat="server" Width="172px"></asp:TextBox>
&nbsp;<asp:RequiredFieldValidator ID="RequiredFieldValidator1" runat="server" 
            ControlToValidate="TextBox1" Display="Dynamic" ForeColor="#CC0000">Required</asp:RequiredFieldValidator>

        <asp:CompareValidator ID="CompareValidator1" runat="server" 
            ControlToValidate="TextBox1" Display="Dynamic" ForeColor="#CC0000" 
            Operator="DataTypeCheck" Type="Integer">Enter Only numbers</asp:CompareValidator>
        <br />
        <asp:Button ID="Button1" runat="server" Text="Submit" />
    
    </div>
    </form>
</body>
</html>

Code Generate the following Output

Accept only numbers by the TextBox in ASP.NET

Examples of some common Algorithms of DataStructure in C programming

1.Algorithm to find the average of  a subject marks of ‘N’ number of students.
             AVG_OF_MARKS (LIST, N)
            [LIST is an array containing marks, N is the size of array]
            SUM 0
            Repeat For I=1,2,3, …N
               SUM  SUM  + LIST[i]
            [End of For I]
            AVG SUM/N
            Write: ‘The average is’,AVG
            Exit.

2.Algorithm to find average of SALARY in an array of EMP struct containing information EMPNO, EMPNAME, and SALARY.
        AVG_SALARY (LIST, SIZE)
        [LIST is an array of EMP, SIZE is size of array]
        SUM 0
        Repeat For I=1,2,3, …SIZE
          SUM SUM  + LIST[I].SALARY
       [End of For I]
       AVG  SUM / SIZE
       Write: ‘The average Salary is’,AVG
       Exit.
An algorithm, that performs sub task, may be called in another algorithm. It is better practice to divide the given problem into sub problems and write the individual algorithms to solve such sub problems and collectively write main algorithm to call the sub algorithms in order to solve the main problem.

3.Algorithm to find maximum of two unequal numbers and use the same to find maximum of four unequal numbers.
          MAX_OF_2(NUM1, NUM2)
          [NUM1 and NUM2 are two numbers]
          If NUM1 > NUM2 Then:
                       Return NUM1
          Else:
                        Return NUM2
          [End of If]
          Exit:
          MAX_OF_4(NUM1, NUM2, NUM3, NUM4)
          [NUM1, NUM2, NUM3, and NUM4 are numbers]
          TEMP1 MAX_OF_2(NUM1, NUM2)
           TEMP2  MAX_OF_2(NUM3, NUM4)
            MAX MAX_OF_2(TEMP1, TEMP2)
            Return MAX
            Exit.

4.Algorithm to find minimum of two distinct numbers and using the same to find minimum of three distinct numbers.
            MIN_OF_2(NUM1, NUM2)
            [NUM1 and NUM2 are two number]
             If NUM1<NUM2 Then:
                 Return NUM1
             Else:
                Return NUM2
               [End of If]
               Exit.
               MIN_OF_3(NUM1, NUM2, NUM3)
               [NUM1, NUM2, and NUM3 are distinct number]
                   Return MIN_OF_2(MIN_OF_2(NUM1, NUM2), NUM3)
                Exit.

5.Algorithm to find the GCD (Greatest Common Divisor)
of two positive numbers and use the same to find LCM of two positive numbers.
GCD(NUM1, NUM2)
Rem    NUM1%NUM2 [%Modulus Operator]
Repeat While Rem<>0
  NUM1 <--- NUM2
   NUM2<--- Rem
   Rem <-- NUM1% NUM2
 [End of While]
Return NUM2
Exit. 
LCM(NUM1,NUM2)
  Return(NUM1*NUM2) / GCD (NUM1,NUM2)
Eixt.
Suppose that the LCM algorithm is called using 12 and 16.
The algorithm calls GCD with 12 and 16.

Working of GCD algorithm:
Rem12%16       i.e.  Rem =12
Rem is not equal to Zero. So, NUM1=16 and NUM2=12
Rem16%12       i.e. Rem=4
Rem is not equal to Zero. So, NUM1=12 and NUM2=4
Rem12%4          i.e. Rem=0
Rem is equal to Zero. So, GCD algorithm returns NUM2 that is 4.
When the algorithm LCM gets the result from GCD algorithm it finds the expression value (NUM1 * NUM2) /GCD(NUM1,NUM2).i.e.(12*16) / 4. Which is equal to 48.48 is the LCM of 12 and 16.
Here in this example algorithm, finding LCM is the main problem that can be divided into sub problem like finding the GCD first and using the same to solve the main problem. So, GCD algorithm is written first and in the order algorithm that can be treated as a main algorithm. In this way a given problem can be divided into small problems and algorithms can be written to solve such small problems.

6. Algorithm to find sum of ‘N’ natural numbers between 
N1 and N2.
SUM1(N1,N2)
[N1 and N2 are two different natural numbers]
If N1> N2 Then:
   MAXN1
    MINN2
Else:
    MAXN2
    MINN1
[End of ]
MIN  MIN – 1[to include MIN in sum]
SUM1 (MIN*(MIN +1))/2
SUM2(MAX*(MAX +1))/2
Return SUM2-SUM1
Exit.
In the above algorithm to find the sum of N natural the formula N(N+1)/2 is used. Instead of formula a repetitive statement can also be used that run from MIN to MAX with setp 1. The algorithm can be re-written as:

SUM2(N1,N2)
[N1 and N2 are two different natural numbers]
If N1>N2 Then:
   MAX N2
   MIN N2
Else:
   MAX N2
   MINN1
[End of If]
SUM 0
Repeat For I= MIN, MIN+1, MIN+2 …MAX
    SUMSUM +1 
[End of For]
Return SUM
Exit.

Dry Run:
Suppose that the above algorithm SUM 1 is called with two number 23 and 11. In the If statement 23>11 condition is TRUE, therefore MAX becomes 23 and MIN becomes 11. Now the loop repeats for 11, 12, 13, 14 up to 23 (I values).Every time when the loop is repeated  I  is added to SUM. So, finally the value of SUM is returned from the algorithm. 

Insert element in Array in PHP Programming

Insert element in PHP array:- 
                                                                             If we wish to insert a new item or element in PHP array then we have three choices first is insert the element  from fist position , second is insert the element  at last position and third is insert the element at any desire position in an array. Here following code is showing that how to implement above three operations.


Insert the element from starting of array: - We can do this we use PHP array_unshift() function. Syntax of this function is follows:-
              Int  array_unshift(array array, mixed variable [, mixed variable...])

So we can use any element to the array which is passed in this function  this can be understand with the help of following code.
:
$names = array("jack”,“jon");
array_unshift($states,"weilems","reacher");
after this statement the array name  becomes
$names = array("jon","jacob","rhett","weilems");

So names jack and jon added to the $names array from its starting index and value of index replace by 2 because two new element we added. The same function can be applied with associative array but the key name does not changed.


Insert the element  at last position:- This can be possible in PHP array by using array_push() method. The syntax of this array is
int array_push(array array, mixed variable [, mixed variable...])
So the element is added to the given array and return true if success and return false if failed. This can be understood with the help of following code.

$names = array("weilems"," reacher");
array_push($states," jon "," jack ");
after this statement the array name  becomes
$names = array("jon","jacob","rhett","weilems");

So names weilems and reacher added to the $names array from its end index and value of index increased by 2 because two new element we added. The same function can be applied with associative array.


Insert the element at any desire position:- This is possible if we have sufficient index is available. This can be possible by using direct assignment for example if we want to add a value at fourth index of $name array the we use following statements.

$name [4] =” weilems”;

If the 4th index is available and free then name “weilems” will be add to this index. Or it replaces the value which is already stored at this index.

Thursday, January 30, 2014

How to Querying Data using Joins in Sql Programming: Part 2

In comparison to an inner join, an outer join displays the result set containing all the rows from one table and the matching rows from another table. For example, if you create an outer join on Table A and Table B, it will show you all the records of Table A and only those records from Table B for which the condition on the common column holds true.

An outer join displays NULL for the columns of the related table where it does not find matching records. The syntax of applying an outer join is:

SELECT column_name, column_name [, column_name]
FROM table1_name [LEFT | RIGHT| FULL] OUTER JOIN table2_name
ON table_name.ref_column_name

An outer join is of three types:

Left Outer Join

A left outer join returns all rows from the table specified on the left side of the LEFT OUTER JOIN keyword and the matching rows from the table specified on the right side. The rows in the table specified on the left side for which matching rows are not found in the table specified on the right side, NULL values are displayed in the column that get data from the table specified on the right side.

Consider an example. The SpecialOfferProduct table contains a list of products that are on special offer. The SalesOrderDetail table stores the details of all the sales transactions. The users at AdventureWorks need to view the transaction details of these products. In addition, they want to view the ProductID of the special offer products for which no transaction has been done.

To perform this task, you can use the LEFT OUTER JOIN keyword, as shown in the following query:

Select p.ProductID, q.SalesOrderID, q.UnitPrice
From Sales.SpecialOfferProduct p
Left outer join Sales.SalesOrderDetail q on p.ProductID= q.ProductID
where SalesOrderID is NULL

The following figure displays the output of the preceding query.

How to Querying Data using Joins in Sql Programming: Part 2

Right Outer Join

A right outer join returns all the rows form the table specified on the right side of the RIGHT OUTER JOIN keyword and the matching rows from the table specified on the left side.

Consider the example of Adventure Works. Inc. The JobCandidate table stores the details of all the job candidates. You need to retrieve a list of all the job candidates. In addition, you need to find which candidate has been employed in Adventure Works, Inc. To perform this task, you can apply a right outer join between the Employee and JobCandidate tables, as shown in the following query:

SELECT e.JobTitle, d.JobCandidateID
FROM HumanResources.Employee e
RIGHT OUTER JOIN HumanResources.JobCandidate d
ON e.BusinessEntityID=d.BusinessEntityID

The result set displays the JobCandidateID column from the JobCandidate table and the BusinessEntityID column from the matching rows of the Employee table.

How to Querying Data using Joins in Sql Programming: Part 2

Full Outer Join

A full outer join is a combination of left outer join and right outer join. This join returns all the matching and non-matching rows from both the tables. However, the matching records are displayed only once. In case of non-matching rows, a NULL value is displayed for the columns for which data is not available.

SELECT e.BusinessEntityID, e.EmployeeName,ed.EmployeeEducationCode,
ed. Education
FROM Employee e FULL OUTER JOIN Education ed
ON e.EmployeeEducationCode = ed.EmployeeEducationCode

According to this query, the employee details and their highest educational qualification is displayed. For non-matching values, NULL is displayed.

Reference Data Types in Java Programming

Any type of storage that stores an address or we can say reference of object in memory, called Reference data type. Java like other language have also some reference data types discussed in the article.

Broadly a reference in Java is a data element whose value is an address of a memory location. Arrays (a group of similar data items), classes (a blue print of some entity e.g. a student) and interfaces are reference type. The value of reference type variable, in contrast to that of primitive type, is a reference to (an address of) the value or set of values represented by variables.

Reference Data Types in Java Programming

A reference is called a pointer, or memory address in other language. The java programming language does not support the explicit use of addresses like other languages do. You use variable’s name instead.

An importance reference type that you use in Java is String type. The String type lets you create variables that can hold textual data e.g. “Mohan”, TZ194”, “194ZB”, “234” etc. Anything that you enclose in double quotes is treated as text in Java.

Create PHP Array in PHP Programming

Create PHP array :-
                               We have following methods to create an array in PHP.
To assign index and key manually to the variable: - In this method we have to provide a specific index value as well as key value to the variable. This can be understood with the help of example.
Let we want an array named “record” to store different information of students such as name, age , id, and marks. Here the variable “record” act as an array and store all these information in following way.

In this example we use an array variable $record to store different elements. Now we have following properties this PHP array.
Index range for this array is 0-3.where minimum index is 0 and maximum index is 3;
Maximum item that this array can store is 4.
A PHP array can store different type of elements like integer or string or double etc. because php takes the type of data automatically corresponding to that.
In above program we use the function print_r() which is used to print values store in array variable.


In this example we used a key in stand of index. PHP provide this facility to make the array calculation much easy and user-friendly. The array which uses keys to hold the value is called associative array. 
To use range() function:- If we want to create an array  with a specific range like for integer such as 100-500 or for float 4.6-90.6 or for string like b-k then we can create an array by using range function. Syntax of this method is following
Range (string value, ending value, difference);
This could be understood with the help of example.


To use array () function: - This functions is used to make an array in php. The syntax of this fictional is follows.
Array array ([ mixed $... ] )
This array function takes mixed type of variables and prepares an array for us.
This can be understand with the help of following codes.
$name=array(“jack”, “jon”,”weilems”);
Or this can be use for associative array such as:-
$record=array(name->”jack” ,roll->5, marks->45.9, address->”new york”);

How to use TextChanged event of TextBox with AutoPostBack in ASP.NET


ASP.NET application works on AutoPostBack model, i mean, if we want to run code behind event like TextChanged event then we must set AutoPostBack property is true.
  <%@ Page Language="C#" AutoEventWireup="true" CodeFile="Default3.aspx.cs" Inherits="Default3" %>

<!DOCTYPE html PUBLIC "-//W3C//DTD XHTML 1.0 Transitional//EN" "http://www.w3.org/TR/xhtml1/DTD/xhtml1-transitional.dtd">

<html xmlns="http://www.w3.org/1999/xhtml">
<head runat="server">
    <title></title>
</head>
<body>
    <form id="form1" runat="server">
    <div>
        Search Item<asp:TextBox ID="TextBox1" runat="server" 
            AutoPostBack="True" Width="174px" ontextchanged="TextBox1_TextChanged"></asp:TextBox>
        <br />
        <br />
    </div>
    <asp:Label ID="Label1" runat="server"></asp:Label>
    </form>
</body>
</html>
Code Behind Code

using System;
using System.Collections.Generic;
using System.Linq;
using System.Web;
using System.Web.UI;
using System.Web.UI.WebControls;

public partial class Default3 : System.Web.UI.Page
{
    protected void Page_Load(object sender, EventArgs e)
    {

    }
    protected void TextBox1_TextChanged(object sender, EventArgs e)
    {
        string[] arr = { "jacob", "lefore", "martin" };

        foreach (string item in arr)
{
if (item==TextBox1 .Text)
        {
            Label1.Text = item;

        } 
}
        
    }
}

Output

This example shows that TextChanged event occurs when user focus out from the TextBox. You can search item on TextChanged event.

Algorithmic Notation in DataStructure, C Programming

Algorithm is a sequential, finite non-complex step-by-step solution, written in English like statements, to solve a problem. Here we can consider some points about the algorithmic notation, which are helpful in writing algorithms to understand the basic data structure operations clearly. Algorithm writing is first step in implementing the data structure.

1.Name of the algorithm and parameters: Name of the algorithm may be written in capital letters and the name is chosen according to the problem or operation specification. The name may depict the work done by algorithm is called can be given as parameter names immediately followed by name of the algorithm in a pair of parenthesis.
           e.g.     TRAVERSELIST (LIST, SIZE)
                       LINEARSEARCH (LIST, SIZE, ITEM)

The name of algorithm serves the purpose of start for algorithm and it is the heading of algorithm, and further statements of algorithm are written after the heading.
s using any of the programming languages.

 2.Comments: The comments that are necessary to explain the purpose of algorithm or the things used in an algorithm in detail as non-executable statements of a program are written in a pair of square brackets.
            e.g.       LINEARSEARCH (LIST, SIZE, ITEM)
                         [Algorithm to search an ITEM in the LIST of size SIZE].

3.Variable names: The variable names are written in capital letters without any blank spaces within it. Underscore (_) may be used in case of multi-word names to separate the words. The name should start with an alphabet and may have any number of further alphabets or numbers.
            e.g.       LIST, SIZE, ITEM, NUM1, FIRST_NUM etc.
                         Single letter names like I, J, K can be used for index numbers.

4.Assignment operator:  To set the values of a variable an assignment operator—may be used or = sign along with SET and value may be used. In this book—is used.
           e.g. SET COUNT=0, COUNT+1 etc.
           The second type is most commonly used.

5.Input and Output: To input the value of a variable Read: and to output the values of variable Write: are used. The message to be outputted may be placed between single quotes ‘ ‘.
             e.g.   Read:  NUM
                       Write: The Value is’, SUM
                       Write: NUM etc.


6.Sequential statements are written one after the other, usually in separate lines. If two statements are to be written on the same line they may be separated by means of comma,. Arithmetic operators +,-, *, /, % can be used for addition, subtraction, multiplication, division, mod operation respectively, to write arithmetic expressions.
               e.g.   SUM—0; NUM—15
                         SUM—SUM+NUM
                         Write: ‘Sum is’, SUM

7.Selective statements or conditional statements can be written using If-Then:,  If-Then:   Else:. The relational operators >,>=<,<=,<>,= can be used for greater than, greater than or equal, less than, less than or equal, not equal, equal respectively. For logical connection of two conditions AND, OR can be used. NOT can be used to negate the condition.


8.Repetitive or Iterative statements can be written between Repeat For … [Endo For] or Repeat While …[End of While]. Repeat For is used for the purpose of repeating the statements for fixed number of times    where as Repeat while is used to repeat the statements till a condition is true.


9.Exit is used terminate the Algorithm and Return may be used to return a value from the algorithm.

Or   


10.The array elements can be referred by means of the Name of the array and subscript in a pair of square brackets. The fields of a static struct can be referred by means of placing the name of the struct variable, a. (dot) and field name. The fields of a dynamic struct can be referred by means of placing the name of struct variable,        (arrow) and field name. The arrow operator is framed as a combination of – (minus) and > (greater than operators).
           e.g. LIST[1], LIST[I], LIST[J] etc.
                  NODE--->LINK, NODE--->INFO etc.
                  EMP.ENO, EMP.SALARY etc.      

Wednesday, January 29, 2014

Character and Boolean Data Types used in Java Programming

Java programming have some more data types for storage of single character and even true/false values. These data types are called Character and Boolean in programming language.

Character Type

The character data type (char) data type of Java is used to store characters. A character in Java can represent all ASCII (American standard Code for Information Interchange) as well as Unicode characters.

The Unicode character representation code can represent nearly all languages of world such as Hindi, English, German, French, Chinese, and Japanese etc. And because of Unicode character, size of char data type of Java is 16 bits i.e., 2 bytes in contrast to 1 byte characters of other programming languages that support ASCII.

  • Type: Char (Single Character)
  • Size:   16bits (2 bytes)
  • Range: 0 to 65536

Boolean Type

Another type of the primitive data type is Boolean. A Boolean value can have one of two values: true or false. So this data type is used to store such type of values.

In a Java program, the words true and false always mean these Boolean values. The data type Boolean is named after a nineteenth century mathematics- George Boole, who discovered that a great many things can be done with true/false value. A special branch of algebra Boolean algebra, is based on Boolean values.

  • Type: Boolean (Logical values)
  • Size:   reserve 8 bits uses 1 bit
  • Range: true or false

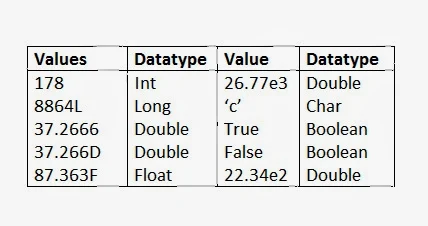
Following tables lists examples of various data items of different data types. Here are some examples of literal values of various primitive types:

Character and Boolean Data Types used in Java Programming


Draw graphics in ASP.NET

You can draw graphics on browser window using Graphics class. This class exists in System.Drawing namespace. It provide different types of graphics methods, such as DrawArc, DrawImage, DrawIcon, DrawLine and many more. Graphics class hold pen instance for creating graphics onto the screen.

Algorithm Behind the drawing

Step-1 : First define the graphics area on browser window using Bitmap class.
Step-2 : Create instance of Graphics class and initialize with Bitmap class instance.
Step-3 : Create Pen class object with specified color and width.
Step-4 : Create starting point and ending point using Point class.
Step-5 : Draw graphics and save into Bitmap instance.

Lets take an simple example of drawing Line , Rectangle in asp.net

 <%@ Page Language="C#" AutoEventWireup="true" CodeFile="Default3.aspx.cs" Inherits="Default3" %>

<!DOCTYPE html PUBLIC "-//W3C//DTD XHTML 1.0 Transitional//EN" "http://www.w3.org/TR/xhtml1/DTD/xhtml1-transitional.dtd">

<html xmlns="http://www.w3.org/1999/xhtml">
<head runat="server">
    <title></title>
</head>
<body>
    <form id="form1" runat="server">
    <div>
    
    </div>
    <asp:Image ID="Image1" runat="server" Height="83px" Width="95px" />
    </form>
</body>
</html>

CodeBehind Code Draw Rectangle

using System;
using System.Collections.Generic;
using System.Linq;
using System.Web;
using System.Web.UI;
using System.Web.UI.WebControls;
using System.Drawing;
using System.Drawing.Imaging;

public partial class Default3 : System.Web.UI.Page
{
    
    protected void Page_Load(object sender, EventArgs e)
    {
         Bitmap bmp = new Bitmap(500,200);  
        Graphics g = Graphics.FromImage(bmp);  
        g.Clear(Color.Green);
        Pen p1 = new Pen(Color.Orange, 3);

        g.DrawRectangle(p1, 20, 20, 80, 40);

        string path = Server.MapPath("~/Image/rect.jpeg");
        bmp.Save(path, ImageFormat.Jpeg);

        Image1.ImageUrl = "~/Image/rect.jpeg";


        g.Dispose();
        bmp.Dispose();

    }
}

Code Generating the following output

Draw Rectangle in asp.net

CodeBehind Code for Draw Line

using System;
using System.Collections.Generic;
using System.Linq;
using System.Web;
using System.Web.UI;
using System.Web.UI.WebControls;
using System.Drawing;
using System.Drawing.Imaging;

public partial class Default3 : System.Web.UI.Page
{
    
    protected void Page_Load(object sender, EventArgs e)
    {
         Bitmap bmp = new Bitmap(500,200);  
        Graphics g = Graphics.FromImage(bmp);  
        g.Clear(Color.Green);
        Pen p1 = new Pen(Color.Orange, 3);
        
        g.DrawLine(p1, 20, 20, 100, 100);
        string path = Server.MapPath("~/Image/line.jpeg");
        bmp.Save(path, ImageFormat.Jpeg);

        Image1.ImageUrl = "~/Image/line.jpeg";


        g.Dispose();
        bmp.Dispose();

    }
}

Code Generating the following output

Draw line in asp.net

Operations on Data Structures, C programming

Basically there are six operations one can do on the data structures. They are Traversing, Searching, Sorting, Insertion, Deletion and Merging.

1.  Traversing: Basically to process a data structure if every element of data structure is visited once and only once, such type of operation is called as TRAVERSING. For example to display all the elements of an array, every element is visited once and only once, so it is called as traversing operation.
            Suppose we have an array of 20 students’ average makes, and if we need to calculate the average of group, we visit (read) each individual average and accumulate (sum) them. Then we will find the array are visited once and only once. Then it is traversing of an array.

2.  Insertion: When an element of the same type is added to an existing data structure, the operation we are doing is called as Insertion operation. The element can be added anywhere in the data structure in the data structure. When the element is added in the end it is called as special type addition, Appending. In case of adding an element to the data structure we may come across ‘Overflow’ If the size of the data structure is fixed and it is full, then if we try insertion operation on the data structure it is said to be overflow of data structure or the data structure is full.

           Suppose we have an array of size 20 used to store marks obtained by the students in Computer Science subject. If we have already added 15 students’ marks according to an ascending order, then we can add another student marks at appropriate place, by shifting the already stored element accordingly. Then it is called Insertion operation.

3.  Deletion: When an element is removed from the data structure, the operation we are doing is called as Deletion operation. We can delete an element  from data structure from any position. In case of deleting an element from the data structure we may come across ‘Underflow’. If no elements are stored in the data structure, then if we try deletion operation on the data structure it is said to be underflow of data structure or data structure is empty.

         Suppose we have an array of size 20 used to store marks obtained by the students in Computer Science subject. If we have already added 15 student s’ marks according to an ascending order, then we can delete one student’s marks from any place, by shifting the already  stored elements accordingly. Then it is called Deletion operation.

4.  Searching: When an element is checked for its presence in a data structure, that operation we are doing is called as ‘searching’ operation. The element that is to be searched is called as key element. The searching can be done using either ‘linear search’ or ‘binary search’.

        Suppose we have an array of size 10 and assume elements stored are 1,2,3,23,34,54,56,21,32,33 and assume we want to search the number 23. So here the number ‘23’ is key element. The key is searched through the array starting from the first element till end. When it is compared with the fourth element in it is present in the list (array) of numbers. So search is successful. This type of searching is called as Linear Search because the last element. In order to apply linear search, the list may not be in any particular order but when binary search is applied the list must be an ordered one.

5.  Sorting: When all the elements of array are arranged in either ascending or descending order, the operation used to do this process is called as Sorting. The Sorting can be done using Insertion, Selection or Bubble sort techniques.
           Suppose we have an array of size 10 and assume elements stored are 1,2,3,23,34,54,56,21,32,33. The elements of the array are not in proper order. If they are arranged in ascending order the list (array) becomes 1,2,3,21,23,32,34,54,56.

6.  Merging: When two lists List A and List B of size M and N respectively, of same type of elements, clubbed or joined to produce the third list, List C of size (M+N), and the operation done during the process is called as Merging.

           Suppose we have a list of size 6, containing the elements 1,2,3,4,71,87 and we have another list of size 5, containing the elements 9,13,21,65,67. Here both the lists are in ascending order. We can produce the third list of size 11 that will also be in ascending order, containing the element 1,2,3,4,9,13,21,65,67,71,87. The third list is called the merged list of first and second lists. In order to merge two lists into single list one needs to compare each element from both the lists and one of them will   go the merged list.
© Copyright 2013 Computer Programming | All Right Reserved