-->

Friday, December 25, 2015

How to bind Bulleted List control in asp.net

Following some steps for binding bulleted list control using SqlDataSource

In this article, I will show you, How to bind BulletedList in ASP.NET. In this article, I will take SQL DataSource control to bind it. ASP.NET Provide inbuilt control to bind any other control like ListBox, ComboBox, BulletedList. After bind it, it will look like list of unordered list of HTML.Lets  to Start how to bind it. I will Give you, video as well as code for this.


Step-1 : Open visual studio
Step-2:  Click  File-->New-->WebSite
starting screen

Step-3: Right click on website name in solution explorer, Add-->Add new item 

web form


Step-4: Make Database table 
Step-5: Drag Bulleted list from toolbox and drop on design window.
Step-6: Select Show smart tag of Bulleted list
show smart tag

Step-7: On Bulledted list task click choose data source link
Step-8: Select New DataSource from Data Source configuration wizard.

choose data source

Step-9: Select SQL Database from Data Source Configuration wizard. and click ok button

data configuration wizard

Step-10 : Select existing database from configure data source.

connection string property

Step-11 : Change Connection name according to you and click ok
web.config file

Step-12 : Select table from name ,select table field name and press ok button

table view

Step-13: Click test query button and finish the process
Step-14: Select a data field to display in the bulleted list.
Step-15: Select a data field for the value of the bulleted list. and press ok button
select one those field in bulleted list

Run your application
how to bind bulleted list in asp.net

Finally source of the code are:


<%@ Page Language="C#" AutoEventWireup="true" CodeFile="Default2.aspx.cs" Inherits="Default2" %>

<!DOCTYPE html>

<html xmlns="http://www.w3.org/1999/xhtml">
<head runat="server">
    <title></title>
</head>
<body>
    <form id="form1" runat="server">
    <div>
    
        <asp:BulletedList ID="BulletedList1" runat="server" DataSourceID="SqlDataSource1" DataTextField="Name " DataValueField="Url">
        </asp:BulletedList>
        <asp:SqlDataSource ID="SqlDataSource1" runat="server" ConnectionString="<%$ ConnectionStrings:ConnectionString %>" SelectCommand="SELECT * FROM [mytab]"></asp:SqlDataSource>
    
    </div>
    </form>
</body>
</html>
Top Related Article

Monday, November 18, 2013

How to Develop your Own Custom Controls in C#

Custom control, the control with combined features of other controls, can be developed by any programmer easily. A custom control will not only be usable in the same application, but also it can be used in any other application that may be on other system. This designed control can be easily embedded in other applications.

Custom control have some basic features as well as some functionality that may be known by the programmer:
  • Improves encapsulation.
  • Simplifying a programming model.
  • Can swap out a control with another one.
  • Combines UI elements in a simple way.
  • Using these controls programmer can develop unique controls.

Types

User Control: combines other controls in a logical unit. Inherit from System.Windows.Forms.UserControl class.

Inherited controls: developed by an existing .NET control that is as close as you want to develop. We have to create a custom class and inherit an existing abstract class that is close to what we are developing.

Owner-drawn controls: inherit from a base class like System.Windows.Forms.Control. These controls provides most customizable UI.

Extender providers: These are used to add features to other controls on a form, means these are not necessarily at all.

These controls may be used in our other applications and it reduces the amount of code and the code duplication. It also helps in modularize your code. In the next article we will explain about the steps to create a custom control and also about the events, need to override to create custom textbox.

Monday, November 4, 2013

Exploring the visual studio 2012 IDE : Part-2

Toolbox

The Toolbox contains a number of tabs and each tab contains a list of controls and components that can be dragged onto your Web form. The Toolbox is docked on the left-side of the IDE; however, if it is not visible, you can access the Toolbox from the View menu or press the CTRL+ALT+ X keys together to open it.

There are different sets of controls available, depending on the type of the designer that is active in the editor. If you are designing a Web Form, you will get a specific set of tools that work with Web controls. If you are designing Windows Form, you will get a specific set of tools in the visual studio IDE for windows controls. If you are designing an XML document, there will be some other controls available within the TollBox. You can also add other customized tabs to the Toolbox wherein you can place your favorite controls and components or add your own customized controls.
ToolBox vs2012


The Code Editor Window

The Code Editor window allows you to write and edit code. You can press the F7 key to switch from the web Forms Designer to Code Editor. Alternatively, you can switch to code Editor by selecting View-->Code. You can use the same editor to create different types of files, such as text files and XML documents. In such a case, this window is called Text Editor
Code Editor window in vs2012

Using the Code Editor window, you can set breakpoints for debugging the application, and collapse sections of code to increase readability. The code Editor window also contain the intellisense feature that makes programming easier.

Intellisense

intelliSense is an extremely useful feature in visual studio. This, as you type the code, provides a list of options for making language references easily accessible and helps you in finding the information you need.
Intellisense is very helpful, as it automatically completes typing for you. For example, when you type TextBox1 and then a period operator(.), Intellisense displays a list of options. Now you can directly enter the member function or variable by using the list of options.
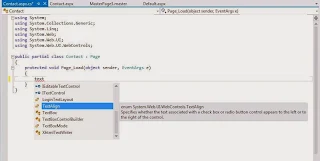
Intellisense in vs2012

The Intellisense technology makes writting of code easier and less prone to errors. It provides quick access to valid member functions or variables, including global variables through the members list. You can select these member functions and variables from the list and use it in your code. Intellisense is also used to view code comments, function declarations, and variable type information. By default, Intellisense works automatically. However, if you prefer to invoke Intellisense explicitly with a menu command or a key combination, disable it by turning it off selecting the Tools-->Options-->Text Editor-->All Languages-->General Option and then deselect the Auto members and Parameter information check boxes. Now, if you want to incorporate the intellisense functionality in the code, You will have to use the Intellisense menu item in the Edit menu.
Visual Studio provides a new features wherein you can make the Intellisense drop-down list transparent. To do so, press the CTRL key while the Intellisense drop-down list is open and you can see the Intellisense drop-down list in a transparent mode that enable you to look at the code without closing the Intellisense.

Transparent Intellisense using ctrl key in vs2012

Various options available in Intellisense are as follows:

List Members- Displays a list of valid member variables or functions for the selected class or structure selecting from the list inserts the member into your code.
Quick Info--Displays the complete declaration for any identifier in your code. Intellisense usually runs as soon as you type the period after a class instance. However, there are occasions where you need to force Intellisense to appear. For example, suppose you misspell a method name, then the Intellisense will not appear because of the wrong function name. You can bring Intellisense appear by pressing CTRL+j keys together. This allows you to select the appropriate method through Intellisense and replace the misspelled method name with the selected one.
Parameter info--Displays the complete declaration, including a parameter list for the method, such as number, name and types of parameters required by a method. You can also force Intellisense for parameter information for methods. For that, type an open parenthesis after the name of the function. Intellisense displays a complete list of the declaration function in a pop-up window and the first parameter appear in bold. By the time you specify the first parameter , the next parameter in the list is highlighted in bold. To close the list, you can press ESC at any time or keep typing the parameters till you complete the method. If you close the closing parenthesis, the parameter list also closes automatically.

Complete Word -- Shows the rest of a variable or function name once you have entered sufficient initial characters to differentiate the term. When you start typing a word and typed sufficient initial character so that it uniquely identifiers a given word in your current file, try pressing the CTRL+SPACEBAR+ keys together. The usual Intellisense drop-down list will be displayed by the specified starting characters. Simply select the appropriate word to complete the word quickly. If the series of starting letters uniquely identifies a single word in the Intellisense list, then the complete word will be inserted automatically. For example, to make the fontFamily property appear quickly on the code Editor, type font on the Code Editor. An Intellisense drop-Down list appear with options starting from Font, such as font, fontConverter, FontFamily, FontHeight. The moment you enter F, the selected item becomes FontFamily and you can press the Enter key to make the FontFamily word appear quickly on the code Editor.

Sunday, October 27, 2013

Exploring the visual studio 2012 IDE : Part-1

Introduction

Visual Studio 2012 provides an IDE to web developers, which is full of toolbars and windows. The windows are dockable, which allows to rearrange them on the IDE as per your requirements. The IDE can also be used for detecting and correcting the errors in your application. The following are the different parts of the visual studio 2012 IDE

  • Start Page
  • Menu Bar 
  • Toolbars 
  • Toolbox
  • The code Editor Window 
  • The Solution Explorer Window
  • The Property Window
  • The Object Browse Window
  • The Class View Window
  • The Server Explorer Window
  • The CSS Style Manager Window
  • The Output Window
  • The Task List Window
  • The Error List Window
  • The Command Window
  • The Dynamic Help Window

Start Page

When you open Visual Studio 2012, the very first window displayed is the Start Page.

 Visual Studio 2012, the very first window displayed is the Start Page

The Recent Projects/WebSites pane displays few projects/WebSites which you have created recently. The Start Page allows you to select from the most recent projects/WebSites on which you have recently worked. The following panes are displayed on the Start Page:
Recent Projects/WebSites : Displays a list of the most recent projects / websites you opened with visual studio, as shown in above figure . You can open the projects by clicking on the Hyperlink having the project's name. At the bottom of the Recent Projects pane two CheckBox are there first one for close page after project load and second one for Show page on startup.

Start : At the Above of the Recent Projects pane , you can see three links - one is for opening an existing project and the other for creating a new project and other for connecting to Team foundation server.

Getting Started: Contains links to various programming tasks in the product's documentation such as Manage your project in the cloud, Learning Resources etc.

Menu Bar

The Menu Bar of the Visual Studio IDE provides different menus for different Visual Studio commands

Menu bar in Visual studio 2012

Most of the menus are displayed as toolbars. Further, if you observe , not all options are available at all times. This is because the options that cannot be applied to the current state of the IDE are made either invisible or disable. For example, when you design the form, the Edit menu bar is quite short; however , when you perform the edit operation, it is quite lengthy.

ToolBars

Toolbars are shortcuts to the most frequently performed actions. You can fin the same commands in menus, but these shortcuts of toolbars are much faster to use than menus. You will find several common toolbars on the Visual Studio IDE, such as standard , layout , formatting , Debug, and Image Editor etc.

ToolBars in visual studio 2012

You can also build your own custom toolbars. Visual Studio displays the toolbars according to the selected object.

Monday, August 26, 2013

Print Image using PrintDialog Box

To print images in windows forms Graphics class and its various methods are used. Graphics class provides methods for sending objects to a device such as printer. Add a printDocument,  printDialog and a button to the windows form application.

In the code behind file create an object of Bitmap class which will be used to create an image. Write a function to capture the screen to be printed just like written in the below code:
private void CaptureScreen()
{
Graphics graphics = this.CreateGraphics();
graphics.DrawRectangle(Pens.Black, 50, 50, 300, 100);
image = new Bitmap(300, 300, graphics);
Graphics g = Graphics.FromImage(image);
g.CopyFromScreen(this.Location.X, this.Location.Y, 0, 0, this.Size);
}
In the above code a rectangle will be drawn at the given location. CopyFromScreen() function used to performs a bit-block transfer of the color data, corresponding to a rectangle of pixels, from the screen to the drawing surface.

In the click event of code write the following code:
CaptureScreen();
printDocument1.PrintPage += printDocument_PrintPage;
printDialog1.Document = printDocument1;
DialogResult res = printDialog1.ShowDialog();
if (res == DialogResult.OK)
printDocument1.Print();
The above code is somewhat same to the code used in printing text except the calling of CaptureScreen() method.

Print page event of print document should be look like:
void printDocument_PrintPage(object sender, PrintPageEventArgs e)
{
e.Graphics.DrawImage(image, 50, 100);
}

Run the project and click on print button. On the print Dialog box click on ok with selected printer and it will print whatever is on your screen at the given points. When I print this then it had printed as the following image:

Print image using PrintDialog Box
See also: Printing Text

FolderBrowserDialog Control in Windows Forms

Browse for folder dialog box is used to select a folder to save or open a file. Most often you may need to select a particular folder to open or save a file in windows based application. It enables user to select any folder on system and to retrieve the path of a folder selected by the user.
Following image shows the Browse for Folder dialog box:
This dialog box is similar to open file dialog box except that it enables user to work with folders. To show this type of dialog box just add Folder Browser Dialog box from toolbox or create an object of this class.

Write folderBrowserDialog1.ShowDialog(); in the click event of button.

To open the default browse for dialog box write the following code in the click event of a button:
private void folderBrowse_Click(object sender, EventArgs e)
{
FolderBrowserDialog folderBrowserDialog = new FolderBrowserDialog();
folderBrowserDialog.ShowDialog();
}

See also: OpenFileDialog Box Control

Friday, August 23, 2013

FileDialogBox control in Windows Forms

It is an abstract class, therefore we cannot instantiate it directly. We can use OpenFileDialog or SaveFileDialog to open a file or to save a file respectively. Just run the open or save dialog boxes is not sufficient to open or save a file, we have to use I/O streams to do these simple tasks.

OpenFileDialog

To open an existing file and see the content of that file, OpenFileDialog box is used. It is same in all window application as shown in following image:

OpenFileDialog Box Control in windows forms

To open this dialog box just add an open file dialog control from toolbox and write openFileDialog1.ShowDialog(); in the click event of button.


SaveFileDialog 

To save a file after creating of modifying you have to save that file using SaveFileDialog box at the specified location. Following figure shows the preview of SaveFileDialog box.

SaveFileDialog Box Control in windows forms

To open this dialog box the same procedure will be followed up. Just add a SaveFileDialog and write saveFileDialog1.ShowDialog(); in the click event of button.

To open these type of dialog boxes we have to create an object of respective class and then call its ShowDialog() method:
OpenFileDialog openFileDialog = new OpenFileDialog();
openFileDialog.ShowDialog();


FolderBrowserDialog Box Control

Font Dialog Box Control in Windows Forms

While working on windows-based application, you might have to change the font size, style or related to font. Just like MS-Word there should be a font dialog box to differentiate some text from common text in the file. This can be done using Font Dialog box shown in following image:


To add this box just drag-n-drop font dialog control from the toolbox. Add a textbox and a button on the form with text property “change font”. Button will used to show the font dialog box and then all the changes made in dialog box will appear in the text box.


By default a textbox has Microsoft Sans Serif as font, Regular as font style and 8 as font size. Now change these values as
  • Font = Monotype Corsiva
  • FontStyle = Bold
  • FontSize = 12
from the font dialog box and then click on ok button. We can see the text has been changed in our textbox as in following diagram.


Following code has to be written in the click event of button to perform these simple task:
private void changeFont_Click(object sender, EventArgs e)
{
fontDialog1.ShowDialog();
textBox1.Font = fontDialog1.Font;
}

FileDialogBox Control

Wednesday, August 21, 2013

Status Strip Container Control in Windows Forms

StatusStrip container control is used to display objects that are on the current form and also to provide feedback on the progress of any progress of any operation being performed by the form. Some of the properties of this container control are:
  • Items: collection of items to be displayed on the control.
  • LayoutStyle: specifies the layout orientation of the control.
  • Dock: defines the border of control which will bind to the parent control.
Status strip control contains four child controls that can be placed as and when required. The child controls are:

Status Label Control

Works as a Label control. Used to display status information and prompt the user for a valid entry. It has some properties to be used by programmer like
  • Text: text to be displayed on the control.
  • Spring: whether the item fills up the remaining space or not. It is a Boolean type property.
  • TextAlign: specify the alignment of the text.

ProgressBar Control

Used to show the status of the task performing by the user. Represent window progress bar control. Some properties of this control are:
  • Minimum: lower bound of the range.
  • Maximum: upper bound of the range.
  • Value: current value to be set on this control.
  • Step: value to be increment/decrement.

DropDown Button Control

Displays toolStripDropDown from which user can select one item at a time. Generally used when the items to be displayed on StatusStrip cannot be accommodated. Some of the properties of this control are:
  • DisplayStyle: whether the text or image to be displayed.
  • DoubleClickEnabled: whether the double click event will occur.
  • DropDownItems: specifies the toolStripItem when the item is clicked.

SplitButton Control

It is a combination of a standard button and a drop-down button on the left and right respectively. Some of the properties are:
  • DisplayStyle: whether the text or image to be displayed.
  • DoubleClickEnabled: whether the double click event will occur.
  • Padding: internal spacing within the item.
The following image shown all the four controls of the StatusStrip control.

StatusStrip Container control in windows forms

Error Provider Control

Friday, July 26, 2013

How to Change file attributes in C# Programming

File attributes are metadata associated with computer files that define system behaviour.  Same as files, folders, volumes and other file system objects may have these attributes. All the operating system have often four attributes i.e. archive, hidden, read-only and system. Windows has more attributes. Read more about File Attributes

User have to right click on desired file or folder and then open properties, to change the attributes of that file or folder. If one want to change attributes of multiple files then he/she has to either select all the files and then change or change attributes of each file or folder one by one.

In programming context we can do this task with a predefined class i.e. FileAttributes which provides all the attributes for files and directories. We can easily change the desired attribute of a file or directory using the above class FileAttributes that is exists in System.IO namespace.

Design a new form in windows form application that will look like the below form:


Change file attributes in C#

There are some controls which are used for specific task in this project, we will discuss them one by one:
  • TextBox: show the path of folder selected by user.
  • Browse Button: open a folderBrowserDialog which select a path of folders and files.
  • CheckBox: if checked program will check all the sub-folders for files.
Except these controls there are three more buttons which are used to play with attributes of files or folders as their text shows. For example "Remove all" will remove all the attributes of files and folder at selected path.

Write the following code in the click event of Only Hidden button:
private void btnSetHidden_Click(object sender, EventArgs e)
        {
            count = 0;
            setHidden(txtPath.Text);
            lblStatus.Text = "Number Of Scanned Files And Folders:" + count.ToString();
        }
In the above code there is an integer variable count that will count the scanned file and folders. Then it will call a function setHidden(string ) that will use the selected path and set the hidden property to true of all the files and folders at that selected path.


The code of this function is:
private void setHidden(string dir)
{
if (!Directory.Exists(dir))
{
lblStatus.Text = "Invalid path!";
return;
}
if (chkSub.Checked)
{
foreach (string d in System.IO.Directory.GetDirectories(dir))
{
count++;
lblStatus.Text = dir;
setHidden(d);
DirectoryInfo df = new DirectoryInfo(d);

df.Attributes = System.IO.FileAttributes.Hidden;
foreach (string fil in System.IO.Directory.GetFiles(d))
{
FileInfo f = new FileInfo(fil);
f.Attributes = System.IO.FileAttributes.Hidden;
Application.DoEvents();
count++;
}
}
}
}
In above code it will change the attribute of a directory and then all the files in that directory. Here, a new Method doEvents() is used which process all windows messages currently in the message queue. Calling this method causes the current thread to be suspended while all waiting window messages are processed. You can read more about DoEvents().

Go for example.

Monday, July 22, 2013

How to prevent duplicate child forms in windows forms C#

In my previous post we have create an MDI container form in which we have opened some individual forms called child forms. Each form contains a property MdiParent that is used to get or set the parent form of a particular form.
Form2 obj = new Form2();
obj.MdiParent = this;
obj.Show();

As we know, in MDI container application user opens multiple child forms at a time. Most often when user opens a child form, application opens a new instance of the form, doesn't matter the form is previously opened or not. This is programmer’s job to check if the same form is previously opened then bring that form to front otherwise create a new instance.

To check the instance is null or not we have to write following code in our code behind file of form that will be the child form.
private static Form3 instance;
public static Form3 GetInstance()
{
if (instance == null)
instance = new Form3 ();
return instance;
}

In above code we have defined a new object of type Form3. Each time when we call this method it will check this object whether it is null or not. If this is null it will create a new instance of the form otherwise it simply return that object.

Our next task is to set the value of that instance to null each time user closes that form. Each form has a FormClosing event which occur whenever user closes the form, before the form will closed. We will set the instance to null in this FormClosing event of the form.
Instance = null;

In the MDI parent form replace the above three line of code with the following code:
Form3 obj = Form3.GetInstance();
obj.MdiParent = this;

if (!obj.Visible)
obj.Show();
else
obj.BringToFront();

Through the above code we will use the newly defined method i.e. GetInstance() in place of its constructor. Now when user opens this child form it will check that if that form is visible then it will bring that in front otherwise display the form to user using show method.

Sunday, July 21, 2013

Filter data in datagridview according to combobox in c#

As we have previously studied that datagridview is used for display rows and columns of data in a grid format in windows form. Mostly data are previously defined which are to be shown in datagridview. Sometimes we have to change the data on basis of some conditions.

In previous post we have learnt to bind a datagridview with search option and in else case all the data from database will bind to datagridview in C# language. In this post we will learn to bind datagridview with the selected index changed event of combobox in C#.

The selection changed event of combobox occurs when the value of selected index property changes. We are going to change our data of datagridview according to that changed value.

Let’s create a student class, which will be used to bind our datagridview, having some properties like below:
public class Student
{
public string Name { get; set; }
public int Age { get; set; }
public string Address { get; set; }
public string Branch { get; set; }
}

Create a new list of student that will be the data source of datagridview and insert some records in that list having branch CS or IT as I have inserted in my example using C# language. Set this list as a data source of datagridview.
dataGridView1.DataSource = studentList;

Now when we run this project all the records will be shown in datagridview. We want to change the data of datagridview according to selection changed event. So write the below code in selection changed event of combobox
if (comboBox1.SelectedItem != null)
{
string branch = comboBox1.Text;
var students = studentList.Where(a => a.Branch.Equals(branch));
dataGridView1.DataSource = students.ToList();
}

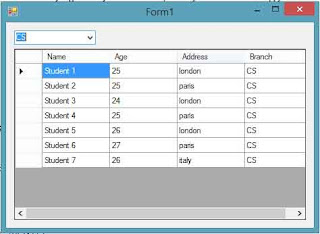
Run this project now and change the selection value of combobox to CS and we will show the data of datagridview have been changed as following image:

Filter data in datagridview according to combobox in c#

Change the selection value to IT and the data will be changed as following image:


Filter data in datagridview according to combobox in c#
Go for example

Sunday, July 7, 2013

Round off value in DataGridView Cell

In most of the situations programmer want to save value in decimal data type, but try to show that value in approximate format. For example we have a variable "income" that have some different value as below
income = 3.57 (stored in database exactly)
income = 3.6 (programmer want to show the user)

The decimal data type can store maximum of 38 digits. It stores exact representation of the number, there is no approximation of the stored value. Decimal data type can be used to store numbers with decimals when the values must store exactly as specified. We can read more about decimal values from http://msdn.microsoft.com/en-us/library/ms187912(v=sql.105).aspx

In above case programmer want to round off that value at run time binding. As we know about datagridview binding in which data will be shown as same as they are stored in our database. When we bind our list to datagridview it means we are binding each cell one by one. If we want to check which cell is binding to what value then we can do this in Cell Formatting event of datagridview.

Datagridview cell formatting event occurs when the contents of a cell need to be formatted for display. If the standard formatting is insufficient, we can customize the formatting by handling this event. This event occurs every time each cell is painted. Go through datagridview cell formatting event if you want to know more about cell formatting event.

Your cell formatting event should look like the below code if you want to round off all the decimal values bind to this datagridview.

private void dataGridView_CellFormatting(object sender, DataGridViewCellFormattingEventArgs e)
{
double decValue;
if (e.Value == null)
return;
if (double.TryParse(e.Value.ToString(), out decValue) == false)
return;
e.Value = Math.Round(decValue);
}

This code will work only with decimal values. It will do nothing if either “value is null” or “value is not type of decimal”. If the value is of type decimal it will round off that value using Math.Round() method. This method rounds a value to its nearest integral value.

Wednesday, July 3, 2013

Use XML file as database

Sometimes, when we are creating small application, we have to use SQL Server database if we don’t know about any alternative solution. SQL Server databases are very familiar with programmers, but if our application is small then we don’t let the user install and maintain any database engine.


We have an alternative solution i.e. XML (Extensible Markup Language) files that is a textual data format. It is widely used for the representation of arbitrary data structures, for example in web services. We can read more about Xml files through http://en.wikipedia.org/wiki/XML.


To work with XML files we use XmlSerializer class that serializes and deserializes objects into and from XML documents. It is in System.Xml.Serialization namespace and enables us to control how objects are encoded into XML. The most important methods in this class are Serialize and Deserialize.


In this article we will serialize a class Person consists of public properties, as shown below:

public class Person
{
     public string Name { get; set; }
     public string FName { get; set; }
     public int Age { get; set; }

}

Write data to XML file:

To write data in XML file we use Serialize method that serializes the specified object and writes the XML document to a file using the specified stream. It takes two parameters.

First parameter will be used to write the data to file, it may be either a FileStream or an XmlWriter. Second parameter is the data that is to be written.


List<Person> personList = new List<Person>();
XmlSerializer serializer = new XmlSerializer(typeof(List<Person>));
using (FileStream stream = new FileStream(Environment.CurrentDirectory + "\\file.xml", FileMode.Create, FileAccess.Write))
{
    serializer.Serialize(stream, personList);
}


In above code


  • Add some data to personList that are to be written to file.
    personList.Add(new Person() { Name = "Student1", FName = "Father1", Age = 25 });
    personList.Add(new Person() { Name = "Student2", FName = "Father2", Age = 24 });
    personList.Add(new Person() { Name = "Student3", FName = "Father3", Age = 26 });
    personList.Add(new Person() { Name = "Student4", FName = "Father4", Age = 23 });

  • Create an object of XmlSerializer class which will decide the type of data that is to be written (list of person here).
  • Create a stream having FileMode Create and FileAccess Write.
  • At the last serialize the list to stream and stream will write it to xml file.

Read data from XML file:


To read data from XML file we use Deserialize method that deserialize the xml document contained by stream. It takes only one parameter i.e. our stream.


List<Person> accessedData = new List<Person&gt
XmlSerializer serializer = new XmlSerializer(typeof(List<Person>));
using (FileStream stream = new FileStream(Environment.CurrentDirectory + "\\file.xml", FileMode.Open, FileAccess.Read))
{
    accessedData = serializer.Deserialize(stream) as List<Person>;
}
dataGridView1.DataSource = accessedData;

In above code
  • Declare a list of person that will hold deserialized data.
  • Create an object of XmlSerializer class which will decide the type of data that is to be read (list of persons here).
  • Create a stream having FileMode Open and FileAccess Read.
  • At the last deserialize the data and convert them to List<Person>.
After successfully deserialize the data in list, i am bind that list to datagridview. When i run the project, my datagridview look like following screenshot:


We can read more about Environment.CurrentDirectory

Saturday, June 29, 2013

Find a control in windows forms

When we drag-n-drop controls in our designer file then we can easily access those controls in our code file directly by its name. But when we dynamically add some controls either in constructor or in load event of form then we can't access them directly in our code.

Let's have an example

  • Add a textbox and a button using drag-n-drop operation on our form i.e. Form1.
  • Leave the name of controls i.e. textBox1 and button1 as they are.
  • Now in constructor add a new textbox dynamically having name "txtBox" with some properties like:

    TextBox txtBox = new TextBox();
    txtBox.Name = "txtBox";
    txtBox.Text = "dynamically added control";
    txtBox.Width = 250;
    txtBox.Location = new Point(10, 10);

    this.Controls.Add(txtBox);
In above code the Name property will be used to find this control. All the remaining properties are familiar to you as in our designer file. At the last we have added this textbox to the form, here the keyword this is pointing Form1.
This form will look like the following screenshot: 

find control in windows form


In click event of button when we will try to access above controls then we notice that "textBox1" will be accessed by its name and "txtBox" will not accessed here.

To access these dynamically added controls we have to use a pre-defined method Find(). This method searches the controls by their name and builds an array as in below code.

Control[] controls = this.Controls.Find("txtBox", false);
foreach (var item in controls)
{
     TextBox txtBox = item as TextBox;
     if (txtBox != null)
        MessageBox.Show("control accessed");
}

In above set of code "controls" will hold the array of all the controls having name "txtBox". One by one we will access items of array and check the type of item. If type of item is TextBox then we found our textbox having name "txtBox".

As we know about naming standards of programming that two controls of the same name cannot exists. Keep in mind the above line, and we are sure that, there will only one control named “txtBox” of type TextBox.

Now we will access the above textbox in one line of code i.e.

TextBox txtBox1 = this.Controls.Find("txtBox", false).First() as TextBox;
if (txtBox1 != null)
 MessageBox.Show("control accessed");

When we run our project and click on button then our form look like this.
find control


Wednesday, June 26, 2013

Cut, Copy and paste operations in windows forms

Introduction

It is impossible for one, specially a Programmer, to imagine his/her life without editing. Editing operations (Cut/Copy and paste etc.) are performed using clipboard, so these are also called Clipboard operation.
Invention

Larry Tesler, who invented Cut/Copy and paste in 1973. He is a computer scientist, working in the field of human-computer interaction. Tesler has worked at Xerox PARC, Apple Computer, Amazon.com and Yahoo! We can find out more about LarryTesler.


In this article I will show how to perform these operations with our own code. As we are just doing editing operations, it doesn't matter which control we are using. Here I am using two textboxes to perform this operation. I created a simple window form with a menu strip and two textboxes. In the menu strip all the operations are added in Edit menu item as shown in below screenshot.


Generate the click event of above three menu items. 
Copy

We are going to copy the selected text of textbox, so we use SelectedText property of textbox. To copy the data in clipboard there is a method in Clipboard class i.e. SetData(), which will clear the clipboard and then add new data in specified format to clipboard.

private void copyToolStripMenuItem_Click(object sender, EventArgs e)
{
      TextBox txtBox = this.ActiveControl as TextBox;
      if (txtBox.SelectedText != string.Empty)
         Clipboard.SetData(DataFormats.Text, txtBox.SelectedText);
Cut

Actually, cut operation is a combination of copying and removing that text from that location. So we will copy the text and empty that string after that.

private void cutToolStripMenuItem_Click(object sender, EventArgs e)
{
    TextBox txtBox = this.ActiveControl as TextBox;
    if (txtBox.SelectedText != string.Empty)
       Clipboard.SetData(DataFormats.Text, txtBox.SelectedText);
    txtBox.SelectedText = string.Empty;
Paste


To insert clipboard data to current location is called paste. We can perform a paste operation multiple times with a single clipboard data. To paste the data from clipboard there is a method in Clipboard class i.e. GetText(). First we get actual position of cursor in the textbox and then insert the data to that position using Insert() method as in above code.

private void pasteToolStripMenuItem_Click(object sender, EventArgs e)
{
    int position = ((TextBox)this.ActiveControl).SelectionStart;
    this.ActiveControl.Text = this.ActiveControl.Text.Insert(position, Clipboard.GetText());
}

Insert() is a method of string class, which return a string in which a specified string is inserted at a specified position. So that is how we perform editing operations with our own code. The same procedure can be used to perform these operation in other controls of windows forms.

Download source.
© Copyright 2013 Computer Programming | All Right Reserved