-->

Saturday, August 30, 2014

How to Create Layout page and set for View: MVC

After creating default MVC application in Visual Studio there is a default layout file has been added in shared folder under views having name _Layout.cshtml. This file is used to provide consistent look on all of the pages having default layout page set. Changes done in this file will set for all the pages/views under this layout.

The above extension ".cshtml" is used only in case of Razor and this will be changed for aspx views. Programmer can even change this layout file as per requirements or can use multiple layout files according to the roles/group  defined. All the scripts, styles and custom files must be included in this layout file if necessary for all views.

If Programmer don't want to use any layout for the view then "Layout = null" must be set in the view page. This feature can only be set for that particular view. Now to create new layout file programmer have to add new item as "MVC Layout Page(Razor)" and change the name if required otherwise default will be used.

MVC set layout null


After adding the layout file create html and use “@RenderBody()” statement wherever you want to render the body of view page which will have this layout. Whatever change we do in this file, will be changed for all the views having this file as a layout.

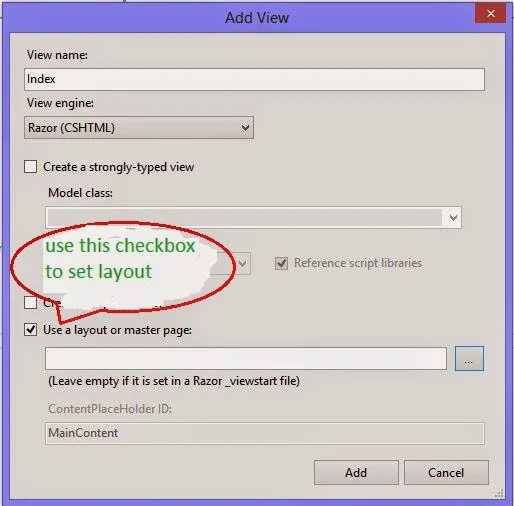
Whenever programmer adds a new view there is an option for using a layout or master file with a checkbox and browse button. Check that checkbox and browse for the layout file created above. This will set that file as a layout for that new view.

MVC set null in new view

Saturday, June 28, 2014

Returns Password input element using Html.Password() Handler: MVC

Html.Password() handler, used to return password input element to be input password value by user. This article describes about to using password html helper that will make text unreadable by other users in MVC application.

Like all other input elements, using Html.Password() html handler users are not able to read input value. This handler is mostly used in login process of any ASP.Net MVC application because of some special features of this helper.

This helper commonly have following features:

  • Text input in the control is un-readable.
  • Does not allow user to copy the text input in the control.
  • Does not repopulate its value from ModelState object.

Parameters


  • htmlHelper: html helper instance that this method extends.
  • name: used to specify the name of form field that may be used to look up the value.
  • value: specify the value of this element.
  • htmlAttributes: specify html attributes to be set for the element like placeholder, id, any class or other values.
Overall this will generate an input element having the type password on the page:
<input type=”password” runat=”server” id=”password” />

Html.PasswordFor(…)

Provide same functionality but used to render password input element for each property passed via model. Here the model is the class for which the view is to be created. This handler have two type parameter i.e. TModel (specify type of model) and TProperty (specify type of value).

Parameters


  • htmlHelper: html helper instance that this method extends.
  • expression: used to identifies object that contains property to render.

Html.PasswordFor(model=>model.Password)

this line will render an input element of type password having id "Password" passed by the model. After submitting form, the value of this element will assigned to the password field of the model and can be easily accessed for further use.

Monday, June 9, 2014

Returns CheckBox Input element using Html.CheckBox() Handler: MVC

Html.CheckBox() handler, used to return check box input element to be input true or false value by user. Selected checkbox will return true and un-selected will return false, otherwise it returns null for the programmer to store/use the value.

In compare to other input element, this handler is easy to bind to with the data source provided by the programmer for the page. This handler/method have its own parameters list as Html.Label() or Html.TextBox() handlers have.

Parameters

  • Name: specifies the name of form field. It is string type of parameter.
  • isChecked: programmer should pass true to select the checkbox, otherwise false. As the name implies it is Boolean type of parameter.
  • htmlAttributes: specifies an object that contains all the html attributes to set for the element as discussed earlier.
@Html.CheckBox("isMarried", true);

This line will return an check box input element on the page with checked true value, as passed with the method. The name of form field will be isMarried, used to get the value of this element.

@Html.CheckBoxFor(…)

This handler works same as above but for a particular property in the object specified in the expression. This handler is used to return check box input for only the bind to property exists in the mode passed by an action to this view page.

Parameters are almost same except the expression which is a predicate to be bind this element with the specific property.

Let’s suppose this view page is bind to a model of type student having the properties like name, age, isMarried and etc. To bind this check box handler programmer have to write the following line of code:

@Html.CheckBoxFor(model => model.isMarried, false)

This handler now binds to isMarried property of the model and by default it will be un-selected on the page.

How to Execute Server-side code based on condition: Razor

Razor syntax helps developers to execute the code based on some condition specified like if-else or may be switch statement. Programmer can easily decide, which statement(s) need to be executed, based on the condition given within if statement.

IF-Else Statement:

To test a condition by using IF statement, write a condition in if parenthesis, start an IF block and at the last write the statements to be executed in the curly braces i.e. called if block. This block will be execute when the given condition is true, to execute some statements on the false of this condition, programmer have to write ELSE part.

@{
    var value = 5;
}

@if (value >4)
{
    <p style="font-size:20px; font-weight:bold">Value is greater than "4"</p>
}
else
{
    <p style="font-size:20px; font-weight:bold">Value is less than or equal to "4"</p>
}

In the above block variable value have initial value 5. According to the given condition the first block will execute. If we change the value as 4 then it will execute the second block i.e. ELSE part of the statement. What if we have some more condition to be check, either we have to use if-else if-else condition or switch statement.

Switch Statement

To execute statements based on number of individual conditions, switch statement is used by the developer. Switch statement specifies some cases to be check by compiler and execute the statements written in particular case on which condition matches. Just notice the following lines of code:

@switch (value)
{
    case 5: <p>Value is: 5</p>
        break;
    case 4: 
    case 3: 
    case 2: <p>Value is >= 2 and <=4</p>
        break;
    case 1: <p>Value is: 1</p>
        break;
    default: <p>Value is either <1 or >5</p>
        break;
}

Here, I have specified individual statement for case 1 and 5 but a single statement for case 2, 3 and 4. This feature of switch statement is used when a single statement is to be executing for one or more cases. Now for value = 2 /3/4 a single statement “Value is >= 2 and <=4” will execute.

Like in if condition the else part will execute when false, switch statement provides “default” case for all other case except specified. This value can also be changed or assigned at runtime to execute code dynamically.

Wednesday, June 4, 2014

Return Text Input Element using Html.TextBox() handler: MVC

Html.TextBox() handler used to return text input element on the page at run time. It supports some types of parameters discussed and also have some more options to returning text inputs on the page. Mostly it is of two types listed below with their specification and uses.

@Html.TextBox(Parameter collection...)

This html handler is used to return text input element to be input some values by user like name, age, address and more. As this element is used like a method in Asp.Net MVC, this may have some parameters to be passed with it. This handler returns only an input field in the form of

<input type="text" name="name" id="id" />

Following is list of parameters this handler may used:
  • Name: used to specify name of form field (can be used to find control on page) and this parameter is of string type.
  • Value: this parameter is of type object and used to specify value of text input element. If this value is null then this element will get the value from viewdata dictionary otherwise model data dictionary.
  • Format: used to format the input value in prescribed format string. To format the text input in date form, programmer may use "{0:d}"
  • Html Attributes: the object contains html attributes to set for the element like class, font size and many more attributes.
    @Html.TextBox("txtName", "Student Name", "{0:d}", new { @class = "txtClass" })

@Html.TextBoxFor(Parameter collection...)

The main difference between @Html.TextBox() and @Html.TextBoxFor() is this handler use prediction to resolve the value to be shown. All the remaining parameters are same in both the handlers.

This method is used when programmer binds this page through a model class (having some properties). Programmer can specify more html attributes within the related section.

For example the following line of code will fix the max length of textbox
@Html.TextBoxFor(m=>m.Name, new { maxlength = "20" })

To disabled the textbox just specify the disabled attribute like written below:
@Html.TextBoxFor(m=>m.Name, new { disabled = "disabled" })

Return Label Element using Html.Label() Handler: MVC

Html.Label() handler used to return label element on the page at run time. It supports some types of parameters discussed and also have some more options to returning labels on the page. Mostly it is of three types listed below with their specification and uses.

Html.Label(parameter collection...)

This Html handler is used to return label element with property name specified by the parameter expression. Here is collection of parameter this html handler used:

  • Expression: used to identify the property to display.
  • label text: specify the text of label to display.
  • Html Attributes: this parameter is type of object, contains all the elements to be set for this label element.
    @Html.Label("stName", "Student Name", new { @class = "lblClass" })

Html.LabelFor(parameter collection...)

This handler is used for showing the label element of property passed from the model, the page bind. For example the page is bind to student model and we bind this handler with student name then this handler will show the name of student like shown below:

@Html.LabelFor(model => model.Name)
Here model represent the class name passed to bind this view. This parameter must be defined in prediction type as shown in the above code, without prediction it will show an error. Remaining parameters are same as Html.Label() handler.

@Html.LabelForModel(parameter collection...)

This handler returns a label whose for value is that of the parameter represented by the model object. It is mostly used in editor templates in MVC View. e.g.

@Html.LabelForModel() - it shows the label element for the string property of model bind with this view.

Variable, Conditions and Looping in Asp.Net Razor: C#

Like all other programming languages, variables are named entities used to store data to be used in particular scope. Declaration of variables must follow all the rules described in other languages like must begin with alphabetic character, cannot contain white spaces or any reserved character.

Variables can be declared by their specific data type or "var" keyword. Variables may use all the operators as other languages use. Following lines of code will declare some variables of different data types:

// Variables having var datatype
var name = "Computer Programming"
var url = "dotprogramming.blogspot.com"
var authors = 10
var estb = 2013

//Datatypes accordingly
String name = "Computer Programming"
String url = "dotprogramming.blogspot.com"
int authors = 10
DateTime estb = 2013

Razor syntax also supports conditional expressions i.e. if...else statement to be used some lines of code accordingly. Following lines of code will specify an if...else code block which with always show the true case, because of the condition.

@{ if (true)
   {<p>This is true case</p>}
   else
   {<p>This is false case</p>}
}

By using above type of code, programmer can easily specify the divisions on individual condition. Like this conditional statement razor also supports looping statements i.e. For loop, for-each loop, while loop etc. To be execute some lines of code multiple times programmer need to use these looping constructs.

Following line of code will write the string ("dotprogramming.blogspot.com") 10 times on the page:

@{ for (int i = 0; i < 10; i++)
   {
       <p><a href="https://dotprogramming.blogspot.com">Computer Programming @(i+1) </a></p>
    
   }
}

Running these line of code will show you 10 links of the same url (as specified):

Variable, Conditions and Looping in Asp.Net Razor: C#

Generating same output from for-each loop, programmer need to write something like these lines of code:

int[] array = new int[10] { 1, 2, 3, 4, 5, 6, 7, 8, 9, 10 };

foreach (var item in array)
{
   <p><a href="https://dotprogramming.blogspot.com">Computer Programming @(item) </a></p>
}

Introduction to Mark-Up Language: Asp.Net Razor

Razor, mostly used language in Asp.Net MVC, is not a programming language but it is a server-side mark up language. It is basically used to let the programmer embed server based code in to web pages.

By running on the server-side, Razor code can perform complex tasks including database accessing. Server executes this code inside the page before returning to the browser at the time of calling a particular page. The main advantage of this markup language is, it supports c sharp (C#) as well as visual basic (VB).

Here are some rules/instructions to be follow when writing razor language with c#:

  • Declarations of variables/functions will start with @
  • Code blocks are enclosed in @ {... }
  • Statements will end with semicolon (;)
  • Remember c# code is case sensitive
  • Comments can be written within @* ...... *@

Following line of code will explain you a brief knowledge about razor syntaxes:

@* Commented Section
Below are some line of code which will use two variables declared in razor and then use them to show title and description of the page.
*@

@{
    var title = "This is this page's title";
    var description = "The description about this page";
}

<div>
    <p>Title: @title</p>
    <p>Description: @description</p>
</div>

<!-- Comments can also be written like this -->

The first block of code is used for commented lines as written as heading. Second block is used to declare two array i.e. title and description that can be used further in the code. The last code is html code and simple div and p tag are placed there to write the values of above declared variables.

Razor provides mostly all the server-side objects with all these methods they can have. To show current date/time razor syntax will be:

<p>
    Today Date:  @DateTime.Today 
    Time:  @DateTime.Now.TimeOfDay
</p>

There are many more we have to learn about razor syntax like variables, conditional statements, looping constructs etc.

© Copyright 2013 Computer Programming | All Right Reserved