-->

Tuesday, March 8, 2016

Customization of CreateUserWizard Control in ASP.NET C#

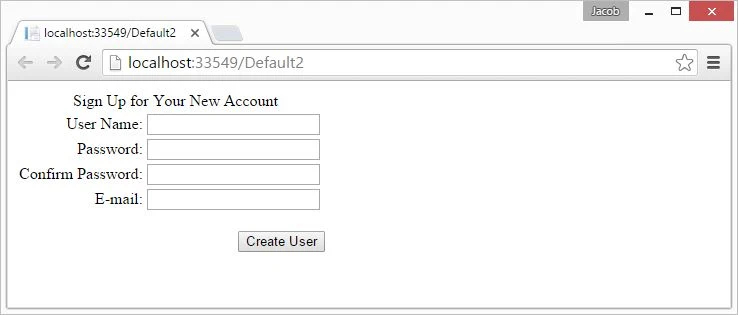
Create User Wizard control is used to store information of the user or visitor into the database table. ASP.net provide the control through this we can store limited information of the client into the database table. But we can change its user interface. You can say customization of Grid View. When we drag it on design window then its look like:


Customization of CreateUserWizard Control

Select Create User Step link by using "show smart tag". After that you can make some changes in fields. Like if You want to remove "Security Answer" and Security Question. Suppose you have to remove it then your interface look like:

 remove "Security Answer" and Security Question.

But when you run it then you get error like :

Default Membership Provider must be specified.

[Solution]
Add tags in web. config file.
<system.web>
<membership>
      <providers>       
        <clear />
      <add requiresQuestionAndAnswer="false" name="AspNetSqlmembershipProvider" type="System.Web.Security.SqlMembershipProvider" connectionStringName="DefaultConnection" applicationName="Application"/>
      </providers>
    </membership>
</system.web>
Code Generates the following output
Customization of CreateUserWizard Control in ASP.NET C#

Wednesday, September 10, 2014

How to Bind DropDownList with Enum MVC

Earlier article was about to bind DropDownList with simple select list of type selectlistitems. These select list may by any type of list either from database or temporary for that view only. In this article we will create an enum, then create a select list through that enum and finally will bind that to drop-down list.

Create an Enum like I have, named OptionType

enum OptionTypes
{
value1,
value2,
value3,
value4
}

After creating enum, write a class that will work like a helper to create select list for that enum:

public static class EnumHelper
{
// Get the value of the description attribute if the   
// enum has one, otherwise use the value.  
public static string GetDescription<TEnum>(this TEnum value)
{
var fleid = value.GetType().GetField(value.ToString());

if (fleid != null)
{
var attributes = (DescriptionAttribute[])fleid.GetCustomAttributes(typeof(DescriptionAttribute), false);

if (attributes.Length > 0)
{
return attributes[0].Description;
}
}

return value.ToString();
}

/// <summary>
/// Build a select list for an enum
/// </summary>
public static SelectList SelectListFor<T>() where T : struct
{
Type t = typeof(T);
return !t.IsEnum ? null
: new SelectList(CreateSelectList(t), "Value", "Text");
}

/// <summary>
/// Build a select list for an enum with a particular value selected 
/// </summary>
public static SelectList SelectListFor<T>(T selected) where T : struct
{
Type t = typeof(T);
return !t.IsEnum ? null
: new SelectList(CreateSelectList(t), "Text", "Value", selected.ToString());
}

private static IEnumerable<SelectListItem> CreateSelectList(Type t)
{
return Enum.GetValues(t)
  .Cast<Enum>()
  .Select(e => new SelectListItem { Value = e.ToString(), Text = e.GetDescription()                            });
}
}

Go to your controller and write the line as I have:

ViewBag.values = EnumHelper.SelectListFor<OptionTypes>();

Open your view page and write

@Html.DropDownList("values");

Run this view in browser and check, your drop-down list has been bind. This will create a simple list named “values” as specified as parameter. If we want to create a drop-down list for a model then:

@Html.DropDownListFor(model => model.property, (IEnumerable<SelectListItem>)ViewBag.values, new { html parameters })

This will bind this drop-down list as strongly with the property of the model.

Saturday, August 30, 2014

Basics about JQUERY, Types of Selectors

To change the web page after rendered programmer has to change the coding done for the page and then refresh again. To manipulate a web page after it has been rendered without change the coding part, programmer often uses Jquery. Jquery library makes it easy to change the functionality of web page smoothly.

Jquery library provides tools that enable user to interact with the page or to include animations on page. This article will describe about some basic elements of jquery library, later we will implement some functionality on the page with tools provided by the library. To user jquery library programmer must have a reference on the web page or layout file.

Selecting an element/control on which programmer will perform some action, jquery library provides selectors. These selectors can select any element/control on the basis of their id, class or their type as per the requirement.

Showing an alert just after loading of the page, jquery provides an in-built function. Programmer can enable any functionality on loading of the page using below syntax.

$(document).ready(function(){
alert("page loaded");
});

First we need to know about how to select an element/control in jquery
Element Selector: To select an element on the page like <p/> (paragraph tag), <a/> (anchor tag), <input /> or any other element, programmer has to write something following below syntax:

$(document).ready(function(){
$('p').click(function(){
alert('<p> element selected');
});
$('a').click(function(){
alert('<a> element selected');
});
$('input').click(function(){
alert('<input> element selected');
});
});

Id selector: to select a control on basis of the id of that element, programmer needs to know about id selector. '#' symbol is used to select according to control's id like "$('#btnInput')" will select the control having id "btnInput". As we know that each control has its own id on the page and that is unique.

$(document).ready(function(){
$('#btnInput').click(function(){
alert('input button clicked');
});
});

Class selector: to select control(s) according to their CSS class property, this selector is used. Suppose we have multiple buttons having same class i.e. "button" so to apply some change on all of then we can do by using this selector.

$(document).ready(function(){
$('.button').click(function(){
alert('button clicked having class "button" ');
});
});

There are many jquery selectors in the library, we will use them one by one in later articles.

How to Create Layout page and set for View: MVC

After creating default MVC application in Visual Studio there is a default layout file has been added in shared folder under views having name _Layout.cshtml. This file is used to provide consistent look on all of the pages having default layout page set. Changes done in this file will set for all the pages/views under this layout.

The above extension ".cshtml" is used only in case of Razor and this will be changed for aspx views. Programmer can even change this layout file as per requirements or can use multiple layout files according to the roles/group  defined. All the scripts, styles and custom files must be included in this layout file if necessary for all views.

If Programmer don't want to use any layout for the view then "Layout = null" must be set in the view page. This feature can only be set for that particular view. Now to create new layout file programmer have to add new item as "MVC Layout Page(Razor)" and change the name if required otherwise default will be used.

MVC set layout null


After adding the layout file create html and use “@RenderBody()” statement wherever you want to render the body of view page which will have this layout. Whatever change we do in this file, will be changed for all the views having this file as a layout.

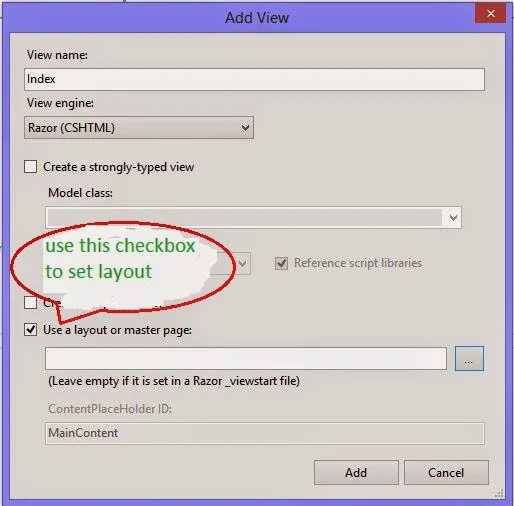
Whenever programmer adds a new view there is an option for using a layout or master file with a checkbox and browse button. Check that checkbox and browse for the layout file created above. This will set that file as a layout for that new view.

MVC set null in new view

Wednesday, July 30, 2014

How to Submit data on DropDown Selection changed in MVC Razor

Submitting the form by button, programmer have to assign only the type of that button and on click this button all the data can be get on the server side. On drop-down change we have manually submit the form by either specifying "OnSelectionChanged" event or some jquery functions.

In earlier article I have created DropDownList in MVC, to submit the form we can simply use only submit function on change event of the list.

@Html.DropDownList("ddlname", "List to bind", "--default title--", new { onchange = "submit();" })

After writing this code on change it will post all the data on the form to server-side but programmer have to use same name in action method as used here “ddlname”. When we use view-model to bind the data then dropdown list’s code will be changed as:

@Html.DropDownListFor(model => model.Property , "List to bind", "--default title--", new { onchange = "submit();" })

This code will contains the value of the property of model as used here. The value will submit on change the selection of this drop-down list. Programmer can change other controls value by using this code.

Suppose we have to select country, state and city on the form in hierarchy manner. On change the country, states drop-down list should change and on change of state, city drop-down list should change. By implement this functionality we can use this submit functionality.

Saturday, June 28, 2014

Returns Radio Button Input element using Html.RadioButton() handler: MVC

Html.RadioButton() handler, used to return radio button input element to be input true or false value by user. Checked radio button will return true and un-checked will return false, otherwise it returns null to store/use the value.

Html.RadioButton() handler method is used to present mutually exclusive option i.e. true of false. Using this radiobutton method makes it easy to bind to view data or model is so easy in compare to using simple input radio element. This handler provides mostly same features as Html.CheckBox() handler discussed earlier.

Parameters


  • htmlHelper: specify html helper instance that this method extends.
  • name: specify name of input element used to access the value in controller.
  • value: specify value of radio button element. If none is assigned then this attribute is used to access the value.
  • isChecked: to be set true of false for radio button. True to select the element, OW false.
  • htmlAttributes: specify an object that contains html attributes to set for the element.
     e.g Html.RadioButton(“gender”)

Html.RadioButtonFor(…)

Having the same functionality as Html.RadioButton() but it returns radio button element for each property passed via the model from controller’s action. This handler have two types of type parameters i.e. TModel (specify type of model) and TProperty (specify type of value).

Parameters

  • htmlHelper: specify html helper instance that this method extends.
  • expression: used to identifies object containing the property to render.
  • value: specify value of radio button element. If none is assigned then this attribute is used to access the value.
  • htmlAttributes: specify an object that contains html attributes to set for the element.

e.g Html.RadioButtonFor(model=>model.Gender)

Render radio button input for the property gender passed via controller. Submitting form will assign the value of this radio button to model’s gender property to be accessed in the controller’s action.

© Copyright 2013 Computer Programming | All Right Reserved