-->

Friday, April 15, 2016

Windows Forms Methods

Windows Forms methods enable you to perform various tasks, such as opening, activating and closing the form.

The commonly used methods are explained in the following:
1. Show ( ) 
Description : Is used to display a form.
Example: Form2 frmobj = new Form2();
frmobj.Show();

Explanation : This code creates a new instance of the Form2 form by using the new keyword. The Show() method display the instance of Form2 form.

2. Hide( )
Description: Is used to hide a form.
Example: Form1 frmobj = new Form1();
frmobj.Hide();
//you can use
this.Hide( ); // for current Form1

Explanation: This code creates a new instance of the Form1 form by using the new keyword. The Hide() method hides the instance of Form1 form.

3. Activate ( )
Description: Is used to activate a form and set the focus on it. When you use this method. It brings the form to the front(if it is the current application) or flashes the form caption(if it is not the current application) on the task bar.
Example: Form1 frmobj = new Form1();
frmobj.Activate();
Explanation : This code sets focus on a form named Form1.

4. Close ( )
Description: Is used to close a form.
Example: Form1 frmobj = new Form1();
frmobj.Close();
Explanation: This code closes the form named Form1.

5. SetDesktopLocation()
Description: Is used to set the desktop location of a form at runtime. This method takes the X and Y coordinates of the desktop as its parameters.
Example: Form1 frmobj = new Form1();
frmobj.SetDesktopLocation(200,200);
Explanation : This code displays the form named Form1 at the specified location.

Thursday, April 7, 2016

Types of Dialog Boxes in Windows Form C#

Windows provides the following type of dialog boxes:
1. Modal
2. System Modal
3. Modeless

Modal Dialog Box : A modal dialog box does not allow you to switch focus to another area of the application, which has invokes the dialog box. However, you can switch to other windows application while the modal dialog box is being displayed on the screen.
For example, the Save as dialog box of Microsoft word is a modal dialog box. If you are trying to save a word file by using the Save As dialog box, you cannot make any changes in the word document until it is saved. The following figure shows the save as dialog box.


Modal Dialog Box


System Modal Dialog Box
The System modal dialog box takes control of the entire Windows environment. For example, the Windows Log On dialog box is a system modal dialog box.
The following figure displays the Log On to Windows dialog box.
Sometimes, error messages are displayed by using a system modal dialog box. When such messages appear on the screen, the user is not allowed to switch to, or interact with, any other Windows application until the system modal dialog box is closed.

System Modal Dialog Box


Modeless Dialog Box

Types of Dialog Boxes in Windows Form C#

The modeless dialog box stays on the screen and is available for use at any time. For example, the Find and Replace dialog box of Microsoft Word is a modeless dialog box. This modeless dialog box allows you to switch to another area of the application, which has invoked the dialog box, or to another windows application.

Sunday, January 10, 2016

Change System date Format using c#

If you want to change Your system date format using c# then you must to use RegistryKey class. This class is available in Microsoft.Win32 namespace. By using this class you can change the short and long date format, Before any changes the Date format look like.

Change System date Format using c#

Now, after the code you can change the Date format:

using Microsoft.Win32;

private void button1_Click(object sender, EventArgs e)
        {
            RegistryKey regkey = Registry.CurrentUser.OpenSubKey(@"Control Panel\International", true);
            regkey.SetValue("sShortDate", "10/12/87");
            regkey.SetValue("sLongDate", "10/12/87");
        }

Customized Date Format

Friday, January 8, 2016

Export DataGridView to Excel using OpenXML and ClosedXML

In this article, I will explain you, How to export data of DataGridView to Excel file. In this article, I will use OpenXML and ClosedXml libraries for export data. We can also export data of DataGridView using Foreach loop by fetching each row of it. To do this task, first of all Download two assemblies i.e :

  1. Open XML SDK 2.0 For Microsoft Office 
  2. Closed XML

Now, Add windows form into your project. Add a DataGridView and single button on it.

using System;
using System.Windows.Forms;
using System.IO;
using System.Data;
using System.Reflection;
using ClosedXML.Excel;

namespace Export_DataTable_Excel
{
    public partial class Form1 : Form
    {
        public Form1()
        {
            InitializeComponent();
            this.BindData();
        }

        private void BindData()
        {
            DataTable dt = new DataTable();
            dt.Columns.AddRange(new DataColumn[3] { new DataColumn("StudentId", typeof(int)),
            new DataColumn("StudentName", typeof(string)),
            new DataColumn("StudentCity",typeof(string)) });
            dt.Rows.Add(1, "Jacob lefore", "US");
            dt.Rows.Add(2, "Ammey smith", "UK");
            dt.Rows.Add(3, "Bill Smith", "Fr");
            dt.Rows.Add(4, "Robert", "Ru");
            this.dataGridView1.DataSource = dt;
        }

        private void ExportExcel_Click(object sender, EventArgs e)
        {
     
            DataTable dt = new DataTable();

 
            foreach (DataGridViewColumn column in dataGridView1.Columns)
            {
                dt.Columns.Add(column.HeaderText, column.ValueType);
            }

   
            foreach (DataGridViewRow row in dataGridView1.Rows)
            {
                dt.Rows.Add();
                foreach (DataGridViewCell cell in row.Cells)
                {
                    dt.Rows[dt.Rows.Count - 1][cell.ColumnIndex] = cell.Value.ToString();
                }
            }

            //Exporting to Excel
            string folderPath = "C:\\my\\";
            if (!Directory.Exists(folderPath))
            {
                Directory.CreateDirectory(folderPath);
            }
            using (XLWorkbook xlfile = new XLWorkbook())
            {
               xlfile.Worksheets.Add(dt, "students");
               xlfile.SaveAs(folderPath + "data.xlsx");
            }
        }
    }
}

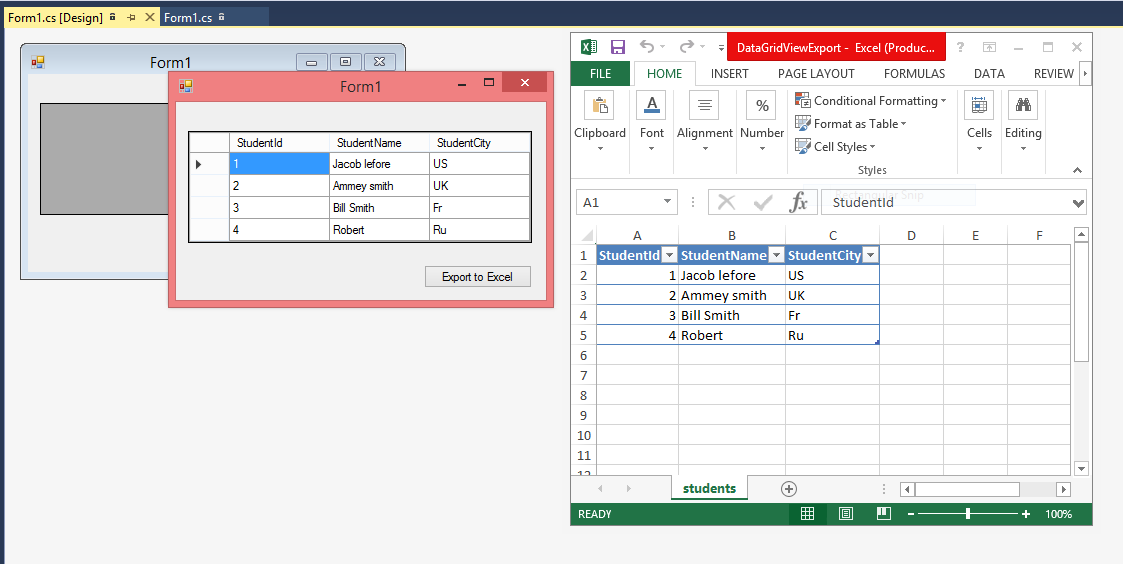
Code Generates the following output

Export DataGridView to Excel using OpenXML and ClosedXML

Sunday, November 16, 2014

How to add controls dynamically in windows form c#

Visual studio provide the best features to design the form. By the designer window, you can add the controls from the toolBox. After added the items, you can set the properties by the property window. Same this things, you can do this by the code window. Follow some steps to add controls dynamically.


  Step-1 : Open Code window that is form1.cs file, create a object for controls like

TextBox t1 = new TextBox();

Step-2 : Associate properties of the TextBox class with the current object like

 t1.Name = "Text1";
    t1.Width = 300;
            t1.Text = " Dynamically added Control";
            t1.Location = new Point(10, 10);

Here Point is a class, in which you have to define the coordinates of x-axis and y-axis, where you want to add the TextBox.

Step-3 : Add this instance in the form by following line of code.

 this.Controls.Add(t1);

 Now code Generate the following output:
How to add controls dynamically in windows form c#

Tuesday, December 24, 2013

How to Delete Multiple Records from DataGridView in Winforms: C#

To remove multiple records from the DataGridView, programmer need to write some line of code, code may be written in a button's click event that is outside of the DataGridView. The article shows about how to select multiple records of DataGridView and the c# code to remove them with a single mouse click.

When a programmer have to remove a single record entry from the DataGridView, then a command button can be added as discussed. Removing a single record can be performed by the index of the record. Through the index programmer can easily get all the unique values about the record which helps to perform the action.


To remove multiple records, follow the steps written below:
  • Drag-n-Drop DataGridView on the form and set its MultiSelect property to True.
  • Create a list of records (Student Class) and bind this DataGridView with that list.
  • Create a button outside of this DataGridView and generate its click event.
  • Write following C# code in the click event of button to remove multiple records:
private void removeButton_Click(object sender, EventArgs e)
{
DataContext dc = new DataContext();
foreach (var item in dataGridView1.Rows)
{
DataGridViewRow dr = item as DataGridViewRow;
if (dr.Selected)
{
string name = dr.Cells["Name"].Value.ToString();
var student = dc.Student.FirstOrDefault(a => a.Name.Equals(name));
if (student != null)
{
dc.Student.Remove(student);
}
}              
}
dataGridView1.DataSource = null;
dataGridView1.DataSource = dc.Student;
}
  • Run the form and select some of the records as in the image:
How to Delete Multiple Records from DataGridView in Winforms: C#

  • Click on the remove button and all these selected records will be deleted. A single record remain safe shown in the image:
How to Delete Multiple Records from DataGridView in Winforms: C#


So all these simple steps are used to delete multiple as well as single record from the DataGridView. Programmer can also use a confirmation message for the surety of the deletion by the user. To do that, just place all the above code in between the below c# code:

if (MessageBox.Show("Are you sure you want to remove all these records?", "Confirm", MessageBoxButtons.YesNo, MessageBoxIcon.Question).ToString() == "Yes")
{
//above code
}

When the programmer will click on the button then a confirmation message will be shown. After clicking on the "Yes" button, all the selected records will be deleted otherwise none of them.

© Copyright 2013 Computer Programming | All Right Reserved