-->

Monday, June 17, 2013

How to set Startup Object in multiple main method in c# console application

Suppose you have a project that it contain multiple main method in different classes Then How to set start-up object
your code are :

using System;
using System.Collections.Generic;
using System.Linq;
using System.Text;
using System.Threading.Tasks;

namespace ConsoleApplication1
{
    class Program
    {
        static void Main(string[] args)
        {
        }
    }
    class program1
    {
        static void Main(string[] args)
        {
        }
    }

}

After run your application you get error 
more than one main method in application


Following some steps for solution:

Step-1 : On Application name, Select properties


Step-2: Select Application tab in left pane, Choose Startup object in right pane

startup object

Step-3: After choosing startup object run your application

output screen


Sunday, June 16, 2013

Thursday, June 13, 2013

How to make Database table in visual studio 2012

Introduction

Database table is a collection of "data-column and data-rows". If you want to make table in visual studio 2010 then you must save table using save icon. Also give name of the table, which is related to table data. In Visual Studio 2013 you must to update table after preparing structure.

Following some steps for creating Database table in visual studio 2012


Step-1 : Right click on website name in solution explorer
Step-2 : Click  Add --> Add New Item
Step-3: Select Sql Server Database

choose sql data base

Step-4: Show new pop up window
folder in App_data
Step-5: Click "Yes" in Microsoft visual Studio pop
and add Database.mdf file in App_Data folder

Step-6: In Server Explorer Expand "+" icon of database.mdf file 

server explorer

Step-7: Right Click on Tables --> Click Add new Table

data base table property

Step-8: make Id as  IsIdentity column.
Step-9: Right click on id column-->Properties 
Step-10: Set Is Identity to "true"
Column property

Step-11 : Add new Column to table 

query design view

Step-12: Before Click on Update button  chnage table name
update and save data base

Step-13 : Insert item into table
Step-14 : Right click on Table name in server explorer
Step-15 : Click show table data 
Step-16 : Insert item into table

assign value to column

How to bind TabControl with database in windows forms

TabControl manages and displays a related collection of tabs that can contain controls and components. We can add multiple pages in a single form and each page can contain its individual set of controls that can displayed when that tab is selected.

When we add a TabControl in our form then it will add three Tab Pages as default pages and tabPage1 will be selected tab. We can remove any tabPage from that control or can add a new tabPage.

Create a tab page

To add a tab page we can use Add method of TabPages property. Following line of code will add three tab pages without any control

tabControl1.TabPages.Add("Page1");
tabControl1.TabPages.Add("Page2");
tabControl1.TabPages.Add("Page3");

Inserting a tabPage with a label control:

Label label = new Label();    //New labal control
label.Text = "This is the control which will added to TabPage";    //set text property of label

TabPage tabPage = new TabPage();    // create a new tabpage
tabPage.Text = "Tab Page 1";    // set text property of tabpage
tabPage.Controls.Add(label);    //add label control to above tabpage

tabControl1.TabPages.Add(tabPage);    //finally add tabpage to our tabcontrol

Remove a tab page 

To remove a tab page we can use Remove method of TabPages property. Using following line of code we can remove selected tab from our tabControl:

tabControl1.TabPages.Remove(tabControl1.SelectedTab);

Load tabpages from Database 

In the following example we will add tabPage according to our departments. Each tab contains a list of employees working in that department. For showing list of employees we used a DataGridView in a UserControl. When we add a tabPage then we will load userControl in that tabPage.

Step 1:
Create two tables i.e. Department and Employee (described in previous article) in our database.

Step 2:
Insert some records in both tables (described in previous article).

Step 3:
Add a UserControl to our project and then add a DataGridView that will contain list of employees. Write following code in constructor of UserControl:
  
public EmployeeUserControl(Department dept)
{
       InitializeComponent();
       DataContext dc = new DataContext();
       var employees = from temp in dc.Employee
                                where temp.Department.Name == dept.Name
                                select new
                                {
                                       temp.Name,
                                       temp.Email,
                                       temp.Mobile
                                 };
       empDataGridView.DataSource = employees.ToList();
 }
As in above code datagridview will bind to the list of employees according to department.

Step 4:
Now finally in our form’s constructor write below line of codes to add pages to tabControl
foreach (var item in dc.Department)
{
        TabPage newTab = new TabPage(item.Name);
         newTab.Controls.Add(new EmployeeUserControl(item));
         tabControl1.TabPages.Add(newTab);
}

Download Source

Wednesday, June 12, 2013

How to create, read, write and delete a text file in windows forms c#

We all know about text files. Text files can contain plain text as well as encrypted text also. A programmer can use these files as a Database in his/her program like to save some Questions to be done by students in their lab, etc.

A programmer don’t know about the hard drives of client’s computer, so we will use our project’s current directory as a path of our files. In Visual Studio, Environment.CurrentDirectory denotes our project’s bin directory.


There are some inbuilt classes which we will use here for our operations like File, FileInfo, StreamWriter, and StreamReader. These all are in System.IO namespace. These classes have thier own methods and properties on which we will work. In this article we will learn how to


  • Create a text file
  • Write data to that file
  • Read data from that File
  • Delete that file

To do some operation with files, create a local variable of type string having path of our project’s current directory with filename:

string path = Environment.CurrentDirectory + "/" + "ab.txt";

Create a text file

if (!File.Exists(path))     //check if file exist or not
    File.Create(path);      //create file if not exist

Here above, first we should have a path to create a file. Then check whether the specified file not exist and then create that file using our last statement i.e. File.Create(path).

Write text to file:

if (File.Exists(path))      //Check if file exist or not
{
    StreamWriter sw = new StreamWriter(path);//create an instance of StreamWriter
    sw.WriteLine("Test Data");               //Write some data in opened file
    sw.Close();                              //close StreamWriter after writing
}

Read text from file:

if (File.Exists(path))      //Check if file exist or not
{
    StreamReader sr = new StreamReader(path);//create an instance of StreamReader
    string line = sr.ReadLine();             // Read line from text file
    sr.Close();                              //close StreamReader after writing
}

Delete a text file:

if (File.Exists(path))      //Check if file exist or not
{
    File.Delete(path);      //if file exist then delete it           
}


Sunday, June 9, 2013

How to drag and drop items from one CheckedListBox to another in windows forms

Most of the GUI based application provides Drag-n-Drop operation. This function enables the user to drag an item from one location and drop to another location. In our previous post we have studied how to bind CheckedListBox using database. Now we will perform Drag-n-Drop operation with two CheckedListBox.


There are series of events that needs to be handled to perform this Drag-n-Drop operation, these are:

MouseDown (of source control): this event is occur when the mouse pointer is over the control and mouse button is pressed. It is beginning point of this operation, where DoDragDrop() method is called to set the data that is to be dragged.
DragEnter (of destination control): occur when mouse drag an item into area of this control. Here, we check that the desired type of data are present or not.
DragDrop (of destination control): occur when Drag-n-Drop operation completed. Here, we retrieve the dragged data and drop it.

Before we start this operation do insert some items in checkedListBox1 i.e.


string[] items = new string[] { "item 1", "item 2", "item 3", "item 4", "item 5" };

checkedListBox1.Items.AddRange(items);

Steps to perform this operation:
Step 1
            Initiate Drag-n-Drop operation for checkedListBox1 by calling DoDragDrop() method from MouseDown event of the control.


Drag-n-Drop

Step 2
            Handle the event to provide information about the operation to the user i.e. DragEnter event of checkedListBox2.


Drag-n-Drop2

Step 3
            To enable to checkedListBox2 to accept the data, set its AllowDrop property to true.
            checkedListBox2.AllowDrop = true;

Step 4
            Handle DragDrop event of checkedListBox2 to specifying what is to be done with dropped data.


DragDrop event of checkedListBox2

Download Example here.

Saturday, June 8, 2013

How to bind CheckedListBox using database In windows forms

CheckedListBox displays a list of items with a checkbox on the left side of each item. The user can select one or more items by simply place a checkmark to one or more items. To access those checked items we can use either CheckedListBox.CheckedItemCollection or CheckedListBox.CheckedIndexCollection in our code behind file.


To add a list of items at run time there is a function i.e. AddRange() that need a parameter of type array. We can add individual items using simple Add() method.
bind CheckedListBox using database
When we run our project it will look like:

bind CheckedListBox using database image

CheckedListBox provides two types of states i.e. Checked and Unchecked. There is one more state i.e. Intermediate that must be set through code If we want to use this.

Now to bind this control using database we must have some entries in our table and I have described this in my previous post. To bind CheckedListBox with our table we have to write following code in our Form’s constructor:
data context class
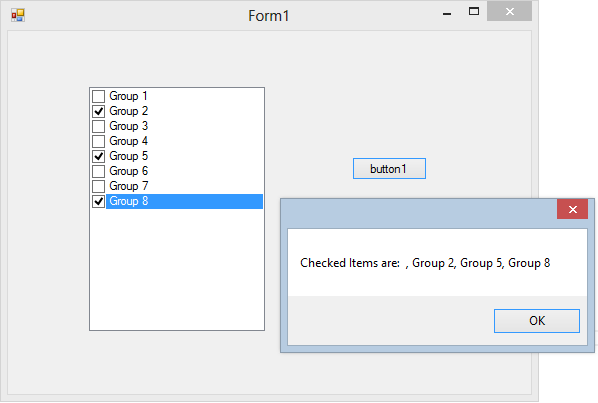
After bind this CheckedListBox  it’s time to get checked items. To get checked items there is a property i.e. CheckedItems type of CheckedItemCollection. So add a button in our form and in the click event of that button we will get checked item one by one and add it to a string variable and finally show this through a message box.
binding listing item
When we will run our project it will show a message box having items that are checked in our CheckedListBox.
binding output

Download Source code
© Copyright 2013 Computer Programming | All Right Reserved