-->

Friday, July 19, 2013

ASP PROGRAM : How to use Wizard Control in ASP.NET

ASP PROGRAM : Introduction
The wizard control provides navigation and a User Interface (UI) to collect related data across multiple steps. It also allows you to implement liner or non-linear navigation through the steps such as skipping unnecessary steps or returning to a previously completed step to change some value. The appearance of the wizard control is fully customized by using templates , skins and style settings; for example , you can use the HeaderTemplate , SideBarTemplate, StartNavigationTemplate , FinishNavigationTemplate , and StepNavigationTemplate properties to customized the interface of the Wizard control.

Public Properties of the Wizard Class
ActiveStep : Obtains the step in the WizardSteps collection , which is currently displayed to the end-user
ActiveStepIndex : Obtains or sets the index value of the current WizardStepBase object.
CancelButtonImageUrl : Obtains or sets the URL of the image displayed for the cancel button.
CancelButtonStyle : Obtains a reference to a collection of style properties that describes the appearance of the cancel button .
CancelButtonText : Obtains or sets the text caption that is displayed for the cancel button.
CancelButtonType : Obtains or sets the type of button that is rendered as the cancel button.
CancelDestinationPageUrl : Obtains or sets the URL that the end user is directed to when they click the cancel button.
CellPadding : Obtains or sets the amount of space between the data of the cell and the cell border.
CellSpacing : Obtains or sets the space between the cells
DisplayCancelButton : Obtains or sets a boolean value showing whether to display a cancel button.
DisplaySideBar : Obtains or sets a Boolean value showing whether to display the sidebar area on the wizard control.

Example of Wizard Control 

When you add a Wizard control on a Web page (Default.aspx), it adds the following code to the source code of the web page
<asp:Wizard ID="Wizard1" runat="server" ActiveStepIndex="0">
            <WizardSteps>
                <asp:WizardStep runat="server" title="Step 1">
                </asp:WizardStep>
                <asp:WizardStep runat="server" title="Step 2">
                </asp:WizardStep>
            </WizardSteps>
        </asp:Wizard>
If you want to add some controls to the Wizard control then you must drop some controls between opening and closing tag of WizardStep

<asp:WizardStep runat="server" title="Step 1">
//Put some controls here
                </asp:WizardStep>
<%@ Page Language="C#" %>

<!DOCTYPE html>

<script runat="server">

    protected void Page_Load(object sender, EventArgs e)
    {

    }

    protected void RadioButtonList1_SelectedIndexChanged(object sender, EventArgs e)
    {
     
            result.Text = "your gender are <br/>" + RadioButtonList1.SelectedItem.Text;
   
    }
</script>

<html xmlns="http://www.w3.org/1999/xhtml">
<head runat="server">
    <title></title>
</head>
<body>
    <form id="form1" runat="server">
    <div>
 
        <asp:Wizard ID="Wizard1" runat="server" ActiveStepIndex="0">
            <WizardSteps>
                <asp:WizardStep runat="server" title="Step 1">
                    Your Gender are<br />
                    <asp:RadioButtonList ID="RadioButtonList1" runat="server" AutoPostBack="True" OnSelectedIndexChanged="RadioButtonList1_SelectedIndexChanged">
                        <asp:ListItem>Male</asp:ListItem>
                        <asp:ListItem>Female</asp:ListItem>
                    </asp:RadioButtonList>
                    <br />
                    <asp:Label ID="result" runat="server"></asp:Label>
                </asp:WizardStep>
                <asp:WizardStep runat="server" title="Step 2">
                    Welcome
                </asp:WizardStep>
            </WizardSteps>
        </asp:Wizard>
 
    </div>
    </form>
</body>
</html>


Output
ASP PROGRAM : How to use Wizard Control in ASP.NET

ASP PROGRAM : How to use Wizard Control in ASP.NET

Thursday, July 18, 2013

How to Bind Bulleted List using XMLDataSource in ASP.NET


Related Post

<%@ Page Language="C#" %>
<!DOCTYPE html>
<script runat="server">
</script>
<html xmlns="http://www.w3.org/1999/xhtml">
<head runat="server">
    <title></title>
</head>
<body>
    <form id="form1" runat="server">
    <div>
   
        <asp:BulletedList ID="BulletedList1" runat="server" DataSourceID="XmlDataSource1" DataTextField="Text" DataValueField="url" DisplayMode="HyperLink">
        </asp:BulletedList>
        <asp:XmlDataSource ID="XmlDataSource1" runat="server" DataFile="~/database/adver.xml"></asp:XmlDataSource>
   
    </div>
    </form>
</body>
</html>
Output
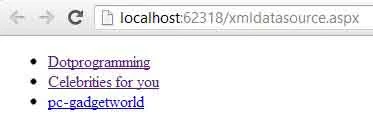
Bind Bulleted list using xmldata source in asp.net

How to use ImageControl in ASP.NET

Introduction 
The Image control is standard Web Server control, which is used to display an image on a Web page. This control exists within the System.Web.UI.WebControl namespace. You set the Uniform resource Locator (URL) of the image with the ImageUrl property of the Image control. The alignment of the image in relation to other elements on the Web page is specified by setting the ImageAlign property.

Public properties of the image Class
AlternateText : Obtains or sets the alternate text displayed in the image control when the image is not available . Browsers that support the ToolTips featurs display this text as a tooltip.
DescriptionUrl : Obtains or sets the location to a detailed description for the image.
Enabled : Obtains or sets a value indicating whether the control is enabled.
Font : Obtains or sets the font properties for the text associated with the control.
GenerateEmptyAlternateText : Obtains or sets a value indicating whether the control generates an alternate text attribute for an empty string value.
ImageAlign : Obtains or sets the alignment of the image control in relation to other controls on the Web page.

ImageUrl : Obtains or sets the location of an image to where it display in the Image control.

Example of Image control in asp.net

First insert image in any folder or root folder of the website

ImageControl example in asp.net

<%@ Page Language="C#" %>

<!DOCTYPE html>

<script runat="server">

</script>

<html xmlns="http://www.w3.org/1999/xhtml">
<head runat="server">
    <title></title>
</head>
<body>
    <form id="form1" runat="server">
    <div>
        <asp:Image ID="Image1" runat="server" ImageUrl ="~/Img/images.jpg" />
    </div>
    </form>
</body>
</html>
Related Post

How to use TextChanged event in ASP.NET

Note : Event occurs only when the AutoPostBack property of the control is set to true.
 Example of TextChanged event of the TextBox when AutoPostBack property is set to true.
<%@ Page Language="C#" %>
<!DOCTYPE html>
<script runat="server">
    protected void TextBox2_TextChanged(object sender, EventArgs e)
    {
        int a = Convert.ToInt32(TextBox1.Text);
        int b = Convert.ToInt32(TextBox2.Text);
        int c = a + b;
        TextBox3.Text = Convert.ToString(c);
      
    }
</script>
<html xmlns="http://www.w3.org/1999/xhtml">
<head runat="server">
    <title></title>
</head>
<body>
    <form id="form1" runat="server">
    <div>
  
        Enter first number:<asp:TextBox ID="TextBox1" runat="server"></asp:TextBox>
        <br />
        Enter Second Number :
        <asp:TextBox ID="TextBox2" runat="server" OnTextChanged="TextBox2_TextChanged" AutoPostBack="True"></asp:TextBox>
        <br />
        Total : <asp:TextBox ID="TextBox3" runat="server"></asp:TextBox>
  
    </div>
    </form>
</body>
</html>
Output
first enter any number into first Textbox after press TAB key 
and enter second number again press TAB key , Your result will show after pressing tab key.
 
TextChanged Event of the textbox class
 

Wednesday, July 17, 2013

How to use Hyperlink control in ASP.NET

Introduction
The HyperLink control is used to create a link to another Web page that can be a page in your Web application. or anywhere else on the World Wide Web (www) . The HyperLink control exists within the System.Web.UI.WebControls namespace.
You can specify the location of the linked page by specifying its URL on the current page . You can use text as well as an image in the HyperLink control. Text is specified with the Text Property and image is specified by the ImageUrl property . By default , when you click a Hyperlink control , the Hyperlinked content appears in a new browser window. You can set the Target property to the name of a window or frame , as linked in blow

Related Post:

Target property Options of the HyperLink class
_blank : Displays the hyperlinked content in a new window without frames.
_parent : Displays the Hyperlinked content in the immediate frameset parent
_self : Displays the Hyperlinked content in the frame with focus.
_top : Displays the Hyperlinked content in the full window without frames.

Public Properties of the HyperLink Class
ImageUrl : Obtains the path to an image to be displayed for the HyperLink control.
NavigateUrl : Obtains the URL to link to the Web page when the HyperLink control is clicked.
Target : Obtains the target window to display the Web page data when the HyperLink control is clicked.
Text : Obtains the text caption for the HyperLink control 

Example of Hyperlink control in ASP.NET  

<%@ Page Language="C#" %>
<!DOCTYPE html>
<script runat="server">
</script>
<html xmlns="http://www.w3.org/1999/xhtml">
<head runat="server">
    <title></title>
</head>
<body>
    <form id="form1" runat="server">
    <div>
        <asp:HyperLink Target ="_blank" ID="HyperLink1" runat="server" NavigateUrl ="http://dotprogramming.blogspot.com"> Worldbest programming blog on blogspot</asp:HyperLink>
    </div>
    </form>
</body>
</html>
Output 
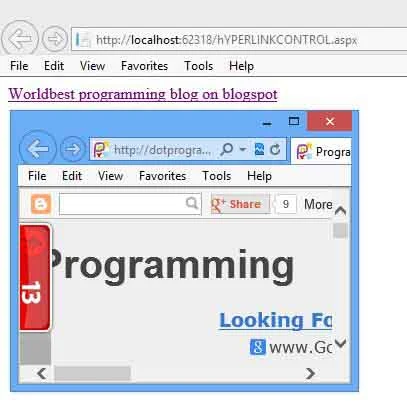
How to use hyperlink control in asp.net

Monday, July 15, 2013

How to use Literal Control in ASP.NET

Introduction of Literal control in ASP.NET:
The literal control is another Web Server control used for displaying text on a Web page, similar to that done by a Label control in ASP.NET , You can add HTML in a web page with the help of Literal control , without switching to the .aspx page. The Literal control exists within the System.Web.UI.WebControls namespace.

Public Properties of the Literal Class

Mode : Obtains or sets an enumeration value that specifies how the content in the Literal control is rendered.

Text : Obtains or sets the caption displayed in the Literal control.

Example of Literal control

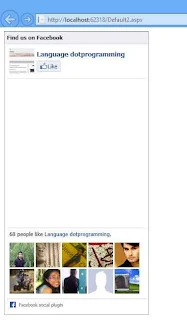
How to use Facebook developer plugin using Literal control.


<%@ Page Language="C#" %>
<!DOCTYPE html>
<script runat="server">
</script>
<html xmlns="http://www.w3.org/1999/xhtml">
<head runat="server">
    <title></title>
</head>
<body>
    <form id="form1" runat="server">
    <div>
   
        <asp:Literal ID="Literal1" runat="server" Mode ="Transform">
            <div id="fb-root"></div>
<script>(function (d, s, id) {
    var js, fjs = d.getElementsByTagName(s)[0];
    if (d.getElementById(id)) return;
    js = d.createElement(s); js.id = id;
    js.src = "//connect.facebook.net/en_US/all.js#xfbml=1&appId=257965964247226";
    fjs.parentNode.insertBefore(js, fjs);
}(document, 'script', 'facebook-jssdk'));</script>
            <div class="fb-like-box" data-href="https://www.facebook.com/Dotprogramming?ref=hl" data-width="292" data-show-faces="true" data-stream="true" data-show-border="true" data-header="true"></div>          
        </asp:Literal>
   
    </div>
    </form>
</body>
</html>
Output
How to use Literal Control in ASP.NET

When you add a Literal control on a web page , The following code is added to the source code of the Web page.

<asp:Literal Id="Literal1" runat="server"></asp:Literal>
in above example mode property is set to Transform that convert your HTML tag into your HTML output.
simply you can say
<H1> Hello world </H1>

Transform enumeration property  gives effect of the heading Tag
Code Generate the following Output
Hello world

Saturday, July 13, 2013

Online Examination System Project in ASP.NET

Introduction:
You can conduct your examination online using online Examination system project. Basically this project is designed for helping conductor. This application is designed for college level project its not used for education purpose.

Login Control


This module provide interface with admin login also provide security to your project. Your admin can see your result or update your questions.


<%@ Page Language="C#" Theme="all" %>
<%@ Import Namespace="System.Data.SqlClient" %>
<%@ Import Namespace="System.Data" %>
<!DOCTYPE html PUBLIC "-//W3C//DTD XHTML 1.0 Transitional//EN" "http://www.w3.org/TR/xhtml1/DTD/xhtml1-transitional.dtd">
<script runat="server">
    protected void btnLogin_Click(object sender, EventArgs e)
    {
        // check whether credentials are valid
        SqlConnection con = new SqlConnection(DBUtil.ConnectionString );
        try
        {
            con.Open();
            SqlCommand cmd = new SqlCommand("select * from oe_members where lname = @lname and pwd = @pwd",con);
            cmd.Parameters.Add("@lname", SqlDbType.VarChar, 10).Value = txtLname.Text;
            cmd.Parameters.Add("@pwd", SqlDbType.VarChar, 10).Value = txtPwd.Text;
          
            SqlDataReader dr = cmd.ExecuteReader();
            if (dr.Read())
            {
                Session.Add("mid", dr["mid"]);
                Session.Add("fullname", dr["fullname"]);
                Session.Add("dlv", dr["dlv"]);
                // update MEMBERS table for DLV
                dr.Close();
                cmd.CommandText = "update oe_members set dlv = getdate() where lname = @lname";
                cmd.ExecuteNonQuery();
                Response.Redirect("default.aspx");
            }
            else
            {
                lblMsg.Text = "Invalid Login!";
                dr.Close();
            }
        }
        catch (Exception ex)
        {
            lblMsg.Text = "Error --> " + ex.Message;
        }
        finally
        {
            con.Close();
        }
      
    }
    protected void dsLogin_Selecting(object sender, SqlDataSourceSelectingEventArgs e)
    {
    }
</script>
<html xmlns="http://www.w3.org/1999/xhtml" >
<head runat="server">
    <title>Untitled Page</title>
<style type="text/css">
 .Hd
 {
     height:100px;
     margin:auto;
     background-color:#DFA;
 }

 .Hd1
 {
     width:1000px;
     height:100px;
     margin:auto;
     border-left:1px solid #ccc;
     border-right:1px solid #ccc;
   
 }

 .Fd
 {
     height:80px;
     margin:auto;
     background-color:#DFA;
 }

 .Fd1
 {
     width:1000px;
     height:80px;
     margin:auto;
     border-left:1px solid #ccc;
     border-right:1px solid #ccc;
   
 }

 .Nd
 {
     height:35px;
     margin:auto;
     background-color:#1AA;
 }

 .Nd1
 {
     width:1000px;
     height:25px;
     margin:auto;
     padding-top:10px;
     border-left:1px solid #ccc;
     border-right:1px solid #ccc;
     font-weight:bold;
    
    
 }


 .Md
 {
     height:500px;
     margin:auto;
     background-color:#ffA;
 }

 .Md1
 {
     width:1000px;
     height:500px;
     margin:auto;
     border-left:1px solid #ccc;
     border-right:1px solid #ccc;
    
    
 }
</style>
</head>
<body>
<center>
    <form id="form1" runat="server">
    <div class="Hd"><div class="Hd1"> <h2 style=" padding-top:30px;">ONLINE EXAMINATION SYSTEM</h2></div></div>
   
    <div class="Nd"><div class="Nd1"> <a style="color:White; font-family:Trebuchet MS;text-decoration:none;" href="login.aspx">About Us</a>  | <a style="color:White; font-family:Trebuchet MS; text-decoration:none;" href="contact.aspx">Contact Us</a>| <a style="color:White; font-family:Trebuchet MS; text-decoration:none;" href="all/adminLogin.aspx">Admin Module</a> </div></div>
   
    <div class="Md"><div class="Md1">
        <div style="width:400px; height:500px; color:Maroon; text-align:justify; padding:5px; line-height:25px; font-family:Trebuchet MS;  float:left;">
        <h3>About System</h3>
        OnlineExams is being launched because a need for a destination that is beneficial for both
institutes and students. With this site, institutes can register and host online exams. Students can
give exams and view their results. This site is an attempt to remove the existing flaws in the
manual system of conducting exams.
<br />Purpose
<br />Online Exams System fulfills the requirements of the institutes to conduct the exams online.
They do not have to go to any software developer to make a separate site for being able to
conduct exams online. They just have to register on the site and enter the exam details and the
lists of the students which can appear in the exam.
Students can give exam without the need of going to any physical destination. They can view
the result at the same time.
Thus the purpose of the site is to provide a system that saves the efforts and time of both the
institutes and the students.</div>
        <div style="width:500px; height:500px;  float:right;">
        <br />
        <br />
        <h4>Login</h4>
        <br />
        <table >
            <tr>
                <td>Login Name :</td>
                <td><asp:TextBox ID="txtLname" runat="server" Width="150px"></asp:TextBox>
                    <asp:RequiredFieldValidator ID="RequiredFieldValidator1" runat="server" ControlToValidate="txtLname" ErrorMessage="Llogin name is missing!" Font-Bold="True">*</asp:RequiredFieldValidator></td>
            </tr>
            <tr>
                <td>Password :</td>
                <td><asp:TextBox ID="txtPwd" runat="server" TextMode="Password" Width="150px"></asp:TextBox>
                    <asp:RequiredFieldValidator ID="RequiredFieldValidator2" runat="server" ControlToValidate="txtPwd" ErrorMessage="Password is missing!" Font-Bold="True">*</asp:RequiredFieldValidator></td>
            </tr>
           <tr>
          <td colspan="2">
              <asp:CheckBox ID="chkRemember" runat="server" Text="Remember Me" /></td>
           </tr>
        </table>
        <br />
        <asp:Button ID="btnLogin" runat="server" Text="Login" Width="116px" OnClick="btnLogin_Click" /><br />
        <br />
        <asp:Label ID="lblMsg" runat="server"></asp:Label>
        <p>
        <asp:ValidationSummary ID="ValidationSummary1" runat="server" HeaderText="Please correct the following errors:" Font-Bold="True" />
        <p/>
        <a href="all/newuser.aspx">New User?</a>
        &nbsp; &nbsp;
        <a href="all/forgotpassword.aspx">Forgot Password?</a> 
     
        <asp:SqlDataSource ID="dsLogin" runat="server" ConnectionString="<%$ ConnectionStrings:examConnectionString %>"
            SelectCommand="select * from members where  lname = @lname and pwd = @pwd"
                onselecting="dsLogin_Selecting">
            <SelectParameters>
                <asp:Parameter Name="lname" />
                <asp:Parameter Name="pwd" />
            </SelectParameters>
        </asp:SqlDataSource>
    </div></div>
    </div>
    <div class="Fd"><div class="Fd1"> <p style="color:Blue; font-family:Trebuchet MS; padding-top:20px; font-weight:bold;">Developed  By: Uma Siyota, Hariom, Babu Lal, Deepak Godara</div></div>
   
    </form>
</center>   
</body>
</html>
Project requirements
  • Visual studio 2010
  • Sql server 2008


If you want to purchase this please contact me on :  narenkumar851@gmail.com
© Copyright 2013 Computer Programming | All Right Reserved