-->

Monday, September 30, 2013

Change Text style of ListBox dynamically in ASP.NET

If you want to change text style of the Listbox control dynamically then you must use listbox property at runtime. such as

  ListBox1.Font.Size = 10;
Note : some property does not appear at runtime , those properties are:
overline,underline etc.


lets take an simple example:

<%@ Page Language="C#" AutoEventWireup="true" CodeFile="Default16.aspx.cs" Inherits="Default16" %>

<!DOCTYPE html PUBLIC "-//W3C//DTD XHTML 1.0 Transitional//EN" "http://www.w3.org/TR/xhtml1/DTD/xhtml1-transitional.dtd">

<html xmlns="http://www.w3.org/1999/xhtml">
<head runat="server">
    <title></title>
</head>
<body>
    <form id="form1" runat="server">
    <div>
        <asp:ListBox ID="ListBox1" runat="server" Font-Overline="True" Height="184px"
            Width="251px">
            <asp:ListItem>Apple </asp:ListItem>
            <asp:ListItem>Orange </asp:ListItem>
            <asp:ListItem>Mango</asp:ListItem>
            <asp:ListItem>Grapes</asp:ListItem>
        </asp:ListBox>
        <br />
        <br />
        <asp:Button ID="Button1" runat="server" onclick="Button1_Click"
            style="height: 26px" Text="Chnage text style" />
        <br />
    </div>
    </form>
</body>
</html>

Output
Change Text style of ListBox dynamically in ASP.NET

How to add new fields in CreateUserWizard in ASP.NET

Introduction

CreateUserWizard is the one of the most famous control for authenticating . Means if you want to store authenticated user information into your database then you can use CreateUserWizard control. Now at this time we will learn how to add new fields in CreateUserWizard control such as Name, Gender, Country etc.
follow some steps for doing this.
Step-1: Drop one CreateUserWizard control to the design page.
Step-2: Select Customize Create User Step link by ShowSmart tag.
How to add new fields in CreateUserWizard in ASP.NET

Step-3: Add new rows after last row also add some controls in the new add rows.
How to add new fields in CreateUserWizard in ASP.NET

Step-4: Handle CreatedUser Event of the  CreateUserWizard control.

protected void CreateUserWizard1_CreatedUser(object sender, EventArgs e)
    {
        ProfileCommon pc = (ProfileCommon)ProfileCommon.Create(CreateUserWizard1.UserName, true);
        pc.Country = ((DropDownList)CreateUserWizard1.CreateUserStep.ContentTemplateContainer.FindControl("DropDownList2")).SelectedValue;
        pc.Gender = ((DropDownList)CreateUserWizard1.CreateUserStep.ContentTemplateContainer.FindControl("DropDownList1")).SelectedValue;
        pc.Name = ((TextBox )CreateUserWizard1.CreateUserStep.ContentTemplateContainer.FindControl("name")).Text;
        pc.Save();
    
    }


According to microsoft ProfileCommon class create a AuthenticatedUser Profile instance using Create method. This class is inherited from ProfileBase class so first we declare a profile properties in web.config file.

<system.web>
    <anonymousIdentification enabled ="true"/>
    <profile>
      <properties >
        <add name="Name" type ="string"/>
        <add name ="Country" type ="string"/>
        <add name ="Gender" type ="String"/>

      </properties>


    </profile>
</system.web>

Run your Application
How to add new fields in CreateUserWizard in ASP.NETHow to add new fields in CreateUserWizard in ASP.NET


Change ListBox Width Dynamically in ASP.NET

Every control have a width property . In width property you can assign any unit value such as 10, 20 and any other number.If you want to change width of the control at runtime then you must assign width to the ListBox at runtime such as

ListBox1.Width = 20;

If you want to change control width according to listbox item then you must to change Item value to integer.
Lets take an simple example.

<%@ Page Language="C#" %>

<!DOCTYPE html PUBLIC "-//W3C//DTD XHTML 1.0 Transitional//EN" "http://www.w3.org/TR/xhtml1/DTD/xhtml1-transitional.dtd">

<script runat="server">

    protected void ListBox1_SelectedIndexChanged(object sender, EventArgs e)
    {
        ListBox1.Width =int.Parse(ListBox1.SelectedValue);
    }
</script>

<html xmlns="http://www.w3.org/1999/xhtml">
<head runat="server">
    <title></title>
</head>
<body>
    <form id="form1" runat="server">
    <div>
        <asp:ListBox ID="ListBox1" runat="server" AutoPostBack="True"
            onselectedindexchanged="ListBox1_SelectedIndexChanged">
            <asp:ListItem Value="100">Increase 100 pixel</asp:ListItem>
            <asp:ListItem Value="200">Increase 200 pixel</asp:ListItem>
        </asp:ListBox>
    </div>
    </form>
</body>
</html>


Output
Change ListBox Width Dynamically in ASP.NET

Change ListBox Width Dynamically in ASP.NET

Change Border Color dynamically in ASP.NET

There is two method for change border color of dropdownlist in asp.net . In first method you can use System.Drawing.Color.Blue enumeration for changing color.

DropDownList1.BorderColor = System.Drawing.Color.Red;
In Second method you can use DropDownList1.Attributes.Add() method.

DropDownList1.Attributes.Add("style", "value");

Lets take an simple example . Drop one dropdownlist control to the design page and handle  SelectedIndexChanged event.


<%@ Page Language="C#" %>

<!DOCTYPE html PUBLIC "-//W3C//DTD XHTML 1.0 Transitional//EN" "http://www.w3.org/TR/xhtml1/DTD/xhtml1-transitional.dtd">

<script runat="server">

    protected void DropDownList1_SelectedIndexChanged(object sender, EventArgs e)
    {
        DropDownList1.Attributes.Add("style", "border-color:" + DropDownList1.SelectedItem.Text);
        DropDownList1.BorderWidth = 5;
        DropDownList1.BorderStyle = BorderStyle.Dashed;
     
     
    }
</script>

<html xmlns="http://www.w3.org/1999/xhtml">
<head runat="server">
    <title></title>
</head>
<body>
    <form id="form1" runat="server">
    <div>
        <asp:DropDownList ID="DropDownList1" runat="server" AutoPostBack="True"
            Height="22px" onselectedindexchanged="DropDownList1_SelectedIndexChanged"
            Width="223px">
            <asp:ListItem>Red</asp:ListItem>
            <asp:ListItem>Green</asp:ListItem>
            <asp:ListItem>Black</asp:ListItem>
        </asp:DropDownList>
    </div>
    </form>
</body>
</html>

Output
Change Border Color dynamically in ASP.NET

Sunday, September 29, 2013

How to use Anchor property of control in windows form

Anchoring is one of the ways that WinForms provides for automatic layout control of your forms and the controls contained therein. By default, all controls are anchored to the upper-left, so that as the form is resized and moved, all controls are kept at their position relative to the upper-left corner of the form. However, in this case, we'd clearly like to have the text box controls widen or narrow as the form is resized. 

Without set right edge in anchor property

How to use Anchor property of control in windows form
Before Re-sizing

How to use Anchor property of control in windows form
After Re-sizing
To change the text boxes so that they anchor to the right edge as well as the top and left edges is a matter of clicking on the anchor rectangle on the right and changing the Anchor property to Top, Left, Right.

Set Top, Left and Right edge in anchor property

How to use Anchor property of control in windows form
Before Re-sizing
After set
How to use Anchor property of control in windows form

How to use Anchor property of control in windows form
After set re-sizing property

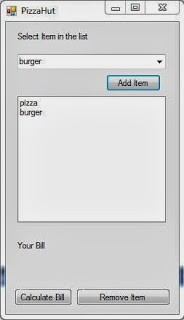
How to add Selected Item from ComboBox to ListBox in Windows form

Introduction

In my previous post we have been bind DropdownList using Complex datatype . Today we will learn how to add Selected Item from ComboBox to ListBox on button click event. follow some steps for add items to ListBox.

Step-1: Take a class file with some fields in the application.

using System;
using System.Collections.Generic;
using System.Linq;
using System.Text;

namespace CoffieShop
{
  
    class CoffieShop
    {
        public string Product_Name { get; set; }
        public decimal price { get; set; }

    }
}

Step-2: Drop a ComboBox control to the design window.
Step-3: Create a instance of the List class also bind list with the class.

namespace CoffieShop
{
    public partial class Form1 : Form
    {
        List<CoffieShop> item = new List<CoffieShop>();

}
}

Step-4:  Initiate class fields with some value and add to the List in Form_Load Event

 public Form1()
       {
           item.Add(new CoffieShop() { Product_Name = "pizza", price = 12.12M });
           item.Add(new CoffieShop() { Product_Name = "burger", price = 15.12M });
      
            InitializeComponent();
        } 
Step-5: Drop One Button Control to the Design window
Step-6: Add selected item from ComboBox to ListBox control on Button_Click Event
  private void button3_Click(object sender, EventArgs e)
        {
           var pro = comboBox1.SelectedItem as CoffieShop;
           listBox1.Items.Add(pro);
           listBox1.DisplayMember = "Product_Name";


        }
Complete code
using System;
using System.Collections.Generic;
using System.ComponentModel;
using System.Data;
using System.Drawing;
using System.Linq;
using System.Text;
using System.Windows.Forms;


namespace CoffieShop
{
    public partial class Form1 : Form
    {
        List<CoffieShop> item = new List<CoffieShop>();
   
        public Form1()
       {
           item.Add(new CoffieShop() { Product_Name = "pizza", price = 12.12M });
           item.Add(new CoffieShop() { Product_Name = "burger", price = 15.12M });


            InitializeComponent();
        }

        private void Form1_Load(object sender, EventArgs e)
        {
            comboBox1.DataSource = item;
            comboBox1.DisplayMember = "Product_Name";
        }

        private void button3_Click(object sender, EventArgs e)
        {
           var pro = comboBox1.SelectedItem as CoffieShop;
           listBox1.Items.Add(pro);
           listBox1.DisplayMember = "Product_Name";


        }
     
 
    }
}

Output
How to add Selected Item from ComboBox to ListBox in Windows form

How to Make TextBox Control ReadOnly: WPF

In our previous post, we have enable the spell check feature of the textbox, through which user can check the spellings of the word entered and correct it. As we know that the textbox is used to input any value by the user, but it can be used to display fix text on the screen.

To display fix text that cannot be edited by the user, we have to make the textbox read-only. The textbox have a property IsReadOnly, that is set to be true to enable this feature. Just write the following XAML code snippet:
<TextBox Width="300" Height="25" Margin="5"
Text="This is the correct line and you cannot edit it."
 IsReadOnly="True">
</TextBox>
Now run the code and a textbox will display with the above text written. The thing to check is, this textbox have its fix text and the user can not vary that text.

How to make read-only textbox in WPF XAML

So the read-only property is used to make the textbox read-only for the users. We can validate the input entered by the user by writing some line of code in our code part. We will validate the input in our next article.

© Copyright 2013 Computer Programming | All Right Reserved