-->

Thursday, December 26, 2013

Selection Sorting Algorithm in C Language

Selection sort, also called in-place comparison sort, is a sorting algorithm in computer programming. It is well-known algorithm for its simplicity and also performance advantages. The article shows the process with C language code and an example.

As the name indicates, first we select the smallest item in the list and exchange it with the first item. Then we select the second smallest in the list and exchange it with the second element and so on. Finally, all the items will be arranged in ascending order. Since, the next least item is selected and exchanged accordingly so that elements are finally sorted, this technique is called selection sort.

For example, consider the elements 50, 40, 30, 20, 10 and sort using selection sort.

Selection Sorting Algorithm in Computer Programming: C

Design: The position of smallest element from i'th position onwards can be obtained using the following code:

pos = i;
for(j=i+1; j<n; j++)
{
   If(arr[j] < arr[pos])
   pos = j;
}

After finding the position of the smallest number, it should be exchanged with i'th position. The equivalent statements are shown below:

temp = arr[pos];
arr[pos] = arr[i];
arr[i] = temp;

The above procedure has to be performed for each value of i in the range 0 < i < n-1. The equivalent algorithm to sort N elements using selection sort is shown below:

Step1:    [Input the number of items]
    Read: n
Step2:    [Read n elements]
    for i = 0 to n-1
        Read: arr[i]
    [End of for]
Step3:    for i = 0 to n - 2  do
        pos = i;
        for j = I + 1 to n – 1 do
            if(arr[j] < arr[pos]) then
                pos = j
            [End of if]
        [End of for]
        temp = arr[pos]
        arr[pos] = arr[i]
        arr[i] = temp
    [End of for]
Step4:    [Display Sorted items]
    for i = 0 to n -1
        Write: arr[i]
    [End of for]
Step5:    Exit

C program to implement the selection sort.

main()
{
 int n, arr[10], pos, i, j, temp;
clrscr();
 printf("Enter the number of items:\n");
 scanf("%d",&n);
 printf("Input the n items here:\n");
 for(i = 0; i< n; i++)
{
 scanf("%d",&arr[i]);
 }
for(i = 0; i <n; i++)
    {
        pos = i;
        for(j = i+1; j< n; j++)
            {
                if(arr[j] < arr[pos])
                    pos = j;
            }
            temp = arr[pos];
            arr[pos] = arr[i];
            arr[i] = temp;
    }
printf("The sorted elements are as:\n");
for( i = 0; i < n; i++)
    {
        printf("%d\n",arr[i]);
    }
getch();
}
The program will outputs as:

Selection Sorting Algorithm in Computer Programming: C, output

Advantages

  • Very simple and easy to implement.
  • Straight forward approach.

Disadvantages

  • It is not efficient. More efficient sorting techniques are present.
  • Even if the elements are sorted, n-1 passes are required.

Binary Search in C
Linear Search in C

Tuesday, December 24, 2013

How to Delete Multiple Records from DataGridView in Winforms: C#

To remove multiple records from the DataGridView, programmer need to write some line of code, code may be written in a button's click event that is outside of the DataGridView. The article shows about how to select multiple records of DataGridView and the c# code to remove them with a single mouse click.

When a programmer have to remove a single record entry from the DataGridView, then a command button can be added as discussed. Removing a single record can be performed by the index of the record. Through the index programmer can easily get all the unique values about the record which helps to perform the action.


To remove multiple records, follow the steps written below:
  • Drag-n-Drop DataGridView on the form and set its MultiSelect property to True.
  • Create a list of records (Student Class) and bind this DataGridView with that list.
  • Create a button outside of this DataGridView and generate its click event.
  • Write following C# code in the click event of button to remove multiple records:
private void removeButton_Click(object sender, EventArgs e)
{
DataContext dc = new DataContext();
foreach (var item in dataGridView1.Rows)
{
DataGridViewRow dr = item as DataGridViewRow;
if (dr.Selected)
{
string name = dr.Cells["Name"].Value.ToString();
var student = dc.Student.FirstOrDefault(a => a.Name.Equals(name));
if (student != null)
{
dc.Student.Remove(student);
}
}              
}
dataGridView1.DataSource = null;
dataGridView1.DataSource = dc.Student;
}
  • Run the form and select some of the records as in the image:
How to Delete Multiple Records from DataGridView in Winforms: C#

  • Click on the remove button and all these selected records will be deleted. A single record remain safe shown in the image:
How to Delete Multiple Records from DataGridView in Winforms: C#


So all these simple steps are used to delete multiple as well as single record from the DataGridView. Programmer can also use a confirmation message for the surety of the deletion by the user. To do that, just place all the above code in between the below c# code:

if (MessageBox.Show("Are you sure you want to remove all these records?", "Confirm", MessageBoxButtons.YesNo, MessageBoxIcon.Question).ToString() == "Yes")
{
//above code
}

When the programmer will click on the button then a confirmation message will be shown. After clicking on the "Yes" button, all the selected records will be deleted otherwise none of them.

Monday, December 23, 2013

Computer Programming : How to get height and width of an image in ASP.NET

If you want to get uploaded image height and width then you should go for Bitmap class. Suppose I have an image, and I want to get height and width parameter of it. Lets take an simple example

How to get height and width of an image in ASP.NET

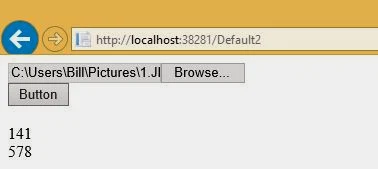
You have an image with height and width parameter. You can see in above snap, which is contains 578pixel in wide and 141pixel in height. Now, you want get that these pixel at runtime in ASP.NET.
A Bitmap class is used for getting Height and Width of image.
Encapsulates a GDI+ bitmap, which consists of the pixel data for a graphics image and its attributes. A Bitmap is an object used to work with images defined by pixel data. according to msdn library.

    Simple example

 
<%@ Page Language="C#" AutoEventWireup="true" CodeFile="Default2.aspx.cs" Inherits="Default2" %>

<!DOCTYPE html>

<html xmlns="http://www.w3.org/1999/xhtml">
<head runat="server">
    <title></title>
</head>
<body>
    <form id="form1" runat="server">
    <div>
    
        <asp:FileUpload ID="FileUpload1" runat="server" />
        <br />
        <asp:Button ID="Button1" runat="server" OnClick="Button1_Click" Text="Button" />
        <br />
        <br />
        <asp:Label ID="Label1" runat="server"></asp:Label><br />
         <asp:Label ID="Label2" runat="server"></asp:Label><br />

    
    </div>
    </form>
</body>
</html>
using System;
using System.Collections.Generic;
using System.Drawing;
using System.Linq;
using System.Web;
using System.Web.UI;
using System.Web.UI.WebControls;

public partial class Default2 : System.Web.UI.Page
{
    protected void Page_Load(object sender, EventArgs e)
    {

    }
    protected void Button1_Click(object sender, EventArgs e)
    {

        using (Bitmap bi = new Bitmap(Server.MapPath("~/img/"+FileUpload1 .FileName), true))
            {
                Label1.Text = Convert.ToString(bi.Height);
                Label2.Text = Convert.ToString(bi.Width);
            }


    }
        }
 

Output of the code

How to get height and width of an image in ASP.NET
 

Saturday, December 21, 2013

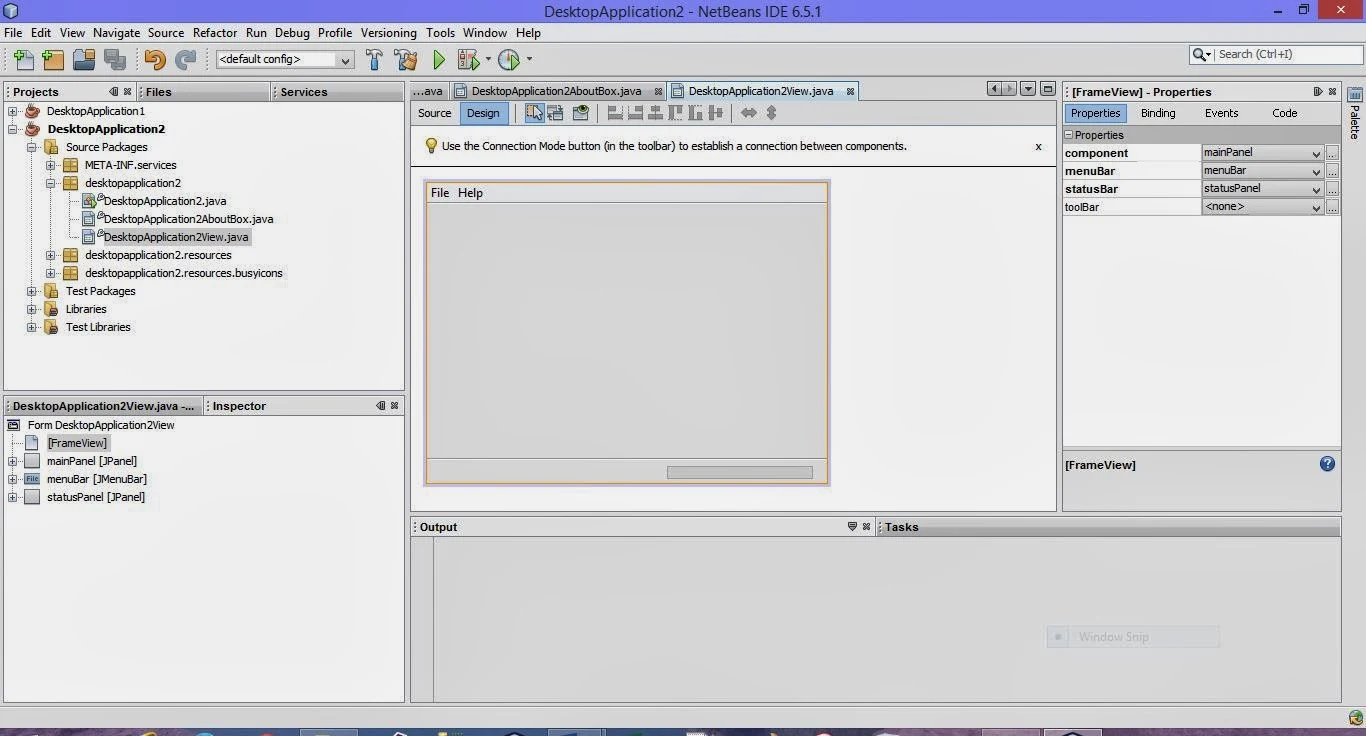
How to Create a Project in NetBeans GUI Builder: Java Programming

A NetBeans IDE project is a group of Java source files plus its associated Meta data, including project-specific files. A Java application may consist of one or more projects. All Java development in the IDE takes place with in projects, we first need to create a new project within which to store sources and other project files.

To create a new GUI application project:

  • Click File → New Project command. Alternately. You can click the New Project icon in the IDE toolbar or press Ctrl + Shift + N.
  • In the Categories pane, select the Java node and in the projects pane, choose the Java Desktop Application and then Click Next.

How to Create a Project in NetBeans GUI Builder: Java Programming

  • Enter desired name in the Project Name field and specify the project location.
  • Leave the Use Dedicated Folder for storing Libraries checkbox unselected. (If you are using IDE 6.0, this option ids not available.)
  • Ensure that the Set as Main Project checkbox is selected.

How to Create a Project in NetBeans GUI Builder: Java Programming


  • Finally click Finish button.
    Now the NetBeans IDE will create the project folder on your system in the designated location. This folder contains all of the project’s associated files.
  • Next, you need to first add a frame window to your project where you can add desired components and functionally.
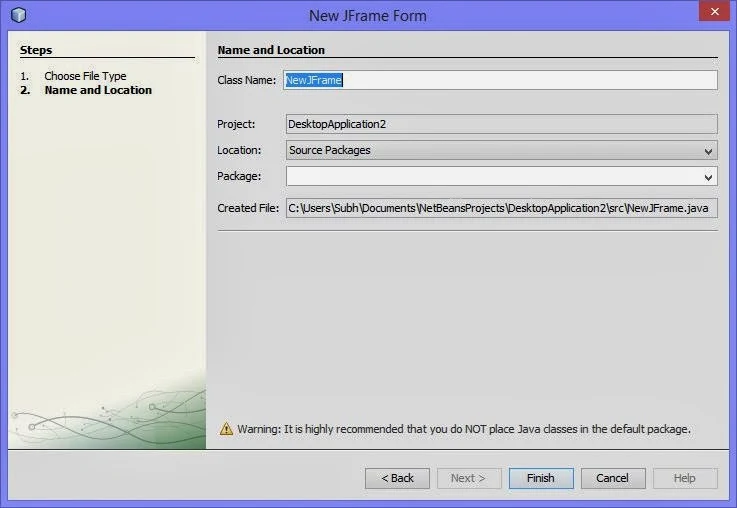
    For this, on the top left pane, under Projects Tab, right click on your project’s name and select New. From the submenu, select JFrame Form. A new Frame dialog box will open as shown:

How to Create a Project in NetBeans GUI Builder: Java Programming

  • In this dialog box, specify the name of the frame being added in the box next to Class Name and click Finish.

This is newly added frame is the top level container of your application. Now in the Design View of this frame, you can add desired components from the Swing Controls under Palette and work further.

Friday, December 20, 2013

Connect SqlDataSource Control with Database, Insert, Update and Delete

How to connect SqlDataSource Control with database, also add extra features like insert, update and delete. Here we will take some steps, these are

Step-1 : Create a SQL Table with some fields like
sno int (primaryKey, Isidentity=true)
name nvarchar(50)
address nvarchar(250)


Step-2 : Add SqlDataSource Control to Design window from toolbox
Step-3 : Select 'Configure Data Source' link using show Smart tag.

'Configure Data Source'


Step-4 : Select Database or ConnectionString from Dropdown menu.
ConnectionString

Step-5 : Select Table-name from Dropdown menu also select Advanced tab.
Table-name from Dropdown menuAdvanced tab

Step-6 : Select Insert, Update and delete checkbox option.
Step-7 : Click to Test Query and  Finish button

Now generate source code in page file

<%@ Page Language="C#" AutoEventWireup="true" CodeFile="Default.aspx.cs" Inherits="_Default" %>
<!DOCTYPE html PUBLIC "-//W3C//DTD XHTML 1.0 Transitional//EN" "http://www.w3.org/TR/xhtml1/DTD/xhtml1-transitional.dtd">
<html xmlns="http://www.w3.org/1999/xhtml">
<head runat="server">
    <title></title>
</head>
<body>
    <form id="form1" runat="server">
    <div>
    Database items
        <br />
        <asp:SqlDataSource ID="SqlDataSource1" runat="server"
            ConnectionString="<%$ ConnectionStrings:xyz %>"
            DeleteCommand="DELETE FROM [emp] WHERE [sno] = @sno"
            InsertCommand="INSERT INTO [emp] ([name], [address]) VALUES (@name, @address)"
            SelectCommand="SELECT * FROM [emp]"
            UpdateCommand="UPDATE [emp] SET [name] = @name, [address] = @address WHERE [sno] = @sno">
            <DeleteParameters>
                <asp:Parameter Name="sno" Type="Int32" />
            </DeleteParameters>
            <InsertParameters>
                <asp:Parameter Name="name" Type="String" />
                <asp:Parameter Name="address" Type="String" />
            </InsertParameters>
            <UpdateParameters>
                <asp:Parameter Name="name" Type="String" />
                <asp:Parameter Name="address" Type="String" />
                <asp:Parameter Name="sno" Type="Int32" />
            </UpdateParameters>
        </asp:SqlDataSource>

    </div>
    </form>
</body>
</html>


Steps to Retrieve Records with SQL Server Management Studio: SQL Programming

As I have discussed in my first SQL article that the database scenario is AdventureWorks, on which we will work on. The AdventureWorks database is stored on the LocalDb (Currently used) database server. The problem we are sorting out is, the details of the sales persons are stored in the SalesPerson table. The management wants to view the details of the top three sales persons who have earned a bonus between $4,000 and $6,000.

To retrieve the specified records, programmer need to create a query first and then execute the query to generate the report. To display the top three sales person records from the SalesPerson table, programmer need to use the TOP keyword. In addition, to specify the range of bonus earned, you need to use the BETWEEN range operator.

To create the query by using the SQL Server Management Studio, just follow simple steps written below:
  • Select Start>Programs>SQL Server Management Studio to display the Microsoft SQL Server Management Studio Window. Connect to Server dialog box is displayed by-default, if not you can simple open it from File>Connect Object Explorer.
  • Select the server name from the Server name drop-down list.

    Steps to Retrieve Records with SQL Server Management Studio: SQL Programming
    Note: Name of the server is computer specific. In this example, the name of the server is (LocalDb)\v11.0. You can use the default server as the database server.
  • Fill the details as given in the image and click on Connect button. It will connect to the server and management studio will be displayed as shown in the image.

    Steps to Retrieve Records with SQL Server Management Studio: SQL Programming
  • Expand the Databases node and it will show all the databases on this server. Now right click on AdventureWorks2012 database and select New Query.
  • Name of the Query Editor window is specific to machine.
  • Type the following query in the Query Editor window:
SELECT TOP 3 *
FROM [AdventureWorks2012].[Sales].[SalesPerson]
Where Bonus BETWEEN 4000 AND 6000

  • Click on Execute (in SQL editor toolbar) or press F5 and check the result as shown in the following image:

Steps to Retrieve Records with SQL Server Management Studio: SQL Programming


Wednesday, December 18, 2013

How to Add Functionality to NetBeans GUI: Java Programming

Programmer can know, to add graphical components in a frame and how to set their properties. But doing much is not sufficient in java programming, because the graphical controls that you add to frame can’t do anything on their own.

In other words, they have the look but not any feel. To add feel i.e. functionality or behaviour to them, you must also know about something called events and listeners. The three major players that add functionality to GUI are:

  • The Event: An event is an objects that gets generated when user does something such as mouse click, dragging, pressing a key on the keyboard etc.
  • Source of the Event: The component where the event has occurred, is the source of the event. For example, if a user clicks (the Event) on a Submit button then the source of this event is Submit button.
  • Event Listener: An event listener is attached to a component and contains the methods/functions that will be executed in response to an event. For example, if a user click on a button, then the buttons event listener will executed some code in response to this event.
    Listener Interface. An event Listener stores all the methods that it will implement in response to events, inside the listener interface. So, you can say that a listener interface stores all event-response-methods or event-handler methods of an event listener.

Commonly used Events and Listeners.


  • ActionEvents: of type ActionListener used to gets activated when the user performs an action with a button or other components. Usually, a user invokes the button by clicking over it. However, the user can also invoke a button action tabbing to the button and pressing the Enter key.
  • ItemEvent of type ItemListener used to gets activated when the selected item in a list control, such as a combo box or list box, is changed.
  • AdjustmentEvent of type AdgustListener used to gets activated when the user drags or moves knob of a scroll bar.
  • ChangeEvent of type ChangeListener used to gets active when the properties of a slider change.
  • KeyEvents of type KeyListener used to gets activate when the user press a key on the keyboard. You can use this event to watch for specific keystrokes entered by the user.
  • ListSelection of type ListSelectionListener used to get activated when an item is selected/deselected from list (JList).
  • MouseEvent of type MouseEventListener used to gets activated when the user does something with the mouse, such as clicks one of the buttons, drags the mouse, or simply moves over another objects.
  • FocusEvent of type FocusEventListener used to gets activated when a components receives or lose focus. Focus is ability to receive input, e.g., you can select from a list box only when it has focus, you can type in a text field only if it has focus.  


Each of the listeners listed above have multiple methods stored in their listener interfaces to respond to different type of events. You are armed with some basic knowledge of GUI functioning in Java so in further articles i will let you know about to create a GUI application using NetBeans.

© Copyright 2013 Computer Programming | All Right Reserved