-->

Wednesday, June 4, 2014

How to Create Index using sql Query: Sql Server

Database programmer should create indexes on the most frequently queried column in a table. However, at times, you might need to create an index based on a combination of one or more columns. An index based on one or more columns is called a composite index. A composite index can be based on a maximum of 16 columns. However, you need to consider that indexes with less number of columns use less disk space and involve fewer resources when compared to indexes based on more columns.

To create an index you can use the CREATE INDEX statement. The syntax of the CREATE INDEX statement is:

CRATE [UNIQUE] [CLUSTERED | NONCLUSTERED] INDEX index_name
ON [{database_name.[schema_name]. | schema_name.}]
{table_or_view_name} (column [ASC | DESC] [, …n])
[INCLUDE (column_name [, …n])]
[WITH (<relational_index_option>[, …n])]
[ON {partition_cheme_name (column_name [, …n]) | filegroup_name |DEFAULT) ]
<relation_index_option> : : =
{PAD_INDEX = {ON | OFF}
| FILLFACTOR = fillfactor
| SORT_IN_TEMPDB = {ON | OFF}
| IGNORE_DUP_KEY = {ON | OFF}
| STASTISTICS_NO_RCOMPUTE = {ON | OFF}
| DROP_EXISTING = {ON | OFF}
| ONLINE = {ON | OFF}

Where,
  • UNIQUE crates an index where each row should contain a different index value. CLUSTERED specifies a clustered index where data is sorted on the index attribute. NONCLUSTERED specifies a nonclustered index that organizes data logically. The data is not sorted physically.
  • Index_name specifies the name of the index.
  • Table_name specifies the name of the table that contains the attributes on which the index is to be created.
  • Column specifies the column or columns on which the index will be created.
  • Column_name specifies the name of the column or columns on which the index would be created.
  • ON partition_scheme_name ( column_name ) specifies the partition scheme the specifies the filegroups in which the pattitioned index will be mapped.
  • ON filegroup_name specifies the filegroup on which index is created.
  • ON DEFAULT specifies that the specified index will be created on the default filegroup.
  • PAD_INDEX = { ON | OFF } specifies the index padding, which is OFF, by default.
  • FILLFACTOR = 1 to 100 specifies a percentage that indicates how full the leaf level of each index page should become during index creation or rebuild. The default value is 0.
  • SORT_IN_TEMPDB = { ON | OFF } specifies about storing temporary sort results in the tempdb.
  • IGNORE_DUP_KEY = { ON | OFF } specifies whether a duplicate key value can be inserted or not…
  • STATISTICS_NO_RECOMPUTE = { ON | OFF } specifies about recomputing the distribution statistics.
  • DROP_EXISTING = { ON | OFF } specifies that the pre-existing clustered, nonclustered, or XML index is dropped and rebuilt.
  • ONLINE = { ON | OFF } checks whether the underlying tables and associated indexes are available to query and modify the data during the index operation.

Developer can create online indexes only in the SQL Server 2005 Enterprise Edition.

Tuesday, June 3, 2014

How to set primary key in entity framework

Suppose you have a class product, which is work as a table in entity framework. In this class you want to create a primary key. This features provides by System.ComponentModel.DataAnnotations namespace. According to msdn article this namespace provides attributes classes that are used to define metadata. In this example we are creating one or more columns , which is uniquely identified in the table. Suppose, in this table you want to set ProductId as a primary key then simple write 'Key' in brackets before fields. Lets a class
How to set primary key in entity framework


using System;
using System.Collections.Generic;
using System.Linq;
using System.Web;
using System.ComponentModel.DataAnnotations;

/// <summary>
/// Summary description for Product
/// </summary>
public class Product
{
    [Key]
    public int ProductId { get; set; } // Primary Key attribute
    public string  productName { get; set; }
}

How to create database table in entity framework windows form c#

I am very happy from entity framework, thanks to Microsoft. Through easy steps you can easily design database table in entity framework. These easy steps are:
Step-1 : Add entity framework package from package manager console.

Tools  --> Library Package Manager --> Package Manager Console

PM> install-package entityframework

Step-2 : First to create a class, which named as 'student'. This class work as database table in entity framework. like that

using System;
using System.Collections.Generic;
using System.Linq;
using System.Text;

namespace WindowsFormsApplication10
{
   public class Student
    {
        public int Id { get; set; }
        public string name { get; set; }
    }
}
Step-3 : Create a connection string in app.config file like

<connectionStrings>
    <add name="connectionstring1" providerName="System.Data.SqlClient" connectionString="Data Source=(LocalDB)\v11.0; Initial Catalog=STUDENTer; Integrated Security=true" />
  </connectionStrings>

Step-4 :  Create an another class, which named as 'DataContext'. This class is inherited from DbContext base class and add student table in it.

using System;
using System.Collections.Generic;
using System.Data.Entity;
using System.Linq;
using System.Text;

namespace WindowsFormsApplication10
{
    class DataContext: DbContext
    {
        public DataContext() :
            base("connectionstring1")
        {
         

        }
        public DbSet<Student> Students { get; set; }

    }
}

Here DataContext class constructor call our base class constructor and pass the connection string , which is define in app.config file. Also add the student table in STUDENTer database.

Step-4 : Add new window form in our project , also create object of DataContext class in form constructor.

public Form1()
        {
            InitializeComponent();
            DataContext dc = new DataContext();
       
        }
Step-5 :  Create break point after DataContext Object.
Create break point after DataContext Object
table confirmation after count is zero


Step-6 : Run your application
How to create database table in entity framework windows form c#

Monday, June 2, 2014

How to get Visitor's IP in ASP.NET

In this article , we will learn how to get visitor's machine IP address and where we use it. Normally this types of query is generated for ptc sites because ptc sites take visitor's ip address in its database table then no buddy cheat with them. This article is very useful, where you establish intranet, through this you can easily determine call request. Here we have two parameters in ServerVariables that is 

HTTP_X_FORWARDED_FOR
REMOTE_ADDR 

In this article both keep different meaning, such as HTTP_X_FORWARDED_FOR parameter used where visitor behind the proxy server, now through this parameter you can easily get 
proxy server ip + client machine ip

Note : Suppose your visitor visit your site through proxy server ip address then you would not get actual ip address of the visitor , through this parameter you can get both (proxy + machine address) address.

REMOTE_ADDR parameter get the router or proxy server ip. Now take an simple example , but in this example we always get 127.0.0.1 because server and client machine are same.
 

Example 

Step-1 : Add Label and Button on webform
Step-2 : Raise click event 
Step-3 : Copy this code and paste into your click handler

Source 
<form id="form1" runat="server">
    <div>
    
        <asp:Label ID="Label1" runat="server"></asp:Label>
        <br />
    
    </div>
    <asp:Button ID="Button1" runat="server" onclick="Button1_Click" 
        Text="Get Ip Address" />
    </form>

Code Behind

 protected void Button1_Click(object sender, EventArgs e)
    {
        string ip;
        ip = Request.ServerVariables["HTTP_X_FORWARDED_FOR"];
        if (ip == "" || ip == null)
            ip = Request.ServerVariables["REMOTE_ADDR"];

        Label1.Text = ip;

    }

Code Generate the following output

How to get Visitor's IP in ASP.NET

Sunday, June 1, 2014

How to get cell value in selected row of DataGridView in windows form c#

If you want to get cell value from DataGridview then first to bind grid with data table with any data source. Now, use this code to retrieve the cell value.

Binding Data 

 private void binddata()
        {
            con.Open();
            cmd.CommandText = "select * from [student_record]";
            cmd.Connection = con;
            SqlDataAdapter da = new SqlDataAdapter(cmd);
            DataSet ds = new DataSet();
            da.Fill(ds);
            dataGridView1.DataSource = ds;
            dataGridView1.DataMember = ds.Tables[0].ToString ();
           
        }

Get cell value on message box

  private void button1_Click(object sender, EventArgs e)
        {
            string name = dataGridView1.SelectedRows[0].Cells[1].Value.ToString();
            MessageBox.Show(name);

        }

Code generate the following output

How to get cell value in selected row of DataGridView in windows form c#

Saturday, May 31, 2014

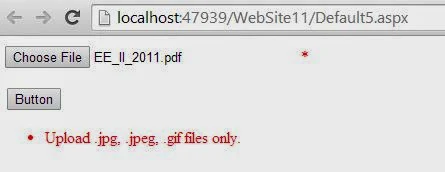
How to validate fileupload control in asp.net also choose selected format

In my previous article we already discussed about file upload control. Suppose your picture is required in the form of registration then you must to validate the file upload control. Also you want to take only jpeg, gif and selected format then should use RegularExpressionValidator with regular expression. Now lets take a simple example.

<%@ Page Language="C#" AutoEventWireup="true" CodeFile="Default5.aspx.cs" Inherits="Default5" %>

<!DOCTYPE html PUBLIC "-//W3C//DTD XHTML 1.0 Transitional//EN" "http://www.w3.org/TR/xhtml1/DTD/xhtml1-transitional.dtd">

<html xmlns="http://www.w3.org/1999/xhtml">
<head runat="server">
    <title>dotptogramming</title>
</head>
<body>
    <form id="form1" runat="server">
    <div>
    <asp:FileUpload ID="fileUpload1" runat="server" Width="280px" />
                                
<asp:RequiredFieldValidator ID="R1" runat="server" 
            ErrorMessage="Select File From File Upload" Text="*"  ValidationGroup="v2" 
            ControlToValidate="fileUpload1" ForeColor="Red"></asp:RequiredFieldValidator>

<asp:RegularExpressionValidator ID="RE1" runat="server" 
            ErrorMessage="Upload .jpg, .jpeg, .gif files only." Text="*"  
            ValidationGroup="v2" ControlToValidate="fileUpload1" 
            ValidationExpression="^.+\.((jpg)|(jpeg)|(gif))$" ForeColor="Red"></asp:RegularExpressionValidator>

    </div>
    <p>

        <asp:Button ID="Button1" runat="server" Text="Button" ValidationGroup="v2"/>
    </p>
    <asp:ValidationSummary ID="ValidationSummary1" runat="server" 
        ValidationGroup="v2" ForeColor="Red" />
    </form>
</body>
</html>

Code Generate the following output

How to validate fileupload control in asp.net also choose selected format

How to validate fileupload control in asp.net also choose selected format

How to pass session value in page title in asp.net

Suppose you have to enter into your account. Now, a session variable created after login and you want to pass this value in page title. If you have a master page then simple use this code in code behind page. Also you can use this code in web form. Lets take a simple example

Use only Business Logic code


public partial class Default5 : System.Web.UI.Page
{
    protected void Page_Load(object sender, EventArgs e)
    {
        Session["username"] = "- ASP.NET CODE";
        Page.Title += Session["username"].ToString();
    }
} 

Code Generate the following Output

How to pass session value in page title in asp.net
© Copyright 2013 Computer Programming | All Right Reserved